はじめに
この記事では、Vue 2 + TypeScript な Vue Component を作成し、 npm に公開するところまで解説します。
TypeScript を使用した記事は少ないので、参考になれば幸いです。
基本的には公式ドキュメントに沿っていきます。
環境
- Alpine 3.12
- nodejs v12.20.1
- @vue/cli 4.5.11
{
  "dependencies": {
    ...,
    "vue": "^2.6.11"
  },
  "devDependencies": {
    ...,
    "@rollup/plugin-buble": "^0.21.3",
    "@rollup/plugin-commonjs": "^17.1.0",
    "@rollup/plugin-typescript": "^8.1.1",
    "rollup": "^2.38.1",
    "rollup-plugin-vue": "5.0.0",
    "typescript": "~3.9.3",
  }
}
コード
https://github.com/eyuta/public_vue_component/tree/main/v2-app
NOTE: rollup の Plugin を使う上での注意点
Vue + TypeScript + rollup を組み合わせる上で注意すべき点についてこちらにまとめました。
興味があれば、覗いてみてください。
手順
- Docker で Node 環境を用意
- 環境依存を減らすため、Docker を使用しています
- 不要な方は読み飛ばしてください
- Vue app の作成
- 公開したいコンポーネントの作成
- コンポーネントをプラグインとして読み込むためのファイルを作成
- ビルド用の rollup のインストールと設定
- npmjs .com に登録
- 既に済んでいる方は読み飛ばしてください
- npmjs に公開
1. Docker で Node 環境を用意
※Node が動くなら、環境は何でも良いです。
※不要な方は読み飛ばしてください。
今回はVisual Studio Code Remote - Containersを使用して Docker 環境の構築をします。
-
Ctrl + Shift + P->Remote-Containers: Add Development Container Configuration Files... - 好きなイメージを選択
- 私は Alpine イメージを選択しました
- が、Node イメージが使いやすいと思います。 Node イメージを使用する場合、npm や yarn のインストールは不要です
- VSCode をリロード
- 選択したイメージが起動します
- 必要なライブラリをインストール
- Dockerfile にも
RUN apk update && apk add --no-cache nodejs npm yarnを追加 - イメージを再起動した際、再インストールの手間を省くためです
-
@vue/cliをグローバルにインストールする場合は、yarn global add @vue/cliも追加します
- Dockerfile にも
sudo apk update && \
  sudo apk add --no-cache nodejs npm yarn
yarn add @vue/cli -D # or yarn global add @vue/cli
注意: Vue CLI は vue-cli ではなく @vue/cli を使用します。vue-cliは deprecated です。
2. Vue app の作成
好きな構成で構いません。ただ、今回の趣旨の都合上、以下を選択しておきます。
-
? Check the features needed for your projectChoose Vue version, TS -
? Choose a version of Vue.js that you want to start the project with2.x
$ npx vue create $YOUR_APP_NAME # or vue create $YOUR_APP_NAME

Vue CLI v4.5.11
? Please pick a preset: Manually select features
? Check the features needed for your project: Choose Vue version, Babel, TS, Linter
? Choose a version of Vue.js that you want to start the project with 2.x
? Use class-style component syntax? No
? Use Babel alongside TypeScript (required for modern mode, auto-detected polyfills, transpiling JSX)? Yes
? Pick a linter / formatter config: Prettier
? Pick additional lint features: Lint on save
? Where do you prefer placing config for Babel, ESLint, etc.? In dedicated config files
? Save this as a preset for future projects? No
? Pick the package manager to use when installing dependencies: Yarn
cd $YOUR_APP_NAME
yarn serve
これでアプリが起動します。
3. 公開したいコンポーネントの作成
任意のコンポーネントを作成します。
こだわりがなければ、自動生成されたHelloWorld.vueでも良いです。
今回は input タグをラップしたコンポーネントを用意してみます。
<template>
  <input
    type="text"
    :value="value"
    @input="$emit('input', $event.target.value)"
  />
</template>

<script lang="ts">
import Vue from "vue";
export default Vue.extend({
  name: "MyComponent",
  props: {
    value: {
      type: String,
      default: "",
    },
  },
});
</script>
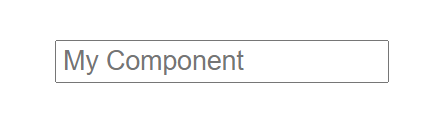
App.vue で呼び出すと、Input タグが表示されます。
<template>
  <div id="app">
    <MyComponent v-model="value" />
  </div>
</template>

<script lang="ts">
import Vue from "vue";
import MyComponent from "@/components/MyComponent.vue";

export default Vue.extend({
  name: "App",
  components: { MyComponent },
  data() {
    return { value: "My Component" };
  },
});
</script>
4. コンポーネントをプラグインとして読み込むためのファイルを作成
作成したコンポーネントを読み込むためのファイルを作成します。
今回は、コンポーネントを以下の 3 つの形式で読み込めるようにします。
-
Vue.use()を利用したプラグイン - 通常の Import
import MyComponent from 'my-app'; - script タグ
作成するファイルは、エントリーポイントであるsrc/index.tsと、その型定義ファイルであるsrc/types.d.tsです。
(名前は何でも良いです)
import { VueConstructor } from 'vue';

// Vue.use() によって実行される install 関数を定義
export interface Install {
  (Vue: VueConstructor): void;
  installed: boolean;
}

// src/index.ts で export default されるオブジェクトの型
export default class MyComponent {
  static install: Install;
}

// src/index.ts で export const component されるオブジェクトの型
export const component: VueConstructor;
// vue コンポーネントのインポート
import component from './components/MyComponent.vue';
import { Install } from './types';

// 重複して読み込まないようにする
const install = function(Vue) {
  if (install.installed) return;
  install.installed = true;
  Vue.component('MyComponent', component); // Vuetifyのように、どこからでもこのコンポーネントを呼び出せるようにする
} as Install;

// Vue.use() のためのモジュール定義を作成
// Create module definition for Vue.use()
const plugin = {
  install
};

// vue が見つかった場合に自動インストールする (ブラウザで <script> タグを用いた場合等)
let GlobalVue = null;
if (typeof window !== 'undefined') {
  GlobalVue = window.Vue;
} else if (typeof global !== 'undefined') {
  GlobalVue = global.Vue;
}
if (GlobalVue) {
  GlobalVue.use(plugin);
}

export default plugin;

// (npm/webpack 等で) モジュールとして利用させるためコンポーネントを export する
export { component };
これで、このコンポーネントが公開されれば以下のように使用できます。
(ここに限った話ではないですが、パッケージ名は適宜読み替えてください)
import Vue from "vue";
import MyComponent from "MyComponent";
Vue.use(MyComponent);
or
<template>
  <MyComponent />
</template>

<script lang="ts">
import Vue from "vue";
import { component as MyComponent } from "MyComponent";

export default Vue.extend({
  components: { MyComponent },
});
</script>
5. ビルド用の rollup のインストールと設定
2.で作成したコンポーネントを公開するために、rollup でビルドします。
rollup とは、webpack のようなモジュールバンドラです1。
rollup を使い、Vue + typeScript なコンポーネントを以下の 3 つの js ファイルに変換します。
{
  "main": "dist/my-component.umd.js",
  "module": "dist/my-component.esm.js",
  "unpkg": "dist/my-component.min.js",
  ...
}
それぞれについて簡単に説明します。
- main
- パッケージのエントリーポイントになります
- 通常、パッケージが呼び出された際はこちらに指定された js が読み込まれます
- module
- パッケージの呼び出し元が ES2015 をサポートしている場合、
package.jsonにmoduleあれば、そこに指定された js を読み込みます - 無ければ main に指定された js が読み込まれます
- 参考: Webpack and Rollup: the same but different
- パッケージの呼び出し元が ES2015 をサポートしている場合、
- unpkg
- npm にパッケージが公開されたとき、https://unpkg.com/にもパッケージが公開されます
- unpkg.com は、
package.jsonにunpkgがあればそこに指定された js を、無ければmainに指定された js を読み込みます
では、実際にビルドしていきます。
まずはじめに、必要なライブラリをインストールします。
yarn add -D \
  rollup
  @rollup/plugin-commonjs \
  @rollup/plugin-buble \
  rollup-plugin-vue \
  @rollup/plugin-typescript \
※こちらにあるように、古いバージョンの rollup plugin を使わないように注意してください。
次に、rollup の設定ファイルを作成します。
import commonjs from "@rollup/plugin-commonjs"; // CommonJS モジュールを ES6 に変換
import vue from "rollup-plugin-vue"; // .vue 単一ファイルコンポーネントを取得
import buble from "@rollup/plugin-buble"; // 適切にブラウザをサポートするトランスパイラおよびポリフィル
import typescript from "@rollup/plugin-typescript";

export default {
  input: "src/index.ts", // 先ほど作成したエントリーファイル
  output: {
    name: "MyComponent",
    exports: "named",
    sourcemap: true,
    globals: {
      vue: "Vue", // global.Vue を使うために必要
    },
  },
  external: ["Vue"], // Vueはその環境に読み込まれているVueを使うため、バンドルしない
  plugins: [
    vue({
      css: true, // css を <style> タグとして注入
      compileTemplate: true, // 明示的にテンプレートを描画関数に変換
    }),
    commonjs(),
    buble(), // ES5 へトランスパイルする
    typescript(), // typescript変換用
  ],
};
最後に、package.jsonにビルド用のスクリプトを追加します。
(コメントは消してください)
{
  "name": "v2-app", // 作成したパッケージの名前。筆者はv2-appとしてます
  "version": "0.1.0", // 任意のバージョン
  "main": "dist/my-component.umd.js",
  "module": "dist/my-component.esm.js",
  "unpkg": "dist/my-component.min.js",
  "types": "src/types.d.ts", // 上で作成した型定義ファイル
  "files": ["index.js", "dist", "src/types.d.ts"], // 公開物
  "scripts": {
    "serve": "vue-cli-service serve",
    "lint": "vue-cli-service lint",
    "build": "yarn build:umd & yarn build:es & yarn build:unpkg",
    "build:umd": "rollup --config rollup.config.js --format umd --file dist/my-component.umd.js",
    "build:es": "rollup --config rollup.config.js --format es --file dist/my-component.esm.js",
    "build:unpkg": "rollup --config rollup.config.js --format iife --file dist/my-component.min.js"
  },
  "dependencies": {
    ...,
  },
  "devDependencies": {
    ...,
  }
}
6. npmjs .com に登録
ユーザが未登録の場合、npm adduserで、登録済みであればnpm loginで認証します。
$ npm adduser
Username: eyuta
Password:
Email: (this IS public) xxx@xxx.com
※npm adduser した場合はメールが送られるで、そちらで認証を済ませます。
7. npmjs に公開
npm publishで公開できます。
事前に公開物を確認したい場合は、npm packを実行します。
参考: npm に公開する前に、パッケージの動作確認をする方法
$ npm publish
npm notice
npm notice 📦  v2-app@0.1.0
npm notice === Tarball Contents ===
npm notice 4.6kB dist/my-component.esm.js
npm notice 5.2kB dist/my-component.min.js
npm notice 5.5kB dist/my-component.umd.js
npm notice 1.6kB package.json
npm notice 6.2kB dist/my-component.esm.js.map
npm notice 6.2kB dist/my-component.min.js.map
npm notice 6.2kB dist/my-component.umd.js.map
npm notice 310B  README.md
npm notice 292B  src/types.d.ts
npm notice === Tarball Details ===
npm notice name:          v2-app
npm notice version:       0.1.0
npm notice package size:  5.4 kB
npm notice unpacked size: 36.0 kB
npm notice shasum:        a0c21208274e7792bf74e43429c1e1dc22a4c020
npm notice integrity:     sha512-aMjpevssuaZjb[...]fKMmxoyclWTag==
npm notice total files:   9
npm notice
+ v2-app@0.1.0
お疲れさまでした。
https://www.npmjs.com/package/$YOUR_APP_NAMEを開くと、パッケージが公開されているのが分かります!!
また、https://unpkg.com/$YOUR_APP_NAME@0.1.0/dist/my-component.min.jsにも、unpkgに指定した js ファイルが置かれています。
動作確認
是非、別の Vue App からインポートしてみてください。
公開したパッケージが実際に動きます。
import Vue from "vue";
import MyComponent from "MyComponent";
Vue.use(MyComponent);
or
<template>
  <MyComponent />
</template>

<script lang="ts">
import Vue from "vue";
import { component as MyComponent } from "MyComponent";

export default Vue.extend({
  components: { MyComponent },
});
</script>
最後に
今回は、公式に掲載されているrollupを用いてビルドを行いました。
今度は esbuild や webpack を用いた公開方法について、まとめてみたいと思います。
トラブルシューティング
npm adduserでユーザを作成した後は、メール認証を行う必要がある
$ npm adduser
Username: eyuta
Password:
Email: (this IS public) xxx@gmail.com
$ npm publish
......

npm ERR! code E403
npm ERR! 403 403 Forbidden - PUT https://registry.npmjs.org/v2-app - Forbidden
npm ERR! 403 In most cases, you or one of your dependencies are requesting
npm ERR! 403 a package version that is forbidden by your security policy.

npm ERR! A complete log of this run can be found in:
npm ERR!     /home/vscode/.npm/_logs/2021-01-31T04_58_23_088Z-debug.log
npm adduserしただけでは 403 エラーが出ます
https://www.npmjs.com/packageにはこんな感じに表示されています。

npm adduserで入力したメールアドレス宛にメールが届いているので、そちらで認証するとエラーが出なくなります。
plugin commonjs より先に plugin vue を読み込む必要がある
[!] (plugin commonjs) SyntaxError: Unexpected token (2:2) in /workspaces/public_vue_component/v2-app/src/components/MyComponent.vue?vue&type=template&id=e855639e&lang.js
src/components/MyComponent.vue?vue&type=template&id=e855639e&lang.js (2:2)
1:
2:   <div class="hello">
     ^
package.json の type に型定義ファイルを指定しないと、import した時に怒られる
10:26 Could not find a declaration file for module 'v2-app'. '/workspaces/public_vue_component/v2-app/node_modules/v2-app/dist/my-component.umd.js' implicitly has an 'any' type.
  Try `npm install @types/v2-app` if it exists or add a new declaration (.d.ts) file containing `declare module 'v2-app';`
     8 | <script lang="ts">
     9 | import Vue from 'vue';
  > 10 | import MyComponent2 from 'v2-app';
参考: Including declarations in your npm package
rollup-plugin-vue の最新バージョン(v6)は、Vue3 にしか対応していない
my-component.esm.js?4799:8 Uncaught TypeError: Object(...) is not a function
    at Module.eval (my-component.esm.js?4799:8)
    at eval (my-component.esm.js:52)
    at Module../node_modules/v2-app/dist/my-component.esm.js (chunk-vendors.js:1223)
    at __webpack_require__ (app.js:849)
    at fn (app.js:151)
    at eval (MyComponent.vue?a75f:9)
    at Module../node_modules/cache-loader/dist/cjs.js?!./node_modules/babel-loader/lib/index.js!./node_modules/ts-loader/index.js?!./node_modules/cache-loader/dist/cjs.js?!./node_modules/vue-loader/lib/index.js?!./src/components/MyComponent.vue?vue&type=script&lang=ts& (app.js:950)
    at __webpack_require__ (app.js:849)
    at fn (app.js:151)
    at eval (MyComponent.vue?1254:1)
rollup-plugin-vue の最新バージョン(v6)は、Vue3 にしか対応していない。
そのため、rollup-plugin-vue@5.0.0 を指定してインストールする必要がある。
script タグ用に global で Vue オブジェクトを呼んでいるので、rollup.config.jsの output.globals にvueを指定する必要がある
vue (imported by src/components/MyComponent.vue?rollup-plugin-vue=script.ts)
(!) Missing global variable name
Use output.globals to specify browser global variable names corresponding to external modules
vue (guessing 'Vue')
export default {
  ...,
  output: {
    ...,
    globals: {
      vue: "Vue",
    },
  },
  ...,
};
-
rollup と webpack の比較は以下のサイトが参考になりました。
webpack と Rollup:似て非なるもの
Rollup vs. Parcel vs. webpack: Which Is the Best Bundler? ↩