はじめに
Windows 10のウィンドウキャプチャAPI (Windows.Graphics.Capture) を使うと、指定したウィンドウのキャプチャイメージを取得することができます。
画面の取り込み - UWP applications | Microsoft Docs
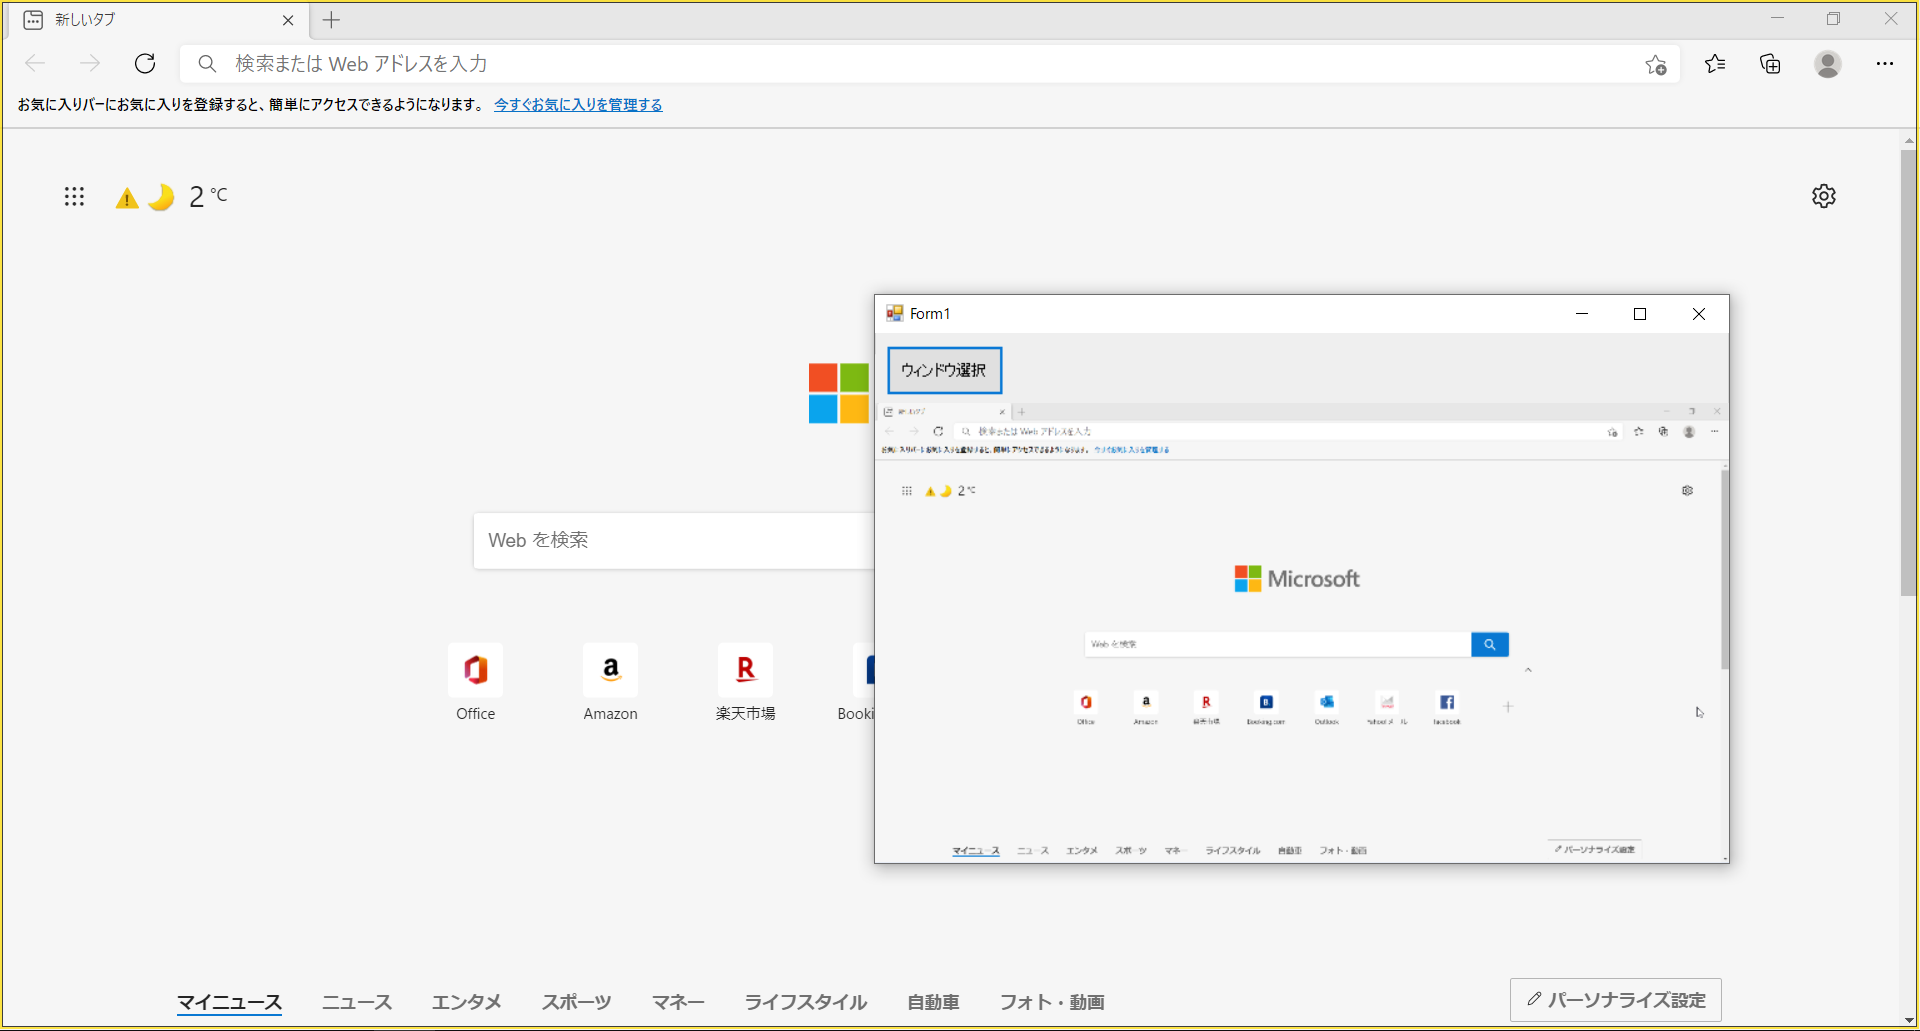
最小化されていない限り、他のウィンドウが上から重なっていたりしても問題なし。こんな感じで。
しかしC++からは使えるっぽいけど、C#の方が書きやすいんだよな。
UWPアプリだとセットアップが面倒なので、**デスクトップアプリから使いたい。**無理なのかな?
**いえいえ、大丈夫。**このサンプル、実はC#のデスクトップアプリだよ!(マジで?)
正確に言えば、WinRTを呼び出すためのラッパーライブラリをC++で書き、C#側から呼び出しています。
概要は以前の記事をどうぞ。
[C#] C++/WinRTのブリッジを作ってC#から呼び出す方法 - Qiita
これを応用して、Windows 10のウィンドウキャプチャAPIをラッパーライブラリ化してみましょう。
検証環境
- Windows 10 Home (20H2)
- Visual Studio 2019 Community
Visual Studio Installerからコンポーネントを追加インストールします。
- ワークロード: 以下の3つにチェック
- .NETデスクトップ開発
- C++によるデスクトップ開発
- ユニバーサルWindowsプラットフォーム開発
- 個別のコンポーネント
- Windows 10 SDK (10.0.18362.0以降を1つ以上)
- (他にもあったかどうか忘れました…)
さらに、C++/WinRT開発のためのVSIXをインストールしておきます。
C++/WinRT - Visual Studio Marketplace
GitHubにコードを置いています
以下の内容を実行したソースコード一式をGitHubに置いておきます。手っ取り早く動作確認したい方はそちらをどうぞ。
build1024/GraphicsCaptureCSharp: Sample of C# project using features of Windows.Graphics.Capture through a C++/WinRT bridge library
ラッパーライブラリ (C++/WinRT) の開発
プロジェクトの作成
まずは、Windows Runtime Component (C++/WinRT) プロジェクトを以下の設定で作ります。
- プロジェクト名は
GraphicsCaptureBridge - ソリューション: 新しいソリューションを作成する
- ソリューション名
GraphicsCaptureCSharp - Windowsのターゲットバージョンは1903以降で。
こうなっています。
ラッパークラスの名前、Class ではあんまりなので、Capture に変えておきます。
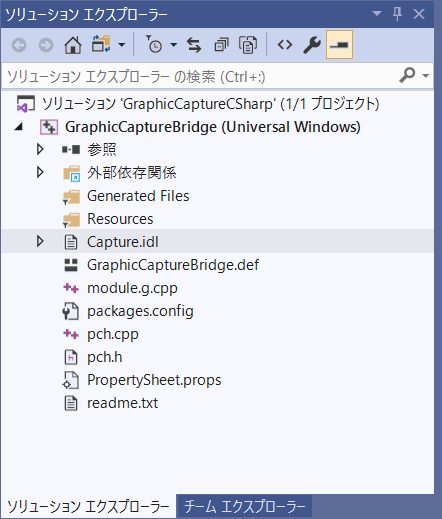
Capture.idl, Capture.cpp, Capture.h の中で、 Class と書いてあるところを全部 Capture に変えます。ClassT も CaptureT に変えます。
そのままプロジェクトをビルドすると Capture.g.cpp が見つからない、といったエラーが出ますが、一度Visual Studioを終了し、再度このソリューションを開いて、プロジェクトをリビルドすると成功します。
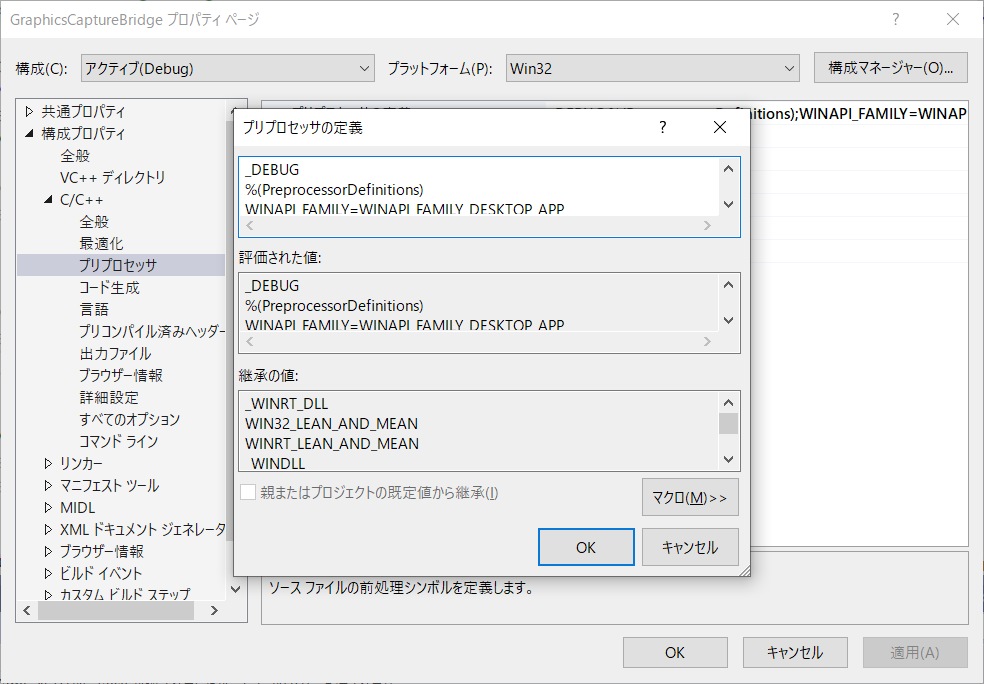
さらに、プロジェクトのプロパティ「構成プロパティ」→「C/C++」→「プリプロセッサ」と進み、「プリプロセッサの定義」に以下の2つを追加します(順番も大事です)。これを書かないと後々ハマることになります。DebugとReleaseの両方に追加するのをお忘れなく。
%(PreprocessorDefinitions)
WINAPI_FAMILY=WINAPI_FAMILY_DESKTOP_APP
参照の追加
必要なパッケージを追加します。
プロジェクト名を右クリック→「NuGet パッケージの管理」から以下の2つを追加します。
- directxtk_desktop_2017 (v2021.1.10.1)
- wtl (v10.0.10320)
実装
ここからの実装は↓の記事をかなり参考にしています。
Windows 10のウィンドウキャプチャAPI - Qiita
pch.h
↓を参考に、実装に必要なヘッダファイルを書いていきます。
examples/stdafx.h at master · opysky/examples · GitHub
# pragma once

# define NOMINMAX

# include <ppltasks.h>

# include <atlbase.h>
# include <atlapp.h>
extern CAppModule _Module;
# include <atlwin.h>
# include <atldlgs.h>
# include <atlcrack.h>
# include <atlmisc.h>

# include <winrt/Windows.Foundation.h>
# include <winrt/Windows.System.h>
# include <winrt/Windows.Graphics.Capture.h>
# include <winrt/Windows.Graphics.DirectX.h>
# include <winrt/Windows.Graphics.DirectX.Direct3d11.h>

# include <shcore.h>
# include <dwmapi.h>
# include <DispatcherQueue.h>
# include <d3d11_4.h>
# include <dxgi1_6.h>
# include <d2d1_3.h>
# include <d2d1_3helper.h>
# include <windows.ui.composition.interop.h>
# include <windows.graphics.directx.direct3d11.interop.h>
# include <Windows.Graphics.Capture.Interop.h>

# include <SpriteBatch.h>
Direct3DHelper.h
新しくヘッダファイルを追加します。中身は↓のコードをそのまま使います。
examples/Direct3DHelper.h at master · opysky/examples · GitHub
Capture.h
ベースは↓です。
examples/CaptureView.h at master · opysky/examples · GitHub
# pragma once

# include "Capture.g.h"

using namespace winrt;
using namespace winrt::Windows::Foundation;
using namespace winrt::Windows::System;
using namespace winrt::Windows::Graphics;
using namespace winrt::Windows::Graphics::DirectX;
using namespace winrt::Windows::Graphics::DirectX::Direct3D11;
using namespace winrt::Windows::Graphics::Capture;

namespace winrt::GraphicsCaptureBridge::implementation
{
    struct Capture : CaptureT<Capture>
    {
        Capture(int64_t ownerHwnd);
        IAsyncOperation<bool> StartCaptureForPickedWindowAsync();
        void StopCapture();
        void Resize();
        bool IsCapturing() { return _framePool != nullptr; }
    private:
        HRESULT CreateDevice();
        void StartCapture(winrt::Windows::Graphics::Capture::GraphicsCaptureItem const& item);
        void OnFrameArrived(
            Direct3D11CaptureFramePool const& sender,
            winrt::Windows::Foundation::IInspectable const& args);

        HWND _ownerHwnd;

        winrt::Windows::Graphics::DirectX::Direct3D11::IDirect3DDevice _device{ nullptr };
        winrt::com_ptr<ID3D11Device> _d3dDevice;
        winrt::com_ptr<IDXGISwapChain1> _dxgiSwapChain;
        winrt::com_ptr<ID3D11RenderTargetView> _chainedBufferRTV;

        std::unique_ptr<::DirectX::SpriteBatch> _spriteBatch;

        winrt::Windows::Graphics::Capture::Direct3D11CaptureFramePool _framePool{ nullptr };
        winrt::Windows::Graphics::Capture::GraphicsCaptureItem _captureItem{ nullptr };
        winrt::Windows::Graphics::Capture::GraphicsCaptureSession _captureSession{ nullptr };
        winrt::Windows::Graphics::Capture::Direct3D11CaptureFramePool::FrameArrived_revoker _frameArrived;
    };
}

namespace winrt::GraphicsCaptureBridge::factory_implementation
{
    struct Capture : CaptureT<Capture, implementation::Capture>
    {
    };
}
元記事では CWindowImpl を継承してウィンドウのサブクラスとして実装し、そのウィンドウにキャプチャされた画像が描画されるようになっています。しかしこれではC#から使いにくいので、代わりにキャプチャ出力先のウィンドウハンドルをコンストラクタで受け取るようにします。
キャプチャ対象のウィンドウ指定について、ピッカーを使用する点は同じですが、GraphicsCapturePicker や GraphicsCaptureItem オブジェクトをC#側に見せる必要はないので、**「ピッカーを表示し、選択されたらそのウィンドウに対してキャプチャを開始する」**というメソッドとして公開します。それが以下の部分です。
IAsyncOperation<bool> StartCaptureForPickedWindowAsync();
IAsyncOperation 型のオブジェクトは、C#側では .AsTask() メソッドで Task オブジェクトに変換することにより await で待機できるようになります。
WindowsRuntimeSystemExtensions.AsTask Method (System) | Microsoft Docs
あとは、ウィンドウサイズの変更時に拡大率を再計算できるように Resize() メソッドを追加しました(これは今回の本筋からは若干外れます)。
Capture.cpp
クラスの実装です。ベースは↓です。
examples/CaptureView.cpp at master · opysky/examples · GitHub
# include "pch.h"
# include "Capture.h"
# if __has_include("Capture.g.cpp")
# include "Capture.g.cpp"
# endif

# include "Direct3DHelper.h"
using namespace ::DirectX;

// Ref: https://github.com/opysky/examples/tree/master/winrt/GraphicsCapture/CapturePreview
namespace {
	// 今回はキャプチャ対象をPickerで指定するようにする
	auto ShowWindowPickerAsync(HWND ownerHwnd)
	{
		auto picker = GraphicsCapturePicker();
		picker.as<IInitializeWithWindow>()->Initialize(ownerHwnd);
		return picker.PickSingleItemAsync();
	}

	auto FitInBox(Size const& source, Size const& destination)
	{
		// アスペクト比を保持したままボックスに収まる矩形を計算
		Rect box;

		box.Width = destination.Width;
		box.Height = destination.Height;
		float aspect = source.Width / source.Height;
		if (box.Width >= box.Height * aspect) {
			box.Width = box.Height * aspect;
		}
		aspect = source.Height / source.Width;
		if (box.Height >= box.Width * aspect) {
			box.Height = box.Width * aspect;
		}
		box.X = (destination.Width - box.Width) * 0.5f;
		box.Y = (destination.Height - box.Height) * 0.5f;

		return CRect(
			static_cast<int>(box.X),
			static_cast<int>(box.Y),
			static_cast<int>(box.X + box.Width),
			static_cast<int>(box.Y + box.Height));
	}
}

namespace winrt::GraphicsCaptureBridge::implementation
{
	Capture::Capture(int64_t ownerHwnd) {
		_ownerHwnd = (HWND)ownerHwnd;
		this->CreateDevice();
	}

	HRESULT Capture::CreateDevice()
	{
		WINRT_VERIFY(IsWindow(_ownerHwnd));

		_device = CreateDirect3DDevice();
		_d3dDevice = GetDXGIInterfaceFromObject<ID3D11Device>(_device);

		auto dxgiDevice = _d3dDevice.as<IDXGIDevice2>();
		com_ptr<IDXGIAdapter> dxgiAdapter;
		check_hresult(dxgiDevice->GetParent(guid_of<IDXGIAdapter>(), dxgiAdapter.put_void()));
		com_ptr<IDXGIFactory2> dxgiFactory;
		check_hresult(dxgiAdapter->GetParent(guid_of<IDXGIFactory2>(), dxgiFactory.put_void()));

		CRect clientRect;
		GetWindowRect(_ownerHwnd, clientRect);

		DXGI_SWAP_CHAIN_DESC1 scd = {};
		scd.Width = clientRect.Width();
		scd.Height = clientRect.Height();
		scd.Format = DXGI_FORMAT_B8G8R8A8_UNORM;
		scd.BufferUsage = DXGI_USAGE_RENDER_TARGET_OUTPUT;
		scd.BufferCount = 2;
		scd.SampleDesc.Count = 1;
		scd.SwapEffect = DXGI_SWAP_EFFECT_FLIP_SEQUENTIAL;
		scd.AlphaMode = DXGI_ALPHA_MODE_IGNORE;

		check_hresult(dxgiFactory->CreateSwapChainForHwnd(
			_d3dDevice.get(),
			_ownerHwnd, // *this,
			&scd,
			nullptr,
			nullptr,
			_dxgiSwapChain.put()));

		com_ptr<ID3D11Texture2D> chainedBuffer;
		check_hresult(_dxgiSwapChain->GetBuffer(0, guid_of<ID3D11Texture2D>(), chainedBuffer.put_void()));
		check_hresult(_d3dDevice->CreateRenderTargetView(chainedBuffer.get(), nullptr, _chainedBufferRTV.put()));

		com_ptr<ID3D11DeviceContext> context;
		_d3dDevice->GetImmediateContext(context.put());
		_spriteBatch = std::make_unique<SpriteBatch>(context.get());

		return S_OK;
	}

	void Capture::StartCapture(winrt::Windows::Graphics::Capture::GraphicsCaptureItem const& item)
	{
		// Direct3D11CaptureFramePool は使いまわせても良さそうな気がするけど
		// GraphicsCaptureSession と一緒に破棄しないとダメっぽ
		StopCapture();

		_captureItem = item;

		_framePool = Direct3D11CaptureFramePool::Create(
			_device,
			DirectXPixelFormat::B8G8R8A8UIntNormalized,
			2,
			_captureItem.Size());
		_frameArrived = _framePool.FrameArrived(auto_revoke, { this, &Capture::OnFrameArrived });

		_captureSession = _framePool.CreateCaptureSession(item);
		_captureSession.StartCapture();
	}

	IAsyncOperation<bool> Capture::StartCaptureForPickedWindowAsync()
	{
		auto op = ShowWindowPickerAsync(_ownerHwnd);
		GraphicsCaptureItem item { co_await op };
		bool successful = (item != nullptr);
		if (successful) {
			StartCapture(item);
		}
		co_return successful;
	}

	void Capture::StopCapture()
	{
		if (IsCapturing()) {
			_frameArrived.revoke();

			_captureSession = nullptr;

			// 何故か Direct3DCaptureFramePool は Close を手動で呼び出さないと
			// 参照カウンタが残ってるというレポートが吐かれる?
			_framePool.Close();
			_framePool = nullptr;

			_captureItem = nullptr;
		}
	}

	void Capture::Resize()
	{
		if (_dxgiSwapChain == nullptr) {
			return;
		}

		CRect clientRect;
		GetWindowRect(_ownerHwnd, clientRect);

		if (!IsIconic(_ownerHwnd) && clientRect.Width() > 0 && clientRect.Height() > 0) {
			_chainedBufferRTV = nullptr;
			_dxgiSwapChain->ResizeBuffers(2, clientRect.Width(), clientRect.Height(), DXGI_FORMAT_B8G8R8A8_UNORM, 0);

			com_ptr<ID3D11Texture2D> chainedBuffer;
			check_hresult(_dxgiSwapChain->GetBuffer(0, guid_of<ID3D11Texture2D>(), chainedBuffer.put_void()));
			check_hresult(_d3dDevice->CreateRenderTargetView(chainedBuffer.get(), nullptr, _chainedBufferRTV.put()));

			InvalidateRect(_ownerHwnd, nullptr, true);
		}
	}

	void Capture::OnFrameArrived(
		Direct3D11CaptureFramePool const& sender,
		winrt::Windows::Foundation::IInspectable const& args){
		auto frame = sender.TryGetNextFrame();
		auto frameSurface = GetDXGIInterfaceFromObject<ID3D11Texture2D>(frame.Surface());

		// なんでか知らんが CaptureItem::Size と CaptureFrame::ContentSize が異なる場合が多い
		// レンダリングは ContentSize を基準にするべき
		auto contentSize = frame.ContentSize();

		com_ptr<ID3D11ShaderResourceView> frameSurfaceSRV;
		check_hresult(_d3dDevice->CreateShaderResourceView(frameSurface.get(), nullptr, frameSurfaceSRV.put()));

		com_ptr<ID3D11DeviceContext> context;
		_d3dDevice->GetImmediateContext(context.put());

		ID3D11RenderTargetView* pRTVs[1];
		pRTVs[0] = _chainedBufferRTV.get();
		context->OMSetRenderTargets(1, pRTVs, nullptr);

		D3D11_VIEWPORT vp = { 0 };
		DXGI_SWAP_CHAIN_DESC1 scd;
		_dxgiSwapChain->GetDesc1(&scd);
		vp.Width = static_cast<float>(scd.Width);
		vp.Height = static_cast<float>(scd.Height);
		context->RSSetViewports(1, &vp);

		auto clearColor = D2D1::ColorF(D2D1::ColorF::CornflowerBlue);
		context->ClearRenderTargetView(_chainedBufferRTV.get(), &clearColor.r);

		_spriteBatch->Begin();

		CRect sourceRect, destinationRect;

		sourceRect.left = 0;
		sourceRect.top = 0;
		sourceRect.right = contentSize.Width;
		sourceRect.bottom = contentSize.Height;

		destinationRect = FitInBox(
			{ static_cast<float>(contentSize.Width), static_cast<float>(contentSize.Height) },
			{ static_cast<float>(scd.Width), static_cast<float>(scd.Height) });

		_spriteBatch->Draw(frameSurfaceSRV.get(), destinationRect, &sourceRect);

		_spriteBatch->End();

		DXGI_PRESENT_PARAMETERS pp = { 0 };
		_dxgiSwapChain->Present1(1, 0, &pp);

		// Surface のサイズはおそらく FramePool 作成時のバッファサイズ。
		// CaptureItem のサイズはウィンドウのサイズに追従するので
		// 差異があるなら FramePool を再作成する
		auto surfaceDesc = frame.Surface().Description();
		auto itemSize = _captureItem.Size();
		if (itemSize.Width != surfaceDesc.Width || itemSize.Height != surfaceDesc.Height) {
			// GraphicsCaptureItem::Closed は参照しているウィンドウが破棄されたら
			// 発行されるイベントかと思ったけどそういうわけでも無さそう…
			// Size が 0 なら破棄されたと見做すしかないかな?
			SizeInt32 size;
			size.Width = std::max(itemSize.Width, 1);
			size.Height = std::max(itemSize.Height, 1);
			_framePool.Recreate(_device, DirectXPixelFormat::B8G8R8A8UIntNormalized, 2, size);
		}
	}
}
Capture::Capture(int64_t ownerHwnd) はキャプチャ内容の描画先ウィンドウを引数に取りますが、後述のidlファイルとの関係で int64_t にしてあります(内部では HWND などにキャストして用います)。
先ほどの StartCaptureForPickedWindowAsync について、co_return で値を返すように書くことで、戻り値は IAsyncOperation<T> 型になります。このオブジェクトは前述のように、C#側で Task を介して await することができます。以下に例が載っています。
C++/WinRT を使用した同時実行操作と非同期操作 - UWP applications | Microsoft Docs
Capture.idl
C#側から見えるインタフェースになります。もともと入っている内容を消して、以下のように書きます。
namespace GraphicsCaptureBridge
{
    [default_interface]
    runtimeclass Capture
    {
        Capture(Int64 ownerHwnd);
        Windows.Foundation.IAsyncOperation<Boolean> StartCaptureForPickedWindowAsync();
        void StopCapture();
        void Resize();
        Boolean IsCapturing();
    }
}
int64_t 型は Int64 になり、bool 型は Boolean になります。
ここまで来たら、プロジェクトをビルドしておきましょう。ビルドが通ればC++側はクリアです。
メインプログラム (C#)
プロジェクトの作成
今あるソリューション GraphicsCaptureCSharp に、新しいプロジェクトを追加します。「Windows フォーム アプリケーション (.NET Framework)」プロジェクトを作ります。「WPF アプリ」でもよいのですが、ウィンドウハンドルを得るのがちょっと面倒なので。
- プロジェクト名は
CapturePreviewCSharp - フレームワークは .NET Framework 4.7.2 で。
このプロジェクト名を右クリック→「スタートアップ プロジェクトに設定」をしておきます。
プラットフォーム設定
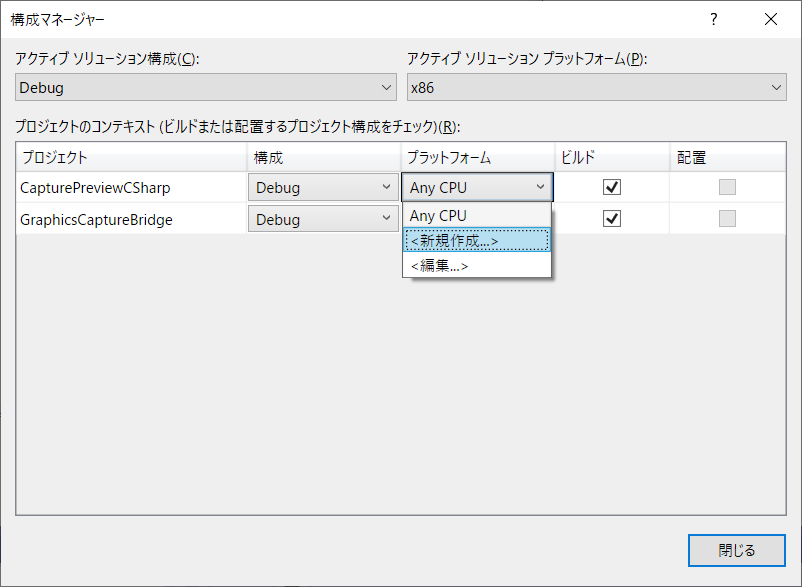
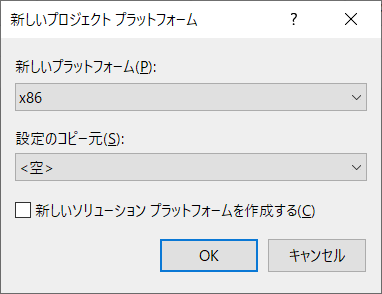
まず、ソリューションの構成マネージャから、C#側プロジェクトのプラットフォームを設定します。Any CPU のままだと動きません。32ビット向けの設定はこんな感じで追加します(x64も同様)。
参照の追加
プロジェクトの「参照」を右クリック→「参照の追加」で「参照マネージャ」を開き、画面左側「プロジェクト」を選び、ブリッジライブラリである GraphicsCaptureBridge にチェックを入れます。
また、画面下側の「参照」ボタンから、以下の3ファイルを順に追加します。
C:\Program Files (x86)\Windows Kits\10\UnionMetadata\10.0.18362.0\Facade\windows.winmdC:\Program Files (x86)\Windows Kits\10\References\10.0.18362.0\Windows.Foundation.UniversalApiContract\8.0.0.0\Windows.Foundation.UniversalApiContract.winmdC:\Program Files (x86)\Windows Kits\10\References\10.0.18362.0\Windows.Foundation.FoundationContract\3.0.0.0\Windows.Foundation.FoundationContract.winmd
NuGetパッケージの追加
次に、プロジェクト名を右クリック→「NuGet パッケージの管理」から以下のパッケージを追加します。
パッケージを追加する時に「Packages.config」か「PackageReference」を選ぶ画面が出たら、**「Packages.config」**にしておきます。
- Microsoft.VCRTForwarders.140 (v1.0.7)
- System.Runtime.WindowsRuntime (v4.7.0)
- System.Runtime.WindowsRuntime.UI.Xaml (v4.7.0)
UIの作成
Form1 に Button と PictureBox を配置します。この PictureBox にキャプチャした画像を描画します。
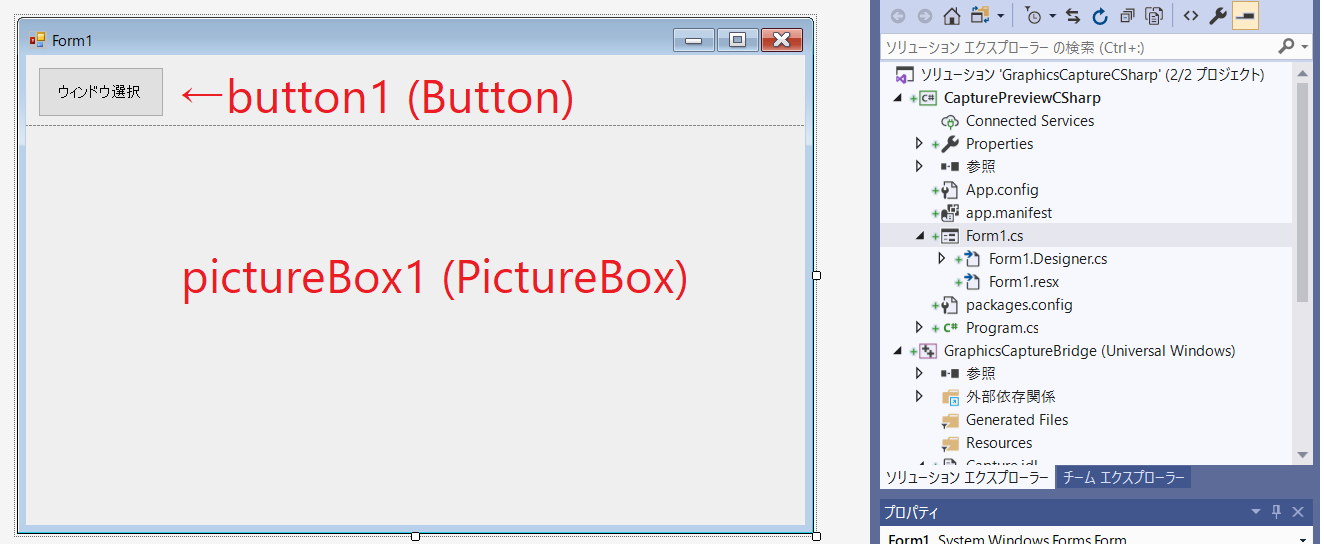
PitureBox の Anchor プロパティに Right と Bottom を追加して、ウィンドウサイズ変更時に自動的にリサイズさせるようにするとよいです。
イベントの実装
Form1 の中身は以下のようになります。コードをコピペする場合は、先にデザイナでイベントハンドラを追加してから行ってください。
コメントにも書いていますが、GraphicsCaptureBridge.Capture(pictureBox1.Handle.ToInt64()); はウィンドウハンドルを使うため Load イベントに書いています。コンストラクタに書くと動きません。
    public partial class Form1 : Form
    {
        private GraphicsCaptureBridge.Capture capture = null; // この行を追加

        public Form1()
        {
            InitializeComponent();
        }

        private async void button1_Click(object sender, EventArgs e)
        {
            await capture.StartCaptureForPickedWindowAsync().AsTask();
        }

        private void Form1_Load(object sender, EventArgs e)
        {
            // コンストラクタの段階ではウィンドウハンドルが生成されていないのでダメ
            capture = new GraphicsCaptureBridge.Capture(pictureBox1.Handle.ToInt64());
        }

        private void Form1_FormClosing(object sender, FormClosingEventArgs e)
        {
            capture?.StopCapture();
        }

        private void pictureBox1_Resize(object sender, EventArgs e)
        {
            capture?.Resize();
        }
    }
app.manifest
過去の記事でも書いたのですが、クラスの実装がどのDLLに入っているかを、C#側で明示的に指定しなければなりません。
[C#] C++/WinRTのブリッジを作ってC#から呼び出す方法 - Qiita
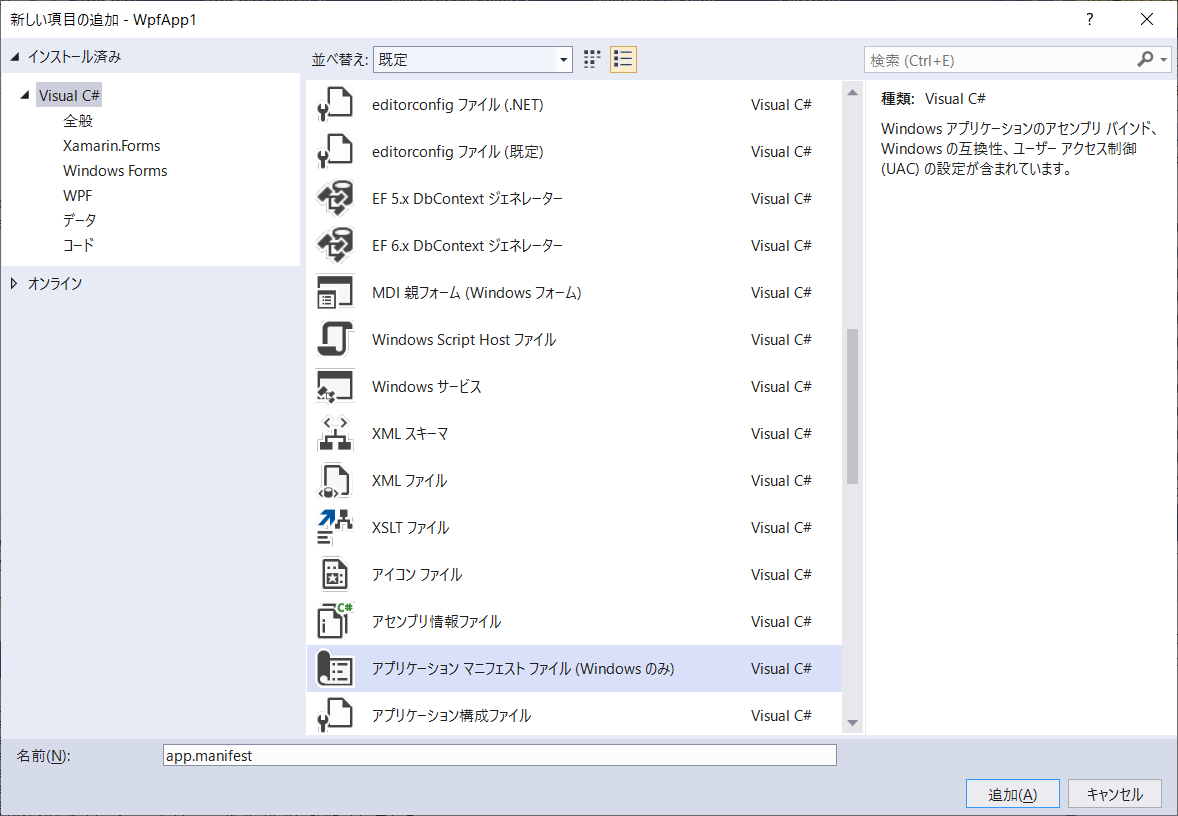
プロジェクト名を右クリック→「追加」から、「アプリケーション マニフェスト ファイル (Windows のみ)」を追加します。
追加した app.manifest の最後の方に以下の記述を追加します。
<?xml version="1.0" encoding="utf-8"?>
<assembly manifestVersion="1.0" xmlns="urn:schemas-microsoft-com:asm.v1">
  <assemblyIdentity version="1.0.0.0" name="MyApplication.app"/>
  (略)
  <file name="GraphicsCaptureBridge.dll">
    <activatableClass
      name="GraphicsCaptureBridge.Capture"
      threadingModel="both"
      xmlns="urn:schemas-microsoft-com:winrt.v1" />
  </file>
</assembly>
いざ実行
C#プロジェクトをF5キーで実行してみましょう。動きましたか?
トラブルシューティング
[C#] C++/WinRTのブリッジを作ってC#から呼び出す方法 - Qiita もあわせてご覧ください。
エラー E0266「"std::IUnknown" があいまいです」
C#側 プロジェクトに追加すべき参照のどれかが足りないみたいです。IntelliSenseのエラーは C++側 のエラーとして出るので分かりにくい。
エラー CS0012「型 'IAsyncOperation<>' は、参照されていないアセンブリに定義されています。(以下略)」
C#側プロジェクトで、winmdファイルの参照が足りないみたいです。
ウィンドウのキャプチャが取れないことがある
最小化されているウィンドウのキャプチャは取ることができません(他ウィンドウの後ろに隠れているだけなら問題なく取れます)。これはAPIの仕様なので、C++で開発している場合も同じ制約を受けます。