はじめに
ユーザーが入力したテキストから、いわゆる「キリスト看板」風の画像を生成するWebアプリ「キリスト看板ジェネレータの復活」を作っています。元々似たようなことをする「キリスト看板ジェネレータ」があったのですが、そのサービスが無くなってしまったので、私が新たに作ったのでした。元のサービスと名前を重複させないように、名前に「復活」をつけています。
こちら、実は2014年ごろに作ったもので、テキストが送信されるとPerlのCGIを実行し、PerlのImager::DTPライブラリを使ってテキストを描画して、画像データを画面に表示するという作りです。
今から作るのであれば、HTML5のcanvasなどを使って作り、画像のプレビュー機能もつけたいものです。以前から、HTML5で作り直す構想はあったのですが、面倒で手が出ませんでした。
しかし、今の時代ならChatGPTを使えば案外簡単に作れるのではないか?とふと思いつき、試してみたところ、ものの1時間ほどで作れてしまいました。というわけで、どういうプロンプトを投げてどういうコードが得られたのか、開発過程をまとめてみようと思います。
なお、今回は簡単のために横書き画像にします。
成果物
案外すんなり形になったので、新ジェネレータを v3 として公開しました。
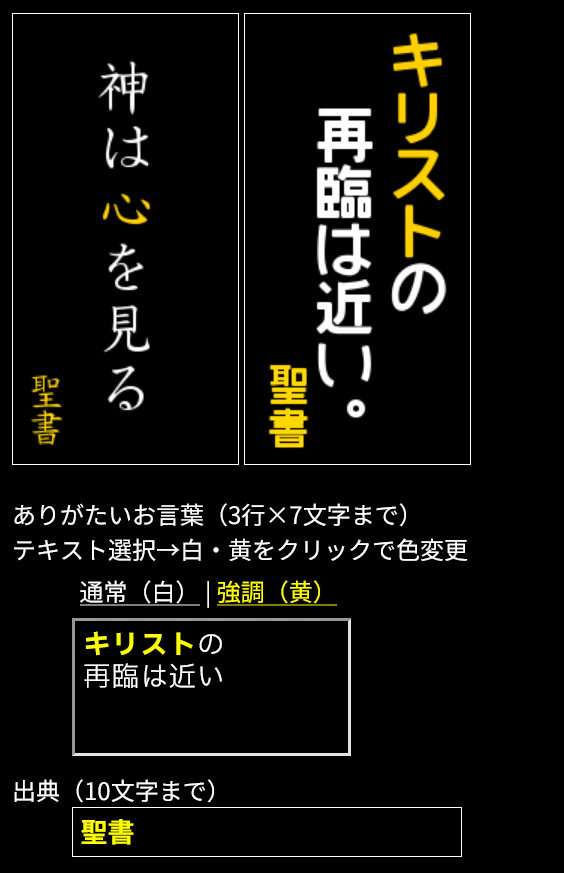
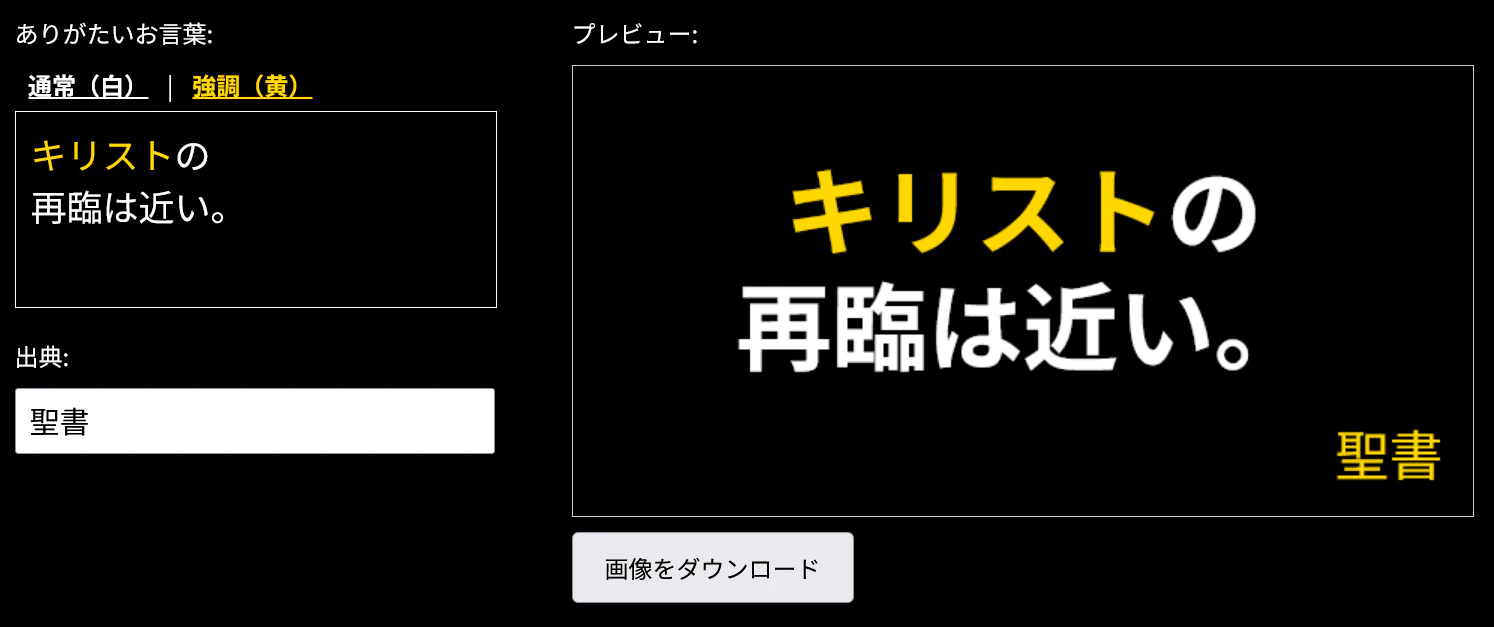
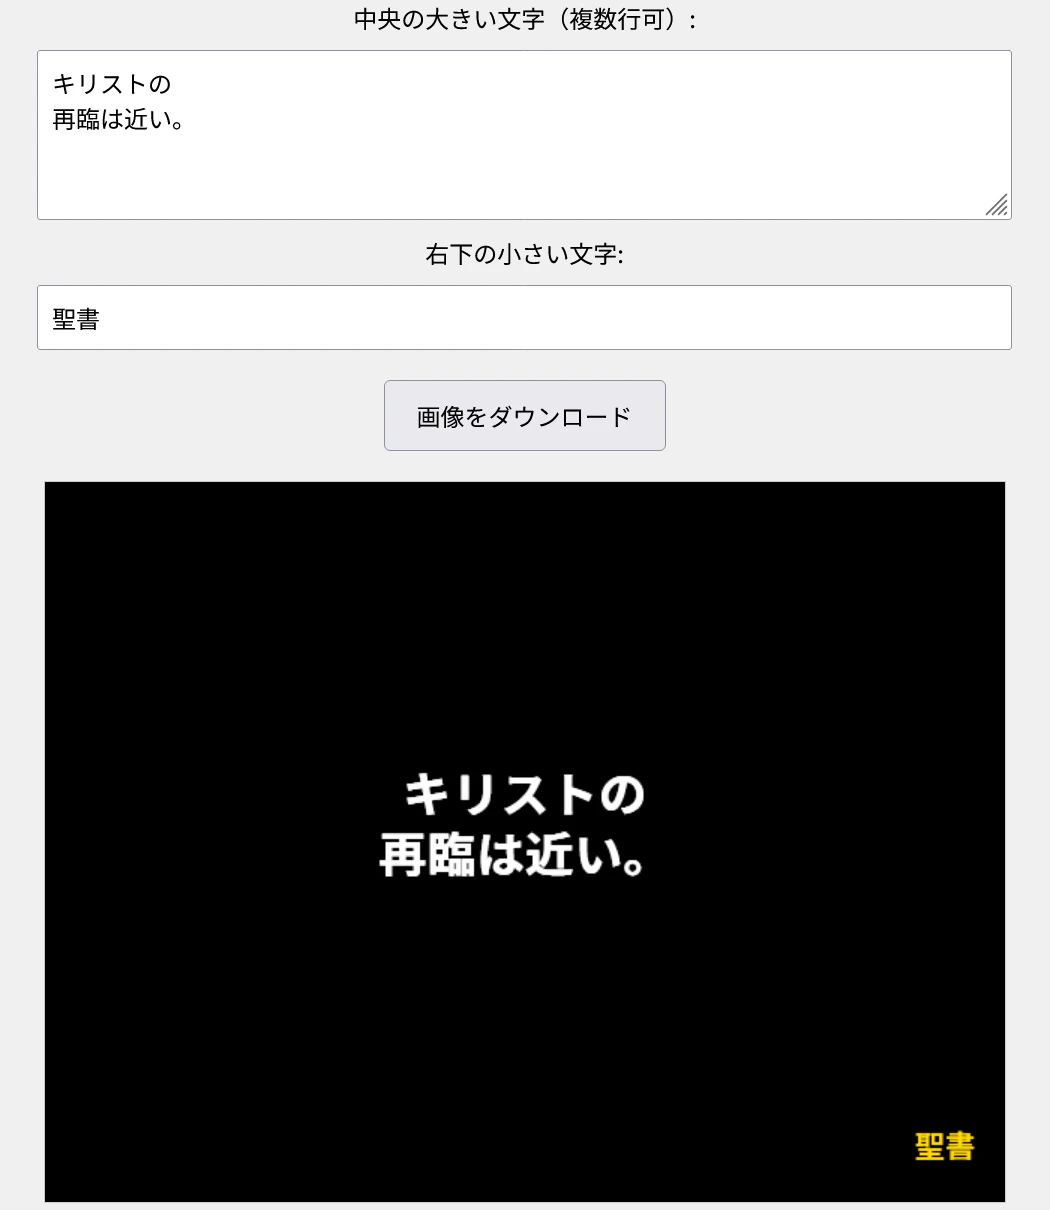
左側のテキストエディタで文字の入力と色変更を行うことができ、入力内容がリアルタイムに右側のプレビューに表示されます。「画像をダウンロード」をクリックすると、表示されている内容をPNG画像でダウンロードすることができます。
細かいですが、簡単なレスポンシブ対応も入れてありまして、ブラウザの横幅が一定値を下回るとエディタとプレビューが縦に並びます。
HTMLファイルで完結していますので、ソースコードをご自由に参照していただいて構いません。
開発過程
準備段階
あらかじめ完成品のイメージを思い浮かべて、プロンプトを書くことにしました。特にどういう技術を使って実現するかの見当をつけておき、それをプロンプトに入れておきます。まあ別にそこまでしなくても作れるとは思いますが、自分で全然触ったことのない技術を持ってこられても困るので、今回は使う技術を指定することにしました。
- 画像のプレビュー機能をHTML5のcanvasを使って実現する
- コマンドボタンで画像をダウンロードできるようにする
- テキストの内容をプレビューにリアルタイムで反映させる
- 3の実現のためにVue.jsを使う(←これは好みです)
1回目
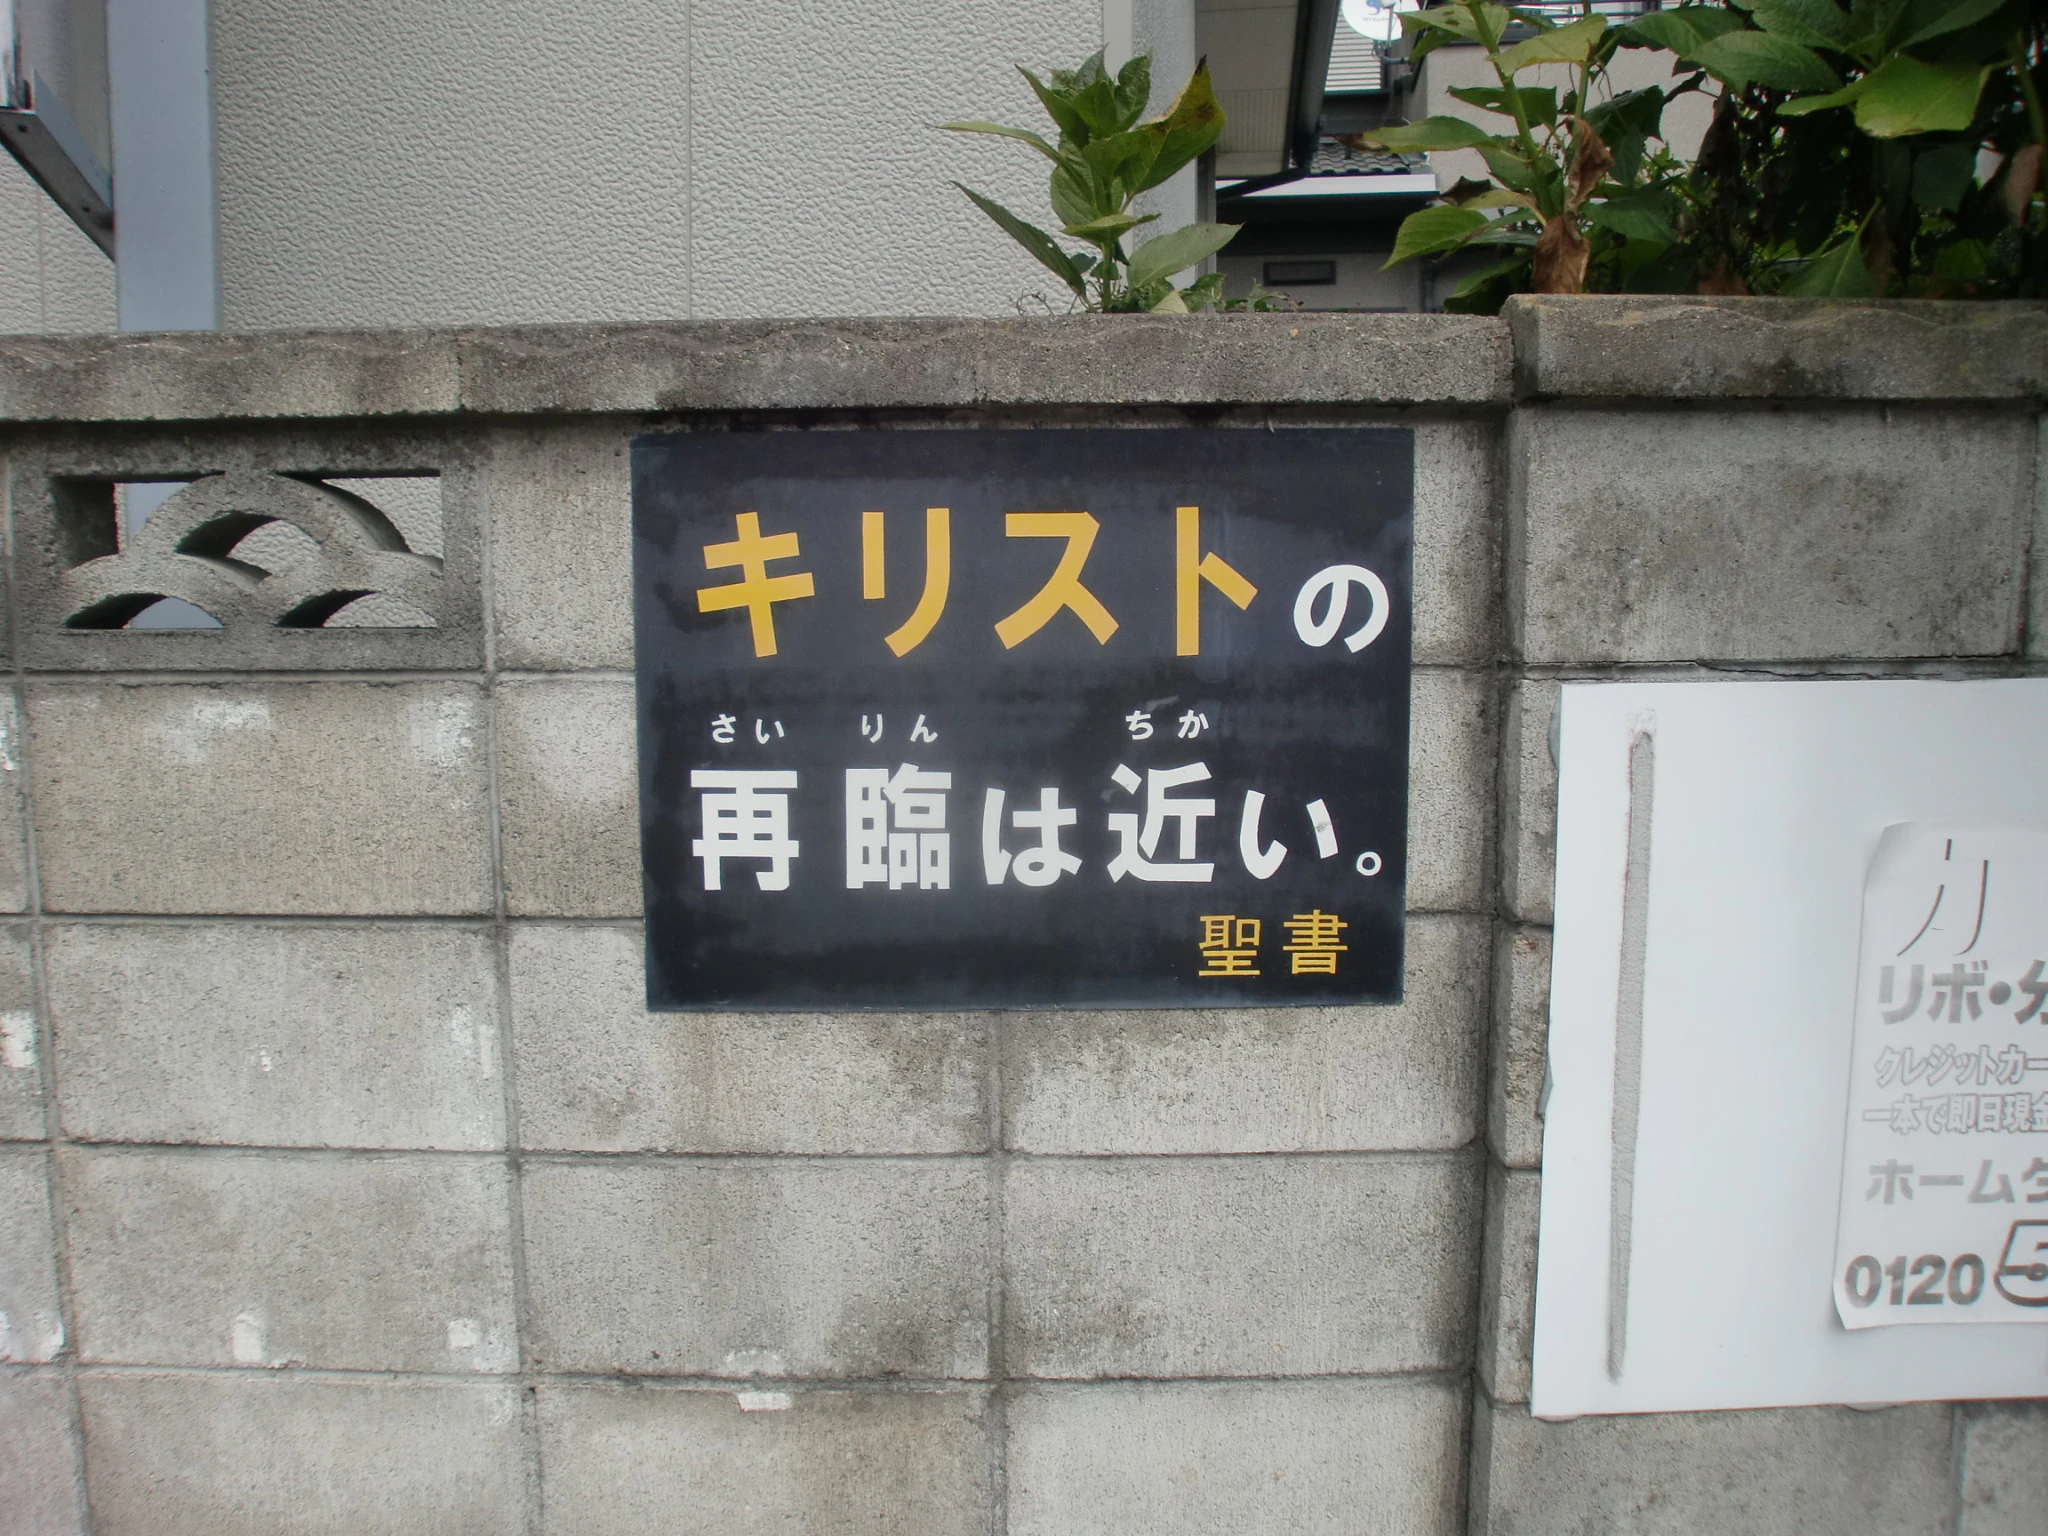
以上の制約条件を踏まえて、試しに以下のようなプロンプトを投げてみます。画像も添付しています。
HTML5の<canvas>を使ったWebアプリを作ってください。Vue.jsを使っても構いません。
概要は次の通りです。
- あらかじめ用意したフォントファイルを使って、黒背景に白と黄色で文字を書いてください。添付画像のような感じです。フリガナを書く必要はありません。
- 大きい文字で書く内容と、右下に小さい文字で書く内容を、別々のテキストボックスに入力できるようにしてください。
- 画像のプレビュー表示ができるようにして、入力内容を変更するたびにリアルタイムにプレビュー表示を更新してください。
- 作成した画像をダウンロードできるコマンドボタンを作ってください。
このプロンプトを送るだけで、こんなコードができました。こちらの意図通り、リアルタイムのプレビュー機能を実装するためにVue.jsが使われています。(style.cssは省略します)
<!DOCTYPE html>
<html lang="ja">
<head>
  <meta charset="UTF-8">
  <title>聖書風看板メーカー</title>
  <link rel="stylesheet" href="style.css">
</head>
<body>
  <div id="app">
    <div class="controls">
      <label>中央の大きい文字:</label>
      <input v-model="mainText" placeholder="例: キリストの再臨は近い。">

      <label>右下の小さい文字:</label>
      <input v-model="smallText" placeholder="例: 聖書">

      <button @click="download">画像をダウンロード</button>
    </div>

    <canvas ref="canvas" :width="canvasWidth" :height="canvasHeight"></canvas>
  </div>

  <script src="https://cdn.jsdelivr.net/npm/vue@2"></script>
  <script src="app.js"></script>
</body>
</html>
new Vue({
  el: '#app',
  data: {
    mainText: 'キリストの再臨は近い。',
    smallText: '聖書',
    canvasWidth: 640,
    canvasHeight: 480,
    fontLoaded: false,
  },
  mounted() {
    this.loadFont().then(() => {
      this.fontLoaded = true;
      this.renderCanvas();
    });
  },
  watch: {
    mainText() {
      this.renderCanvas();
    },
    smallText() {
      this.renderCanvas();
    }
  },
  methods: {
    async loadFont() {
      const font = new FontFace('CustomFont', 'url(./fonts/YourFont.ttf)');
      await font.load();
      document.fonts.add(font);
    },
    renderCanvas() {
      if (!this.fontLoaded) return;

      const canvas = this.$refs.canvas;
      const ctx = canvas.getContext('2d');

      // 背景
      ctx.fillStyle = '#000000';
      ctx.fillRect(0, 0, this.canvasWidth, this.canvasHeight);

      // メインテキスト(白・中央)
      ctx.font = 'bold 32px CustomFont';
      ctx.fillStyle = '#FFFFFF';
      ctx.textAlign = 'center';
      ctx.fillText(this.mainText, this.canvasWidth / 2, this.canvasHeight / 2);

      // サブテキスト(黄・右下)
      ctx.font = '20px CustomFont';
      ctx.fillStyle = '#FFD700';
      ctx.textAlign = 'right';
      ctx.fillText(this.smallText, this.canvasWidth - 20, this.canvasHeight - 30);
    },
    download() {
      const canvas = this.$refs.canvas;
      const link = document.createElement('a');
      link.download = 'bible_sign.png';
      link.href = canvas.toDataURL('image/png');
      link.click();
    }
  }
});
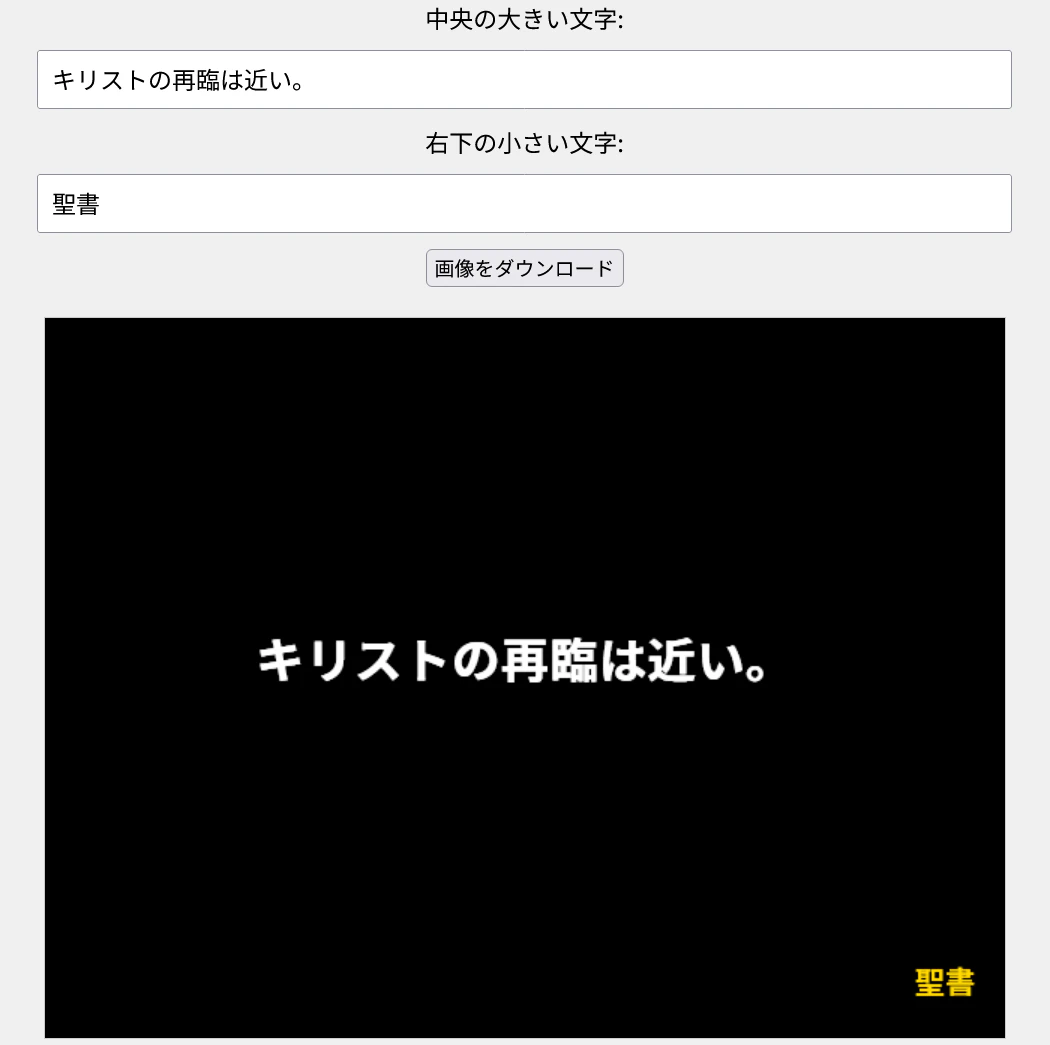
それで実際にブラウザで表示してみると、もう動くものができてしまっています。文字を入力すると、即座にプレビューにも反映されます。一発目で、もう半分くらいはできたようなものです。
看板の色についてはこちらから何も指示しませんでしたが、画像データをもとに、背景は黒 (#000000)、本文は白 (#FFFFFF)、出典は黄色 (#FFD700) となりました。
以下では描画フォントとしてSource Hans Sans JP (Bold) を使っています。
2回目
しかし使われているVue.jsがまさかのVer.2系。もうとっくにサポートが終了しているので、Ver.3系を使うように書き換えてもらいます。以下のプロンプトを投げます。
Vue.jsのバージョンを3.xにしてください。
すると、以下のコードが生成されました。意図通り、CDNからVue.jsのVer.3系(執筆時点ではv3.5.17)を読み込んでいます。今回の生成結果ではHTML, JS, CSSが1つに統合されました。見た目は特に変わりませんのでスクショは省略します。
<!DOCTYPE html>
<html lang="ja">
<head>
  <meta charset="UTF-8" />
  <title>聖書風看板メーカー</title>
  <style>
  (中略)
  </style>
</head>
<body>
  <div id="app">
    <div class="controls">
      <label>中央の大きい文字:</label>
      <input v-model="mainText" placeholder="例: キリストの再臨は近い。" />

      <label>右下の小さい文字:</label>
      <input v-model="smallText" placeholder="例: 聖書" />

      <button @click="download">画像をダウンロード</button>
    </div>

    <canvas ref="canvas" width="640" height="480"></canvas>
  </div>

  <!-- Vue 3 CDN -->
  <script type="module">
    import { createApp, ref, onMounted, watch } from 'https://unpkg.com/vue@3/dist/vue.esm-browser.js';

    createApp({
      setup() {
        const mainText = ref('キリストの再臨は近い。');
        const smallText = ref('聖書');
        const canvas = ref(null);
        const canvasWidth = 640;
        const canvasHeight = 480;
        const fontLoaded = ref(false);

        const loadFont = async () => {
          const font = new FontFace('CustomFont', 'url(./fonts/YourFont.ttf)');
          await font.load();
          document.fonts.add(font);
          fontLoaded.value = true;
          renderCanvas();
        };

        const renderCanvas = () => {
          if (!fontLoaded.value) return;

          const ctx = canvas.value.getContext('2d');

          // 背景
          ctx.fillStyle = '#000000';
          ctx.fillRect(0, 0, canvasWidth, canvasHeight);

          // 中央テキスト
          ctx.font = 'bold 32px CustomFont';
          ctx.fillStyle = '#FFFFFF';
          ctx.textAlign = 'center';
          ctx.fillText(mainText.value, canvasWidth / 2, canvasHeight / 2);

          // 小さいテキスト
          ctx.font = '20px CustomFont';
          ctx.fillStyle = '#FFD700';
          ctx.textAlign = 'right';
          ctx.fillText(smallText.value, canvasWidth - 20, canvasHeight - 30);
        };

        const download = () => {
          const link = document.createElement('a');
          link.download = 'bible_sign.png';
          link.href = canvas.value.toDataURL('image/png');
          link.click();
        };

        onMounted(() => {
          loadFont();
        });

        watch([mainText, smallText], renderCanvas);

        return {
          mainText,
          smallText,
          canvas,
          download
        };
      }
    }).mount('#app');
  </script>
</body>
</html>
3回目
次はメインテキストを複数行入力できるようにしましょう。
中央の大きい文字は、<textarea>にして複数行を入力できるようにしてください。
<!DOCTYPE html>
<html lang="ja">
<head>
  <meta charset="UTF-8" />
  <title>聖書風看板メーカー</title>
  <style>
  (中略)
  </style>
</head>
<body>
  <div id="app">
    <div class="controls">
      <label>中央の大きい文字(複数行可):</label>
      <textarea v-model="mainText" rows="4" placeholder="例: キリストの\n再臨は近い。"></textarea>

      <label>右下の小さい文字:</label>
      <input v-model="smallText" placeholder="例: 聖書" />

      <button @click="download">画像をダウンロード</button>
    </div>

    <canvas ref="canvas" width="640" height="480"></canvas>
  </div>

  <!-- Vue 3 CDN -->
  <script type="module">
    import { createApp, ref, onMounted, watch } from 'https://unpkg.com/vue@3/dist/vue.esm-browser.js';

    createApp({
      setup() {
        const mainText = ref('キリストの\n再臨は近い。');
        const smallText = ref('聖書');
        const canvas = ref(null);
        const canvasWidth = 640;
        const canvasHeight = 480;
        const fontLoaded = ref(false);

        const loadFont = async () => {
          const font = new FontFace('CustomFont', 'url(./fonts/YourFont.ttf)');
          await font.load();
          document.fonts.add(font);
          fontLoaded.value = true;
          renderCanvas();
        };

        const renderCanvas = () => {
          if (!fontLoaded.value) return;

          const ctx = canvas.value.getContext('2d');

          // 背景
          ctx.fillStyle = '#000000';
          ctx.fillRect(0, 0, canvasWidth, canvasHeight);

          // メインテキスト(複数行対応)
          const lines = mainText.value.split('\n');
          const lineHeight = 40;
          const startY = (canvasHeight / 2) - ((lines.length - 1) * lineHeight / 2);

          ctx.font = 'bold 32px CustomFont';
          ctx.fillStyle = '#FFFFFF';
          ctx.textAlign = 'center';

          lines.forEach((line, i) => {
            ctx.fillText(line, canvasWidth / 2, startY + i * lineHeight);
          });

          // 小さいテキスト
          ctx.font = '20px CustomFont';
          ctx.fillStyle = '#FFD700';
          ctx.textAlign = 'right';
          ctx.fillText(smallText.value, canvasWidth - 20, canvasHeight - 30);
        };

        const download = () => {
          const link = document.createElement('a');
          link.download = 'bible_sign.png';
          link.href = canvas.value.toDataURL('image/png');
          link.click();
        };

        onMounted(loadFont);
        watch([mainText, smallText], renderCanvas);

        return {
          mainText,
          smallText,
          canvas,
          download
        };
      }
    }).mount('#app');
  </script>
</body>
</html>
ちゃんと複数行入力できるようになりました。これで8割くらいはもうできています。
4回目
あと一つ難しいのは、看板の文字の色を部分的に変えることです。「キリスト」の文字だけ黄色くしたいのです。
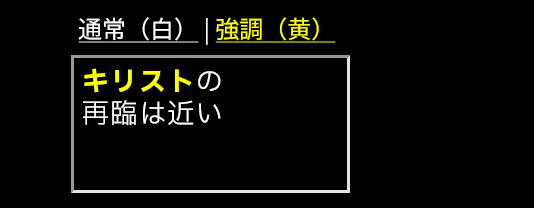
現在動いているUIのスクショを添付し、似たUIを作ってもらいます。全部スクラッチで作ったと言いたいところですが、ここだけ既存の成果物を利用しています。
中央の大きい文字に書いた内容を、部分的に黄色に変えられるようにしてください。画像のようなイメージで、選択範囲のテキストの色を黄色に変える機能と、白に戻す機能をつけてください。それ以外の太字・斜体・下線などの修飾を付ける機能は必要ありません。
適当なWYSIWIGエディタのJavaScriptライブラリを使って構いません。
このプロンプトを書いた時点では、色変更できるUIを作るためにWYSIWYGエディタのライブラリを使うことを想定したのですが、実際には contenteditable な div として作られました。確かに、今どき複雑な編集操作が不要ならそれでいいですよね。
ただ、色変更を押すと正常に色が変わらず、プレビュー画像の表示が乱れてしまう問題が起こりましたので、修正してもらいます。(そのため4回目の出力結果は省略)
5回目
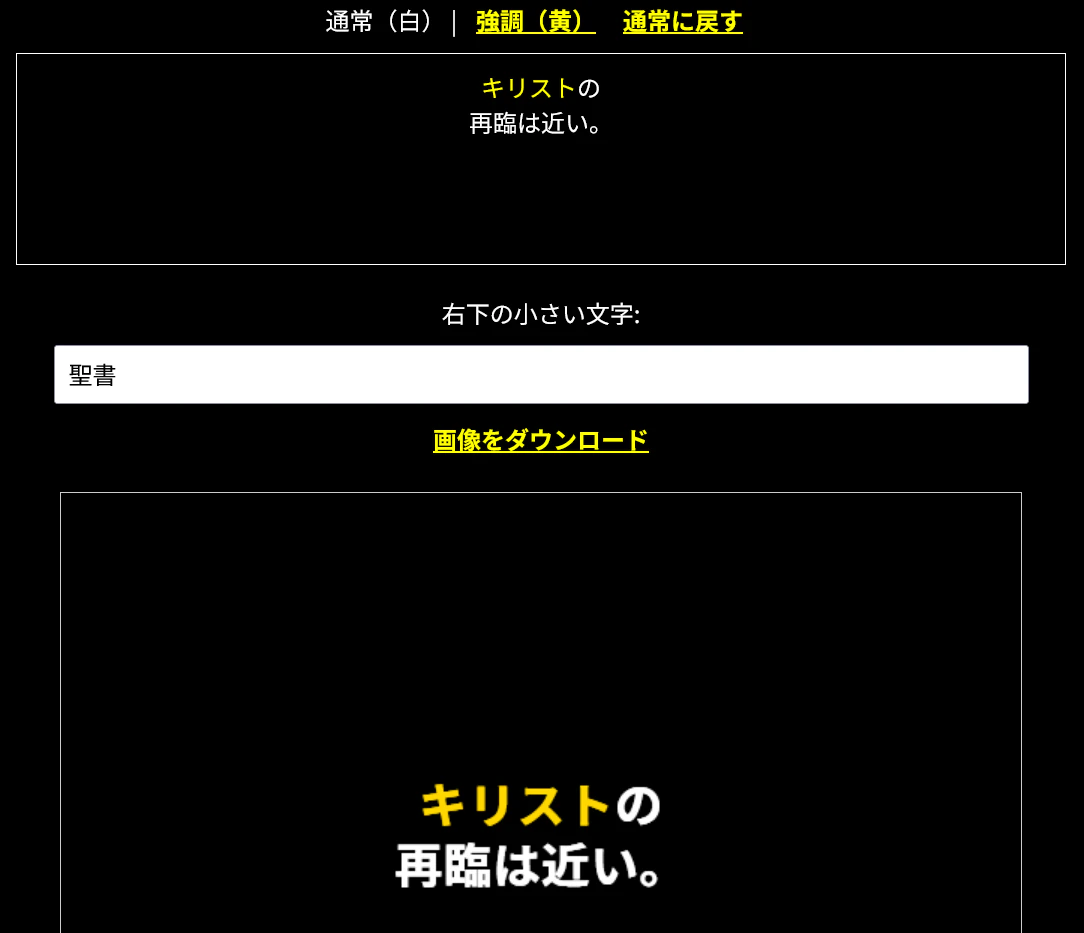
テキストエリアは正しく色が変更されていますが、プレビュー画像の表示が乱れています。プレビュー画像も、テキストエリアで設定した通りに文字色が変わるようにしてください。
すると以下のようなコードになりました。実際には4回目のコードからの差分が出力されましたので、こちらでマージしたものを以下に貼ります。1箇所だけバグがあったので自分で直しています。(コードのコメント参照)
<!DOCTYPE html>
<html lang="ja">
<head>
  <meta charset="UTF-8" />
  <title>聖書風看板メーカー(色強調対応)</title>
  <style>
  (中略)
  </style>
</head>
<body>
  <div id="app">
    <div class="toolbar">
      <span style="color: white;">通常(白)</span> |
      <button @click="applyColor('yellow')">強調(黄)</button>
      <button @click="applyColor('white')">通常に戻す</button>
    </div>

    <div
      class="editor"
      contenteditable="true"
      ref="editor"
      @input="updateHtml"
    ></div>

    <label>右下の小さい文字:</label>
    <input v-model="smallText" placeholder="例: 聖書" />

    <button @click="download">画像をダウンロード</button>

    <br><br>
    <canvas ref="canvas" width="640" height="480"></canvas>
  </div>

  <script type="module">
    import { createApp, ref, onMounted, watch } from 'https://unpkg.com/vue@3/dist/vue.esm-browser.js';

    createApp({
      setup() {
        const editor = ref(null);
        const htmlContent = ref('');
        const smallText = ref('聖書');
        const canvas = ref(null);
        const canvasWidth = 640;
        const canvasHeight = 480;
        const fontLoaded = ref(false);

        const applyColor = (color) => {
          document.execCommand('styleWithCSS', false, true);
          document.execCommand('foreColor', false, color);
        };

        const updateHtml = () => {
          htmlContent.value = editor.value.innerHTML;
          renderCanvas();
        };

        const loadFont = async () => {
          const font = new FontFace('CustomFont', 'url(./fonts/YourFont.ttf)');
          await font.load();
          document.fonts.add(font);
          fontLoaded.value = true;
          renderCanvas();
        };

        const parseStyledText = () => {
          const lines = [];
          let currentLine = [];

          const addSegment = (text, color = 'white') => {
            const linesInText = text.split('\n');
            linesInText.forEach((lineText, i) => {
              if (i > 0) {
                lines.push(currentLine);
                currentLine = [];
              }
              currentLine.push({ text: lineText, color });
            });
          };

          const walk = (node, inheritedColor = 'white') => {
            if (node.nodeType === 3) {
              addSegment(node.textContent, inheritedColor);
            } else if (node.nodeType === 1) {
              const color = node.style.color || inheritedColor;
              for (let child of node.childNodes) {
                walk(child, color);
              }
              if (node.tagName === 'DIV' || node.tagName === 'P' || node.tagName === 'BR') {
                lines.push(currentLine);
                currentLine = [];
              }
            }
          };

          for (let child of editor.value.childNodes) {
            walk(child);
          }
          if (currentLine.length) lines.push(currentLine);
          return lines;
        };

        const renderCanvas = () => {
          if (!fontLoaded.value) return;
          const ctx = canvas.value.getContext('2d');
          ctx.clearRect(0, 0, canvasWidth, canvasHeight);
          ctx.fillStyle = '#000';
          ctx.fillRect(0, 0, canvasWidth, canvasHeight);

          const lines = parseStyledText();
          const lineHeight = 40;
          const startY = (canvasHeight / 2) - ((lines.length - 1) * lineHeight / 2);

          ctx.font = 'bold 32px CustomFont';
          ctx.textAlign = 'left';

          lines.forEach((segments, i) => {
            // 中央寄せ:全体幅を測ってから左端を決める
            let totalWidth = 0;
            segments.forEach(seg => {
              ctx.font = 'bold 32px CustomFont';
              totalWidth += ctx.measureText(seg.text).width;
            });
            let x = (canvasWidth - totalWidth) / 2;

            segments.forEach(seg => {
              //ctx.fillStyle = seg.color === 'yellow' ? '#FFD700' : '#FFFFFF'; // この行だけ生成結果から修正した
              ctx.fillStyle = seg.color !== 'white' ? '#FFD700' : '#FFFFFF';
              ctx.fillText(seg.text, x, startY + i * lineHeight);
              x += ctx.measureText(seg.text).width;
            });
          });

          // 小さいテキスト
          ctx.font = '20px CustomFont';
          ctx.fillStyle = '#FFD700';
          ctx.textAlign = 'right';
          ctx.fillText(smallText.value, canvasWidth - 20, canvasHeight - 30);
        };

        const download = () => {
          const link = document.createElement('a');
          link.download = 'bible_sign.png';
          link.href = canvas.value.toDataURL('image/png');
          link.click();
        };

        onMounted(() => {
          loadFont();
          updateHtml();
        });

        watch(smallText, renderCanvas);

        return {
          editor,
          smallText,
          applyColor,
          download,
          updateHtml,
          canvas
        };
      }
    }).mount('#app');
  </script>
</body>
</html>
ということで、チャット5往復で欲しい機能が全部揃いました。ここまでで作り始めてからわずか1時間です。
仕上げ
あとはフォントサイズやレイアウト調整など色々ありますが、それはもうHTMLやCSSを自分で編集したほうが早いので、ChatGPTの出番はここまで。
最終的にできたのが、冒頭にご紹介したジェネレータv3です。
なお、applyColor の中で document.execCommand() という非推奨メソッドを使っていますが、これを置き換える機能はないようで、いったん放置しています。代替案をChatGPTで作ってもらいましたが、バグがあり、細かく確認する必要がありそうなので、またの機会に。
まとめ
- 画像ジェネレータは1時間で作れる!(UIの調整を除く)
- 完成イメージを添付するとスムーズ(ペイントで適当に描いたラフイメージでも良い)
- 使いたい技術が決まっていた方がスムーズに作れる(かもしれない)
- 不完全なコードができても慌てない
- みんなもChatGPTで好きな画像ジェネレータやWebアプリを錬成してみよう!