はじめに
WinRT (Windowsランタイム) API は Windows 8 以降で実装されている新しいAPIです。
モダンUIになっていて、Win32APIでサポートされていなかった様々な機能が使えるようにもなっています。
↓UIに関していえば、メッセージボックス一つとってもこの違い。(上: WinRT, 下: Win32APIベース (MessageBox.Show()))

しかし、WinRTはUWP (Universal Windows Platform) 向け(いわゆるストアアプリ用)な節があるものの、実際にはUWPだと実装しにくい機能も多く、普通のWindowsデスクトップアプリ (WPFなど) からWinRTの機能を「つまみ食い」したいこともあると思います。
C++/WinRTを介して呼び出せる
C++/WinRTでライブラリを作成し、それをC#側から参照することによってWinRT APIの機能を使うことができます。
普通のデスクトップアプリとしてビルドできるので(もちろんWindowsのバージョンが古いと実行できませんが)、Windowsの設定(サイドローディングとか)を変えないと開発できないとか、スタートメニューからしか起動できないといった悩みから解放されます。
[C#] C++/WinRTのブリッジを作ってC#から呼び出す方法 - Qiita
以下のMicrosoftの公式サンプルもこの方法です。
microsoft/RegFree_WinRT: Sample Code showing use of Registration-free WinRT to access a 3rd party native WinRT Component from a non-packaged Desktop app
でももっとお手軽に
とはいえ、ちょっとつまみ食いだけの割には少々ハードルが高いのも事実です。
というわけで、この記事ではもっと手軽にWinRTの機能を呼び出す方法をまとめてみます。
検証環境
- Windows 10 Home 1903
- Visual Studio Community 2019
事前準備
C#の WPF App (.NET Core) プロジェクトを作成しておきます。
NuGetパッケージマネージャーから、Microsoft.Windows.SDK.Contracts を追加します。このときターゲットにするWindowsのバージョン (1903とか) に合わせてパッケージのバージョンを指定します。1
今回は1903をターゲットにするために 10.0.18362.2005 を選びました。
プロジェクトのプロパティ「対象のフレームワーク」はデフォルトの .NET Core 3.1 のままにしました。
WPF アプリ (.NET Framework) を選んで .NET Framework (4.5以上) をターゲットにすることも可能ですが、その場合はさらに
C:\Program Files (x86)\Windows Kits\10\UnionMetadata\10.0.18362.0\Facade\windows.winmdC:\Program Files (x86)\Windows Kits\10\References\10.0.18362.0\Windows.Foundation.UniversalApiContract\8.0.0.0\Windows.Foundation.UniversalApiContract.winmdC:\Program Files (x86)\Windows Kits\10\References\10.0.18362.0\Windows.Foundation.FoundationContract\3.0.0.0\Windows.Foundation.FoundationContract.winmd
への参照を手動で追加する必要がありました。2
コーディング
Microsoft.Windows.SDK.Contracts パッケージを追加しておくと、UWPアプリと同様、Windows 名前空間の下にあるWinRTの機能にアクセスできるようになります。
例えば、こんな感じで MessageDialog クラスにアクセスできるようになります。
using System;
using System.Windows;
using Windows.UI.Popups;

namespace WpfApp1
{
    /// <summary>
    /// Interaction logic for MainWindow.xaml
    /// </summary>
    public partial class MainWindow : Window
    {
        public MainWindow()
        {
            InitializeComponent();
        }

        private async void Button_Click(object sender, RoutedEventArgs e)
        {
            var dlg = new MessageDialog("Hello World!");
            await dlg.ShowAsync();
        }
    }
}
ただし、このプログラムはビルドはできますが、実行してみると例外が発生してしまいます。
System.Exception: 'ウィンドウ ハンドルが無効です。

CoreWindow を使用してこの API をスレッドから呼び出すか、ウィンドウを明示的に設定しておく必要があります。'
この問題を解決するためには、作成した MessageDialog のインスタンスについて、事前に IInitializeWithWindow インタフェースにキャストした上で Initialize() メソッドを呼び出しておきます。このとき、親ウィンドウのハンドルを取得して指定する必要があります。3
ウィンドウハンドルは Process.GetCurrentProcess().MainWindowHandle で取得しているサンプルが多いようですが、メインウィンドウではなく特定のウィンドウを指定したいこともあると思うので、応用が利くように以下では new WindowInteropHelper(this).Handle を使って取得しています。4
Windowsフォーム (WinForms) ベースで開発している方は this.Handle でウィンドウハンドルが取れます。
IInitializeWithWindow の定義はおまじない。5
using System;
using System.Runtime.InteropServices;
using System.Windows;
using System.Windows.Interop;
using Windows.UI.Popups;

namespace WpfApp1
{
    [ComImport]
    [Guid("3E68D4BD-7135-4D10-8018-9FB6D9F33FA1")]
    [InterfaceType(ComInterfaceType.InterfaceIsIUnknown)]
    public interface IInitializeWithWindow
    {
        void Initialize(IntPtr hwnd);
    }

    /// <summary>
    /// Interaction logic for MainWindow.xaml
    /// </summary>
    public partial class MainWindow : Window
    {
        public MainWindow()
        {
            InitializeComponent();
        }

        private async void Button_Click(object sender, RoutedEventArgs e)
        {
            var dlg = new MessageDialog("Hello World!");
            ((IInitializeWithWindow)(object)dlg).Initialize(new WindowInteropHelper(this).Handle);
            await dlg.ShowAsync();
        }
    }
}
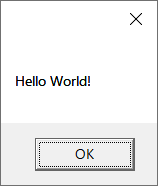
昔ながらのUIではなく、Windows 10風のUIでメッセージが表示されたでしょうか。
普通のデスクトップアプリなので、ビルドしたexeから直接起動できます。他のマシンへの配布も簡単です。(配布先のマシンへの .NET Core のインストールは必要ですが)
UIに関係しないAPI
何も考えずにUWPと同じように呼び出せます。
例えば、Windows.Data.Json クラスを使ってJSON文字列を解析できます。6
var obj = Windows.Data.Json.JsonObject.Parse("{\"a\": 1, \"b\": 2}");
System.Diagnostics.Debug.WriteLine(obj["a"].GetNumber());
クリップボードが更新されたときに、コピーされた内容を使って何らかの処理を実行する例。7
Windows.ApplicationModel.DataTransfer.Clipboard.ContentChanged += async (object? sender, object e) =>
{
    Windows.ApplicationModel.DataTransfer.DataPackageView content = Windows.ApplicationModel.DataTransfer.Clipboard.GetContent();
    if (content.Contains(Windows.ApplicationModel.DataTransfer.StandardDataFormats.Text))
    {
        var text = await content.GetTextAsync();
        System.Diagnostics.Debug.WriteLine(text);
    }
};
日本語の形態素解析(文章を単語に分割して読みをつける)も標準機能でできます。8
var result = Windows.Globalization.JapanesePhoneticAnalyzer.GetWords("本日は晴天なり");
foreach (var word in result)
{
    System.Diagnostics.Debug.WriteLine("{0},{1}", word.DisplayText, word.YomiText);
}
UIが関係するAPI
MessageDialog のようにダイアログを表示するような機能については、作成したインスタンスに対して IInitializeWithWindow::Initialize() を一度呼び出しておく必要があります。あとは同じです。
FileOpenPicker であればこんな感じ。9
var openPicker = new FileOpenPicker();
((IInitializeWithWindow)(object)openPicker).Initialize(new WindowInteropHelper(this).Handle);
openPicker.ViewMode = PickerViewMode.Thumbnail;
openPicker.SuggestedStartLocation = PickerLocationId.PicturesLibrary;
openPicker.FileTypeFilter.Add(".jpg");
StorageFile file = await openPicker.PickSingleFileAsync();
if (file != null)
{
    System.Diagnostics.Debug.WriteLine(file.Path);
}
最後に
.NET 5 以降だともっと手軽に呼び出せるようになっているらしい。
.NET 5 から Windows Runtime API を呼ぶのが凄い楽になってる - Qiita
-
UWPなしでMicrosoft.Windows.SDK.Contractsを使用してC#.netフレームワーク4.7.2からFileOpenPickerを使用すると、「無効なウィンドウハンドル」エラーが発生する] ↩
-
デスクトップ アプリケーションからセカンダリ タイルをピン留めする - UWP applications | Microsoft Docs ↩
-
Using JavaScript Object Notation (JSON) (Windows Runtime app using C++, C#, or Visual Basic) (Windows) | Microsoft Docs ↩
-
FileOpenPicker Class (Windows.Storage.Pickers) - Windows UWP applications | Microsoft Docs ↩