Oracle Cloud Infrastructure Advent Calendar 2024 8日目の続き
- この記事では、OCI Object Storageへコマンド実行履歴を保管し、そのTextデータとOCI 生成AIエージェントを繋げてみるところまでを行います
1. OCI Object Storageへデータ連携
- 8日目の記事「4.fluentで受け取る」では、stdoutへ出力/ファイルへ保存するだけでした
- 要件に応じて、AWSやAzureに備わる各種機能を活用する事ももちろん可能ですが、OCI Object Storageへ保存させます
- fluentからOCI Object Storageへの連携にはflunet-plugin-s3 を使います
1.1 Credential 準備
- OCI Object Storageへデータ連携を行うにあたり必要となります
- データ連携=「外部保管」です
- OCIコンソールで「アイデンティティ」→「ユーザー」→「ユーザーの詳細」
左の「リソース」メニューの「顧客秘密キー」を選択します - 「秘密キーの生成」をクリックし、任意の名称を付けて秘密キーを作成します
- 生成された「秘密キー」と「アクセスキー」をテキストファイルにメモしておく事を忘れないでください
1.2 OCI Object Storage準備
- Bukectを事前に作成しておいてください
- この名称は後述の "s3_bucket" パラメータで指定します
1.3 fluentでOCI Object Storageへ繋げる
- 既存のDocker Imageが既にs3プラグイン入りでBuildされている事が必須です
- 1.1 の「秘密キー」と「アクセスキー」を下記の通り張り付ける
- before ※8日目の記事 の時
<source> @type syslog port 5140 bind 0.0.0.0 tag terminal <parse> message_format rfc3164 with_priority false </parse> </source> <match terminal.local6.*> @type stdout </match>- after
- 内部で @type copy を使う事でfluentがデータを複製して様々なアクションを実現可能にします。fluent素晴らし!
<source> @type syslog port 5140 bind 0.0.0.0 tag terminal <parse> message_format rfc3164 with_priority false </parse> </source> <match terminal.local6.*> @type copy <store> @type stdout </store> <store> @type s3 aws_key_id ”「アクセスキー」” aws_sec_key ”「秘密キー」” s3_bucket aiagent s3_region ap-tokyo-1 s3_endpoint https://<コンパートメント>.compat.objectstorage.<リージョン>.oraclecloud.com check_apikey_on_start false ssl_verify_peer false force_path_style true <buffer> @type file #path /var/log/td-agent/buffer/oci.buffer path /fluentd/log chunk_limit_size 1m queue_limit_length 256 store_as txt # default: gzip (gzip,izo,json,txt) flush_at_shutdown true flush_interval 1s retry_wait 30s retry_max_times 9 </buffer> </store> </match>- docker再起動
[opc@ol8 fluentd]$ docker-compose restart
[+] Restarting 1/1
? Container fluentd-fluentd-1  Started
[opc@ol8 fluentd]$ docker logs -f fluentd-fluentd-1

2024-12-09 07:10:15 +0000 [info]: #0 starting fluentd worker pid=16 ppid=7 worker=0
2024-12-09 07:10:16 +0000 [warn]: #0 restoring buffer file: path =
/fluentd/log/buffer.q628cff0b64392bee6aaa9023c205f261.log
2024-12-09 07:10:16 +0000 [warn]: #0 restoring buffer file: path =
/fluentd/log/buffer.q628d0834ebace3d5e15774265eeb8d13.log
2024-12-09 07:10:16 +0000 [warn]: #0 restoring buffer file: path =
/fluentd/log/buffer.q628d09b1cc79c60c3a5b2ef3c4bcaba3.log
2024-12-09 07:10:16 +0000 [info]: #0 listening syslog socket on 0.0.0.0:5140 with udp
2024-12-09 07:10:16 +0000 [info]: #0 fluentd worker is now running worker=0
1.3 Object Storage確認
- OCIコンソールでも確認可能ですが、aws cliでも確認が可能なので試してみます
1.3.1 aws cli install
- こちらの手順に従う
- セットアップ作業
[opc@ol8-arm64 ~]$ /usr/local/bin/aws configure
AWS Access Key ID [****************2412]: 「アクセスキー」
AWS Secret Access Key [****************9eg=]: 「秘密キー」
Default region name [None]:
Default output format [None]:
1.3.2 aws cli で oci object storageを覗く
- fluent-plugin-s3経由で無事、3つの圧縮ファイルとテキストファイルが1つ確認できました
- OCI 生成AIエージェントのデータソースとする為にテキストファイルが必要になります
[opc@ol8-arm64 ~]$ aws s3 --region ap-tokyo-1 --endpoint-url https://<コンパートメント>.compat.objectstorage.<リージョン名>.oraclecloud.com ls s3://<bucket名>
2024-12-09 07:10:17        300 20241209_0.gz
2024-12-09 07:10:18        198 20241209_1.gz
2024-12-09 07:10:19        650 20241209_2.gz
2024-12-09 07:17:54       6926 20241209_2.txt
2. OCI 生成AIエージェントを繋げてみる
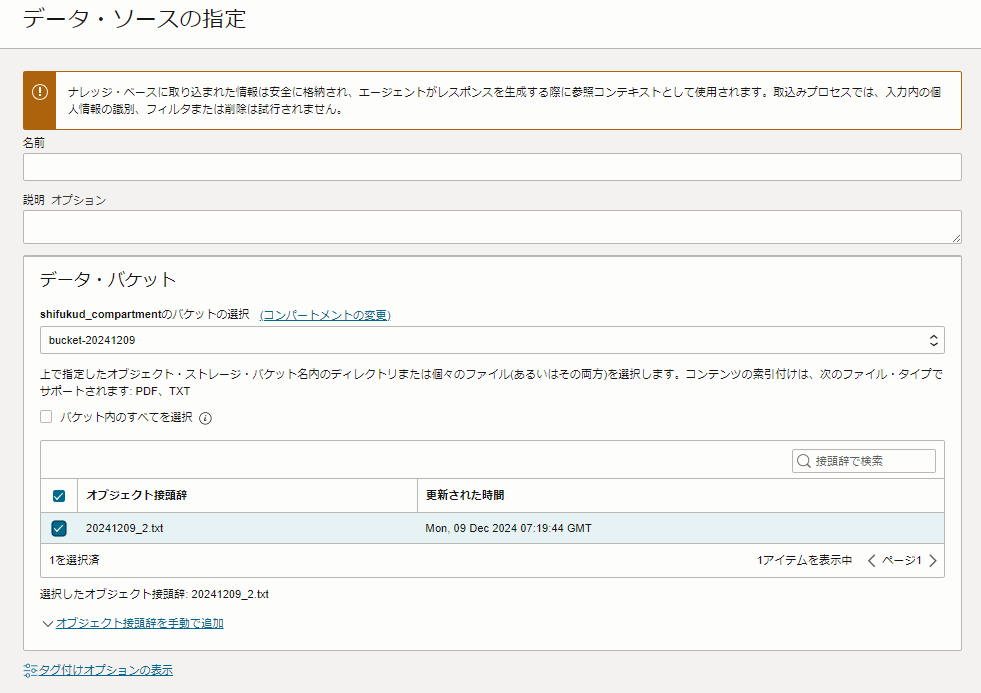
- コマンド実行履歴の外部保管を行う事に加え、OCI生成AIエージェントの「ナレッジベース」として使えるか試してみます
- こちらの記事を参考にしました
2.1 生成Aiエージェント用Textデータの準備
- 諸般の事情により、ap-tokyo-1 では生成AIエージェントが使えない為、Chicagoリージョンに同名のBucketとファイルをアップロードしてください
2.2 生成AIエージェントの作成
2.3 生成AIエージェント・チャット
- こちらに素晴らしい記事👏がありますので割愛させていただきます。
まとめ
- セキュリティ対策として、任意のOSユーザのコマンド実行履歴をリアルタイムに補足、証跡を外部保管したものをOCI 生成AIエージェントを使って活用するアイデアを実現しました
- これにより、OCI生成AIエージェントからチャット形式でコマンド実行履歴を確認する事が可能になります
- 結果として、ログチェックの様な専門的なスキルが不要となり、確認するオペレーションコストも下げられる事が期待できます
以上

