実施の経緯
本家 PyODE 様サイトはこちら
本家チュートリアルには「接触判定」と「床でバウンド」のチュートリアルとして「Tutorial 3」があります。
しかし、落下オブジェクトが多数あったり、3D描画部分のコードが多かったり、OpenGLが必要だったりと
なんか過剰というか、実施しづらいサンプルです。
そこで本記事では最も単純な「Tutorial 1」に接触/床反発を足してみました。
↓ こちらは拙者の関連記事です。
・「Tutorial 1」実施記事
・「Tutorial 3」実施記事
1 概要
本家の「Tutorial 1」は、1個のオブジェクトに初速を与えて自由落下の様子を見るものでした。
[先の記事] (https://qiita.com/emuai/items/75df831c16dbe660df68)では、Matplotlib でプロット表示追加して実施しました。
このときのプログラムに
・オブジェクトに接触判定用形状定義
・床の定義
・接触判定ルーチン
の3つを追加します。
これら追加部分は、前述「本家Tutorial 3」に倣っています。
2 サンプルコード(全部)
定数COLLISION でスイッチするところが追加部分です。
##  pyODE example-1: with MPL-plot
##  Appended ``A floor and collision'' to observe bouncing motion.

import ode

# Create a world object
world = ode.World()
world.setGravity( (0,-9.81,0) )


# Create a body inside the world
body = ode.Body(world)
M = ode.Mass()
rho = 2500.0
r = 0.05
M.setSphere( rho, r)
M.mass = 1.0
body.setMass(M)

body.setPosition( (0,0,0) )
# body.addForce( (0,200,0) )
body.setLinearVel( (0.0,10.0,0.0))


ERP_GLOBAL = 1.0
CFM_GLOBAL = 0.0
COLLISION = True
BOUNCE = 0.5

if COLLISION:
    # Create a space object
    space = ode.Space()
    # Create a plane geom which prevent the objects from falling forever
    floor = ode.GeomPlane( space, (0,1,0), 0. )

    geom = ode.GeomSphere( space, radius=r )
    geom.setBody( body )

    world.setERP( ERP_GLOBAL )   ####    ERP : Error Reduction Parameter
    world.setCFM( CFM_GLOBAL )   ####    CFM : Constraint Force Mixing

    # A joint group for the contact joints that are generated whenever
    # two bodies collide
    contactgroup = ode.JointGroup()

    # Collision callback
    def near_callback(args, geom1, geom2):
        """ Callback function for the collide() method.

        This function checks if the given geoms do collide and
        creates contact joints if they do.
        """

        # Check if the objects do collide
        contacts = ode.collide(geom1, geom2)

        # Create contact joints
        (world, contactgroup) = args

        for c in contacts:

            c.setBounce( BOUNCE ) #0.2)
            c.setMu(5000)

            j = ode.ContactJoint( world, contactgroup, c )
            j.attach( geom1.getBody(), geom2.getBody() )


##  Proceed the simulation...
total_time = 0.0
dt = 0.04

import numpy as np
nt = 100
txyzuvw = np.zeros( (7,nt+1) )
tn=0

END_TIME = 5.0
while total_time <= END_TIME:
    x,y,z = body.getPosition()
    u,v,w = body.getLinearVel()
    print( "%1.2fsec: pos=(%6.3f, %6.3f, %6.3f)  vel=(%6.3f, %6.3f, %6.3f)" % (total_time, x, y, z, u,v,w) )
    if tn <= nt:
        txyzuvw[0][tn]=total_time
        txyzuvw[1][tn]=x
        txyzuvw[2][tn]=y
        txyzuvw[3][tn]=z
        txyzuvw[4][tn]=u
        txyzuvw[5][tn]=v
        txyzuvw[6][tn]=w

    if COLLISION:
        # Detect collisions and create contact joints
        space.collide( (world,contactgroup), near_callback )

    world.step(dt)
    total_time+=dt

    if COLLISION:
        # Remove all contact joints
        contactgroup.empty()

    tn += 1

end_tn = tn

import matplotlib.pyplot as plt
# MPL-Plot
plt.plot( txyzuvw[0][0:end_tn], txyzuvw[2][0:end_tn], label='Vertical position')
plt.plot( txyzuvw[0][0:end_tn], txyzuvw[5][0:end_tn], label='Vertical velocity')
plt.xlabel('time [s]')
plt.ylabel('Vertical position [m]')
plt.legend()

xmin = np.min( txyzuvw[0] )
xmax = np.max( txyzuvw[0] )

plt.hlines( [0], xmin, xmax, "blue", linestyles='dashed')     # hlines

savepath = './y_ERP%g_CFM%g_BR%g.png'%(ERP_GLOBAL, CFM_GLOBAL, BOUNCE)
plt.savefig( savepath )
print('An image-file exported : [%s]'%savepath )

# plt.show()
plt.pause(1.0)
↑ 20200506: スタートの位置記録できてなかったの修正
BOUNCE = 0.5 が反発係数です。
3 プログラム実行と結果
(あらかじめnumpyとmatplotlibをインストールしてください。)
実行すると......

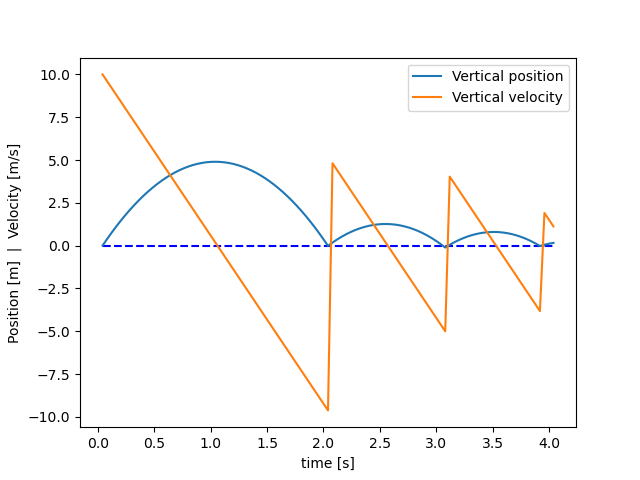
↑ このグラフ画像(PNG)がカレントに保存されます。
垂直方向(Y座標)に投じられた物体の高さと速度の時間変化です。
接触判定に使われる物体直径値は0.1mです。(もっと小さくてもよかった。)
落ちてきたオブジェクトは -10.0[m/s] で床に衝突し+5.0 [m/s] で反発しているから
1回目のバウンドは係数どおりの挙動です。
2回目のバウンドはかなりずれている。
これはdtの値によっても変わってきますし、ERP、CFMによっても変わるはず。
    world.setERP( ERP_GLOBAL )   ####    ERP : Error Reduction Parameter
    world.setCFM( CFM_GLOBAL )   ####    CFM : Constraint Force Mixing
↑この部分でセットする2つの値は、もっと高度な計算の際は検討が必要。
今回の値1.0 と 0.0 は弾性衝突の場合の理想的な値です。
おそらく疑似的に柔らかい物性にするとか、計算コストの都合とかで調整する
(ものだと筆者はみている、まだ厳密には把握してない汗)