初めてWatson IoT Platformを使ってみよう、というかたのためのガイドです。
Watson IoT Platformを使ってみるでIoTアプリを使ってみました。
- Node-REDでシンプルなウェブサイトを作ってみる でNode-REDを使ってシンプルなウェブサイトを作ってみます。
- Node-REDでシンプルなウェブサイト - 1.シンプルなhtmlを送ってみる / 2. 色を付けてみるでシンプルなhtml画面を表示し、色をつけてみました。
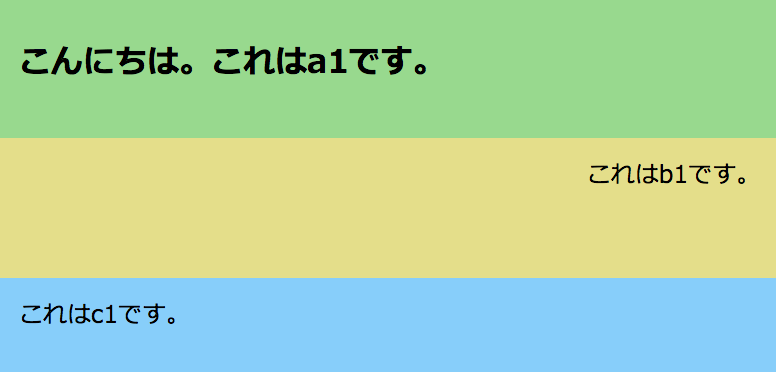
3.1. 画面を複数のdivに分割して使ってみます
-
Node-RED - フローをコピーする方法を参照し、下記のフローをコピペします。

[{"id":"88123141.6c60e","type":"template","z":"75eef29b.360a7c","name":"test14.html","field":"payload","fieldType":"msg","format":"handlebars","syntax":"mustache","template":"<html>\n <head>\n <style type=\"text/css\">\n {{{payload.css}}}\n </style>\n </head>\n <body style=\"background-color: #EAE5E3\">\n <div id='basic'>\n <div id='a1'>\n <h1>\n こんにちは。これはa1です。\n </h1>\n </div>\n <div id='b1'>\n これはb1です。\n </div>\n <div id='c1'>\n これはc1です。\n </div>\n </div>\n </body>\n</html>","x":470,"y":380,"wires":[["37d5c968.f7c61e"]]},{"id":"59cb5e42.620ad","type":"template","z":"75eef29b.360a7c","name":"css","field":"payload.css","fieldType":"msg","format":"handlebars","syntax":"mustache","template":"#basic {\n font-family: meiryo;\n}\n#a1 {\n background-color: #98d98e;\n padding: 20px;\n height: 100px;\n}\n#b1 {\n background-color: #e4de8a;\n padding: 20px;\n height: 100px;\n text-align: center;\n font-size: 18pt\n}\n#c1 {\n background-color: lightskyblue;\n padding: 20px;\n height: 100px;\n text-align: left;\n font-size: 18pt\n}\n","x":310,"y":380,"wires":[["88123141.6c60e"]]},{"id":"6edaaee3.af5ed","type":"http in","z":"75eef29b.360a7c","name":"","url":"/test14","method":"get","swaggerDoc":"","x":130,"y":380,"wires":[["59cb5e42.620ad"]]},{"id":"37d5c968.f7c61e","type":"http response","z":"75eef29b.360a7c","name":"","x":630,"y":380,"wires":[]},{"id":"b7f03bb4.58aeb8","type":"comment","z":"75eef29b.360a7c","name":"複数divを設定してみました","info":"","x":180,"y":340,"wires":[]}]
-
ブラウザで
アプリ名/test14へアクセスし画面を確認します。
-
Node-REDで
cssと書かれたテンプレートノード(オレンジ色)を開き、スタイルシートの内容を確認します。
test14.css
# basic {
  font-family: meiryo;
}
# a1 {
  background-color:  #98d98e;
  padding: 20px;
  height: 100px;
}
# b1 {
  background-color:  #e4de8a;
  padding: 20px;
  height: 100px;
  text-align: center;
  font-size: 18pt
}
# c1 {
  background-color:  lightskyblue;
  padding: 20px;
  height: 100px;
  text-align: left;
  font-size: 18pt
}
- Node-REDで
test14.htmlと書かれたテンプレートノード(オレンジ色)を開き、htmlの内容を確認します。
test14.html
<html>
    <head>
        <style type="text/css">
            {{{payload.css}}}
        </style>
    </head>
    <body style="background-color: #EAE5E3">
        <div id='basic'>
            <div id='a1'>
                <h1>
                    こんにちは。これはa1です。
                </h1>
            </div>
            <div id='b1'>
                これはb1です。
            </div>
            <div id='c1'>
                これはc1です。
            </div>
        </div>
    </body>
</html>
- div毎に色やフォント、文字の配置などを設定可能なことを確認します。
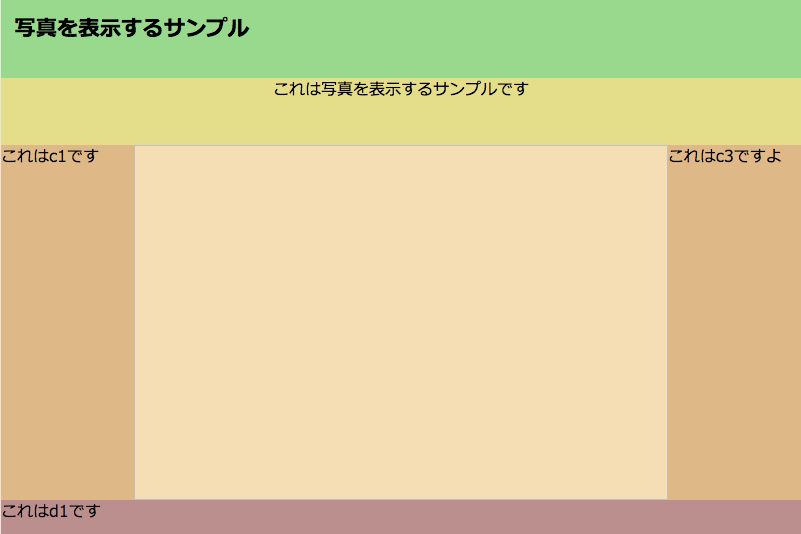
3.2.画面を横方向に分割する
- 下記はこのあとの写真を貼ってみるで使っているフローです。
画面を横方向に分割
[{"id":"4b8318b1.5544b8","type":"http in","z":"2302eb53.652cc4","name":"","url":"/test24","method":"get","swaggerDoc":"","x":90,"y":100,"wires":[["2d4b4493.1fe804"]]},{"id":"d9360f6e.c3bd2","type":"http response","z":"2302eb53.652cc4","name":"","x":710,"y":100,"wires":[]},{"id":"a5558d53.b42448","type":"comment","z":"2302eb53.652cc4","name":"写真を掲出します","info":"","x":110,"y":60,"wires":[]},{"id":"72030a24.31f77c","type":"template","z":"2302eb53.652cc4","name":"image","field":"payload.image","fieldType":"msg","format":"handlebars","syntax":"mustache","template":"","x":390,"y":100,"wires":[["581c5a16.d8a26c"]]},{"id":"581c5a16.d8a26c","type":"template","z":"2302eb53.652cc4","name":"test24.html","field":"payload","fieldType":"msg","format":"handlebars","syntax":"mustache","template":"<html>\n <head>\n <style type=\"text/css\">\n {{{payload.css}}}\n </style>\n </head>\n <body style=\"background-color: #EAE5E3; \">\n <div id='basic'>\n <div id='a1'><h1>写真を表示するサンプル</h1></div>\n <div id='b1'>これは写真を表示するサンプルです</div>\n <div id='c1'>これはc1です</div>\n <div id='c2'>\n <img src=\"{{{payload.image}}}\" style=\"width:100%;height:auto;\" />\n </div>\n <div id='c3'>これはc3ですよ</div>\n <div id='d1'>これはd1です</div>\n </div>\n </body>\n</html>\n","x":550,"y":100,"wires":[["d9360f6e.c3bd2"]]},{"id":"2d4b4493.1fe804","type":"template","z":"2302eb53.652cc4","name":"css","field":"payload.css","fieldType":"msg","format":"handlebars","syntax":"mustache","template":"#basic {\n font-family: meiryo;\n width: 1200px;\n position: absolute;\n top: 0;\n left: 0;\n right: 0;\n bottom: 0;\n margin: auto;\n}\n#a1 {\n background-color: #98d98e;\n height: 100px;\n padding: 20px;\n}\n#b1 {\n background-color: #e4de8a;\n height: 100px;\n text-align: center;\n font-size: 18pt;\n}\n#c1 {\n float: left;\n background-color: burlywood;\n height: 533px;\n width: 200px;\n text-align: left;\n font-size: 18pt;\n}\n#c2 {\n float: left;\n background-color: wheat;\n height: 533px;\n width: 800px;\n}\n#c3 {\n float: right;\n background-color: burlywood;\n height: 533px;\n width: 200px;\n font-size: 18pt;\n}\n#d1 {\n clear: both;\n background-color: rosybrown;\n height: 100px;\n text-align: left;\n font-size: 18pt;\n}\n","x":250,"y":100,"wires":[["72030a24.31f77c"]]}]
- 画面を横方向に分割しています。
test24.css
# basic {
    font-family: meiryo;
    width: 1200px;
    position: absolute;
    top: 0;
    left: 0;
    right: 0;
    bottom: 0;
    margin: auto;
}
# a1 {
    background-color:  #98d98e;
    height: 100px;
    padding: 20px;
}
# b1 {
    background-color:  #e4de8a;
    height: 100px;
    text-align: center;
    font-size: 18pt;
}
# c1 {
    float: left;
    background-color:  burlywood;
    height: 533px;
    width: 200px;
    text-align: left;
    font-size: 18pt;
}
# c2 {
    float: left;
    background-color:  wheat;
    height: 533px;
    width: 800px;
}
# c3 {
    float: right;
    background-color:  burlywood;
    height: 533px;
    width: 200px;
    font-size: 18pt;
}
# d1 {
    clear: both;
    background-color:  rosybrown;
    height: 100px;
    text-align: left;
    font-size: 18pt;
}
-
float: leftで画面左側に寄せます -
clear: bothでfloat設定を解除します
つぎは、、、
Node-REDでシンプルなウェブサイト - 4. 文字列を送受信してみるでウェブサイトへ文字列を送受信してみます。