準備
Terraform インストールしてリソース グループ作成するまで - Qiita の続き
本題
ファイルを用意
main.tf
resource "random_pet" "rg_name" {
  prefix = var.resource_group_name_prefix
}

resource "azurerm_resource_group" "rg" {
  location = var.resource_group_location
  name     = random_pet.rg_name.id
}

# Create virtual network
resource "azurerm_virtual_network" "my_terraform_network" {
  name                = "myVnet"
  address_space       = ["10.0.0.0/16"]
  location            = azurerm_resource_group.rg.location
  resource_group_name = azurerm_resource_group.rg.name
}

# Create subnet
resource "azurerm_subnet" "my_terraform_subnet" {
  name                 = "mySubnet"
  resource_group_name  = azurerm_resource_group.rg.name
  virtual_network_name = azurerm_virtual_network.my_terraform_network.name
  address_prefixes     = ["10.0.1.0/24"]
}

# Create public IPs
resource "azurerm_public_ip" "my_terraform_public_ip" {
  name                = "myPublicIP"
  location            = azurerm_resource_group.rg.location
  resource_group_name = azurerm_resource_group.rg.name
  allocation_method   = "Dynamic"
}

# Create Network Security Group and rule
resource "azurerm_network_security_group" "my_terraform_nsg" {
  name                = "myNetworkSecurityGroup"
  location            = azurerm_resource_group.rg.location
  resource_group_name = azurerm_resource_group.rg.name

  security_rule {
    name                       = "SSH"
    priority                   = 1001
    direction                  = "Inbound"
    access                     = "Allow"
    protocol                   = "Tcp"
    source_port_range          = "*"
    destination_port_range     = "22"
    source_address_prefix      = "*"
    destination_address_prefix = "*"
  }
}

# Create network interface
resource "azurerm_network_interface" "my_terraform_nic" {
  name                = "myNIC"
  location            = azurerm_resource_group.rg.location
  resource_group_name = azurerm_resource_group.rg.name

  ip_configuration {
    name                          = "my_nic_configuration"
    subnet_id                     = azurerm_subnet.my_terraform_subnet.id
    private_ip_address_allocation = "Dynamic"
    public_ip_address_id          = azurerm_public_ip.my_terraform_public_ip.id
  }
}

# Connect the security group to the network interface
resource "azurerm_network_interface_security_group_association" "example" {
  network_interface_id      = azurerm_network_interface.my_terraform_nic.id
  network_security_group_id = azurerm_network_security_group.my_terraform_nsg.id
}

# Generate random text for a unique storage account name
resource "random_id" "random_id" {
  keepers = {
    # Generate a new ID only when a new resource group is defined
    resource_group = azurerm_resource_group.rg.name
  }

  byte_length = 8
}

# Create storage account for boot diagnostics
resource "azurerm_storage_account" "my_storage_account" {
  name                     = "diag${random_id.random_id.hex}"
  location                 = azurerm_resource_group.rg.location
  resource_group_name      = azurerm_resource_group.rg.name
  account_tier             = "Standard"
  account_replication_type = "LRS"
}

# Create SSH Key
resource "tls_private_key" "myazssh" {
  algorithm = "RSA"
  rsa_bits = 4096
}
output "tls_private_key" {
    value = tls_private_key.myazssh.private_key_pem
    sensitive = true
}

# Create virtual machine
resource "azurerm_linux_virtual_machine" "my_terraform_vm" {
  name                  = "myVM"
  location              = azurerm_resource_group.rg.location
  resource_group_name   = azurerm_resource_group.rg.name
  network_interface_ids = [azurerm_network_interface.my_terraform_nic.id]
  size                  = "Standard_DS1_v2"

  os_disk {
    name                 = "myOsDisk"
    caching              = "ReadWrite"
    storage_account_type = "Premium_LRS"
  }

  source_image_reference {
    publisher = "Canonical"
    offer     = "0001-com-ubuntu-server-jammy"
    sku       = "22_04-lts-gen2"
    version   = "latest"
  }

  computer_name  = "hostname"
  admin_username = var.username

  admin_ssh_key {
    username   = var.username
    public_key     = tls_private_key.myazssh.public_key_openssh
  }

  boot_diagnostics {
    storage_account_uri = azurerm_storage_account.my_storage_account.primary_blob_endpoint
  }
}
outputs.tf
output "resource_group_name" {
  value = azurerm_resource_group.rg.name
}

output "public_ip_address" {
  value = azurerm_linux_virtual_machine.my_terraform_vm.public_ip_address
}
provider.tf
terraform {
  required_version = ">=0.12"

  required_providers {
    azapi = {
      source  = "azure/azapi"
      version = "~>1.5"
    }
    azurerm = {
      source  = "hashicorp/azurerm"
      version = "~>2.0"
    }
    random = {
      source  = "hashicorp/random"
      version = "~>3.0"
    }
  }
}

provider "azurerm" {
  features {}
}
variables.tf
variable "resource_group_location" {
  type        = string
  default     = "eastus"
  description = "Location of the resource group."
}

variable "resource_group_name_prefix" {
  type        = string
  default     = "rg"
  description = "Prefix of the resource group name that's combined with a random ID so name is unique in your Azure subscription."
}

variable "username" {
  type        = string
  description = "The username for the local account that will be created on the new VM."
  default     = "azureadmin"
}
作成
クイック スタート: Terraform を使用して Linux VM を作成する - Azure Virtual Machines | Microsoft Learn
terraform init -upgrade
terraform plan -out main.tfplan
terraform apply main.tfplan
terraform output -raw tls_private_key > id_rsa
terraform output public_ip_address
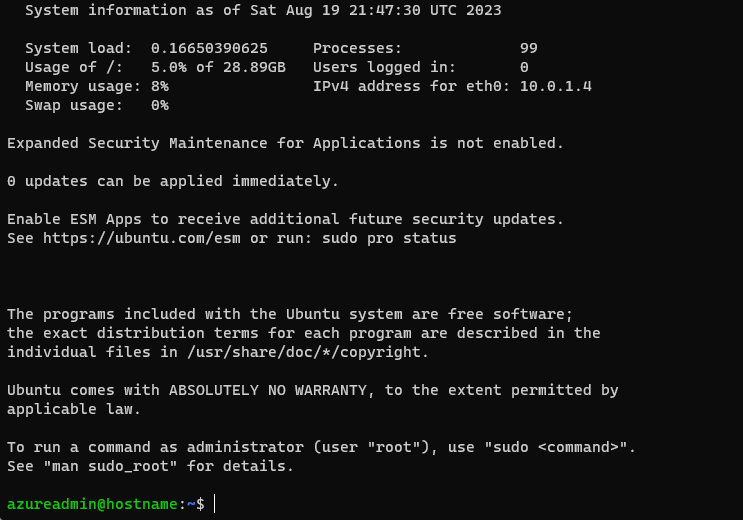
ssh -i id_rsa azureadmin@<public_ip_address>
完成
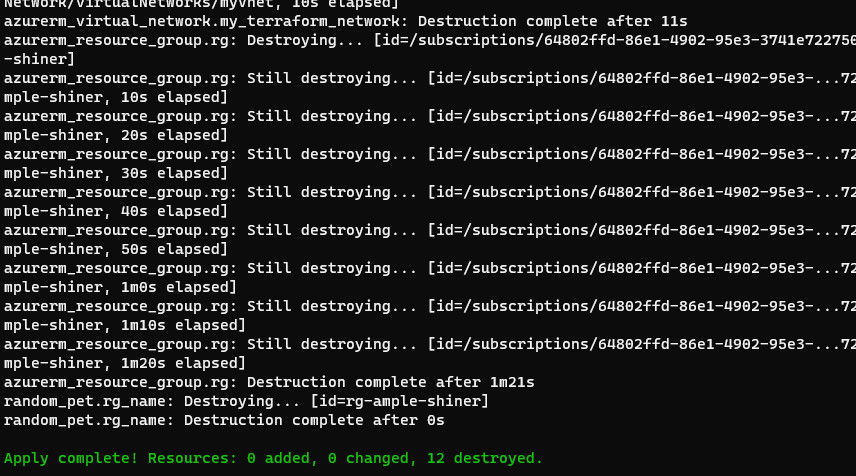
後片付け
terraform plan -destroy -out main.destroy.tfplan
terraform apply main.destroy.tfplan
以上です~