いやーーー今週はエラーに悩まされました![]()
まだ解決してませんが
おそらく個人的なエラーと認識できたので投稿します!
Flutter関連の投稿です。
備忘録として使用する予定ですが
皆さんの解決策にもなれば幸いです。
今回からはFirebaseの投稿になります。
今回はFlutterアプリにFirebaseを追加します!
またページ内リンクや注釈を加えましたので
以前より説明が分かりやすく
ページ内遷移も楽になったと思います。
目次
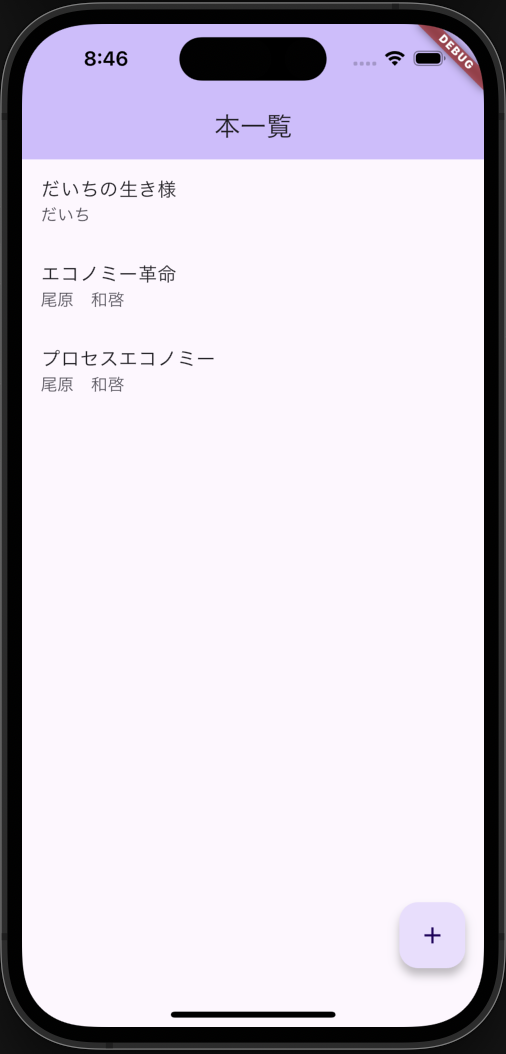
-完成イメージ
-1.構成
-2.FlutterアプリにFirebaseを追加①_main.dartの整理
-3.FlutterアプリにFirebaseを追加②_ターミナルからFirebaseへログイン・FlutterFireCLIのインストール
-4.FlutterアプリにFirebaseを追加③_Firebase上にプロジェクトを作成・プロジェクトの連携
-5.FlutterアプリにFirebaseを追加④_プロジェクト連携後の追加処理
-6.FlutterアプリにFirebaseを追加⑤_FireStoreのインストール
-7.FlutterアプリにFirebaseを追加⑥_FireStoreを導入する
-8.FlutterアプリにFirebaseを追加⑦_Firebase上でデータを登録する
-9.全体コード
-参考文献
-最後に
完成イメージ
・FlutterアプリにFirebaseを追加
・Firebaseより本一覧を記入

1.構成
・main.dartのコードを整理をし、book_list_page.dartを作成
・ターミナルからFirebaseのツールをインストールしログインする
・FlutterFireCLIをインストールする
・Firebase上にプロジェクトを作成し、開発中のプロジェクトを
flutter configureで連携させる
・flutter pub add firebase_coreを行う
・構成ファイルと初期化処理を追加する
・flutter pub add cloud_firestoreでFireStoreをインストールする
・book_list_page.dartにFireStoreを導入する
・Firebase上でデータを登録する
2.FlutterアプリにFirebaseを追加①_main.dartの整理
・main.dartのコードを整理をし、book_list_page.dartを作成する
import 'package:firebase1_firebase_add/book_list_page.dart';
import 'package:flutter/material.dart';

void main() {
  runApp(const MyApp());
}

class MyApp extends StatelessWidget {
  const MyApp({super.key});
  @override
  Widget build(BuildContext context) {
    return MaterialApp(
      title: 'BookListSample',
      home: BookListPage(),
    );
  }
}
import 'package:flutter/material.dart';

class BookListPage extends StatelessWidget {
  @override
  Widget build(BuildContext context) {
    return Scaffold(
      appBar: AppBar(
        backgroundColor: Theme.of(context).colorScheme.inversePrimary,
        title: Text('本一覧'),
      ),
      body: Center(
        child: Text(
          ‘本一覧’,
        ),
      ),
      floatingActionButton: FloatingActionButton(
        onPressed: null,
        tooltip: 'Increment',
        child: const Icon(Icons.add),
      ),
    );
  }
}
 ※現状のイメージ画像
3.FlutterアプリにFirebaseを追加②_ターミナルからFirebaseへログイン・FlutterFireCLIのインストール
・ターミナル1からFirebaseをインストールする
curl -sL https://firebase.tools | bash
・Firebaseにログインする
・質問文に対してY/nで聞かれるのでYを入力する
firebase login
・FlutterFireCLIをインストールする
dart pub global activate flutterfire_cli
4.FlutterアプリにFirebaseを追加③_Firebase上にプロジェクトを作成・プロジェクトの連携
・下記リンクにログインする
※ログインは先ほどログインしたものと同様のアカウント
https://firebase.google.com/
・右上の「Go to Console」をクリック
・「プロジェクトを追加」をクリック
・プロジェクト名を記入する→続行

・Googleアナリティクスアカウントを選択→プロジェクト作成
※何もお持ちでない方は「Default Account for Firebase」を選択

Firebase上はこれでOK!!!
・プロジェクト内のターミナル2で
Firebaseが使用できるように構成する
flutter configure
・使用するプラットフォーム(ios、android、webなど)を選択する
※スペースキーで外したり選択が可能。
基本iosとandroidのみでOK

libフォルダ内にfirebase_options.dartがあればOK!!!

5.FlutterアプリにFirebaseを追加④_プロジェクト連携後の追加処理
・プロジェクト内のターミナル3でFlutterアプリのFirebase構成を最新にする
flutter pub add firebase_core
pubspec.yamlに下記表示があればOK!!!
firebase_options.dartのimportのエラーも解消される
  # The following adds the Cupertino Icons font to your application.
  # Use with the CupertinoIcons class for iOS style icons.
  cupertino_icons: ^1.0.6
  firebase_core: ^3.1.0//←この表記があればOK!!!
・main.dartに構成ファイルと初期化処理を追加する
import 'package:firebase1_firebase_add/book_list_page.dart';
import 'package:flutter/material.dart';
import 'package:firebase_core/firebase_core.dart';//←構成ファイルの追加
import 'firebase_options.dart';//←構成ファイルの追加

void main() async {//←初期化処理のためasyncを追加
  WidgetsFlutterBinding.ensureInitialized();//←初期化処理の追加

  await Firebase.initializeApp(//←初期化処理の追加
    options: DefaultFirebaseOptions.currentPlatform,
  );
  runApp(const MyApp());
}
6.FlutterアプリにFirebaseを追加⑤_FireStoreのインストール
・プロジェクト内のターミナル4で
FlutterアプリにFireStoreをインストールする
flutter pub add cloud_firestore
pubspec.yamlに下記表示があればOK!!!
  # The following adds the Cupertino Icons font to your application.
  # Use with the CupertinoIcons class for iOS style icons.
  cupertino_icons: ^1.0.6
  firebase_core: ^3.1.0
  cloud_firestore: ^5.0.1//←この表記があればOK!!!
7.FlutterアプリにFirebaseを追加⑥_FireStoreを導入する
・book_list_page.dartのCenter Widget内に
Streambuilder<>〜を記載する
・final Stream _usersStreamを追加
class BookListPage extends StatelessWidget {
  final Stream<QuerySnapshot> _usersStream =
      FirebaseFirestore.instance.collection('books').snapshots();//←追加

  @override
  Widget build(BuildContext context) {
    return Scaffold(
      appBar: AppBar(
        backgroundColor: Theme.of(context).colorScheme.inversePrimary,
        title: Text('本一覧'),
      ),
      body: Center(
        child: StreamBuilder<QuerySnapshot>(
          stream: _usersStream,
          builder:
              (BuildContext context, AsyncSnapshot<QuerySnapshot> snapshot) {
            if (snapshot.connectionState == ConnectionState.waiting) {
              return Text("Loading");
            }

            return ListView(
              children: snapshot.data!.docs.map((DocumentSnapshot document) {
                Map<String, dynamic> data =
                    document.data()! as Map<String, dynamic>;
                return ListTile(
                  title: Text(data['title']),
                  subtitle: Text(data['author']),
                );
              }).toList(),
            );
          },
        ),
      ),//←//Center内にStreambuilder<>〜を追加
      floatingActionButton: FloatingActionButton(
        onPressed: null,
        tooltip: 'Increment',
        child: const Icon(Icons.add),
      ),
    );
  }
}
8.FlutterアプリにFirebaseを追加⑦_Firebase上でデータを登録する
・下記リンクにログインする
※ログインは先ほどログインしたものと同様のアカウント
https://firebase.google.com/
・右上の「Go to Console」をクリック
・作成したプロジェクトをクリック
・左のタブの「構築」→「Firestore Database」をクリック

・「コレクションを開始」をクリック
・コレクションIDに「books」→次へ
・ドキュメントIDの「自動ID」をクリック
・フィールドに「title」、値に「エコノミー革命」を入力
・フィールドの追加→フィールドに「author」、
値に「尾原 和啓」を入力

※2回目以降の入力は、「ドキュメントを追加」をクリックして
authorとtitleのみを入力する
これで完成!!!
9.全体コード
mport 'package:firebase1_firebase_add/book_list_page.dart';
import 'package:flutter/material.dart';
import 'package:firebase_core/firebase_core.dart';
import 'firebase_options.dart';

void main() async {
  WidgetsFlutterBinding.ensureInitialized();

  await Firebase.initializeApp(
    options: DefaultFirebaseOptions.currentPlatform,
  );
  runApp(const MyApp());
}

class MyApp extends StatelessWidget {
  const MyApp({super.key});
  @override
  Widget build(BuildContext context) {
    return MaterialApp(
      title: 'BookListSample',
      home: BookListPage(),
    );
  }
}
import 'package:cloud_firestore/cloud_firestore.dart';
import 'package:flutter/material.dart';

class BookListPage extends StatelessWidget {
  final Stream<QuerySnapshot> _usersStream =
      FirebaseFirestore.instance.collection('books').snapshots();

  @override
  Widget build(BuildContext context) {
    return Scaffold(
      appBar: AppBar(
        backgroundColor: Theme.of(context).colorScheme.inversePrimary,
        title: Text('本一覧'),
      ),
      body: Center(
        child: StreamBuilder<QuerySnapshot>(
          stream: _usersStream,
          builder:
              (BuildContext context, AsyncSnapshot<QuerySnapshot> snapshot) {
            if (snapshot.connectionState == ConnectionState.waiting) {
              return Text("Loading");
            }

            return ListView(
              children: snapshot.data!.docs.map((DocumentSnapshot document) {
                Map<String, dynamic> data =
                    document.data()! as Map<String, dynamic>;
                return ListTile(
                  title: Text(data['title']),
                  subtitle: Text(data['author']),
                );
              }).toList(),
            );
          },
        ),
      ),
      floatingActionButton: FloatingActionButton(
        onPressed: null,
        tooltip: 'Increment',
        child: const Icon(Icons.add),
      ),
    );
  }
}
// File generated by FlutterFire CLI.
// ignore_for_file: type=lint
import 'package:firebase_core/firebase_core.dart' show FirebaseOptions;
import 'package:flutter/foundation.dart'
    show defaultTargetPlatform, kIsWeb, TargetPlatform;

/// Default [FirebaseOptions] for use with your Firebase apps.
///
/// Example:
/// ```dart
/// import 'firebase_options.dart';
/// // ...
/// await Firebase.initializeApp(
///   options: DefaultFirebaseOptions.currentPlatform,
/// );
/// ```
class DefaultFirebaseOptions {
  static FirebaseOptions get currentPlatform {
    if (kIsWeb) {
      throw UnsupportedError(
        'DefaultFirebaseOptions have not been configured for web - '
        'you can reconfigure this by running the FlutterFire CLI again.',
      );
    }
    switch (defaultTargetPlatform) {
      case TargetPlatform.android:
        return android;
      case TargetPlatform.iOS:
        return ios;
      case TargetPlatform.macOS:
        throw UnsupportedError(
          'DefaultFirebaseOptions have not been configured for macos - '
          'you can reconfigure this by running the FlutterFire CLI again.',
        );
      case TargetPlatform.windows:
        throw UnsupportedError(
          'DefaultFirebaseOptions have not been configured for windows - '
          'you can reconfigure this by running the FlutterFire CLI again.',
        );
      case TargetPlatform.linux:
        throw UnsupportedError(
          'DefaultFirebaseOptions have not been configured for linux - '
          'you can reconfigure this by running the FlutterFire CLI again.',
        );
      default:
        throw UnsupportedError(
          'DefaultFirebaseOptions are not supported for this platform.',
        );
    }
  }

  static const FirebaseOptions android = FirebaseOptions(
    apiKey: 'your api key',
    appId: '1:481769511549:android:2c0a8fbf00cc7a42016f14',
    messagingSenderId: '481769511549',
    projectId: 'book-list-sample-f1449',
    storageBucket: 'book-list-sample-f1449.appspot.com',
  );

  static const FirebaseOptions ios = FirebaseOptions(
    apiKey: 'your api key',
    appId: '1:481769511549:ios:dbae2200057f984c016f14',
    messagingSenderId: '481769511549',
    projectId: 'book-list-sample-f1449',
    storageBucket: 'book-list-sample-f1449.appspot.com',
    iosBundleId: 'com.example.firebase1FirebaseAdd',
  );
}
pubspec.yamlは変更点のあった35~39行目付近のみを記載
  # The following adds the Cupertino Icons font to your application.
  # Use with the CupertinoIcons class for iOS style icons.
  cupertino_icons: ^1.0.6
  firebase_core: ^3.1.0
  cloud_firestore: ^5.0.1
参考文献
Flutter大学. 「【2021年8月最新】FlutterアプリにFirebaseを追加しよう」. YouTube. 2021/07,https://www.youtube.com/watch?v=VZ9wcJ920XA&t=0, (参照 2024-06-30)
Flutter大学. 「【Flutter×Firebase2024】Firebase接続とエラー解消」. YouTube. 2024/06,https://www.youtube.com/watch?v=DxO_uxnTRSE&t=0, (参照 2024-06-30)
Firebase. 「Flutter アプリに Firebase を追加する」. 2024,
https://firebase.google.com/docs/flutter/setup?hl=ja&platform=ios, (参照 2024-06-30)
Firebase. 「Firebase CLI リファレンス」. 2023,
https://firebase.google.com/docs/cli?hl=ja&_gl=1*1schew5*_up*MQ..*_ga*OTQxMDY0NTU3LjE3MTk3MjYyMjc.*_ga_CW55HF8NVT*MTcxOTcyNjIyNi4xLjAuMTcxOTcyNjIyNi4wLjAuMA..#install-cli-mac-linux, (参照 2024-06-30)
Firebase. 「Cloud Firestore を使ってみる」. 2024,
https://firebase.google.com/docs/firestore/quickstart?hl=ja&_gl=1*1hiohbj*_up*MQ..*_ga*OTQxMDY0NTU3LjE3MTk3MjYyMjc.*_ga_CW55HF8NVT*MTcxOTcyNjIyNi4xLjAuMTcxOTcyNjIyNi4wLjAuMA..#dart, (参照 2024-06-30)
最後に
・現在発生しているエラーは
Androidでエミュレータが起動しない問題です
こちらでもし同様の現象となればご連絡頂けたらと思います。
・2024版と2021年版を参考にしています
2024年版ではFireStoreサイト上でiOSとAndroidの
登録がなくなっておりました。
・全体コードは今後多くなってくる場合は
変更点のみ記載しようかと考えております。
・同じ注釈はまとめてもいいかなーとも思いました!
