ご挨拶
この記事は Unreal Engine (UE) Advent Calendar 2025 シリーズ1の12日目の記事です。
今年もUEアドカレの季節がやってきました。今回は独自のマテリアルノードを作成して、マテリアルから任意の値をGBufferに書き出してポストプロセスで利用するというネタをやってみようと思います。
はい、ガッツリエンジン改造します。そして、来年にはマテリアルシステムがSubstrateに移行して役に立たなくなるかもしれません。
まあ、例によってネタ記事なのでお気楽に。時間があまりなかったので雑な記事ですがご容赦ください。
出力系マテリアルエクスプレッション
UEのマテリアルノードは内部的にはそれぞれマテリアルエクスプレッションと呼ばれています。基本的にはマテリアルエクスプレッションを線で繋いでゆき、最終的にはマテリアルアトリビュートのどれかのピンに接続されます。しかし、たまに例外的にどこにも繋がらないエクスプレッションが存在します。Tangent Outputとか、Outputという名称が付いたものが多いです。ざっと調べただけでこんな感じのエクスプレッションが見つかりました。アウトプットが無いエクスプレッションがアウトプット系です。要はアウトプット先なのでそれ以上アウトプットが無いわけで(ややこしい説明)

これらはマテリアルアトリビュートに無い特殊な出力が必要なときに使用するために用意されています。
今回の記事では独自のカスタムアウトプットを作成してみようというものです。
カスタムアウトプット系エクスプレッションとは?
基本的にはUMaterialExpressionCustomOutputを継承するエクスプレッションで、主にBaseMaterialに追加のパラメーターを与えるのが目的です。
つまり、ほとんどのパラメーターはBase Passで使用されます。一部エクスプレッションの値はGBufferに書き込まれ、ライティングパスで使用されたりもします。
カスタムアウトプットエクスプレッションを作成してみる
ということで、独自のエクスプレッションを作成してみましょう。記事のための汎用的なアウトプットということで、UserCustomOutputという名前を付けてやっていきます。
Unreal Engineのバージョンは5.7ですが、少し前のバージョンでも多分大丈夫です。あと、Substrateは無効にしてください。
MaterialExpressionBentNormalCustomOutput.hをもとにヘッダを作成します。
#pragma once

#include "CoreMinimal.h"
#include "UObject/ObjectMacros.h"
#include "MaterialExpressionIO.h"
#include "MaterialValueType.h"
#include "Materials/MaterialExpressionCustomOutput.h"
#include "MaterialExpressionUserCustomOutput.generated.h"

UCLASS()
class UMaterialExpressionUserCustomOutput : public UMaterialExpressionCustomOutput
{
	GENERATED_UCLASS_BODY()

	UPROPERTY(meta = (RequiredInput = "true"))
	FExpressionInput Input;

#if WITH_EDITOR
	virtual int32 Compile(class FMaterialCompiler* Compiler, int32 OutputIndex) override;
	virtual void GetCaption(TArray<FString>& OutCaptions) const override;
	virtual EMaterialValueType GetInputValueType(int32 InputIndex) override { return MCT_Float; }
	virtual FExpressionInput* GetInput(int32 InputIndex) override;
#endif
	virtual int32 GetNumOutputs() const override { return 1; }
	virtual FString GetFunctionName() const override { return TEXT("GetUserCustom"); }
	virtual FString GetDisplayName() const override { return TEXT("UserCustom"); }
};
配置先は Engine\Source\Runtime\Engine\Public\Materials です。
定義内容は出力はひとつで、入力はMCT_Float、つまり浮動小数点値ひとつです。
実体はMaterialExpressions.cppに追加していきます。
まずは
#include "Materials/MaterialExpressionUserCustomOutput.h"
を追加。
///////////////////////////////////////////////////////////////////////////////
// User Custom Output
///////////////////////////////////////////////////////////////////////////////

UMaterialExpressionUserCustomOutput::UMaterialExpressionUserCustomOutput(const FObjectInitializer& ObjectInitializer)
: Super(ObjectInitializer)
{
#if WITH_EDITORONLY_DATA
	bCollapsed = true;

	// No outputs
	Outputs.Reset();
#endif
}

#if WITH_EDITOR
int32  UMaterialExpressionUserCustomOutput::Compile(class FMaterialCompiler* Compiler, int32 OutputIndex)
{
	if (Input.GetTracedInput().Expression)
	{
		return Compiler->CustomOutput(this, OutputIndex, Input.Compile(Compiler));
	}
	else
	{
		return CompilerError(Compiler, TEXT("Input missing"));
	}
}

void UMaterialExpressionUserCustomOutput::GetCaption(TArray<FString>& OutCaptions) const
{
	OutCaptions.Add(FString(TEXT("UserCustomOutput")));
}

FExpressionInput* UMaterialExpressionUserCustomOutput::GetInput(int32 InputIndex)
{
	return InputIndex == 0 ? &Input : nullptr;
}

#endif // WITH_EDITOR
ビルドして、適当なマテリアルを作製してエクスプレッションを置いてみます。

とりあえず追加するだけならとても簡単です。ただし、中身が無いので実際にはこのマテリアルをコンパイルしても何も行われません。
とは言え、Unreal Engineのよくできた仕組みがある程度勝手に処理を作ってくれます。マテリアルエディターからシェーダーコード->HLSLコードを選んでコードを確認すると
#define NUM_MATERIAL_OUTPUTS_GETUSERCUSTOM 1
#define HAVE_GetUserCustom0 1
MaterialFloat GetUserCustom0(inout FMaterialPixelParameters Parameters)
{
 return Material.PreshaderBuffer[1].x;
}
FWSScalar GetUserCustom0_LWC(inout FMaterialPixelParameters Parameters) { return WSPromote(GetUserCustom0(Parameters)); }
こんなコードが自動で生成されていることがわかります。
後はエンジンのシェーダーコードになにかしら処理を追加すればこのUserCustomの数値を利用することができます。とはいえ、実際になにをするか戦略が無いとあまり意味がありません。ということで、この記事での戦略としては、「GBufferに格納してポストプロセスから参照する」という目標を建ててみました。
ここから、ちょっと脱線してゆきますw
GBufferにスキマを作る
はい、ここでちょっと前に書いた記事の登場です。
UnrealEngineのGBuffer構造を変更してみる。またはPBRパラメーターにそんな精度いらないんじゃ疑惑
この記事で言及したように、PBRパラメーターの精度を落としてGBufferに空きをつくります。無理やりに。
GBufferInfo.hのEGBufferSlotにスロットを追加します
enum EGBufferSlot
{
	GBS_Invalid,
	GBS_SceneColor, // RGB 11.11.10
	GBS_WorldNormal, // RGB 10.10.10
	GBS_PerObjectGBufferData, // 2
	GBS_Metallic, // R8
	GBS_Specular, // R8
	GBS_Roughness, // R8
	GBS_ShadingModelId, // 4 bits
	GBS_SelectiveOutputMask, // 4 bits
	GBS_BaseColor, // RGB8
	GBS_GenericAO, // R8
	GBS_IndirectIrradiance, // R8
	GBS_AO, // R8
	GBS_Velocity, // RG, float16
	GBS_PrecomputedShadowFactor, // RGBA8
	GBS_WorldTangent, // RGB8
	GBS_Anisotropy, // R8
	GBS_CustomData, // RGBA8, no compression
	GBS_SubsurfaceColor, // RGB8
	GBS_Opacity, // R8
	GBS_SubsurfaceProfile, //RGB8
	GBS_ClearCoat, // R8
	GBS_ClearCoatRoughness, // R8
	GBS_HairSecondaryWorldNormal, // RG8
	GBS_HairBacklit, // R8
	GBS_Cloth, // R8
	GBS_SubsurfaceProfileX, // R8
	GBS_IrisNormal, // RG8
	GBS_SeparatedMainDirLight, // RGB 11.11.10
	GBS_UserOutput, // R8 これを追加
	GBS_Num
};
GBufferInfo.cppのコード生成部分に手をいれます。
#if 1
	Info.Slots[GBS_Metallic] = FGBufferItem(GBS_Metallic, GBC_Packed_Quantized_4, GBCH_Both);
	Info.Slots[GBS_Metallic].Packing[0] = FGBufferPacking(TargetGBufferB, 0, 0, 0, 0, 4);

	Info.Slots[GBS_Specular] = FGBufferItem(GBS_Specular, GBC_Packed_Quantized_4, GBCH_Both);
	Info.Slots[GBS_Specular].Packing[0] = FGBufferPacking(TargetGBufferB, 0, 0, 0, 4, 4);

	Info.Slots[GBS_Roughness] = FGBufferItem(GBS_Roughness, SpecularGBufferChannel, GBCH_Both);
	Info.Slots[GBS_Roughness].Packing[0] = FGBufferPacking(TargetGBufferB, 0, 1);

	Info.Slots[GBS_UserOutput] = FGBufferItem(GBS_Roughness, SpecularGBufferChannel, GBCH_Both);
	Info.Slots[GBS_UserOutput].Packing[0] = FGBufferPacking(TargetGBufferB, 0, 2);
#else
こんな感じでMetallicとSpecularを4bitずつに詰めて、1バイト分空きを作ってUserOutputを格納できるようにします。
GBS_UserOutputの名前を取得できるようにしておきます
static FString GetSlotTextName(EGBufferSlot Slot)
{
	FString Ret = TEXT("");
	switch (Slot)
	{
	case GBS_Invalid:
		check(0);
		return TEXT("Invalid");
	case GBS_SceneColor:
		return TEXT("SceneColor");
	case GBS_WorldNormal:
		return TEXT("WorldNormal");
	case GBS_PerObjectGBufferData:
		return TEXT("PerObjectGBufferData");
	case GBS_Metallic:
		return TEXT("Metallic");
	case GBS_Specular:
		return TEXT("Specular");
	case GBS_Roughness:
		return TEXT("Roughness");
	case GBS_ShadingModelId:
		return TEXT("ShadingModelID");
	case GBS_SelectiveOutputMask:
		return TEXT("SelectiveOutputMask");
	case GBS_BaseColor:
		return TEXT("BaseColor");
	case GBS_GenericAO:
		return TEXT("GenericAO");
	case GBS_IndirectIrradiance:
		return TEXT("IndirectIrradiance");
	case GBS_Velocity:
		return TEXT("Velocity");
	case GBS_PrecomputedShadowFactor:
		return TEXT("PrecomputedShadowFactors");
	case GBS_WorldTangent:
		return TEXT("WorldTangent");
	case GBS_Anisotropy:
		return TEXT("Anisotropy");
	case GBS_CustomData:
		return TEXT("CustomData");
	case GBS_SubsurfaceColor:
		return TEXT("SubsurfaceColor");
	case GBS_Opacity:
		return TEXT("Opacity");
	case GBS_SubsurfaceProfile:
		return TEXT("SubsurfaceProfile");
	case GBS_ClearCoat:
		return TEXT("ClearCoat");
	case GBS_ClearCoatRoughness:
		return TEXT("ClearCoatRoughness");
	case GBS_HairSecondaryWorldNormal:
		return TEXT("HaireEcondaryWorldNormal");
	case GBS_HairBacklit:
		return TEXT("HairBacklit");
	case GBS_Cloth:
		return TEXT("Cloth");
	case GBS_SubsurfaceProfileX:
		return TEXT("SubsurfaceProfileX");
	case GBS_IrisNormal:
		return TEXT("IrisNormal");
	case GBS_SeparatedMainDirLight:
		return TEXT("SeparatedMainDirLight");
	case GBS_UserOutput:
		return TEXT("UserOutput"); // コレ
	default:
		break;
	};
ここに定義した名前がシェーダー内部で使用される変数名になります。
シェーダー側のFGBufferData構造体にも追加します
struct FGBufferData
{
	// normalized
	half3 WorldNormal;
	// normalized, only valid if HAS_ANISOTROPY_MASK in SelectiveOutputMask
	half3 WorldTangent;
	// 0..1 (derived from BaseColor, Metalness, Specular)
	half3 DiffuseColor;
	// 0..1 (derived from BaseColor, Metalness, Specular)
	half3 SpecularColor;
	// 0..1, white for SHADINGMODELID_SUBSURFACE_PROFILE and SHADINGMODELID_EYE (apply BaseColor after scattering is more correct and less blurry)
	half3 BaseColor;
	// 0..1
	half Metallic;
	// 0..1
	half Specular;
	// 0..1
	float4 CustomData;
	// AO utility value
	half GenericAO;
	// Indirect irradiance luma
	half IndirectIrradiance;
	// Static shadow factors for channels assigned by Lightmass
	// Lights using static shadowing will pick up the appropriate channel in their deferred pass
	half4 PrecomputedShadowFactors;
	// 0..1
	half Roughness;
	// -1..1, only valid if only valid if HAS_ANISOTROPY_MASK in SelectiveOutputMask
	half Anisotropy;
	// 0..1 ambient occlusion  e.g.SSAO, wet surface mask, skylight mask, ...
	half GBufferAO;
	// Bit mask for occlusion of the diffuse indirect samples
	uint DiffuseIndirectSampleOcclusion;
	// 0..255
	uint ShadingModelID;
	// 0..255
	uint SelectiveOutputMask;
	// 0..1, 2 bits, use CastContactShadow(GBuffer) or HasDynamicIndirectShadowCasterRepresentation(GBuffer) to extract
	half PerObjectGBufferData;
	// in world units
	float CustomDepth;
	// Custom depth stencil value
	uint CustomStencil;
	// in unreal units (linear), can be used to reconstruct world position,
	// only valid when decoding the GBuffer as the value gets reconstructed from the Z buffer
	float Depth;
	// Velocity for motion blur (only used when WRITES_VELOCITY_TO_GBUFFER is enabled)
	half4 Velocity;

	// 0..1, only needed by SHADINGMODELID_SUBSURFACE_PROFILE and SHADINGMODELID_EYE which apply BaseColor later
	half3 StoredBaseColor;
	// 0..1, only needed by SHADINGMODELID_SUBSURFACE_PROFILE and SHADINGMODELID_EYE which apply Specular later
	half StoredSpecular;
	// 0..1, only needed by SHADINGMODELID_EYE which encodes Iris Distance inside Metallic
	half StoredMetallic;
	// Only needed for SHADINGMODELID_TWOSIDED_FOLIAGE
	half3 NormalDistribution;

	// Curvature for mobile subsurface profile
	half Curvature;

	half UserOutput; // コレ
};
ここまでで一旦ガワは完了です。
あとはマテリアルのパラメーターをGBufferにセットする処理を追加します。
void SetGBufferForShadingModel(
	in out FGBufferData GBuffer,
	in out FMaterialPixelParameters MaterialParameters,
	FPixelMaterialInputs PixelMaterialInputs,
	const float Opacity,
	const half3 BaseColor,
	const half  Metallic,
	const half  Specular,
	const float Roughness,
	const float Anisotropy,
	const float3 SubsurfaceColor,
	const float SubsurfaceProfile,
	const float Dither,
	const uint ShadingModel)
{
	GBuffer.WorldNormal = MaterialParameters.WorldNormal;
	GBuffer.WorldTangent = MaterialParameters.WorldTangent;
	GBuffer.BaseColor = BaseColor;
	GBuffer.Metallic = Metallic;
	#if SHADING_PATH_MOBILE
	GBuffer.Specular = Specular;
	#else
	// Dither value for avoiding quantization artifact (for now, only Specular is dithered based on artists' feedback)
	GBuffer.Specular = Dither8bits(Specular, Dither);
	#endif
	GBuffer.Roughness = Roughness;
	GBuffer.Anisotropy = Anisotropy;
	GBuffer.ShadingModelID = ShadingModel;

	// Calculate and set custom data for the shading models that need it
#if NUM_MATERIAL_OUTPUTS_GETUSERCUSTOM > 0
	GBuffer.UserOutput = GetUserCustom0(MaterialParameters).x;
#else
	GBuffer.UserOutput = 0.0;
#endif
これでUserOutputの値がGBufferに書き込まれるようになります。
内部的には拡張したGBuffer構造体のパラメーターをGBufferのフォーマットに変換するコードがエンジン内で生成されるので、そこはお任せです。
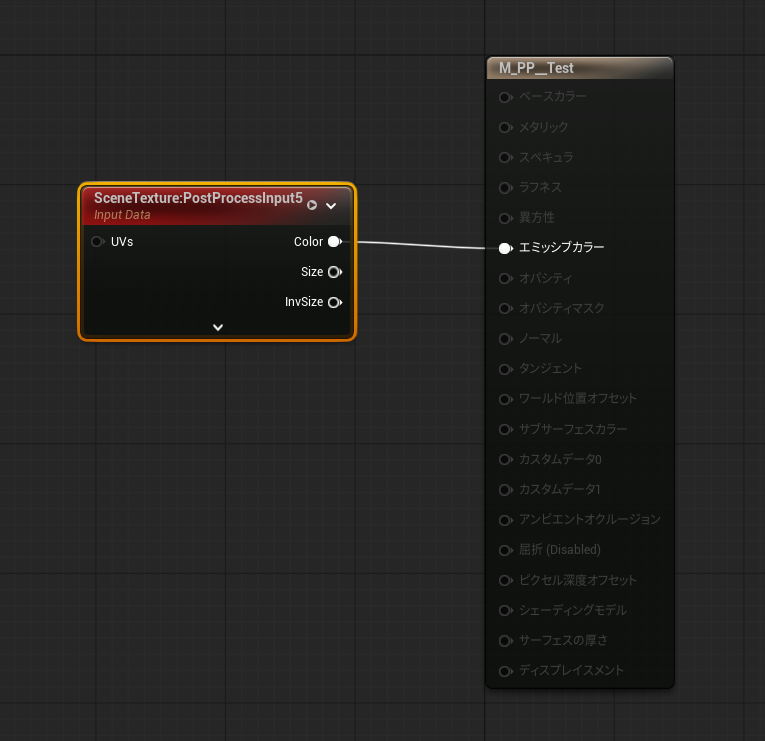
せっかくGBufferにセットできたので、この値をPostprocessマテリアルから取得したいです。そのために、MaterialTemplate.ushをちょっと修正します。
#define PPI_PostProcessInput5 19 // (UNUSED)
UNUSEDとあるので、これを使わせてもらいましょう。
float4 SceneTextureLookup(float2 UV, int SceneTextureIndex, bool bFiltered)
にコードを追加します。場所は3368行あたり
		case PPI_PostProcessInput4:		RETURN_POST_PROCESS_INPUT_SAMPLE(4);
		case PPI_PostProcessInput5:
			{
				FScreenSpaceData ScreenSpaceData = GetScreenSpaceData(UV, false/*bGetNormalizedNormal*/);
				return float4(ScreenSpaceData.GBuffer.UserOutput, 0, 0, 0);
			}
		}
これでSceneTextureでPotprocessInput5を選択すれば取得できるようになります。
Substrateとの関係でちょっと無理やりな実装になっています。
実際になんかやってみよう
とりあえず使えるようになったので実際に使ってみます。

このメッシュには3つのマテリアルが設定されていますが、それぞれのOutputに違う値を設定します。
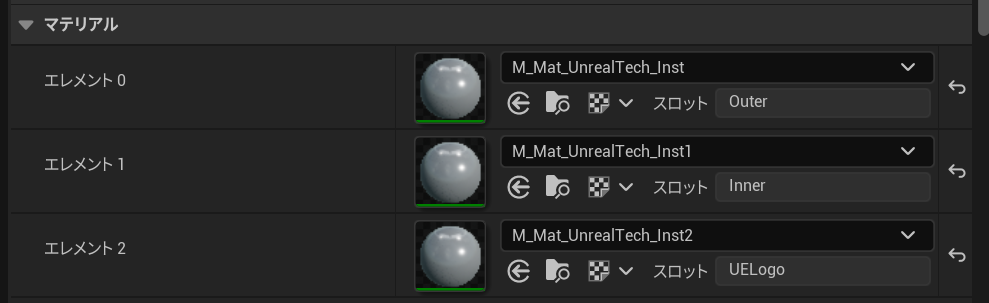
Custom Outputを表示するとこんなふうに塗り分けられているのがわかります。

Outputの差をアウトラインとして抽出すると

こんな感じになり、よくあるマテリアル境界のアウトラインとして使用できます。
考察
UE5.9からUEのマテリアルシステムがSubstrateに移行するということで、今やっていることがどこまで継続して使えるか不透明ではあります。現状はGBuffer構造は変更されていませんが、Legacyマテリアルを切り捨てて再構成されてしまうかもしれません。SubstrateのBSDFにはMetallicというパラメーターはありませんし、スペキュラもF0とF90でコントロールするので現状のGBufferそのままでは非効率にも思えます。
まあ、そのときはそのときということでこんな記事を書いてみました。
GBufferに独自のパラメーターを持てるとどんなことができるかというと、上記のようにマテリアルIDだったり、SDFの値を入れてライティングを補間するとか、なんらかのマスクに使うか、などなどアイディア次第では面白そうなことができそうです。