はじめに
VPSを借り、外部サーバーを立てられるようになったので、以前調べてずっと利用してみたかったLet's Encryptを利用して、サーバーのセキュリティ強度チェックをしたいと思います。
対象サーバーはDTI ServersMan@VPS Entryプラン, CentOS 7です。
初期セットアップを終えた状態から、HTTPS設定を行っていきます。
ドメインの取得
Let's Encryptを利用するにはドメイン名が必要です。ドメイン提供サービスは色々あるみたいですね。
今回はお試しなのでお名前.comで適当な格安ドメイン名を取得しました。
https://www.onamae.com/
ドメイン名を取得⇒VPSのアドレスをレコード登録してあげればOKなはずです。
出来たらPCからnslookup等でDNS名前解決が出来るか確認してみてください。
Let's Encryptで証明書を作成
Let's Encrypt 総合ポータルを参考に、必要なアプリケーションをインストールします。
yumがinstall出来るならいいんですが、前回同様initscriptsの問題で必要なパッケージがインストールできないでの、直接スクリプトをダウンロードして実行します。
pipのインストール
上記実行前にpipが必要なのでインストールします。いつもの通りこちらも依存関係でyumが使えないので、こちらを参考にget-pip.pyを利用します。
$ wget https://bootstrap.pypa.io/get-pip.py
$ python get-pip.py
Let's encryptはデフォルトのpythonコマンドと紐づくversionのpythonで実行されるので、pythonのversionは気にせずでよさそう。(利用してるのは2.7です)
後はとりあえずvirtualenvが必要と怒られていたのでpipインストール。(無くても行けるかもです)
pip install virtualenv
Ley's encryptのcertbot-autoを利用する
準備が出来たので、総合ポータルの手番に戻り証明書の作成に取り掛かります。まずはcertbot-auto実体をダウンロード
wget https://dl.eff.org/certbot-auto
chmod a+x certbot-auto
次にコマンド実行。起動しているHTTPサーバーがあったらそちら向けの設定が行われるので、余計なhttpサーバーが動作してるなら止めた方が良さそう。
./certbot-auto --no-bootstrap
./certbot-auto certonly
--no-bootstrapを付けてるのはデフォルトだとパッケージアップデートが走り、initscriptsとの依存関係でエラーになったためです。
自作サーバー等ではオプションなしの方がアップデートが実行されてよりセキュアになるかもです。
(実際はいきなりcertonlyでも問題ないかもですが、試していません。)
certbot-auto certonlyではこんな感じ対話型で質問されますので、自分に合う選択肢を選んでください。
聞かれる内容を抜粋。ACME CAをどうする?自分はwebrootとか用意していないのでとりあえずstandaloneを選択
How would you like to authenticate with the ACME CA?
- - - - - - - - - - - - - - - - - - - - - - - - - - - - - - - - - - - - - - - -
1: Spin up a temporary webserver (standalone)
2: Place files in webroot directory (webroot)
- - - - - - - - - - - - - - - - - - - - - - - - - - - - - - - - - - - - - - - -
Select the appropriate number [1-2] then [enter] (press 'c' to cancel): 1
E-mailアドレス設定。後でsubscriptionを求めるメール「Please Confirm Your EFF Subscription」がAaron Jue membership@eff.orgさんから届きます。
Plugins selected: Authenticator standalone, Installer None
Enter email address (used for urgent renewal and security notices) (Enter 'c' to
cancel): address
Let's Encryptが使用しているACMEプロトコルでは外部サーバーにクライアント登録を行い、認証⇒証明書発行の流れになるようです。このクライアント登録の承認問いかけ。
ACME参考:ACME
- - - - - - - - - - - - - - - - - - - - - - - - - - - - - - - - - - - - - - - -
Please read the Terms of Service at
https://letsencrypt.org/documents/LE-SA-v1.2-November-15-2017.pdf. You must
agree in order to register with the ACME server at
https://acme-v02.api.letsencrypt.org/directory
- - - - - - - - - - - - - - - - - - - - - - - - - - - - - - - - - - - - - - - -
(A)gree/(C)ancel: a
メールアドレスに情報送るよ~へのYes/Noと、ドメイン名の指定
- - - - - - - - - - - - - - - - - - - - - - - - - - - - - - - - - - - - - - - -
Would you be willing to share your email address with the Electronic Frontier
Foundation, a founding partner of the Let's Encrypt project and the non-profit
organization that develops Certbot? We'd like to send you email about our work
encrypting the web, EFF news, campaigns, and ways to support digital freedom.
- - - - - - - - - - - - - - - - - - - - - - - - - - - - - - - - - - - - - - - -
(Y)es/(N)o: y
Please enter in your domain name(s) (comma and/or space separated)  (Enter 'c'
to cancel): server.developerkikikaikaienjoy.work
最後に状態が表示されます。この時点では/etc/letsencryptには秘密鍵、証明書署名要求(csr)までしか作られませんでした。
IMPORTANT NOTES:
 - Your account credentials have been saved in your Certbot
   configuration directory at /etc/letsencrypt. You should make a
   secure backup of this folder now. This configuration directory will
   also contain certificates and private keys obtained by Certbot so
   making regular backups of this folder is ideal.
メールのsubscriptionを行った後の2回目の結果はこんな感じ。/etc/letsencrypt/live/server.developerkikikaikaienjoy.work/にファイルがコピーされているのが分かります。
# ./certbot-auto certonly
...

IMPORTANT NOTES:
 - Congratulations! Your certificate and chain have been saved at:
   /etc/letsencrypt/live/server.developerkikikaikaienjoy.work/fullchain.pem
   Your key file has been saved at:
   /etc/letsencrypt/live/server.developerkikikaikaienjoy.work/privkey.pem
   Your cert will expire on 2019-04-26. To obtain a new or tweaked
   version of this certificate in the future, simply run certbot-auto
   again. To non-interactively renew *all* of your certificates, run
   "certbot-auto renew"
 - If you like Certbot, please consider supporting our work by:

   Donating to ISRG / Let's Encrypt:   https://letsencrypt.org/donate
   Donating to EFF:                    https://eff.org/donate-le
これで証明書の作成が完了。
Go echoのHTTPS設定を行う
普通のハンドリングの仕方と少し違うだけです。
echoのe.Startをe.StartTLSに変えて、作成した証明書と秘密鍵を指定するだけ。
-       e.Start(":80" )
+       e.StartTLS(":443", "/dir_of_pem/fullchain.pem", "/dir_of_pem/privkey.pem")
SSL Server Testで検証してみる
さあ、Let't EncryptでのHTTPS動作が出来たので検証してみよう!ずっと試してみたかったんですよね、SSL Server Test (https://www.ssllabs.com/ssltest/)。
作成したechoのHTTPサーバーに対するセキュリティ強度をチェックしてもらいましょう!結果はこんな感じでした。元々のechoサーバー自体も優秀だったようで、すんなりとA判定に。
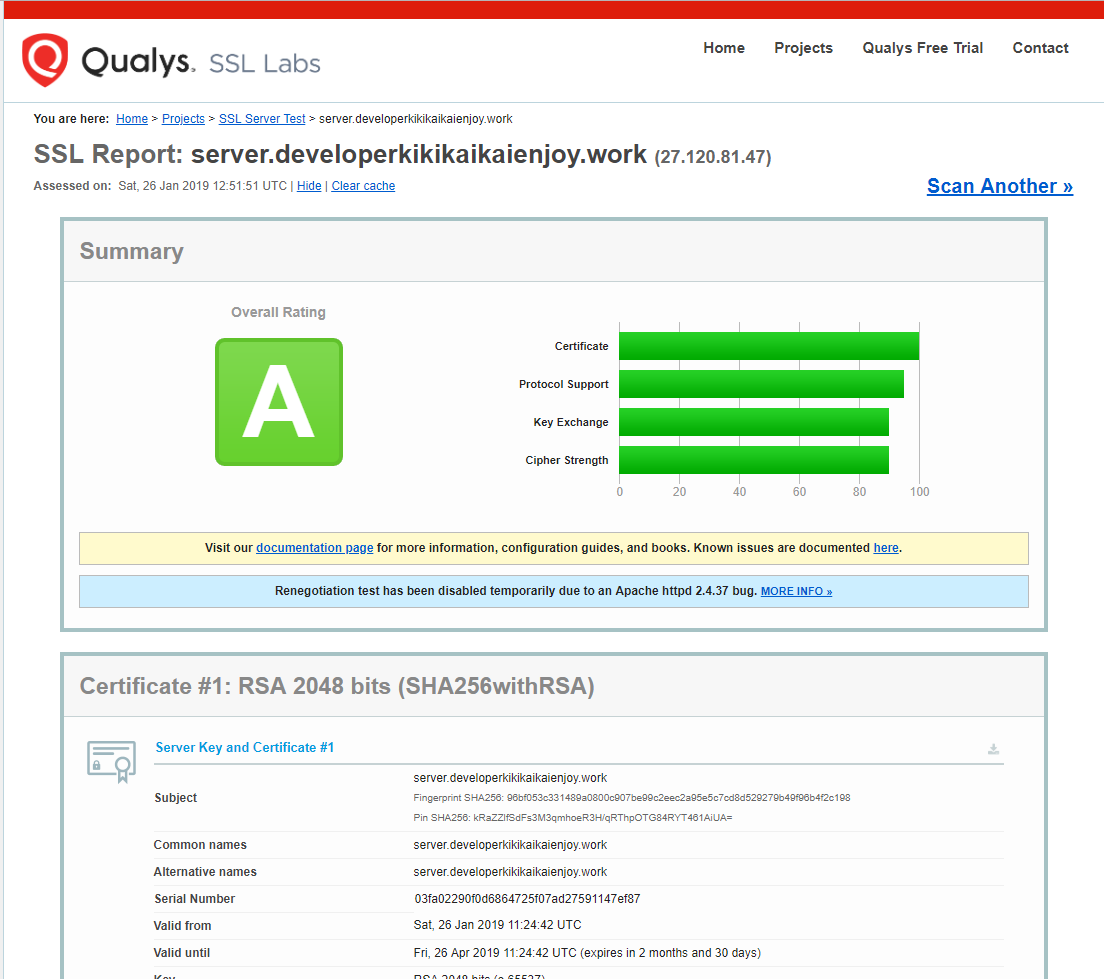
いくつかのサイトを参考に、物足りない点を調べてみるとこんな感じでしょうか?
ベースがいいので1. CipherSuitesの制限をする、2. DH鍵長を変える(RSAも?)くらいが実施出来れば、もしかしたらA+も行けるのでは?
| 項目 | 評価 |
|---|---|
| Certificate | 問題なし。定期的にアップデートすれば問題なさそうです。 |
| Protocol Support | TLS1.3非サポートで点数下がっているだけ? |
| Key Exchange | 鍵長が2048bitで物足りないのと、TLS_ECDHE_RSA_WITH_3DES_EDE_CBC_SHAを利用しているのが問題 |
| Cipher Strength | TLS_RSA_WITH_AES_128(256)_CBC(GCM)_SHA系と、3DES系が問題 |
参考:
HOWTO: A+ with all 100%’s on SSL Labs test using apache2.4 (READ WARNINGS)
Let's EncryptのSSL証明書で、Qualys SSLTestでA+評価を獲得するには
他のA+サイトを見ると、TLSのバージョンを1.2だけに絞っていたり、HSTS Preloadingを導入してたりしますね。
セキュリティ強度アップにトライ!
CipherSuiteの制限
goのechoコードを確認したところ、e.TLSConfigは証明書だけ設定。この場合Cipher Suiteはcrypto/tlsで実装されている全てを使うらしいです。
https://golang.org/pkg/crypto/tls/#Config
しかもecho内部でのe.TLSConfigの設定は、StartTLSの中で作成+APIでのCipherSite変更も用意されていない模様。デフォルトのまま動作します。
(その先で利用されているgolang.org/x/net/でなんやかんや設定しているようですが)
絞れないのは悲しいので、echoに手を入れてみました。(pull request出してみたいな)
diff --git a/echo.go b/echo.go
index f0b6284..6d1f714 100644
--- a/echo.go
+++ b/echo.go
@@ -604,13 +604,25 @@ func (e *Echo) Start(address string) error {
        return e.StartServer(e.Server)
 }

+func (e *Echo)generateInstanceOfsTLSConfig() {
+       s := e.TLSServer
+       if s.TLSConfig == nil {
+               s.TLSConfig = new(tls.Config)
+       }
+}
+
+func (e *Echo)SetTLSCipherSuites(cipherSuites []uint16) {
+       e.generateInstanceOfsTLSConfig();
+       e.TLSServer.TLSConfig.CipherSuites = cipherSuites;
+}
+
 // StartTLS starts an HTTPS server.
 func (e *Echo) StartTLS(address string, certFile, keyFile string) (err error) {
        if certFile == "" || keyFile == "" {
                return errors.New("invalid tls configuration")
        }
        s := e.TLSServer
-       s.TLSConfig = new(tls.Config)
+       e.generateInstanceOfsTLSConfig();
        s.TLSConfig.Certificates = make([]tls.Certificate, 1)
        s.TLSConfig.Certificates[0], err = tls.LoadX509KeyPair(certFile, keyFile)
        if err != nil {
ただこれだけだと暗号の優先度設定が出来ないので、弱い暗号が選ばれないような修正を行う必要がありそうです。こちらはgolang/net側を見ることになるのかな。
お遊びサイトなのでガツガツ絞ってCipher Strengthは最大まで行きました。
鍵長を変える
- DH鍵長
調査中。他のA+サイトを見てもDH 2048 bitsになっているので設定したいだろうけど、設定見当たらない。。。
一般的なサイトでは以下を参照ください。
Guide to Deploying Diffie-Hellman for TLS
- RSA鍵長
Let's Encryptはオプションで変更できるらしいですが、certbot-autoにはなさそうでした。とりあえずpython2.7にインストールされていたcrypto_util.pyを弄って鍵長を4096に変更してみました(A+には届かず)。
ちなみに私の環境のパスはこちらでした。make_keyで鍵長指定しています。
/opt/eff.org/certbot/venv/lib/python2.7/site-packages/certbot/crypto_util.py
その他: Session resumption (caching) No (IDs empty)
直訳するとセッション再開。文脈から予想すると「TLSのセッションを内部でキャッシュしているか?その設定は大丈夫か?」といった内容かな?
例えばnginxだとこんな設定で回避できるそうです。
ssl_session_cache shared:SSL:50m;
ssl_session_timeout 5m;
参考:【備忘録】SSL Sever Test の Session resumption (caching) を nginx にて Yes にする方法
特に問題があるというものでもなさそうなのでとりあえずスルー。
最後に
オレオレじゃないちゃんとした証明書が導入できると気持ちいいですね!
もちろん有償の発行元サイトを介して発行してもらった証明書の方が、言葉通りの「信頼された」証明書になると思いますが、こういったツールによりセキュアなサーバーが増えるのはいいことですね。
後は実用を考えると、ドメイン名.comや.jpじゃなくていいの?とか細かな設定どうなってるの?とか考えることは多いと思いますが、いい勉強になりました。