はじめに
AI連携フレームワーク『シンプルエーアイ』を使って遊ぶ、第2回目(その1)です。
この記事より、実際に作って動かします。環境等は、第1回目の記事をご覧下さい。
・(1)準備編
公式サイトはこちら:https://smartaifw.com/simpleai-trial/
叱られました
ひとつ前の記事である『【改訂しました】(2):AIっぽい事をさせてみたい』を公開後、「複雑過ぎて分かり辛い」とご指摘がありました。
よって、より機能を絞り込んだサンプルプログラムを作成しましたので、そちらを元に改めて書いていきたいと思います。
前回記事をご覧下さった皆様、ありがとうございます。懲りずに、どうぞ今回もお付き合い下さい。
やりたい事
- 起動したら、カメラを使って自分を写す。
- 「人物判断」ボタンを押すと、写っている人物の性別と年齢をAIが答えてくれる。
新しいファイルを準備しよう(おさらい)
『(1)準備編』では、APIキーを準備し、フレームワークを解凍して新しいファイルを作るところまで行いました。
この新しいファイルというのは、これからフレームワークを動かすコードを書く為のファイルです。
おさらいになりますが、ファイルのヘッダ部分には、jqueryおよびシンプルエーアイのJSファイルを設定しておいて下さい。
以下、あらためてソースの記述例を挙げておきます。
<!DOCTYPE html>
<html>
<head>
    <title>シンプルエーアイ デモ</title>
    <script src="https://code.jquery.com/jquery-3.0.0.js"></script>
    <script src="simpleai-0.1.0.min.enc.js"></script>
起動したら、カメラを使って自分を映す
それでは、本記事で想定しているサンプルプログラムの動作を説明します。
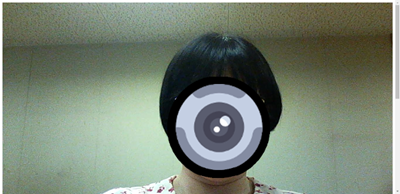
サンプルプログラムをクリックして開くと、このようにカメラが起動し、画面に表示されるようにしたいと思います。

このような動作をする為には、起動時にカメラ等のセンサー制御を行う必要があります。
起動時処理は window.onload イベントにて行います。
//起動時処理
window.onload = function () {
	var SimpleAI = new denaripamSimpleAI(
		this,
		{},
		{
			initCamera:true,
		},
	);
シンプルエーアイ本体のオブジェクトを作成し、カメラを初期化しています。
これで、画面が開いた時からカメラが使えるようになります。
…と、言いたいところですが、まだ大事な設定が残っています。そう、APIキーですね。
『(1)準備編』で取得しておいたキーを、ここで設定します。
本記事で利用するのはFace API のキーだけですが、後々の事を考え、3種類全て設定してしまいましょう。
設定するキーの種類と内容を間違えないよう、ご注意下さい。
なお、サンプルプログラムでは「initCamera:true,」の後に設定しています。
//-----uriBase、APIキーを設定してください START-----
			MicrosoftAzureFaceAPI:true,
			MicrosoftAzureFaceAPIuriBase:"",		//FaceAPIのエンドポイントを入力
			MicrosoftAzureFaceAPIsubscriptionKey:"",		//FaceAPIのキー②を入力

			MicrosoftBingSpeechAPIREST:true,
			MicrosoftBingSpeechAPIRESTuriBase:"https://speech.platform.bing.com/speech/recognition/<RECOGNITION_MODE>/cognitiveservices/v1?language=<LANGUAGE_TAG>&format=<OUTPUT_FORMAT>",		//※※※※変更不要※※※※
			MicrosoftBingSpeechAPIsubscriptionKey:"",		//BingSpeechAPIのキー②を入力

			MicrosoftAzureComputerVisionAPI:true,
			MicrosoftAzureComputerVisionAPIuriBase:"",		//ComputerVisionAPIのエンドポイントを入力

			MicrosoftAzureComputerVisionAPIsubscriptionKey:"",	//ComputerVisionAPIのキー①を入力

//-----uriBase、APIキーを設定してください END-----
ボタンを押すと、人物判断を行う
カメラが使えるようになったので、人物判断の処理を追加します。
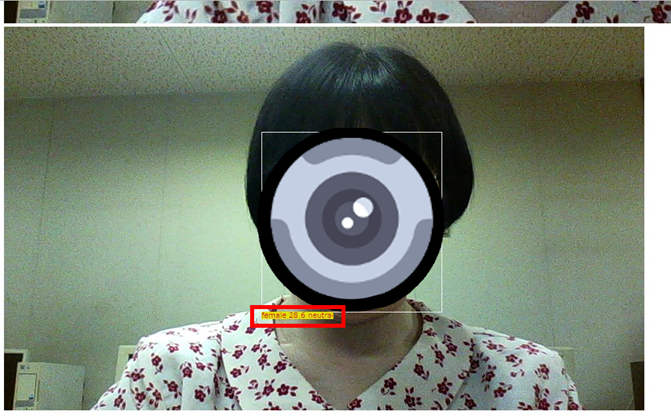
サンプルプログラムでは、「人物判断」ボタンを押した時に撮影を行い、写っている人物全ての性別や年齢を表示しています。
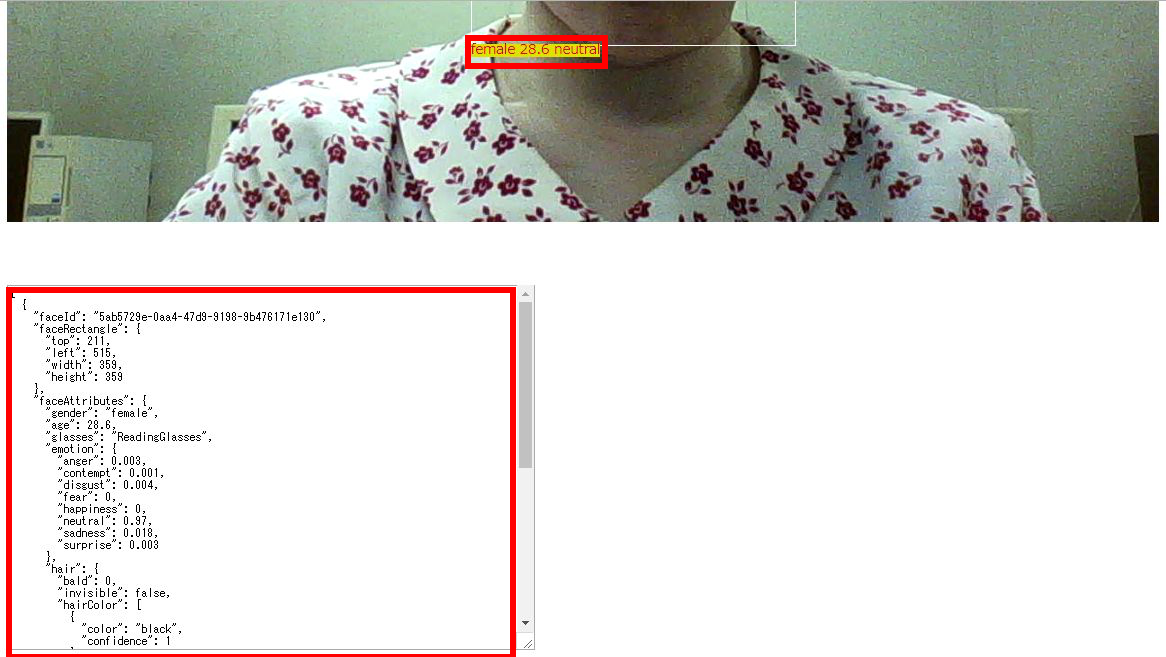
人間の顔と判断した領域を白枠で囲い、その下に性別や年齢が、黄色背景の赤文字で表示するようになっています。

余談ですが、これ人によっては実年齢と結構違う結果が出たりします。日本人の情報は少ないのかもしれません。
これらの処理については、以下のように記述しています。
JavaScriptのボタンの処理はこちら。
//人物判断ボタン
var captureButton = document.getElementById('capture');
	captureButton.addEventListener('click', function() {
	SimpleAI.Personinformation();
  });
HTML側は、このようになっています。
上から順に、人物判断ボタン、カメラ画像表示区域(video)、画像撮影結果、分析結果です。
<body>
<button id="capture">人物判断</button><br>
<video id="denaripamControlSensor_video" width="800px" height="600px" controls autoplay></video>
<div id="denaripamSimpleAI_responseRect"></div><br>
<textarea id="denaripamSimpleAI_responseTextArea" class="UIInput" style="width:580px; height:400px;"></textarea><br>
</body>
そもそも『シンプルエーアイ』って何をやっているの?
『シンプルエーアイ』は、AIサービスとセンサーを結び付け、お互いの処理を簡単にやり取りできるようにするものです。
少々堅苦しい説明ですが、処理の流れを説明しているスライドを以下に置いておきますね。
サンプルコード全文
最後に、今回作成したサンプルプログラムの全文を記載しておきます。
サンプルコード
<!DOCTYPE html>
<html>
<head>
    <title>シンプルエーアイ デモ</title>
    <script src="https://code.jquery.com/jquery-3.0.0.js"></script>
    <script src="simpleai-0.1.0.min.enc.js"></script>
<script>
//------------------------------------------------------------------------------------------------------------------------
//起動時処理
window.onload = function () {
	var SimpleAI = new denaripamSimpleAI(
		this,
		{},
		{
			initCamera:true,

//-----uriBase、APIキーを設定してください START-----
			MicrosoftAzureFaceAPI:true,
			MicrosoftAzureFaceAPIuriBase:"",					//FaceAPIのエンドポイントを入力
			MicrosoftAzureFaceAPIsubscriptionKey:"",									//FaceAPIのキー②を入力

			MicrosoftBingSpeechAPIREST:true,
			MicrosoftBingSpeechAPIRESTuriBase:"https://speech.platform.bing.com/speech/recognition/<RECOGNITION_MODE>/cognitiveservices/v1?language=<LANGUAGE_TAG>&format=<OUTPUT_FORMAT>",		//※※※※変更不要※※※※
			MicrosoftBingSpeechAPIsubscriptionKey:"",									//BingSpeechAPIのキー②を入力

			MicrosoftAzureComputerVisionAPI:true,
			MicrosoftAzureComputerVisionAPIuriBase:"",		//ComputerVisionAPIのエンドポイントを入力

			MicrosoftAzureComputerVisionAPIsubscriptionKey:"",							//ComputerVisionAPIのキー①を入力

//-----uriBase、APIキーを設定してください END-----
		},
	);
//-----------------------------------------------
//人物判断ボタン
var captureButton = document.getElementById('capture');
	captureButton.addEventListener('click', function() {
	SimpleAI.Personinformation();
  });
//--------------------------------------------
};
//------------------------------------------------------------------------------------------------------------------------
</script>
</head>
<body>
<button id="capture">人物判断</button><br>
<video id="denaripamControlSensor_video" width="800px" height="600px" controls autoplay></video>
<div id="denaripamSimpleAI_responseRect"></div><br>
<textarea id="denaripamSimpleAI_responseTextArea" class="UIInput" style="width:580px; height:400px;"></textarea><br>
</body>
</html>
最後に
今回のプログラムについては、サーバにアップしなくても、ご自身のパソコンで動作させることができます。
※ただし、Microsoft Edgeではセキュリティ?の影響でか、動作しませんでした。
対応策等詳しい方がいらっしゃいましたら、コメントいただければ幸いです。
今回はここまでです。お疲れ様でした。
次回の記事では、更に機能を追加していきます。
