はじめに
この記事は、トラハック氏(@torahack_)が運営するYoutubeチャンネル『トラハックのエンジニア学習ゼミ【とらゼミ】』の『日本一わかりやすいReact-Redux講座 実践編』の学習備忘録です。
前回講座では、画像ファイルを商品情報(Products)として登録できるようになりました。(CRUDのC)
今回の講座では、一度登録した商品情報を編集・更新できるようにします(CRUDのU)
※ 前回記事: 【備忘録】日本一わかりやすいReact-Redux講座 実践編 #5 「Cloud Storageに画像をアップ&プレビュー&削除」
要点
- ルーティングの正規表現を用いることで、各 products ドキュメントに対応した編集画面を表示させる
- Cloud Firestore からのデータの取得時には
useEffectを用いる。
#6_useEffectで編集機能を作ろう
今回の実装機能は以下の二つです。
- Products の編集機能
- Products 内にサイズ、数量のフィールドを追加
『第1回講座』で示した通り、今回のアプリでは、商品情報のDBについては、 CRUDを全て実装します。
[リンク先引用]
商品情報のCRUD
- Create: 商品情報の追加
- Read: 商品情報の読み込み
- Update: 商品情報の更新
- Delete: 商品情報の削除
前回講座までで、Productsの新規登録(Create)は、以下の仕様で実装済みでした。
今回の講座では、CRUDのうち、Updateを実装します。
加えて、Productsが持つ商品情報として、新たに「サイズ(S, M, Lなど)」と「数量」の情報を保存できるようにします。
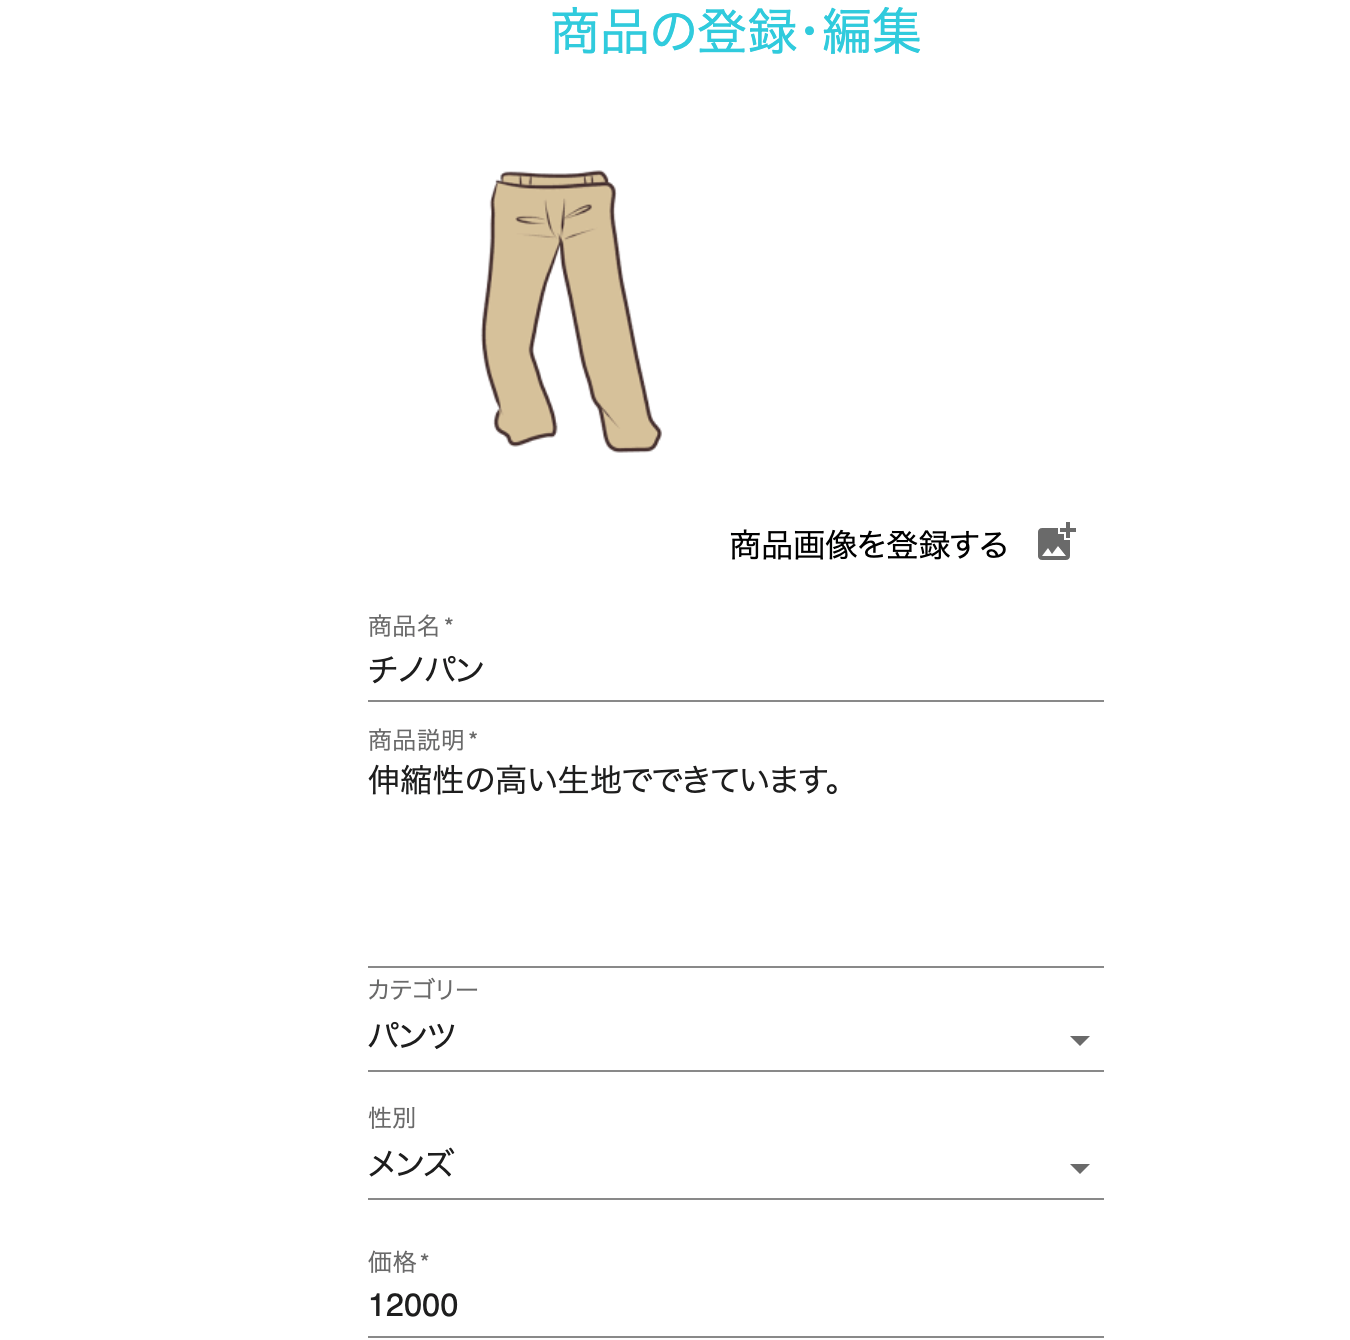
完成系イメージ
http://localhost:3000/product/edit
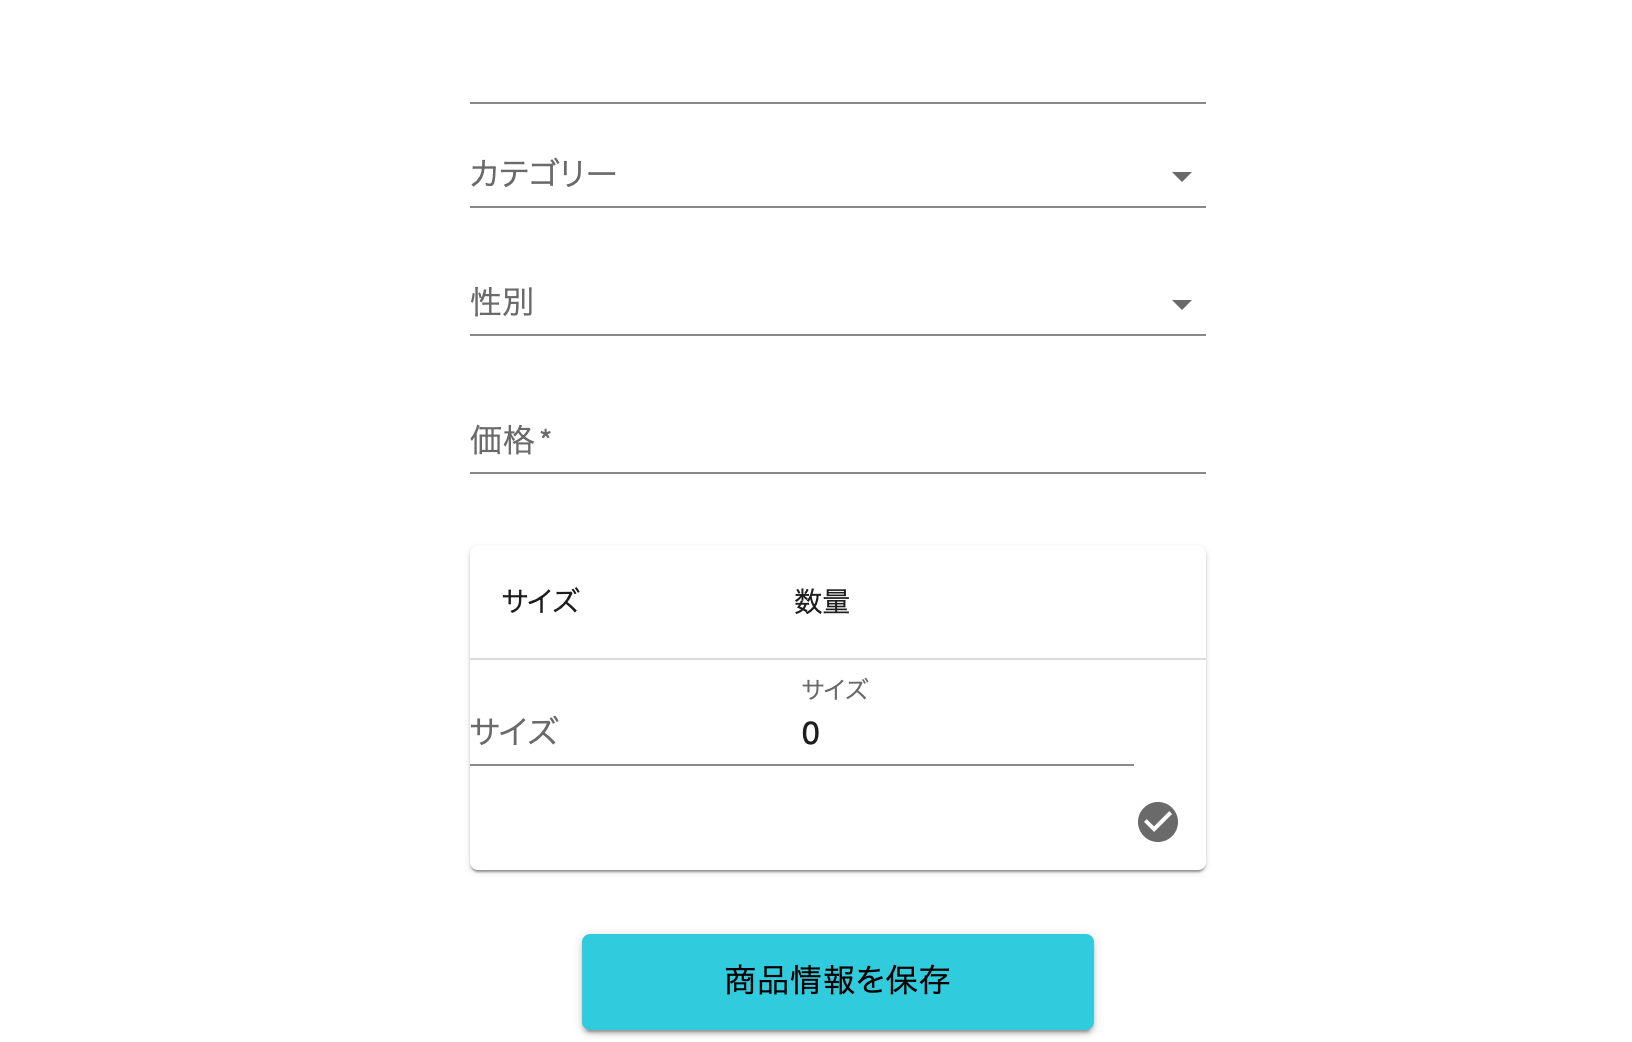
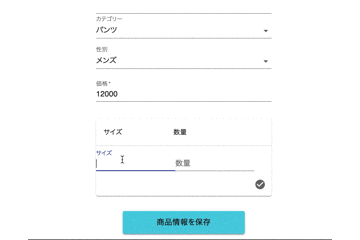
商品情報登録画面の下部に、サイズと数量を登録するエリアを追加します。
サイズ、数量を入力して右下のチェックマークをクリックすると、

↓
サイズと、それに紐づく数量の情報が入力されます。
これは複数記入することができます。
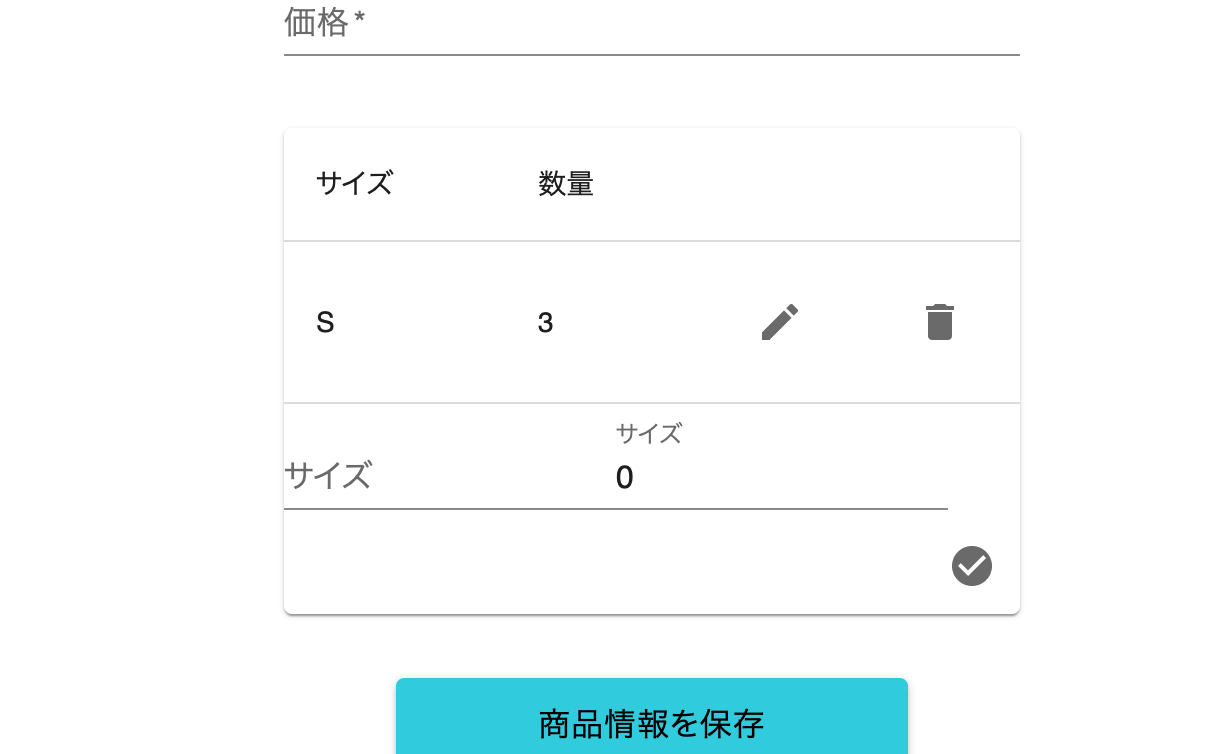
横の鉛筆マーク、ゴミ箱マークをクリックすることで、編集・削除が行えます。
最終的に入力したサイズ、数量の情報は、その他商品情報と合わせて、Cloud Firestore に登録されます。
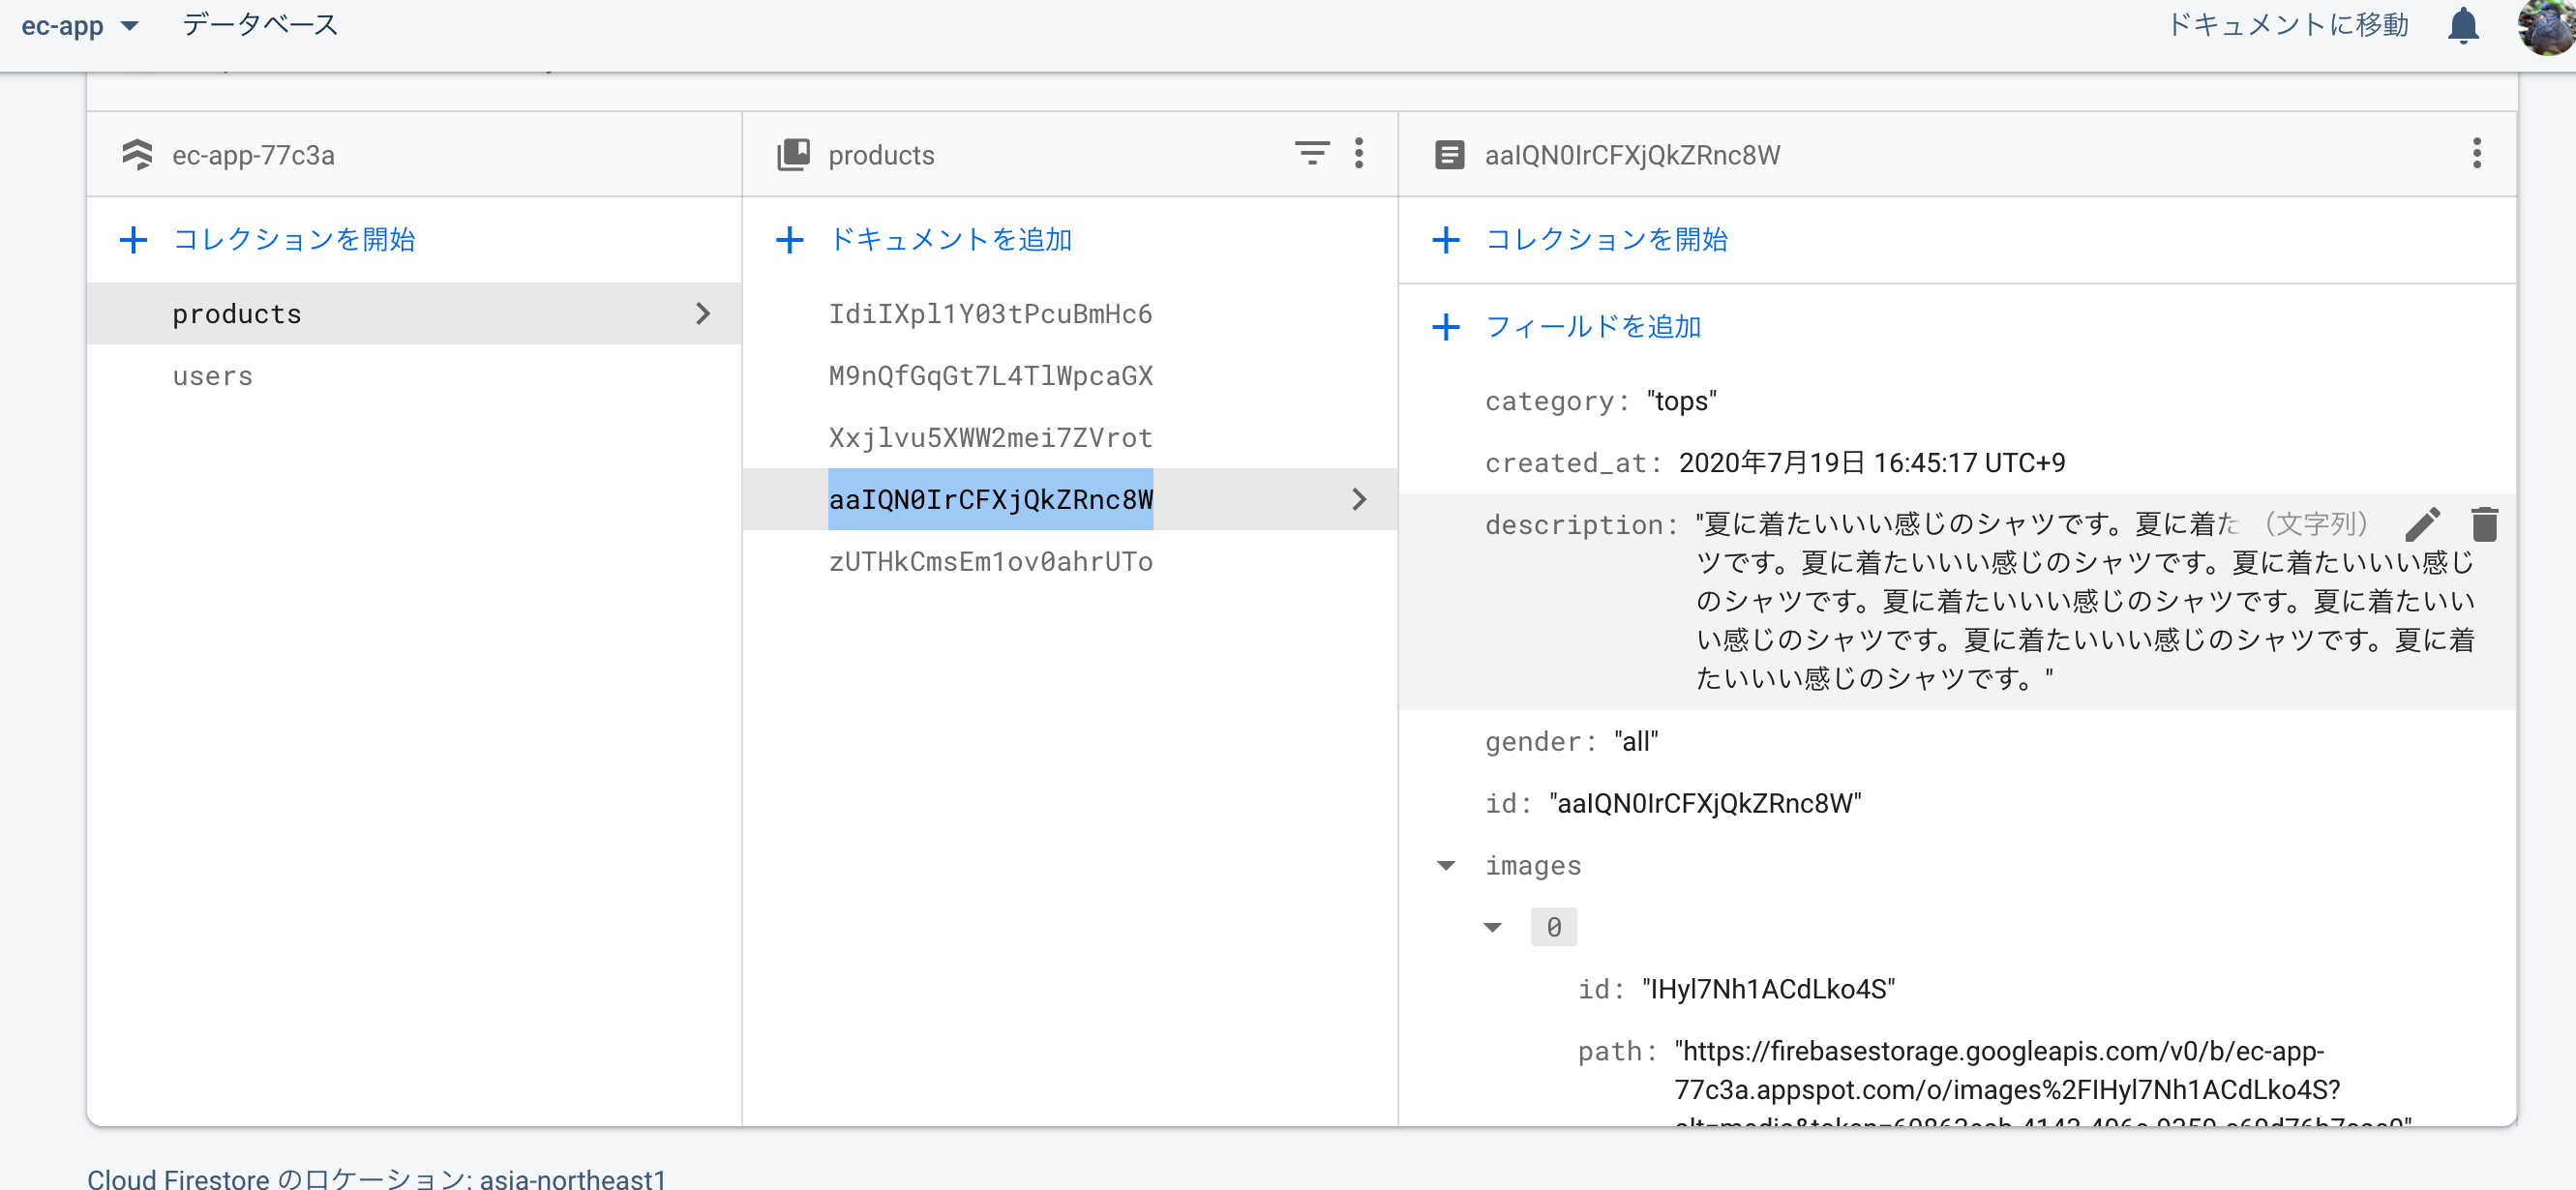
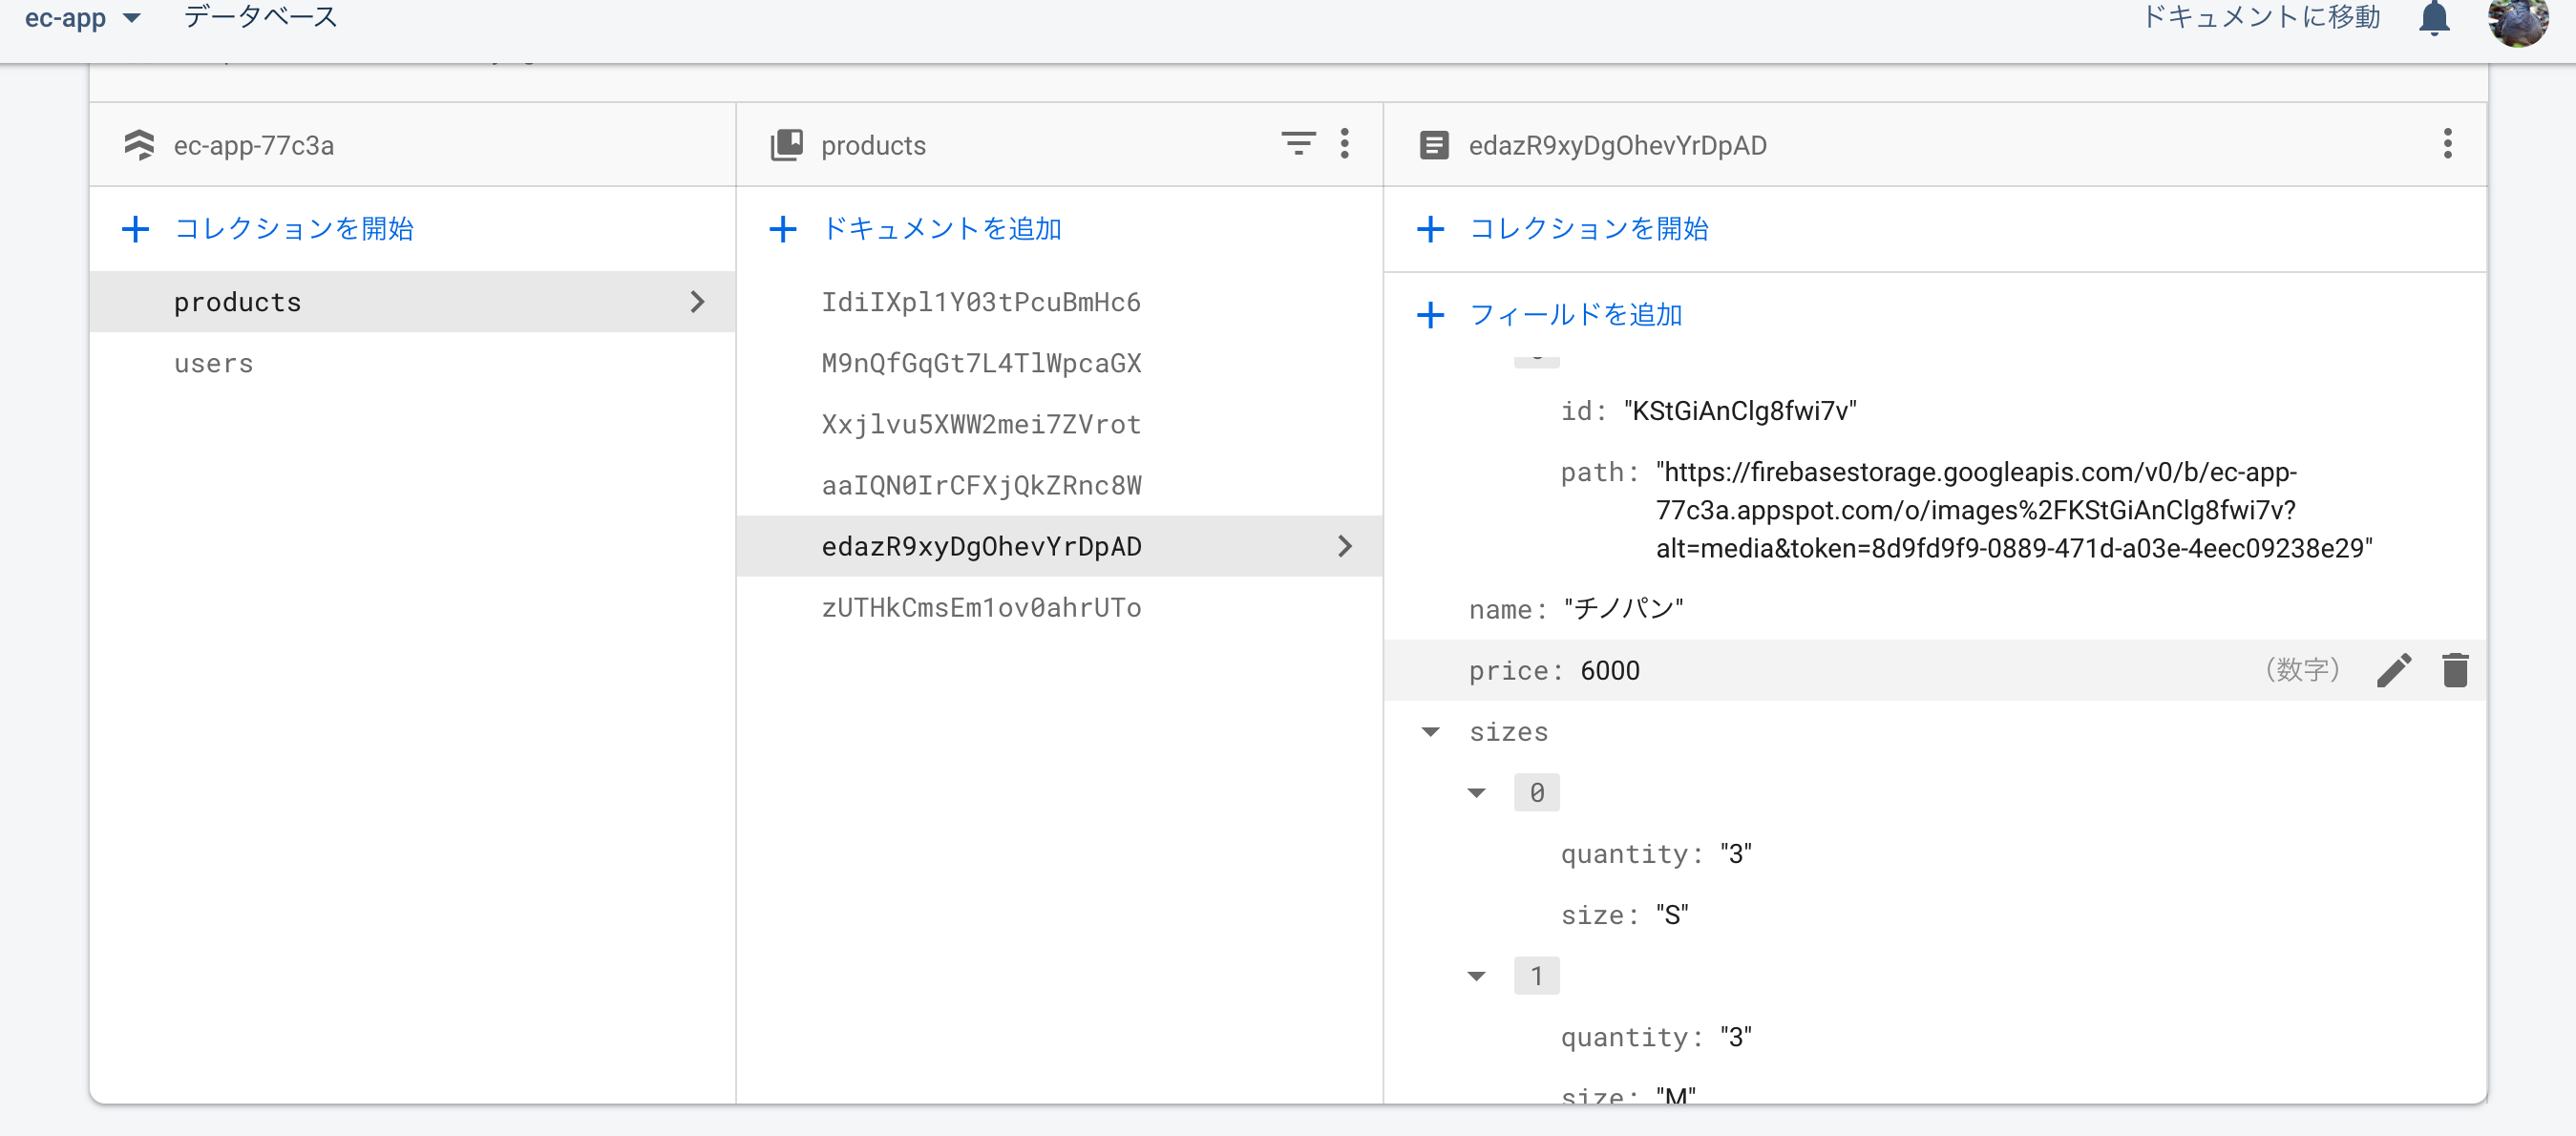
続いて、編集機能を見ます。Firebaseコンソール -> Database から、保存済みの任意の products の idをコピーを取得し、URLの末尾にコピーします。
http://localhost:3000/product/edit/aaIQN0IrCFXjQkZRnc8W
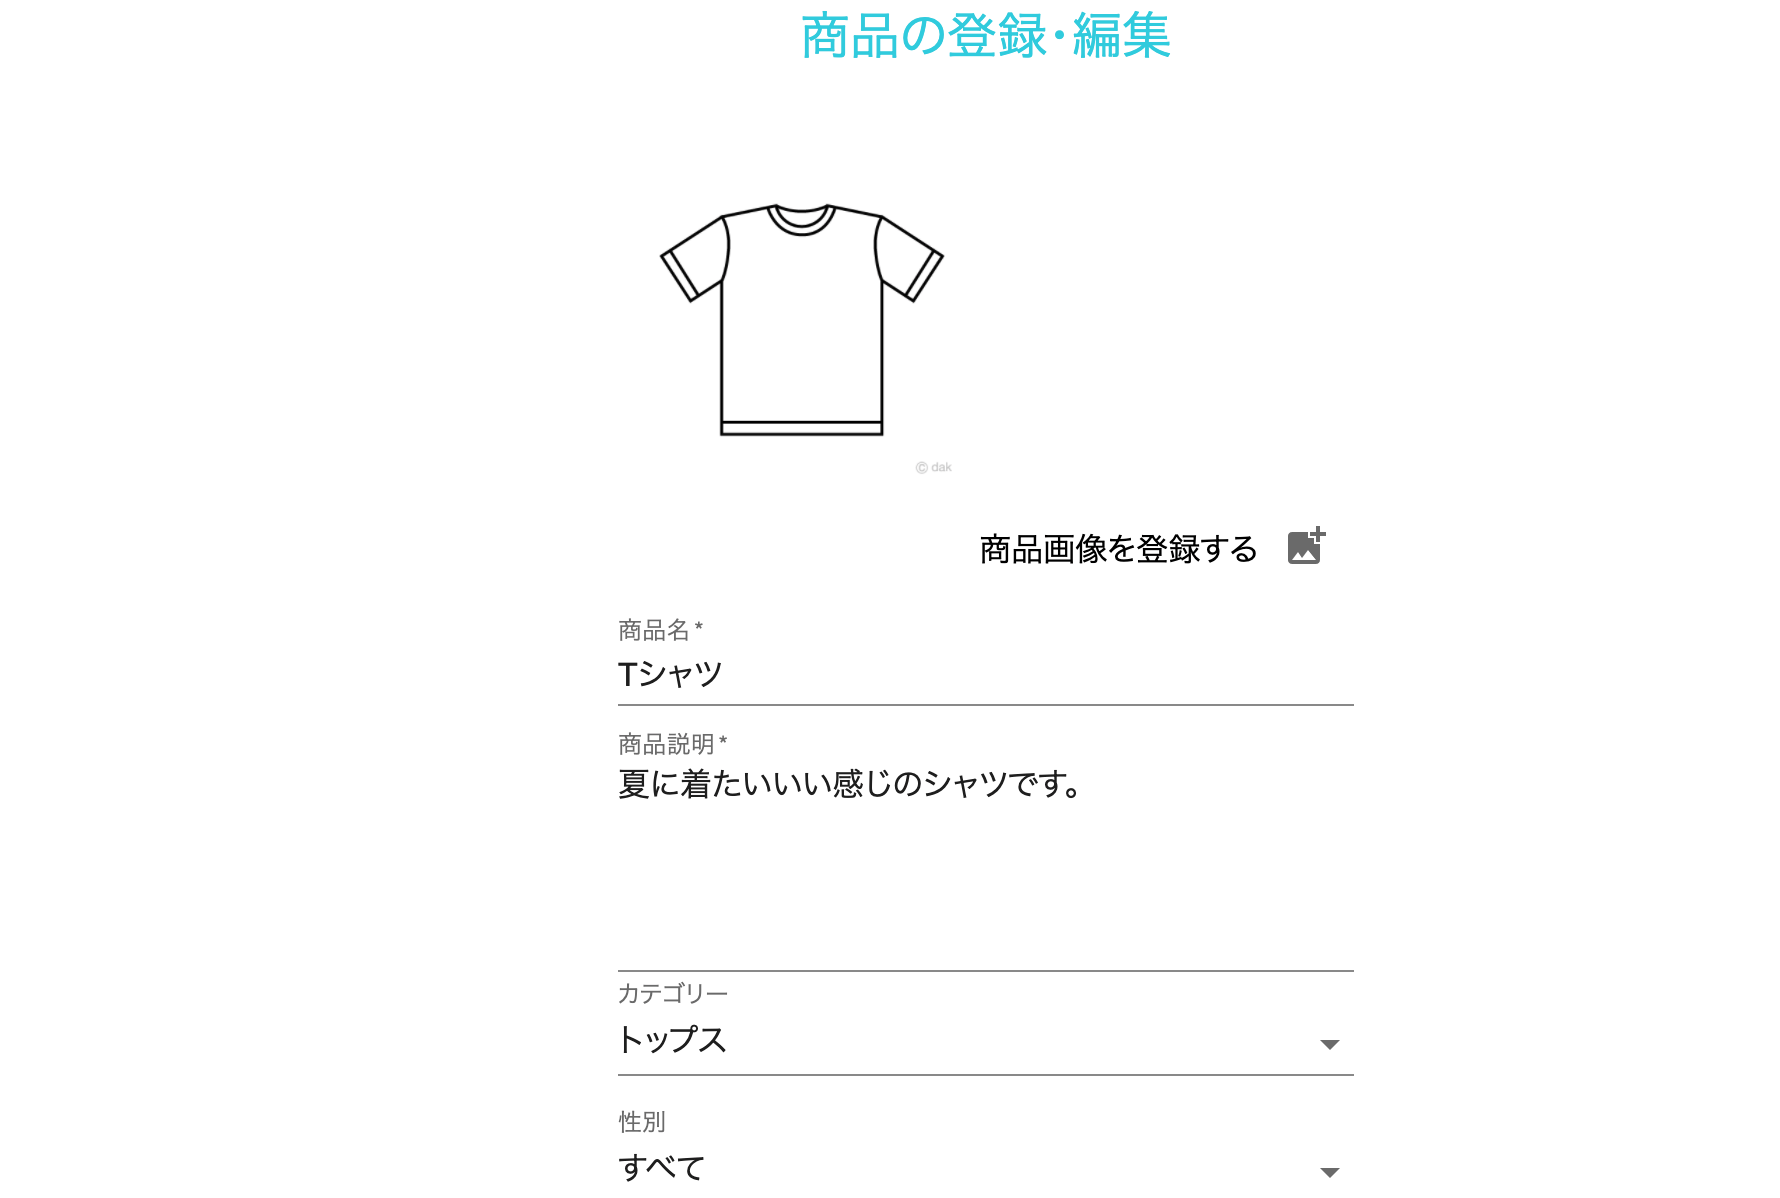
Cloud Firestore 上のデータが画面に反映され、各入力フィールドに表示されています。
入力値を変更し「商品情報を保存」をクリックすると、

↓
商品情報の Update ができました!
商品情報登録画面のルーティング修正
前回までで、Products の新規登録機能を、下記の仕様で実装しました。
- テンプレート:
ProductEdit.jsx - ルーティング:
/product/edit
Updateを実装するにあたり、テンプレート、ルーティングを新規登録と別個に実装してもよいのですが、今回はルーティングの正規表現をうまく使うことで、テンプレートを共通して使用します。
ルーティングの正規表現
src/Roter.jsx を編集します。
import React from 'react';
import {Route, Switch} from "react-router";
import {Home,ProductEdit,Reset,SignIn,SignUp} from "./templates";
import Auth from "./Auth"

const Router = () => {
  return (
    <Switch>
      <Route exact path={"/signup"} component={SignUp} />
      <Route exact path={"/signin"} component={SignIn} />
      <Route exact path={"/signin/reset"} component={Reset} />

      <Auth>
        <Route exact path={"(/)?"} component={Home} />
        {/* <Route exact path={"/product/edit"} component={ProductEdit} /> */}
        <Route path={"/product/edit(/:id)?"} component={ProductEdit} /> //追記
      </Auth>
    </Switch>
  );
};

export default Router
path={"/product/edit(/:id)?"}の部分が、正規表現を用いたルーティングです。
exact path -> pathとすることで、ルーティングの条件が完全一致から部分一致に切り替わります。
加えて、正規表現である(/:id)?を付け加えることで、
- /product/edit
- /product/edit/(何らかの文字列)
にアクセスがあったときは、いずれもcomponent={ProductEdit}が描画されるようになります。
この:idの部分には、Cloud firestore 上の Products の idが文字列として入ります。これをアプリ側で取得することで、「どの products を編集したいか」を判断します。
最終的には、
-
/product/edit
→ 新規登録画面 -
/product/edit/(保存済みの products の id)
→ 編集画面
のように切り替えます。特に編集画面の方では、対応する id の DB情報を取得し、アプリ側で表示させる処理(各入力フォームへの反映)を行います。
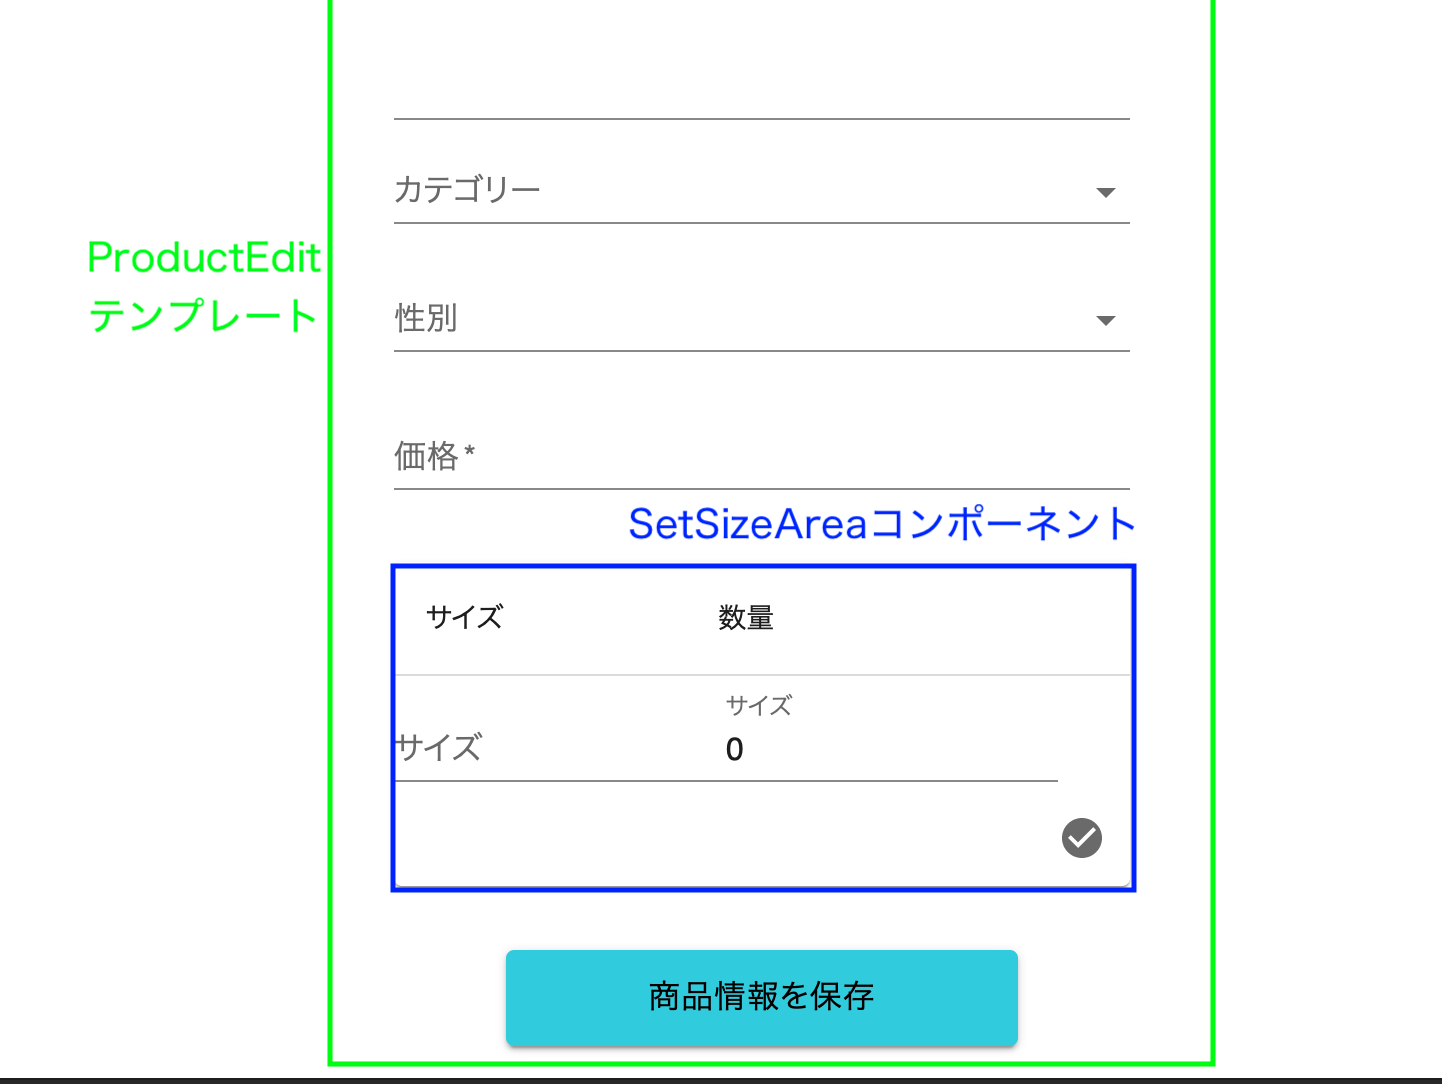
SetSizeAreaコンポーネント
編集機能の前に、サイズ・数量を入力するフォームを作成します。
今回はProductEdit.jsxに直接記述するのではなく、SetSizeArea.jsxという外部コンポーネントを定義して実装します。
import React, {useCallback, useMemo, useState} from 'react';
import {TextInput} from "../UIkit";
import IconButton from "@material-ui/core/IconButton";
import CheckCircleIcon from '@material-ui/icons/CheckCircle';
import DeleteIcon from '@material-ui/icons/Delete';
import EditIcon from '@material-ui/icons/Edit';
import Table from '@material-ui/core/Table';
import TableBody from '@material-ui/core/TableBody';
import TableCell from '@material-ui/core/TableCell';
import TableContainer from '@material-ui/core/TableContainer';
import TableHead from '@material-ui/core/TableHead';
import TableRow from '@material-ui/core/TableRow';
import Paper from '@material-ui/core/Paper';
import {makeStyles} from "@material-ui/styles";

const useStyles = makeStyles({
  checkIcon: {
    float: "right"
  },
  iconCell: {
    height: 48,
    width: 48
  }
})

const SetSizeArea = (props) => {
  const classes = useStyles();

  const [index, setIndex] = useState(0),
        [size, setSize] = useState(""),
        [quantity, setQuantity] = useState(0)

  const inputSize = useCallback((event)=>{
    setSize(event.target.value)
  },[setSize]);

  const inputQuantity = useCallback((event)=>{
    setQuantity(event.target.value)
  },[setQuantity]);

  const addSize = (index, size, quantity) => {
    if (size === "" || quantity === "" ) {
      return false
    } else {
      if (index === props.sizes.length) {
        props.setSizes(prevState => [...prevState, {size:size, quantity:quantity}])
        setIndex(index + 1)
        setSize("")
        setQuantity(0)
      } else {
        const newSizes = props.sizes
        newSizes[index] = {size:size, quantity:quantity}
        props.setSizes(newSizes)
        setIndex(newSizes.length)
        setSize("")
        setQuantity(0)
      }
    }
  };

  const editSize = (index,size,quantity) => {
    setIndex(index);
    setSize(size);
    setQuantity(quantity);
  }

  const deleteSize = (deleteIndex) => {
    const newSizes = props.sizes.filter((item,i) => i !== deleteIndex);
    props.setSizes(newSizes);
  }

  const memoIndex = useMemo(() => {
    setIndex(props.sizes.length)
  }, [props.sizes.length])

  return (
    <div>
      <TableContainer component={Paper}>
        <Table>
          <TableHead>
            <TableRow>
              <TableCell>サイズ</TableCell>
              <TableCell>数量</TableCell>
              <TableCell className={classes.iconCell} />
              <TableCell className={classes.iconCell} />
            </TableRow>
          </TableHead>
          <TableBody >
            { props.sizes.length > 0 && (
              props.sizes.map((item,i) => (
                <TableRow key={item.size}>
                  <TableCell>{item.size}</TableCell>
                  <TableCell>{item.quantity}</TableCell>
                  <TableCell>
                    <IconButton className={classes.iconCell} onClick={() => editSize(i,item.size,item.quantity)}>
                      <EditIcon />
                    </IconButton>
                  </TableCell>
                  <TableCell>
                    <IconButton className={classes.iconCell} onClick={() => deleteSize(i)}>
                      <DeleteIcon />
                    </IconButton>
                  </TableCell>
                </TableRow>
              ))
            )}
          </TableBody>
        </Table>
        <div>
          <TextInput
            fullWidth={false} label={"サイズ"} multiline={false} requires={true}
            onChange={inputSize} rows={1} value={size} type={"text"}
          />
          <TextInput
            fullWidth={false} label={"サイズ"} multiline={false} requires={true}
            onChange={inputQuantity} rows={1} value={quantity} type={"number"}
          />
        </div>
        <IconButton className={classes.checkIcon} onClick={() => addSize(index, size,quantity)}>
          <CheckCircleIcon/>
        </IconButton>
      </TableContainer>
    </div>
  )
}

export default SetSizeArea
JSX部分については、 Material-UI の Table をうまく活用して実装しています。
本コンポーネントは、親コンポーネントであるProductEdit.jsxから、sizes(およびそれを変更するsetSizes)を受け取ります。
sizesの中には、size(サイズ)とquantitiy(数量)の組み合わせが、複数格納されています。
これらの値は、最終的には他の商品情報と合わせて Cloud Firestore へ送信されるため、SetSizeArea.jsxのローカル state としてではなく、ProducEdit内で定義し、propsとして渡しています。
SetSizeArea.jsxでは、受け取ったprops.sizesを扱うために以下の3つのローカル stateを 定義しています。
- index(int):
props.sizes.length(登録されたサイズ・数量セットの数)を格納する - size(str): フォームに入力された「サイズ」を格納する
- quantity(int): フォームに入力された「数量」を格納する
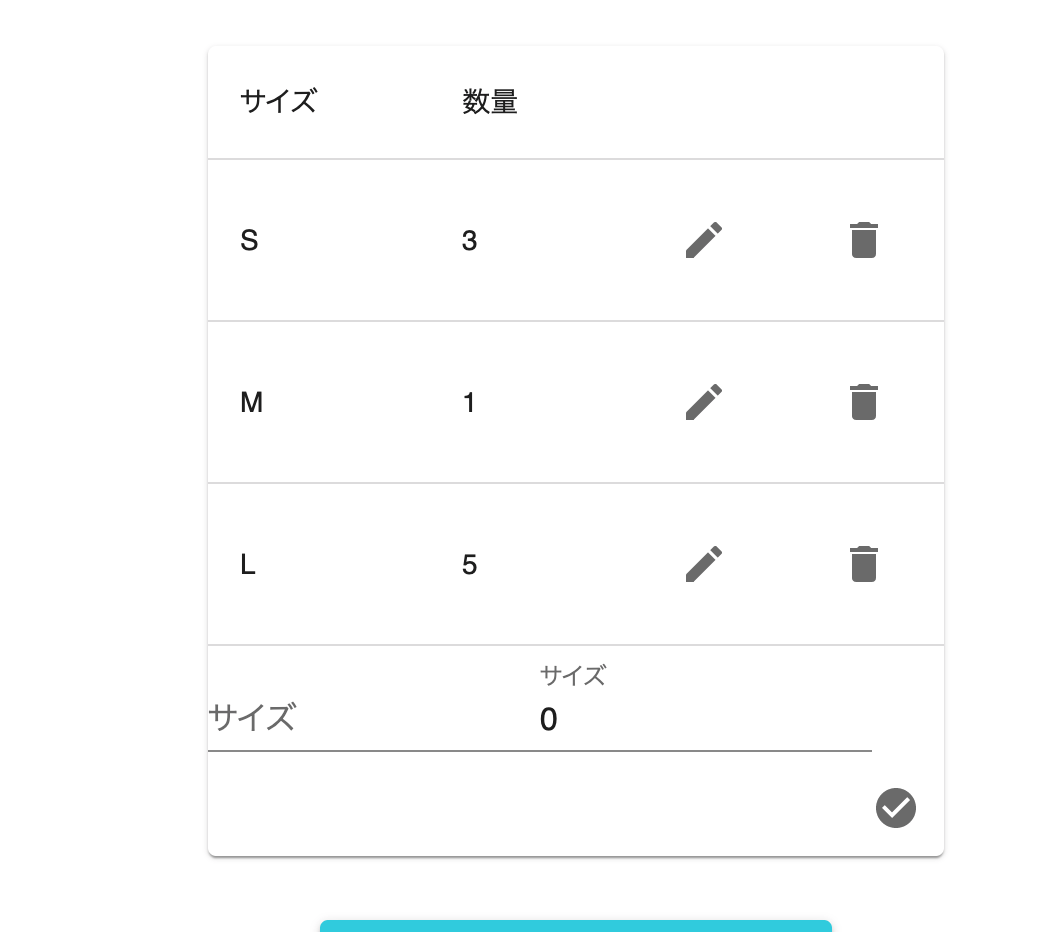
今回のアプリでは、サイズ・数量のセットは複数登録できる仕様にします。「今現在、何セット登録されているか」を表す情報が都度必要になるため、indexを定義しています。
各 state の役割を整理すると、
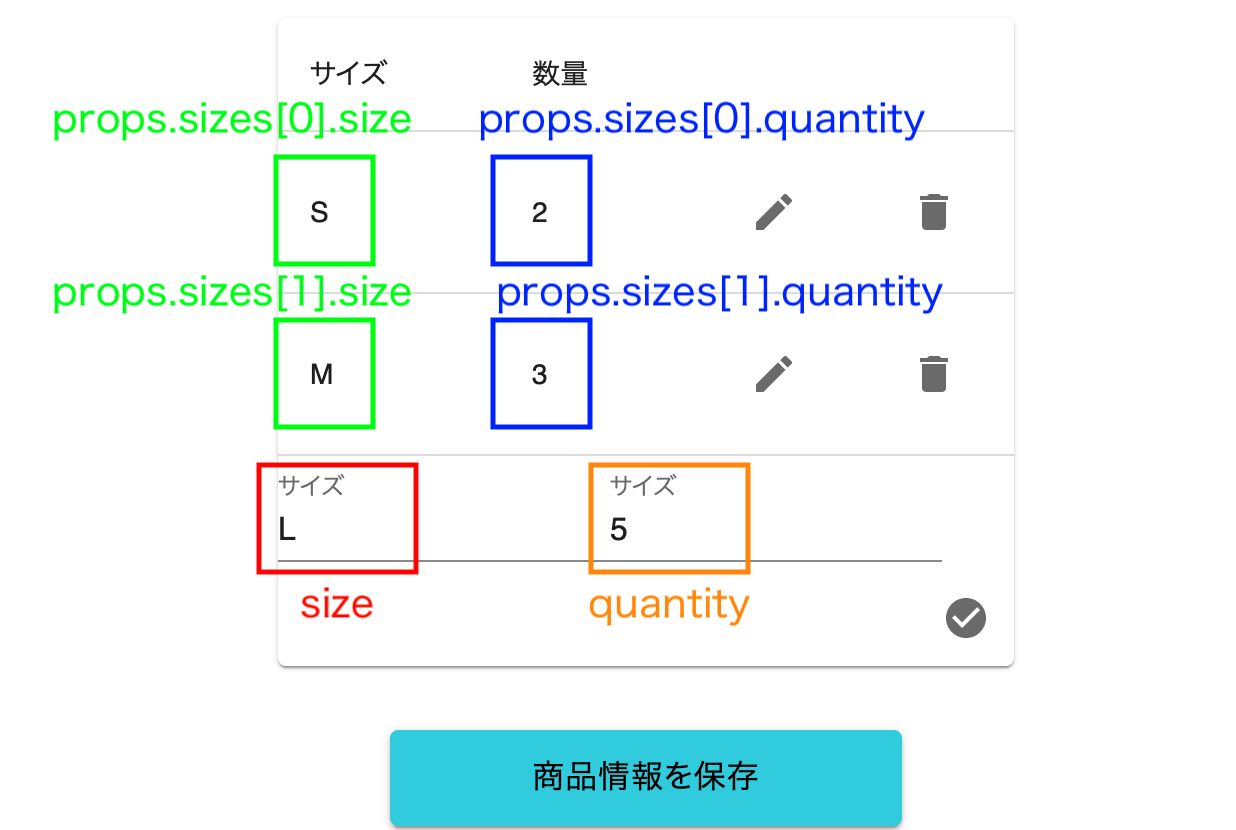
この画面の状態では、index=2となります。
state の操作として、以下の3つの関数を定義してます。
- addSize: 入力したサイズ・数量を登録する
- editSize: 登録したサイズ・数量を編集する
- deleteSize: 登録したサイズ・数量を削除する
addSize では、props.setSizeを用いて、size と quantity をprops.sizesに追加します。この操作により、index が +1 されます。
editSize では、該当する index のprops.sizesの値を、入力フォームの値をもとに更新します。この関数は、index の値は変わりません。
deleteSize では、該当する index のprops.sizesを削除します。index の値は -1 されます。
関数と画面のアイコンを紐づけるとこんな感じ。

ついでに、src/components/products直下のコンポーネントを外部読み込みするためのエントリーポイントを作成します(今まではエントリーポイント経由ではなく、直接読み込んでいました)
export {default as ImageArea} from "./ImageArea"
export {default as ImagePreview} from "./ImagePreview"
export {default as SetSizeArea} from "./SetSizeArea"
編集機能の追加
先ほどのSetSizeArea.jsxの配置と、編集機能の追加をいっぺんに行います。編集ファイルは以下の通り。
1. src/templates/ProductEdit.jsx
2. src/reducks/products/operations.js
import React,{ useState, useCallback, useEffect } from "react";
import { PrimaryButton, SelectBox, TextInput } from "../components/UIkit";
import { useDispatch } from "react-redux";
import { saveProduct } from "../reducks/products/operations";
import {db} from "../firebase"
import { ImageArea,SetSizeArea } from "../components/Products";

const ProductEdit = () => {
  const dispatch = useDispatch();

  let id = window.location.pathname.split('/product/edit')[1];
  if (id !== "") {
    id = id.split("/")[1]
  }

  const [name, setName] = useState(""),
        [description, setDescription] = useState(""),
        [category, setCategory] = useState(""),
        [gender, setGender] = useState(""),
        [images, setImages] = useState([]),
        [price, setPrice] = useState(""),
        [sizes, setSizes] = useState([]);

  const inputName = useCallback((event) => {
    setName(event.target.value)
  },[setName])

  const inputDescription = useCallback((event) => {
    setDescription(event.target.value)
  },[setDescription])

  const inputPrice = useCallback((event) => {
    setPrice(event.target.value)
  },[setPrice])

  const categories = [
    {id:"tops", name:"トップス"},
    {id:"shirt", name:"シャツ"},
    {id:"pants", name:"パンツ"}
  ]

  const genders = [
    {id:"all", name:"すべて"},
    {id:"male", name:"メンズ"},
    {id:"female", name:"レディース"}
  ]

  useEffect(() => {
    if (id !== "") {
      db.collection("products").doc(id).get()
        .then(snapshot => {
          const data = snapshot.data();
          setImages(data.images);
          setName(data.name);
          setDescription(data.description)
          setGender(data.gender);
          setCategory(data.category);
          setPrice(data.price)
          setSizes(data.sizes)
        })
    }
  },[id]);

  return (
    <section>
      <h2 className="u-text__headline u-text-center">商品の登録・編集</h2>
      <div className="c-section-container">
        <ImageArea images={images} setImages={setImages} />
        <TextInput
          fullWidth={true} label={"商品名"} multiline={false} required={true}
          onChange={inputName} rows={1} value={name} type={"text"}
          />
        <TextInput
          fullWidth={true} label={"商品説明"} multiline={true} required={true}
          onChange={inputDescription} rows={5} value={description} type={"text"}
          />
        <SelectBox
          label={"カテゴリー"} required={true} options={categories} select={setCategory} value={category}
        />
        <SelectBox
          label={"性別"} required={true} options={genders} select={setGender} value={gender}
        />
        <TextInput
          fullWidth={true} label={"価格"} multiline={false} required={true}
          onChange={inputPrice} rows={1} value={price} type={"number"}
          />
        <div className="module-spacer--small" />
        <SetSizeArea sizes={sizes} setSizes={setSizes}  />
        <div className="module-spacer--small" />
        <div className="center">
          <PrimaryButton
            label={"商品情報を保存"}
            onClick={() => dispatch(saveProduct(id, name, description, category, gender, images, price, sizes))}
            />
        </div>
      </div>
    </section>
  )
}

export default ProductEdit
let id = の箇所で、URL末尾の:idにあたる部分の文字列を抽出しています。これが Cloud Firestore の productsドキュメントの id に対応します。
id に対応する Cloud Firestore の productsドキュメントを取得しています。もし、id===""であるときは、新規登録画面として描画するため、この操作は行いません。
このCloud Firestore からのデータの取得は、useEffect()を用いて実装しています。第2引数に[id]を入れることで、[id]が切り替わるタイミングでのみ、Cloud Firestore との通信が行われるようにしています。
そして、取得した products ドキュメントの各フィールド値を、<TextInput>の value に渡すことで、入力フォームに対して「現在の登録内容」を表示させます。
このように実装することで、ProductEdit.jsxが、「新規登録」「更新」両方の場面で共通して使えるテンプレートになります。
続いて、「商品情報を登録する」ボタンで発火するsaveProductを編集します。現在は、「新規登録」にしか対応していないので、こちらも「更新」に対応できるようにします。
import {db, FirebaseTimestamp} from "../../firebase";
import { push } from "connected-react-router";

const productsRef = db.collection("products")

export const saveProduct = (id,name,description,category,gender,images,price) => {
  return async (dispatch) => {
    const timestamp = FirebaseTimestamp.now()

    const data = {
      category: category,
      description: description,
      gender: gender,
      images: images,
      name: name,
      price: parseInt(price, 10),
      updated_at: timestamp
    }

    if (id === "") {
      const ref = productsRef.doc();
      id = ref.id;
      data.id = id
      data.created_at = timestamp
    }

    return productsRef.doc(id).set(data, {merge: true})
      .then(() => {
        dispatch(push('/'))
      }).catch((error) => {
        throw new Error(error)
      })
  }
}
新規idの発行は、「新規登録」のときのみとしたいので、if (id === "") {...で条件分岐させています。
また、最後のreturnで.set(data, {merge: true})とすることで、 既存のフィールド値はそのまま変更箇所のみを更新する、という操作が可能になります。
動作確認
まずは新規登録を通じて、SetSizeArea.jsxの動作を確認します。
http://localhost:3000/product/edit
登録、編集、削除が行えています!
その他フォームも入力し、「商品情報を保存」します。
実装が正しく行えていれば、アプリはルートにリダイレクトされます。
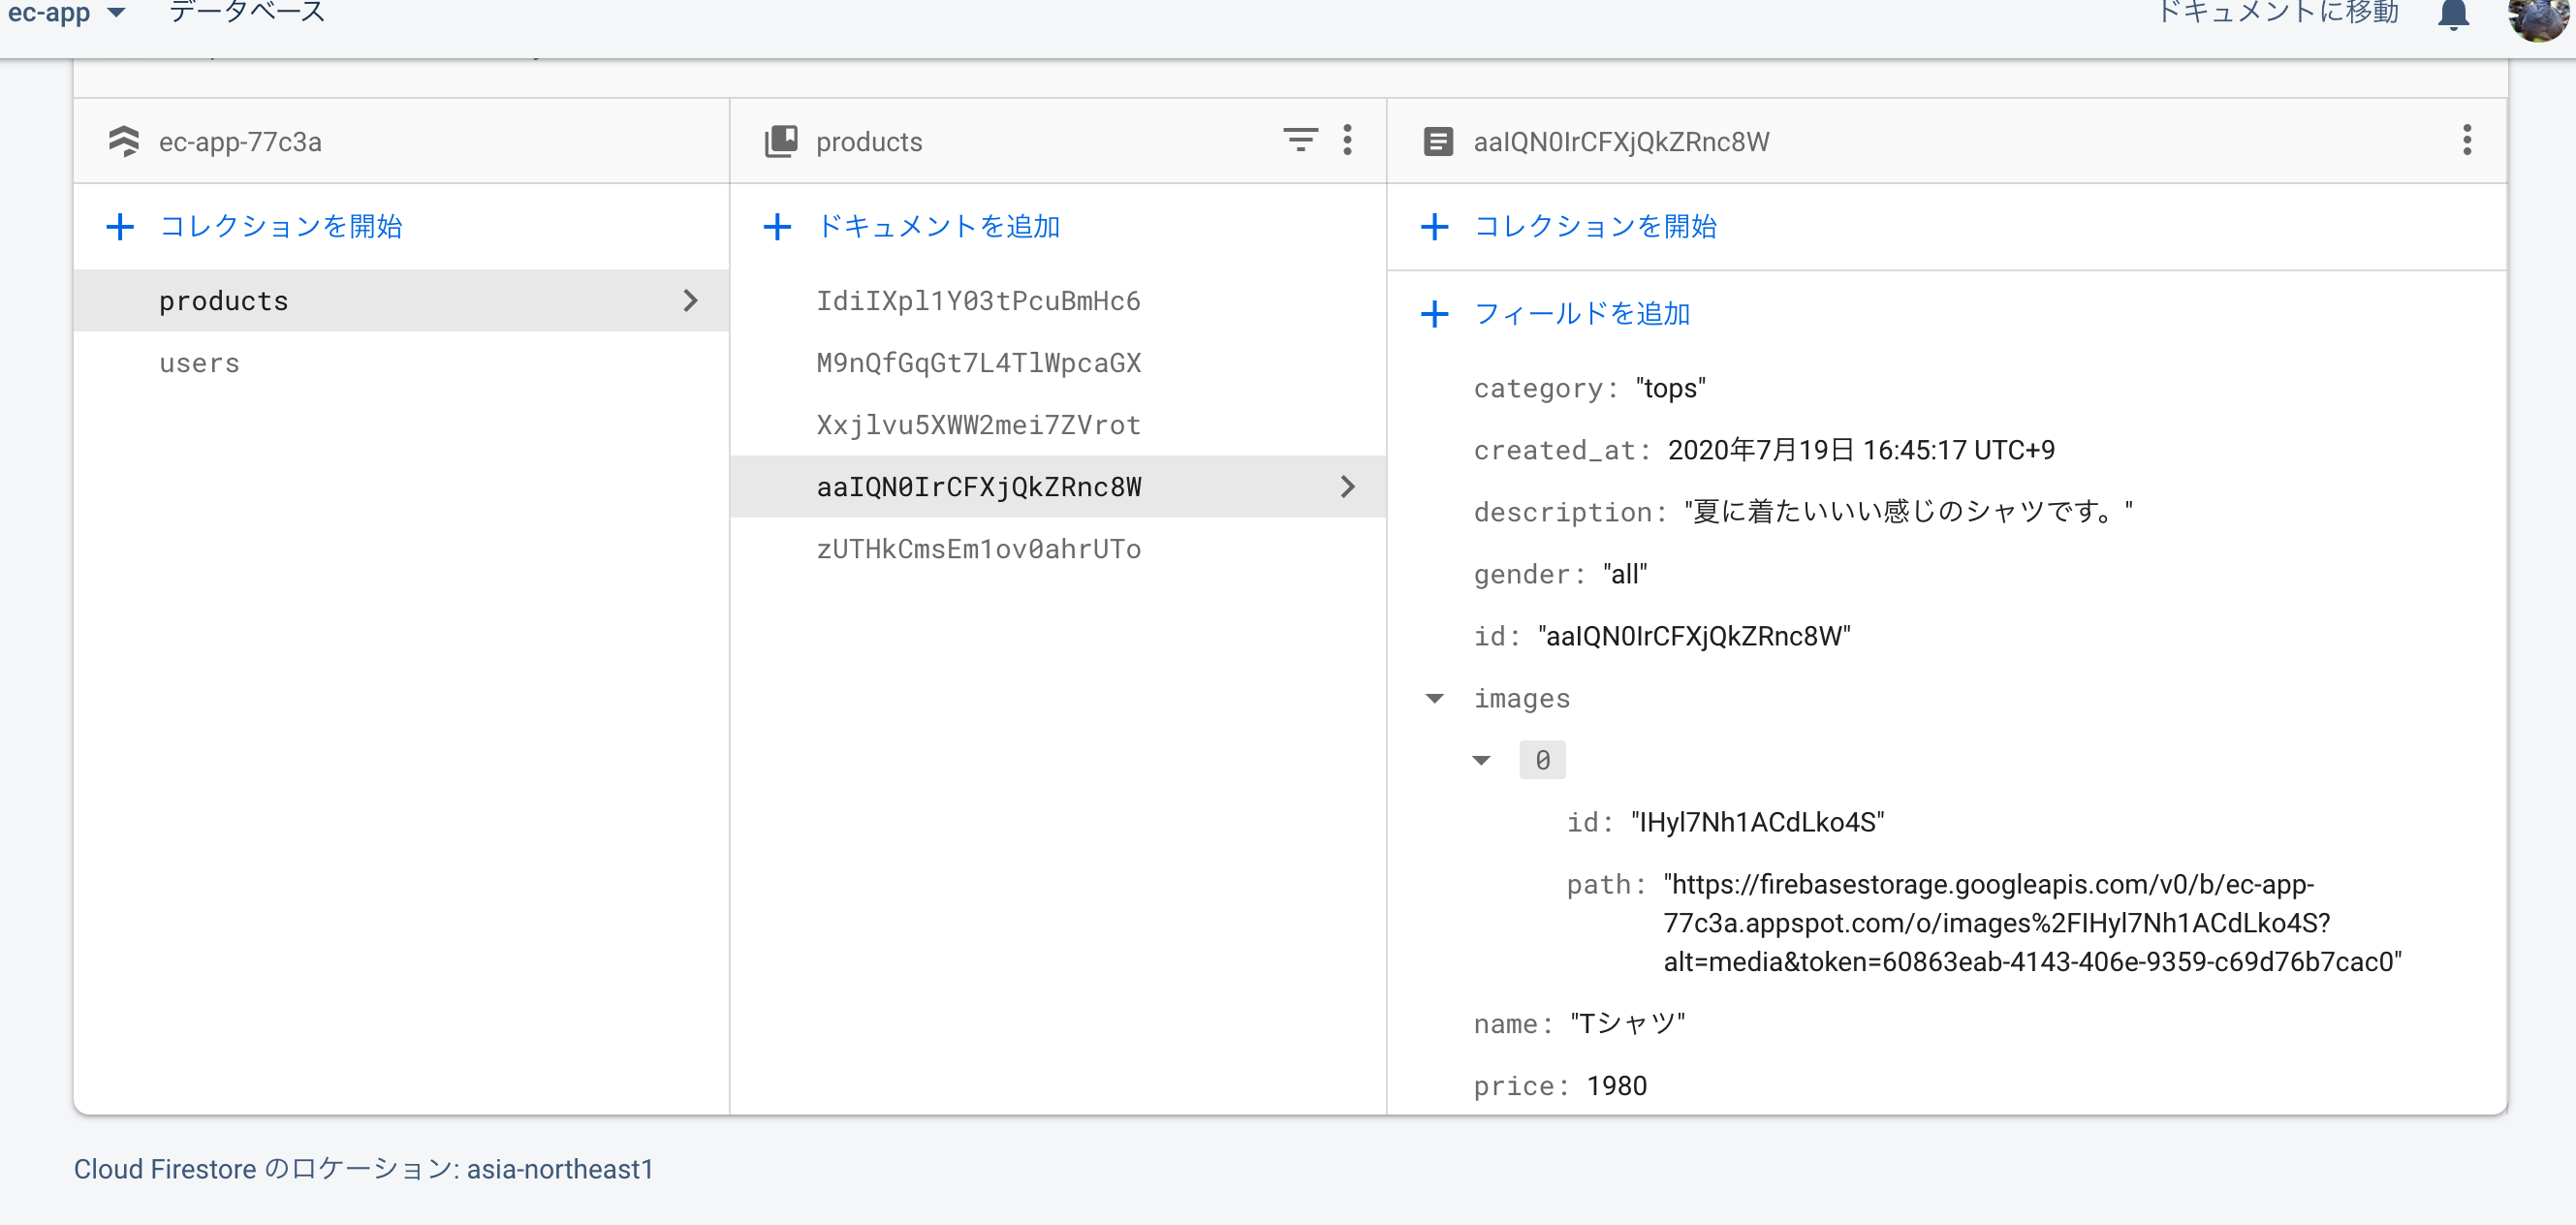
Firebaseコンソールから確認すると、
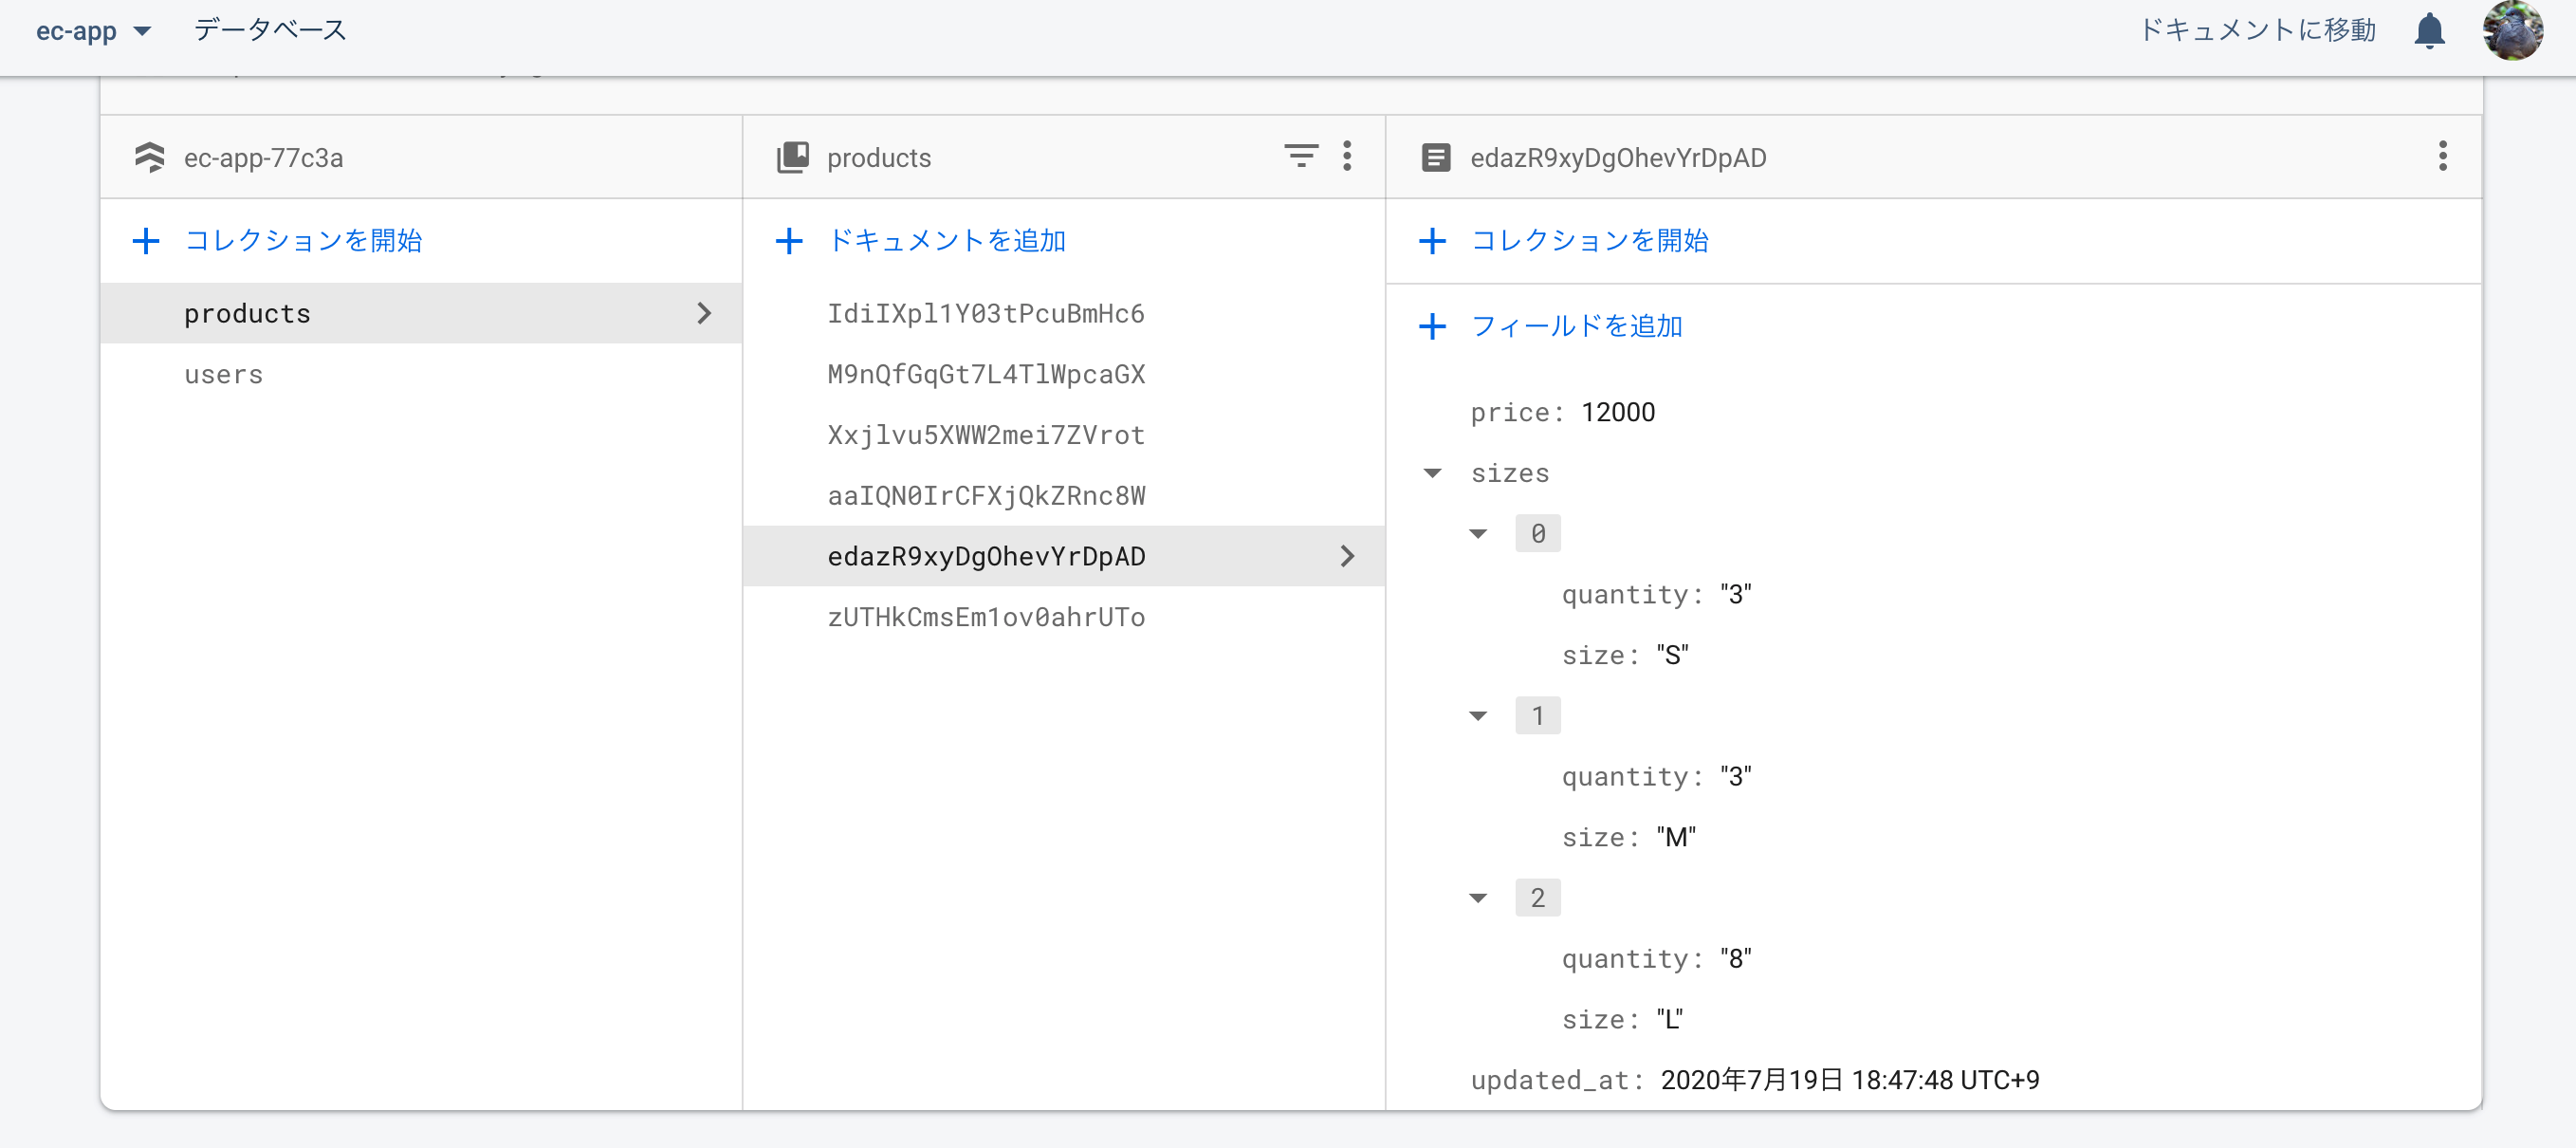
ちゃんと sizes の情報も登録されていますね!
続いて、編集機能を確認します。先ほどの登録した商品情報のidをコピーし、該当URLにアクセスします。
http://localhost:3000/product/edit/edazR9xyDgOhevYrDpAD

Cloud Firestore に一度保存された情報が、入力フォームに反映されています!
値を更新して、再度データを送信します。
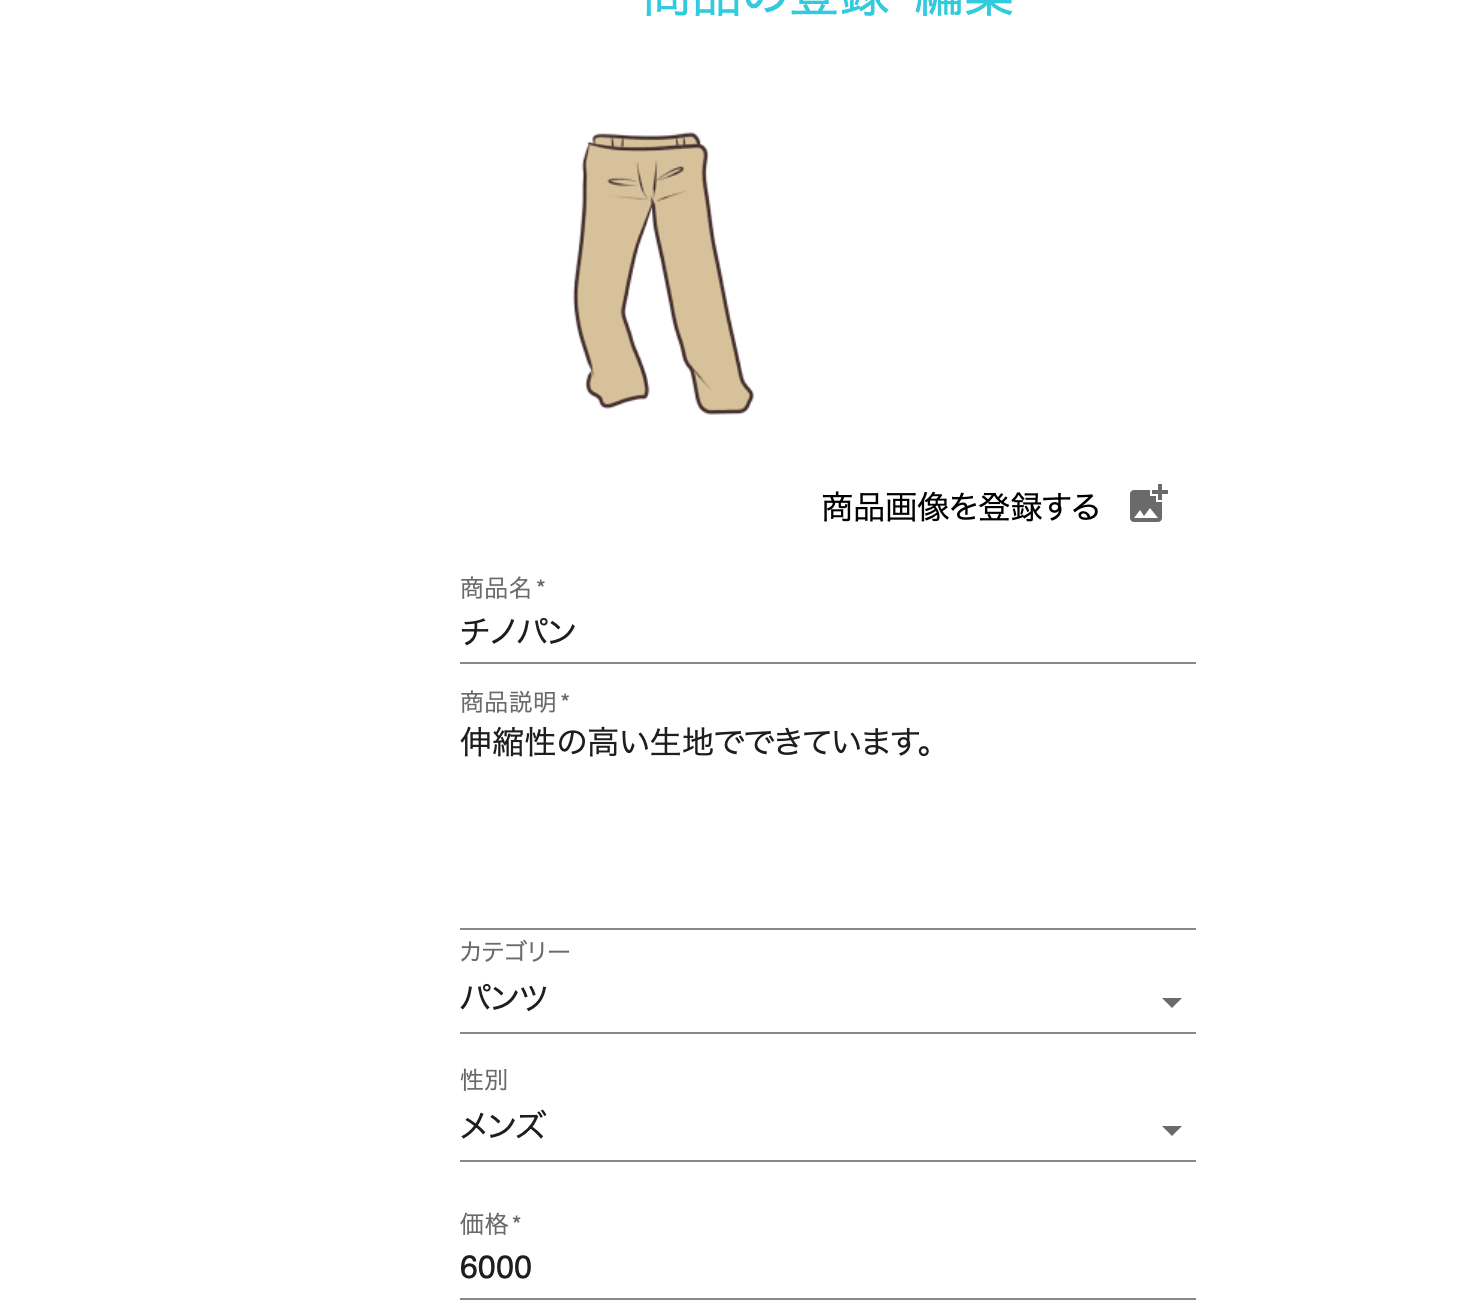
無事、Update機能が動作しています!
さいごに
今回の要点を整理すると、
- ルーティングの正規表現を用いることで、各 products ドキュメントに対応した編集画面を表示させる
- Cloud Firestore からのデータの取得時には
useEffectを用いる。
今回は以上です!
このような学習内容を日々呟いていますので、よろしければTwitter(@ddpmntcpbr)のフォローもよろしくお願いします。