Amplify GeoとVue.jsを組み合わせてマップアプリケーションを構築してみました 
以前、プレビュー版の記事をMIERUNEメンバーが出してくれました ![]()
今回は、先日Amplify Geoが正式に一般公開されたのでさっそく試してみました!
Amplify Geoとは、AWS Amplifyの機能の一部として、Amazon Location Serviceをより手軽に構築できるようにした機能です ![]()
事前準備
- AWS AmplifyとVue.jsのログイン機能までの設定
AWS AmplifyとAmplify UI VueとVue 3でログイン機能を構築してみた
Amplify Geoの設定
はじめに、Amplify Geoの設定をします。
位置情報機能(マップ)を追加
位置情報機能(マップ)のみであればこの2コマンドで実装可能です!
Amazon Location Serviceでは、AWSコンソールでの設定やロールの設定がぞれぞれ必要でしたが、Amplify Geoを利用することでそれらの設定をすべてAmplifyでおこなってくれます!
amplify add geo
amplify push
これでAmplify Geoの設定は完了になります ![]()
フロントエンド
次に、実際にマップアプリケーションを構築していきます。
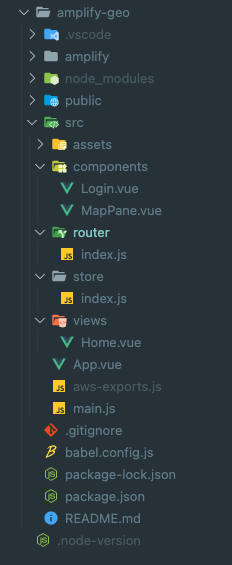
AmplifyとVue.jsの構成ができていると、基本的には「MapPane.vue」を新規で追加するのと、コードを一部変更するのみになります。
実行環境
- node v16.10.0
- npm v7.24.0
事前に、MapLibre GL JSのv1とラッパーライブラリであるMapLibre GL JS Amplifyのパッケージをインストールします。
npm install maplibre-gl@1.15.2
npm install maplibre-gl-js-amplify
全体構成
package.json
{
  "name": "amplify-geo",
  "version": "0.1.0",
  "private": true,
  "scripts": {
    "serve": "vue-cli-service serve",
    "build": "vue-cli-service build",
    "lint": "vue-cli-service lint"
  },
  "dependencies": {
    "@aws-amplify/ui-components": "^1.9.2",
    "aws-amplify": "^4.3.4",
    "core-js": "^3.6.5",
    "maplibre-gl": "^1.15.2",
    "maplibre-gl-js-amplify": "^1.1.2",
    "vue": "^3.0.0",
    "vue-router": "^4.0.0-0",
    "vuex": "^4.0.0-0"
  },
  "devDependencies": {
    "@vue/cli-plugin-babel": "~4.5.0",
    "@vue/cli-plugin-eslint": "~4.5.0",
    "@vue/cli-plugin-router": "~4.5.0",
    "@vue/cli-plugin-vuex": "~4.5.0",
    "@vue/cli-service": "~4.5.0",
    "@vue/compiler-sfc": "^3.0.0",
    "babel-eslint": "^10.1.0",
    "eslint": "^6.7.2",
    "eslint-plugin-vue": "^7.0.0"
  },
  "eslintConfig": {
    "root": true,
    "env": {
      "node": true
    },
    "extends": [
      "plugin:vue/vue3-essential",
      "eslint:recommended"
    ],
    "parserOptions": {
      "parser": "babel-eslint"
    },
    "rules": {}
  },
  "browserslist": [
    "> 1%",
    "last 2 versions",
    "not dead"
  ]
}
/src
main.js
import { createApp } from 'vue'
import App from './App.vue'
import router from './router'
import store from './store'
import 'maplibre-gl/dist/maplibre-gl.css'

import {
  applyPolyfills,
  defineCustomElements
} from '@aws-amplify/ui-components/loader';
import Amplify from 'aws-amplify';
import awsconfig from './aws-exports';
Amplify.configure(awsconfig);

applyPolyfills().then(() => {
  defineCustomElements(window);
});

const app = createApp(App);
app.config.isCustomElement = tag => tag.startsWith('amplify-');
app.use(store).use(router).mount('#app');
MapLibre GL JSを読み込みます。
import 'maplibre-gl/dist/maplibre-gl.css'
/src/views
Home.vue
<template>
  <div class="home">
    <h2>Amplify Geo</h2>
    <MapPane></MapPane>
    <amplify-sign-out></amplify-sign-out>
  </div>
</template>

<script>
import MapPane from '@/components/MapPane.vue'

export default {
  name: 'Home',
  components: {
    MapPane
  }
}
</script>
マップコンポーネントを設定します。
<MapPane></MapPane>
マップコンポーネントを読み込みます。
import MapPane from '@/components/MapPane.vue'

export default {
    name: 'home',
    components: {
        MapPane
    }
}
/src/components
MapPane.vue
<template>
    <div class='mapPane'>
        <div id='map'></div>
    </div>
</template>

<script>
    import { createMap, drawPoints } from 'maplibre-gl-js-amplify';

    export default {
        name: 'MapPane',
        data() {
            return {
            }
        },
        mounted: async function () {
            this.mapCreate();
        },
        methods: {
            mapCreate: async function() {
                const map = await createMap({
                    container: 'map',
                    center: [139.7648, 35.6794],
                    zoom: 15,
                    bearing: 64.8,
                    pitch: 60,
                    hash: true,
                });

                map.on('load', function () {
                    drawPoints('pointsSource',
                        [
                            {
                                coordinates: [139.7646, 35.6827],
                                title: 'Point01',
                                address: 'Main Points',
                            },
                            {
                                coordinates: [139.7720, 35.6768],
                                title: 'Point02',
                            },
                            {
                                coordinates: [139.7607, 35.6759],
                            },
                        ],
                        map,
                        {
                            showCluster: true,
                            unclusteredOptions: {
                                showMarkerPopup: true,
                                defaultColor: '#005773'
                            },
                            clusterOptions: {
                                showCount: true,
                                fillColor: '#005773'
                            },
                        }
                    );
                });
            }
        }
    }
</script>

<style scoped>
    #map {
        z-index: 0;
        height: 800px;
    }
</style>
MapLibre GL JS Amplifyでマップ機能とマーカー機能を読み込みます。
import { createMap, drawPoints } from 'maplibre-gl-js-amplify';
MapLibre GL JS Amplifyでマップを設定します。
const map = await createMap({
    container: 'map',
    center: [139.7648, 35.6794],
    zoom: 15,
    bearing: 64.8,
    pitch: 60,
    hash: true,
});
MapLibre GL JS Amplifyでマーカーを設定します。
drawPoints('pointsSource',
    [
        {
            coordinates: [139.7646, 35.6827],
            title: 'Point01',
            address: 'Main Points',
        },
        {
            coordinates: [139.7720, 35.6768],
            title: 'Point02',
        },
        {
            coordinates: [139.7607, 35.6759],
        },
    ],
    map,
    {
        showCluster: true,
        unclusteredOptions: {
            showMarkerPopup: true,
            defaultColor: '#005773'
        },
        clusterOptions: {
            showCount: true,
            fillColor: '#005773'
        },
    }
);
簡易ローカルサーバーで確認してみます。
npm run serve
ローカルサーバーを立ち上げて、ログインしてみます ![]()
Amplify GeoとVue.jsを組み合わせてマップアプリケーションを構築できました 
Amplify Geoを利用すると、AWSコンソールでの設定やロールの設定が不要になり、Amazon Location Serviceをそのまま利用するよりも手軽に構築できます。ただ、既存機能以上のカスタマイズをする時は、MapLibre GL JSを直接読み込んで開発する必要があり、Amplify Geoの必要な部分と組み合わせて利用することでより複雑なカスタマイズができそうです。引き続き探っていきたいと思います ![]()
AWS AmplifyとMapLibre GL JSとVue.jsについて、他にも記事を書いています。よろしければぜひ。
tags - AWS Amplify
tags - MapLibre GL JS
tags - Vue.js
やってみたシリーズ ![]()
tags - Try
Amazon Location ServiceとMapLibre GL JSとAWS AmplifyとVue.jsを組み合わせてマップアプリケーションを構築してみた
AWS AmplifyとAmplify UI VueとVue 3でログイン機能を構築してみた


