モチベーション
RHEL8も導入する前提での良記事が有ります。
RHEL8&JBossEAPを爆速で試す
一方で、アプリ開発したい方々には
「JBoss EAPに触れたいだけなのにOSインストールから始めるの!?面倒くさい!」という人も居ます。
更にライトに試せる手順を目指して、環境導入ナレッジを纏めます。
大前提
可能な限り、低コスト+お手軽に組みます。
-
JBoss EAP導入先の環境としてAWS EC2を採用。
-
AWS無料利用枠内での稼働を想定して、インスタンスタイプは
t2.microを用います。 -
JBoss EAPライセンスは
Red Hat Developer Subscription for Individualsを利用します。
Red Hat Developer Programへの登録が必要です。- 概要と登録手順を解説しておられる良記事ありますので参照ください。
- ライセンス要綱に目を通していることも前提とします。
-
EC2へのSSH接続にはTeratermを用います。
本編
1.RHELインストール
AWS管理コンソール操作して、JBoss EAP導入先となるEC2インスタンスを作成。
お手軽に済ませます。
解説ページ沢山ありますので仔細は割愛。
インスタンス作成する際の、各画面での留意事項のみ以下に纏めます。
- AMIの選択
- Red Hat Enterprise Linux 8(
無料利用枠の対象タグ有るもの)を選びます。 - 他はデフォルト(x86)で「選択」ボタンをクリック。
- インスタンスタイプの選択
- デフォルト(
t2.micro)のまま「次のステップ」に進みます。
- インスタンスの設定
- 特段の設定なし。
- ストレージの追加
- EBS容量を30GBに増量します。2021/7/25時点:無料の範疇です。
- タグの追加
- 特段の設定なし。
- セキュリティグループの追加
- 「SSH接続」ポートのみ開放したSecurityGroupを作ります。
・SecurityGroupで以下ポート開けてしまうと、セキュリティ観点で宜しくないです。
JBoss EAP管理コンソール(port:9990)
JBoss EAP上の各種アプリケーション(port:任意)
・本記事では上記ポートに通信する折、Teraterm設定によりSSHを経由させる手順としています。
2.事前準備(OS:SWAP設定)
インスタンスタイプt2.microだと、メモリ量(RAM:1.0GiB)が少なくてOOM killerが起きるのでSWAP領域を設定。ひとまず4GB分を用意。
[ec2-user@ip-xx-xx-xx-xx ~]$
[ec2-user@ip-xx-xx-xx-xx ~]$ sudo su - root
# 4GBファイル生成&フォーマット
[root@ip-xx-xx-xx-xx ~]# dd if=/dev/zero of=/swapfile bs=128M count=32
[root@ip-xx-xx-xx-xx ~]# chmod 600 /swapfile
[root@ip-xx-xx-xx-xx ~]# mkswap /swapfile
# SWAPファイル設定
[root@ip-xx-xx-xx-xx ~]# swapon /swapfile
# 設定確認
[root@ip-xx-xx-xx-xx ~]# swapon -s
Filename                                Type            Size    Used    Priority
/swapfile                               file            4194300 0       -2
# 再起動後も有効にしたいので追加設定
[root@ip-xx-xx-xx-xx ~]# vi /etc/fstab
# 以下を書き込んで保存します
/swapfile swap swap defaults 0 0
3.JBoss EAP:インストール + OS:service登録
まず初めに、RedHatアカウントにEC2インスタンスを登録します。
[ec2-user@ip-xx-xx-xx-xx ~]$
[ec2-user@ip-xx-xx-xx-xx ~]$ sudo su - root
[root@ip-xx-xx-xx-xx ~]#
[root@ip-xx-xx-xx-xx ~]# which subscription-manager
/usr/sbin/subscription-manager
[root@ip-xx-xx-xx-xx ~]#
[root@ip-xx-xx-xx-xx ~]# subscription-manager status
+-------------------------------------------+
   System Status Details
+-------------------------------------------+
Overall Status: Unknown

System Purpose Status: Unknown

[root@ip-xx-xx-xx-xx ~]#
[root@ip-xx-xx-xx-xx ~]# subscription-manager register
Registering to: subscription.rhsm.redhat.com:443/subscription
Username: xxxxx
Password:
The system has been registered with ID: xxxxx
The registered system name is: xxxxx
[root@ip-xx-xx-xx-xx ~]#
[root@ip-xx-xx-xx-xx ~]# subscription-manager config --rhsm.manage_repos=1
[root@ip-xx-xx-xx-xx ~]# subscription-manager attach --auto
Installed Product Current Status:
Product Name: Red Hat Enterprise Linux for x86_64
Status:       Subscribed
続いて、JBoss EAPライセンスを有効にします。
今回はJBoss EAP 7.3を用います。
設定値としてはjb-eap-7.3-for-rhel-8-x86_64-rpmsを探します。
まずは管理対象に含まれていること確認。
# subscription-managerで管理できる一覧を表示
[root@ip-xx-xx-xx-xx ~]# subscription-manager repos --list
+----------------------------------------------------------+
    Available Repositories in /etc/yum.repos.d/redhat.repo
+----------------------------------------------------------+
// 割愛

# JBoss EAP関連に絞って表示
[root@ip-xx-xx-xx-xx ~]# subscription-manager repos --list | grep eap
Repo ID:   jb-eap-7.4-for-rhel-8-x86_64-debug-rpms
Repo URL:  https://cdn.redhat.com/content/dist/layered/rhel8/x86_64/jbeap/7.4/debug
Repo ID:   jb-eap-7.3-for-rhel-8-x86_64-source-rpms
Repo URL:  https://cdn.redhat.com/content/dist/layered/rhel8/x86_64/jbeap/7.3/source/SRPMS
Repo ID:   jb-eap-7.3-for-rhel-8-x86_64-rpms
Repo URL:  https://cdn.redhat.com/content/dist/layered/rhel8/x86_64/jbeap/7.3/os
Repo ID:   jb-eap-7.2-for-rhel-8-x86_64-debug-rpms
Repo URL:  https://cdn.redhat.com/content/dist/layered/rhel8/x86_64/jbeap/7.2/debug
Repo ID:   jb-eap-7.3-for-rhel-8-x86_64-debug-rpms
Repo URL:  https://cdn.redhat.com/content/dist/layered/rhel8/x86_64/jbeap/7.3/debug
Repo ID:   jb-eap-textonly-1-for-middleware-rpms
Repo URL:  https://cdn.redhat.com/content/dist/middleware/jbeap/1.0/$basearch/os
Repo ID:   jb-eap-7.4-for-rhel-8-x86_64-rpms
Repo URL:  https://cdn.redhat.com/content/dist/layered/rhel8/x86_64/jbeap/7.4/os
Repo ID:   jb-eap-7.2-for-rhel-8-x86_64-rpms
Repo URL:  https://cdn.redhat.com/content/dist/layered/rhel8/x86_64/jbeap/7.2/os
Repo ID:   jb-eap-7.2-for-rhel-8-x86_64-source-rpms
Repo URL:  https://cdn.redhat.com/content/dist/layered/rhel8/x86_64/jbeap/7.2/source/SRPMS
Repo ID:   jb-eap-7.4-for-rhel-8-x86_64-source-rpms
Repo URL:  https://cdn.redhat.com/content/dist/layered/rhel8/x86_64/jbeap/7.4/source/SRPMS
[root@ip-xx-xx-xx-xx ~]#
続いてライセンス登録します。
subscription-managerコマンドを用いますが、入力補完は効かないので
上記、一覧のRepo ID:をコピーして--enable=の後ろ部分にペーストします。
[root@ip-xx-xx-xx-xx ~]# subscription-manager repos --enable=jb-eap-7.3-for-rhel-8-x86_64-rpms
Repository 'jb-eap-7.3-for-rhel-8-x86_64-rpms' is enabled for this system.
[root@ip-xx-xx-xx-xx ~]#
正しく登録できると、Red Hat サブスクリプション管理が更新されます。
確認方法は補足にて後述します。
最後に、タイトル通り
rpmコマンドを用いてjboss-eap7を導入します。
[root@ip-xx-xx-xx-xx ~]# yum groupinstall jboss-eap7
// 割愛
Installing Groups:
 Red Hat JBoss EAP 7.3

Transaction Summary
====================================================================================================================================
Install  457 Packages

Total download size: 371 M
Installed size: 553 M

# Yes(=y)を入力して進めます
Is this ok [y/N]: y
Downloading Packages:
(1/457): graphite2-1.3.10-10.el8.x86_64.rpm                                                         947 kB/s | 122 kB     00:00
// 割愛
(457/457): eap7-ironjacamar-validator-1.4.33-1.Final_redhat_00001.1.el8eap.noarch.rpm                96 kB/s | 129 kB     00:01
------------------------------------------------------------------------------------------------------------------------------------
Total                                                                                               1.9 MB/s | 371 MB     03:14
Running transaction check
Transaction check succeeded.
Running transaction test
Transaction test succeeded.
Running transaction
// 割愛
Installed products updated.

Installed:
// 割愛

Complete!
[root@ip-xx-xx-xx-xx ~]#
Complete!が出力されたら、インストール先フォルダを確認します。
$EAP_HOMEは空ですが
/opt/rh/eap7/root/usr/share/wildfly/にはファイル配置済です。
[root@ip-xx-xx-xx-xx ~]# echo $EAP_HOME
[root@ip-xx-xx-xx-xx ~]#
[root@ip-xx-xx-xx-xx ~]# ls -ltr /opt/rh/eap7/root/usr/share/wildfly/
total 40
-rw-r--r--. 1 root root    65 Jun  7 03:38 version.txt
drwxr-xr-x. 3 root root    20 Jun  7 03:38 modules
-rw-r--r--. 1 root root 26530 Jun  7 03:38 LICENSE.txt
-rw-r--r--. 1 root root   419 Jun  7 03:38 JBossEULA.txt
lrwxrwxrwx. 1 root root    50 Jun 14 17:14 jboss-modules.jar -> /opt/rh/eap7/root/usr/share/java/jboss-modules.jar
drwxr-xr-x. 2 root root    27 Jul 23 09:24 appclient
drwxr-xr-x. 3 root root  4096 Jul 23 09:24 bin
drwxr-xr-x. 2 root root    52 Jul 23 09:24 docs
drwxr-xr-x. 2 root root    76 Jul 23 09:24 domain
drwxr-xr-x. 2 root root    44 Jul 23 09:24 migration
drwxr-xr-x. 2 root root    91 Jul 23 09:24 standalone
drwxr-xr-x. 4 root root   158 Jul 23 09:24 welcome-content
[root@ip-xx-xx-xx-xx ~]#
rpmコマンドでインストールしたので、systemctlコマンド用のserviceファイルも配置済です。
serviceを有効にしておきます。
今回はdomainモードで稼働させることにします。eap7-domain.serviceを用います。
[root@ip-xx-xx-xx-xx ~]# ls -ltr /usr/lib/systemd/system/ | grep eap7
-rw-r--r--. 1 root root 1075 Jun 14 17:14 eap7-standalone.service
-rw-r--r--. 1 root root 1106 Jun 14 17:14 eap7-domain.service
[root@ip-xx-xx-xx-xx ~]#
[root@ip-xx-xx-xx-xx ~]# systemctl enable eap7-domain.service
Created symlink /etc/systemd/system/multi-user.target.wants/eap7-domain.service → /usr/lib/systemd/system/eap7-domain.service.
[root@ip-xx-xx-xx-xx ~]#
4.JBoss EAP:稼働確認+初期設定
まずはJBoss EAPを起動します。
statusがActive: active (running)であることを確認。
[root@ip-xx-xx-xx-xx ~]# systemctl status eap7-domain.service
● eap7-domain.service - JBoss EAP (domain mode)
   Loaded: loaded (/usr/lib/systemd/system/eap7-domain.service; enabled; vendor preset: disabled)
   Active: inactive (dead)
[root@ip-xx-xx-xx-xx ~]#
[root@ip-xx-xx-xx-xx ~]# systemctl start eap7-domain.service
[root@ip-xx-xx-xx-xx ~]#
[root@ip-xx-xx-xx-xx ~]# systemctl status eap7-domain.service
● eap7-domain.service - JBoss EAP (domain mode)
   Loaded: loaded (/usr/lib/systemd/system/eap7-domain.service; enabled; vendor preset: disabled)
   Active: active (running) since Fri 2021-07-23 09:43:40 UTC; 3s ago
 Main PID: 2789 (scl)
    Tasks: 31 (limit: 4732)
   Memory: 233.9M
   CGroup: /system.slice/eap7-domain.service
           tq2789 /usr/bin/scl enable eap7 -- /opt/rh/eap7/root/usr/share/wildfly/bin/launch.sh /usr/lib/jvm/jre /usr/lib/jvm/jre/b>
           tq2790 /bin/bash /var/tmp/scl1CSnW7
           tq2792 /bin/sh /opt/rh/eap7/root/usr/share/wildfly/bin/launch.sh /usr/lib/jvm/jre /usr/lib/jvm/jre/bin /opt/rh/eap7/root>
           tq2793 /bin/sh /opt/rh/eap7/root/usr/share/wildfly/bin/domain.sh -c domain.xml -b 0.0.0.0
           tq2883 /usr/lib/jvm/jre/bin/java -D[Process Controller] -server -Xms64m -Xmx512m -XX:MaxMetaspaceSize=256m -Djava.net.pr>
           mq2895 /usr/lib/jvm/jre/bin/java -D[Host Controller] -Dorg.jboss.boot.log.file=/opt/rh/eap7/root/usr/share/wildfly/domai>

Jul 23 09:43:40 ip-xx-xx-xx-xx.ap-northeast-1.compute.internal systemd[1]: Started JBoss EAP (domain mode).
[root@ip-xx-xx-xx-xx ~]#
続いて、JBoss EAP用の管理ユーザを追加します。
JBoss EAP公式ガイドに沿って
ユーザ名:mgmtuser1 パスワード:password1!とします。
[root@ip-xx-xx-xx-xx ~]# /opt/rh/eap7/root/usr/share/wildfly/bin/add-user.sh -u 'mgmtuser1' -p 'password1!' -g 'guest,mgmtgroup'
最後に、JBoss EAPを停止してみます。
statusがActive: inactive (dead)となることを確認。
[root@ip-xx-xx-xx-xx ~]# systemctl stop eap7-domain.service
[root@ip-xx-xx-xx-xx ~]# systemctl status eap7-domain.service
● eap7-domain.service - JBoss EAP (domain mode)
   Loaded: loaded (/usr/lib/systemd/system/eap7-domain.service; enabled; vendor preset: disabled)
   Active: inactive (dead) since Fri 2021-07-23 09:56:55 UTC; 2s ago
  Process: 2789 ExecStart=/usr/bin/scl enable $EAP7_SCLS_ENABLED -- /opt/rh/eap7/root/usr/share/wildfly/bin/launch.sh $JAVA_HOME $J>
 Main PID: 2789 (code=killed, signal=TERM)

Jul 23 09:43:40 ip-xx-xx-xx-xx.ap-northeast-1.compute.internal systemd[1]: Started JBoss EAP (domain mode).
Jul 23 09:56:55 ip-xx-xx-xx-xx.ap-northeast-1.compute.internal systemd[1]: Stopping JBoss EAP (domain mode)...
Jul 23 09:56:55 ip-xx-xx-xx-xx.ap-northeast-1.compute.internal systemd[1]: eap7-domain.service: Succeeded.
Jul 23 09:56:55 ip-xx-xx-xx-xx.ap-northeast-1.compute.internal systemd[1]: Stopped JBoss EAP (domain mode).
[root@ip-xx-xx-xx-xx ~]#
5.JBoss EAP:管理コンソール利用 + OS:ポート設定
Webアプリケーション製品ですので、
サービス提供できていることも含めて確認したいですよね。
管理コンソール使ってみましょう。
すなわち、JBoss EAPの管理コンソールにログイン要求します。
今回アクセスするJBoss EAP管理コンソールのURLは以下とします。
まずはTeratermでSSH接続の上、更にSSHポート転送を設定します。
手順は以下です。前述の通り、EC2インスタンスには
「SSH接続」ポートのみ開放したSecurityGroupしか付けていないので、ポート転送も要ります。
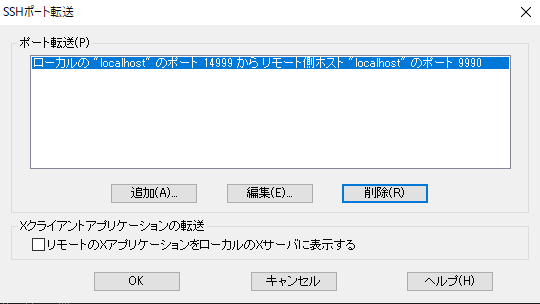
- Teratermを起動+EC2インスタンスにSSH接続した状態で「設定」タブから「SSH転送」を選択。
- 「追加」から、ローカルのポート
14999を、リモート側のポート9990に転送。なお、localhostは自動補完されるので入力不要です。 - 「OK」をクリックしてウィンドウ閉じます。
加えてfirewalldで、管理コンソール(port:9990)の通信を許可します。
[root@ip-xx-xx-xx-xx ~]# firewall-cmd --add-port=9990/tcp --permanent
success
[root@ip-xx-xx-xx-xx ~]#
[root@ip-xx-xx-xx-xx ~]# firewall-cmd --reload
success
[root@ip-xx-xx-xx-xx ~]#
正しく設定されるとportsが追加されます。
[root@ip-xx-xx-xx-xx ~]# firewall-cmd --list-all
public (active)
  target: default
  icmp-block-inversion: no
  interfaces: eth0
  sources:
  services: cockpit dhcpv6-client ssh
  ports: xxxxx/tcp(!セキュリティ都合で伏せます:ssh接続port等々) 9990/tcp
  protocols:
  masquerade: no
  forward-ports:
  source-ports:
  icmp-blocks:
  rich rules:
[root@ip-xx-xx-xx-xx ~]#
最後に、Teraterm起動しているPC上のブラウザで以下URLを入力。管理コンソールにアクセスします。
ユーザ名、およびパスワードを求められるので
事前に設定した管理ユーザ(ユーザ名:mgmtuser1 パスワード:password1!)でログインします。
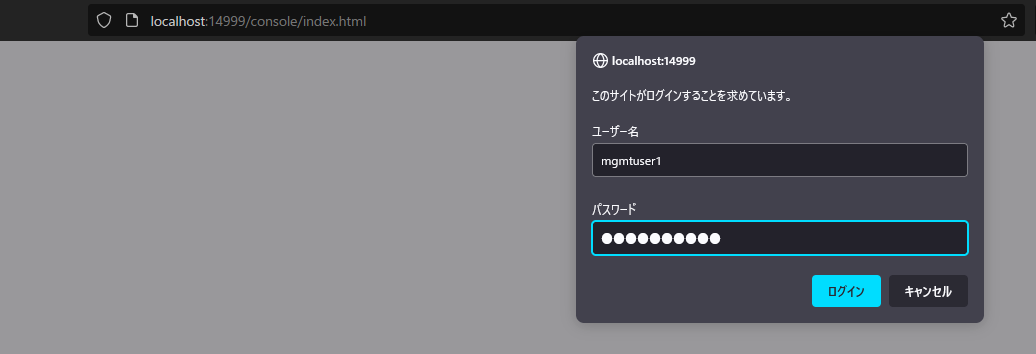
ログインに成功すると以下の画面になります。

おわり
本日はここまで。
rpmコマンドの魅力は、serviceが使えることですね。
参考記事
Red Hat Developer Programに登録して最大16台までRHELを使おう
Red Hat JBoss Enterprise Application Platform 7.3 インストールガイド
Installing JBoss EAP 7 on RHEL using RPMs
Subscription-manager throws 'Repositories disabled by configuration' while enabling repository
補足
Red Hat サブスクリプション管理対象の確認
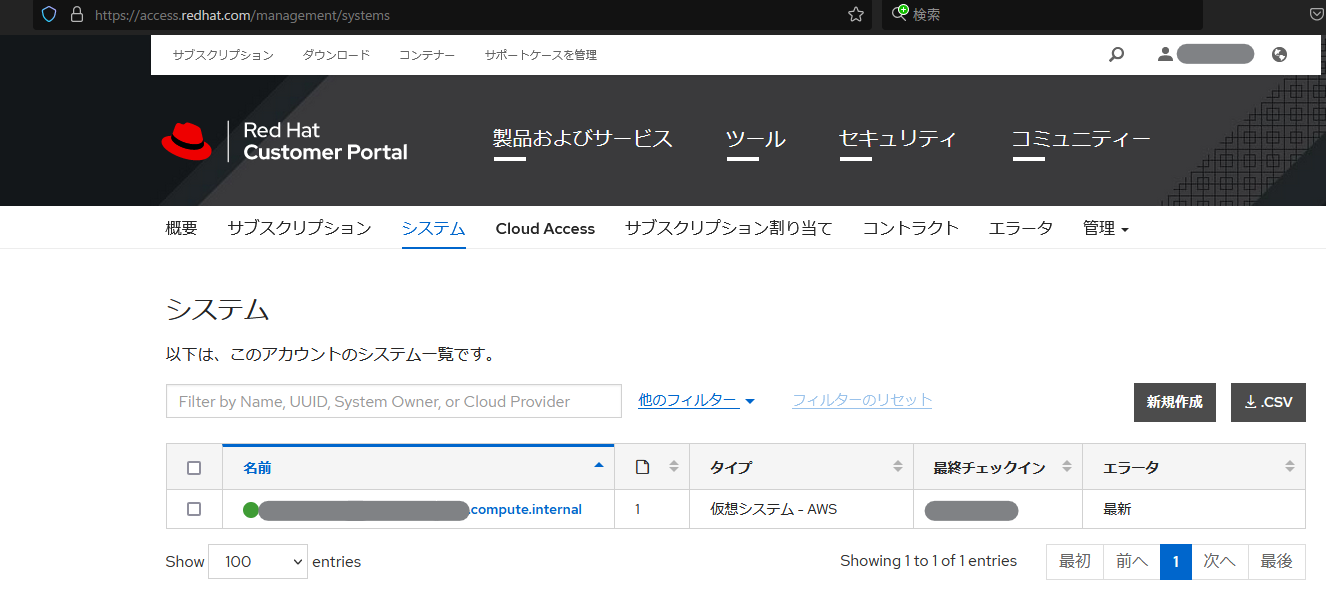
以下URLにアクセスします。
ログインした状態で「システム」タブを開きます。

正しく登録されていると、システム一覧に、該当EC2インスタンスが表示されます。
EC2インスタンスを(停止ではなくて)終了する際には、
サブスクリプション登録も忘れずに解除しましょう。
AWS EC2(RHEL8)にRDP接続する
ご紹介した通り、Jboss EAPはCUIオンリーでインストール可能ですが
GUIインストーラ用いて構築したい方も居るかもしれないので、RDP設定手順を備忘します。
インスタンスタイプはt2.microより高性能な方が良いです。
参考となるサイトは以下。
https://soypocket.com/it/amazon-linux-2-rdp/
http://vhabit.com/how-to-install-and-configure-gui-on-aws-ec2-instance-for-linux/
https://goto-linux.com/ja/2020/6/20/rhel-8-/-centos-8%E3%81%ABvnc%E3%82%B5%E3%83%BC%E3%83%8F%E3%83%BC%E3%82%92%E3%82%A4%E3%83%B3%E3%82%B9%E3%83%88%E3%83%BC%E3%83%AB%E3%81%99%E3%82%8B%E6%96%B9%E6%B3%95/
設定コマンド備忘です。
途中passwdコマンド使っていますが、
RDP接続時コンソールで用いるユーザ情報としてパスワード持たせたい意図であり、
sshとしての接続許可は無用である点にご留意ください。
sudo su - root
yum -y update
yum groupinstall -y "Server with GUI"
yum install xrdp
systemctl set-default graphical.target
systemctl default
chcon --type=bin_t /usr/sbin/xrdp
chcon --type=bin_t /usr/sbin/xrdp-sesman
firewall-cmd --add-port=3389/tcp --permanent
firewall-cmd --reload
systemctl restart xrdp
passwd root