Elixir&Phoenixでプロフィールサービスを作った
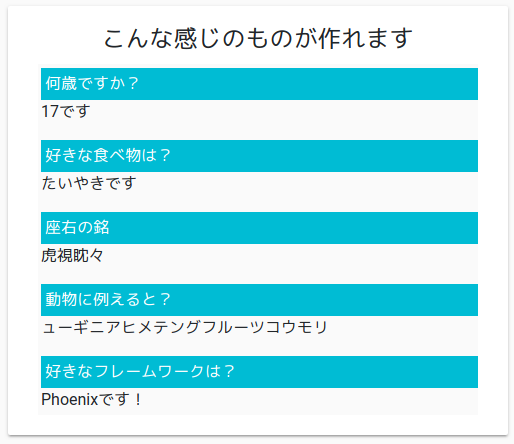
とりまプロフィールという、主にTwitterで使われることを想定したプロフィールサービスを作成しました。
質問を送って回答したりも出来ます。
環境
- Elixir1.6
- Phoenix1.3
- MySQL5.7
- Vue.js
- GCE(f1-micro)
- Bootstrap Material Design
プロフィール編集画面
動きのあるところはVueコンポーネントで作っています。vuedraggableを入れることで既存のコードをほとんど変えずソートなども可能です。スマホでも問題なく動いていました。
各行もコンポーネントになっているので、その内部では配列的な事も気にせず単にシンプルなupdate, delete等の実装が可能です。
  <div>
    <draggable v-model="currentUsersSubjects" :options="{handle: '.name'}" @end="onDragEnd">
      <profile-row
        v-for="usersSubject in currentUsersSubjects"
        :key="usersSubject.id"
        :users-subject="usersSubject"
        @on-update="onUpdate"
        @on-delete="onDelete"
      ></profile-row>
    </draggable>
    <add-subject
      :popular-subjects="popularSubjects"
      :users-subjects="currentUsersSubjects"
      :questions="questions"
      @on-create="onCreate"
    ></add-subject>
  </div>
色の設定
色を設定できるようにしていますが、material-colorsとvue-color(のSwatches)を使っています。色を自分で決めたかったので、palette属性で指定しています。(vue-color自体のソースを参考にしています)
<swatches-picker v-model="currentBgColor" :palette="palette" />
import material from "material-colors";
import { Swatches } from "vue-color";

const colorMap = [
  "red",
  "pink",
  "purple",
  "deepPurple",
  "indigo",
  "blue",
  "lightBlue",
  "cyan",
  "teal",
  "green",
  "lightGreen",
  "lime",
  "yellow",
  "amber",
  "orange",
  "deepOrange",
  "brown",
  "grey",
  "blueGrey",
  "black"
];
const colorLevel = [
  "900",
  "800",
  "700",
  "600",
  "500",
  "400",
  "300",
  "200",
  "100",
  "50"
];

const palette = (() => {
  let colors = [];
  colorMap.forEach(type => {
    var typeColor = [];
    if (type.toLowerCase() === "black" || type.toLowerCase() === "white") {
      typeColor = typeColor.concat(["#000000", "#FFFFFF"]);
    } else {
      colorLevel.forEach(level => {
        const color = material[type][level];
        typeColor.push(color.toUpperCase());
      });
    }
    colors.push(typeColor);
  });
  return colors;
})();
Twitter API
色々作り進めていっているうちにTwitter用のライブラリを2つ使うことになってしまいました。
認証&フォローユーザー取得
ueberauth/ueberauth_twitter: Twitter Strategy for Überauth
こちらのライブラリを下記目的で使用しました。
- 認証
- フォローユーザー取得
- ブロックユーザー取得
当初、ueberauthしか知らなかったのでueberauthで認証とフォローユーザー取得を使い始めてしまいました。ただ、次に紹介するライブラリはブロックユーザー取得の機能もなかったので、とりあえず差し替えずに併用することにしました。
今後リファクタリングする場合このあたりはどうするか再検討が必要そうな気がします。
認証
これはもうマニュアル通りです。ただ、DBに色々保存する必要があるので下記のようにして取得しています。authがcallbackで送られてくるユーザーの情報です。
    attrs = %{
      twitter_name: auth.info.nickname,
      twitter_token: to_string(auth.credentials.token),
      twitter_secret: to_string(auth.credentials.secret)
    }
    attrs =
      attrs
      |> Map.put_new(:name, name_from_auth(auth))
      |> Map.put_new(:avatar, String.replace(auth.info.image, "http://", "https://"))
名前は適当にあれこれ適当に判別してます。
  defp name_from_auth(auth) do
    if auth.info.name do
      auth.info.name
    else
      name =
        [auth.info.first_name, auth.info.last_name]
        |> Enum.filter(&(&1 != nil and &1 != ""))

      cond do
        length(name) == 0 -> auth.info.nickname
        true -> Enum.join(name, " ")
      end
    end
  end
フォローユーザー取得
これは取得する方法自体は無かったのでライブラリの中のソースを真似て作成しました。結構適当だった気がするのでコピペはしない方が良いと思います。
  def friends_list(id, token, cursor \\ nil) do
    params = [
      {"user_id", id},
      {"count", 200},
      {"skip_status", true},
      {"include_user_entities", false}
    ]

    params = if cursor, do: params ++ [{"cursor", cursor}], else: params

    case Twitter.OAuth.get("/1.1/friends/list.json", params, token) do
      {:ok, {{'HTTP/1.1', 401, _message}, _headers, _body}} ->
        {:error, nil}

      {:ok, {{'HTTP/1.1', status_code, 'OK'}, _headers, body}} when status_code in 200..399 ->
        body = Poison.decode!(body)
        {:ok, body["users"], body["previous_cursor"], body["next_cursor"]}

      {:ok, {{'HTTP/1.1', status_code, message}, _headers, _body}} ->
        {:error, to_string(message)}
    end
  end
ブロック一覧
こちらも似たような感じです。
  def blocks_ids(token, cursor \\ nil) do
    params = [
      {"stringify_ids", true}
    ]

    case Twitter.OAuth.get("/1.1/blocks/ids.json", params, token) do
      {:ok, {{'HTTP/1.1', 401, _message}, _headers, _body}} ->
        {:error, nil}

      {:ok, {{'HTTP/1.1', status_code, 'OK'}, _headers, body}} when status_code in 200..399 ->
        body = Poison.decode!(body)
        {:ok, body["ids"], body["previous_cursor"], body["next_cursor"]}

      {:ok, {{'HTTP/1.1', status_code, message}, _headers, _body}} ->
        {:error, to_string(message)}
    end
  end
ツイート
こちらは下記を使ってます。
parroty/extwitter: Twitter client library for elixir
非常にシンプル。ユーザーのトークンを使うのでいちいちconfigureしています。
  def tweet(token, secret, body) do
    ex_twitter_configure(token, secret)
    ExTwitter.API.Tweets.update(body)
  end

  defp ex_twitter_configure(token, secret) do
    conf = [
      consumer_key: Application.get_env(:extwitter, :oauth)[:consumer_key],
      consumer_secret: Application.get_env(:extwitter, :oauth)[:consumer_secret],
      access_token: token,
      access_token_secret: secret
    ]

    ExTwitter.configure(:process, conf)
  end
キャッシュ
ConCacheというのがあるのですが、メモリキャッシュなので超貧弱なサーバーだと無理そうだなと思いました。最初ConCacheを使っていましたが自前のDB保存に変更しました。
一応ConCacheのインターフェースに合わせてあるので、タプルと文字列の変換を入れています。
  def tuple_to_string(tuple) do
    list = Tuple.to_list(tuple)

    case Poison.encode(list) do
      {:ok, str} ->
        str

      {:error, _any} ->
        ""
    end
  end

  def string_to_tuple(str) do
    case Poison.decode(str) do
      {:ok, list} ->
        List.to_tuple(list)

      {:error, _any} ->
        nil
    end
  end
Bootstrap Material Design
brunchでBootstrap Material Design4を使うの記事の方法で導入しています。
デプロイ
最近はどれもElixir & Phoenix & GCEなので、以前下記で書いた方法でやっています。
まとめ
この構成で作ったサービスもこれで4つ目になりだいぶ小慣れてきました。あまりこういった構成のものを見たことが無い方などいらっしゃれば是非見てみて下さい。
