はじめに(Preface)
Linuxインスタンスへの、Secure Agent のインストール手順を説明します。
This article introduces how to install a Secure Agent onto a Linux instance.
用語(Words)
Secure Agent
- IDMCと連携してデータ処理を実行するエージェントソフトウェア。
- 幅広いプラットフォーム (AWS, Azure, GCP, on-premises, etc.) で動作。
- 複数のSecure Agentをグループ化して負荷分散や冗長化が可能。
- 詳しくは、Qiita解説記事を参照。
IDMC
- Informatica社が法人や官公庁向けに提供しているクラウドサービス。
- Intelligent Data Management Cloud の略。
- データ活用ソリューションの統合プラットフォーム。
- 詳しくは、Qiita解説記事 を参照。
Informatica
- 日本語読みはインフォマティカ。
- 法人や官公庁向けにデータ活用ソリューションを開発・販売する独立系ベンダー。
- 米国カリフォルニア州に本社を置き、ニューヨーク証券取引所に上場。
- 詳しくは、Wikipedia(英語)または SCSK社の記事 を参照。
Secure Agent インストールトークンの取得
インストールトークン
・インストールトークンは、IDMCとSecure Agentのペアリングに使う事前共有鍵です。
・IDMCの管理者サービス画面で発行し、Secure Agentのインストール時に使います。
IDMCにログインして管理者サービス画面を表示します。
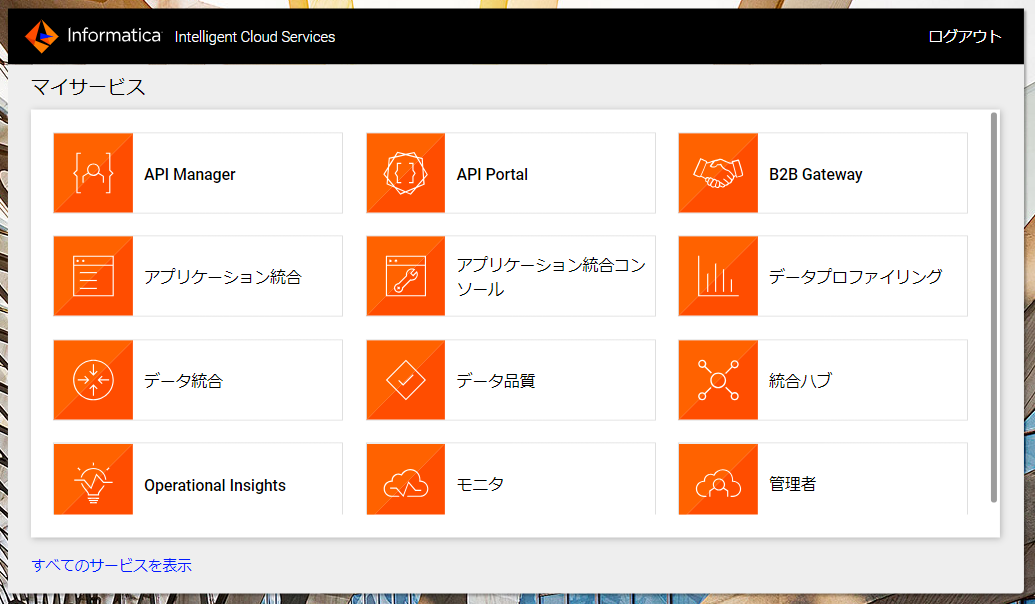
ランタイム環境タブで、インストールトークンの生成ボタンをクリックします。

インストールトークンが表示されたら、コピーボタンをクリックします。

Secure Agent インストーラーのダウンロード
ランタイム環境タブで、Secure Agentのダウンロードボタンをクリックします。
インストール先のOSを選択して、ダウンロードをクリックします。

Informaticaのリポジトリから直接ダウンロードする方法
・Informaticaのリポジトリからインストーラーを直接ダウンロードすることもできます。
その場合、この項で説明したIDMCのGUIを使ったダウンロードは不要です。
・次の項では、Linux OSでwgetを使ってコマンドでダウンロードしています。
Secure Agent のインストール(Linux編)
LinuxインスタンスにSSHでログインします。ここではSSHクライアントとしてMobaXtermを使います。
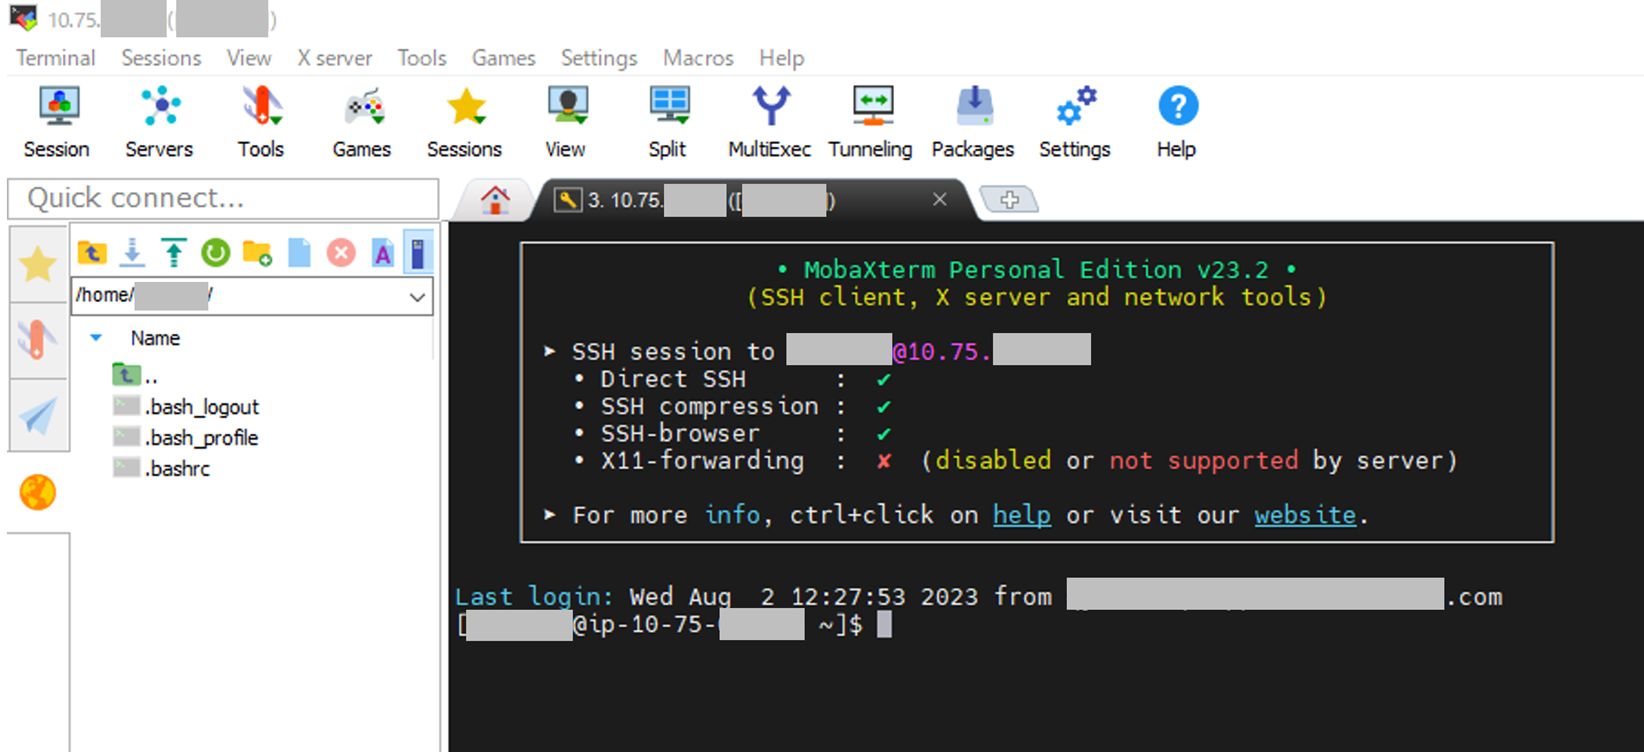
使用しているOSは、Red Hat Enterprise Linux Server release 7.7 です。
[*******@ip-10-75-**-** ~]$ cat /etc/redhat-release
Red Hat Enterprise Linux Server release 7.7 (Maipo)
インストール用のユーザーを作成します。
[*******@ip-10-75-**-** ~]$ sudo useradd infa

We trust you have received the usual lecture from the local System
Administrator. It usually boils down to these three things:

    #1) Respect the privacy of others.
    #2) Think before you type.
    #3) With great power comes great responsibility.

[sudo] password for *******:
作成したユーザーとしてログインします。
[*******@ip-10-75-**-** ~]$ su - infa
Password:
Secure Agent のインストーラーを、Informatica のサーバーからダウンロードします。
ダウンロード元のURL
利用中のIDMCのPOD(≒リージョン)により異なります。
今回は、https://na1.dm-us.informaticacloud.com/saas/download/installer/linux64/agent64_install_ng_ext.bin を指定します。
[infa@ip-10-75-**-** ~]$ wget https://na1.dm-us.informaticacloud.com/saas/download/installer/linux64/agent64_install_ng_ext.bin
ネットワークの疎通に問題がなければ、以下のようにダウンロードが進みます。
サイズは150 MB程度です。
--2023-08-02 17:29:12--  https://na1.dm-us.informaticacloud.com/saas/download/installer/linux64/agent64_install_ng_ext.bin
Resolving na1.dm-us.informaticacloud.com (na1.dm-us.informaticacloud.com)... 99.83.225.209, 75.2.30.109
Connecting to na1.dm-us.informaticacloud.com (na1.dm-us.informaticacloud.com)|99.83.225.209|:443... connected.
HTTP request sent, awaiting response... 302
Location: https://common.dm-us.informaticacloud.com/package-manager/files/binary/agent64_install_ng_ext/6608/linux64/agent64_install_ng_ext.6608.bin [following]
--2023-08-02 17:29:13--  https://common.dm-us.informaticacloud.com/package-manager/files/binary/agent64_install_ng_ext/6608/linux64/agent64_install_ng_ext.6608.bin
Resolving common.dm-us.informaticacloud.com (common.dm-us.informaticacloud.com)... 44.229.211.46, 34.215.62.0
Connecting to common.dm-us.informaticacloud.com (common.dm-us.informaticacloud.com)|44.229.211.46|:443... connected.
HTTP request sent, awaiting response... 200 OK
Length: 151096308 (144M) [application/octet-stream]
Saving to: ‘agent64_install_ng_ext.bin’

100%[====================================================================================================================================================================>] 151,096,308 2.79MB/s   in 1m 41s

2023-08-02 17:30:56 (1.42 MB/s) - ‘agent64_install_ng_ext.bin’ saved [151096308/151096308]
ダウンロード完了後、インストーラー(agent64_install_ng_ext.bin)のパーミッションを777にします。
[infa@ip-10-75-**-** ~]$ chmod 777 agent64_install_ng_ext.bin
インストーラーを実行します。
[infa@ip-10-75-**-** ~]$ ./agent64_install_ng_ext.bin
インストールプロセスが順調に進むと、以下のメッセージが表示されます。
Preparing to install
Extracting the JRE from the installer archive...
Unpacking the JRE...
Extracting the installation resources from the installer archive...
Configuring the installer for this system's environment...

Launching installer...


Graphical installers are not supported by the VM. The console mode will be used instead...

===============================================================================
Informatica Cloud Secure Agent                   (created with InstallAnywhere)
-------------------------------------------------------------------------------

Preparing CONSOLE Mode Installation...


===============================================================================
Choose Install Folder
---------------------

Where would you like to install?

  Default Install Folder: /home/infa/infaagent

ENTER AN ABSOLUTE PATH, OR PRESS <ENTER> TO ACCEPT THE DEFAULT
      :


===============================================================================
Pre-Installation Summary
------------------------

Please Review the Following Before Continuing:

Product Name:
    Informatica Cloud Secure Agent

Install Folder:
    /home/infa/infaagent

Disk Space Information (for Installation Target):
    Required:      302,462,109 Bytes
    Available: 104,494,039,040 Bytes

PRESS <ENTER> TO CONTINUE:
Enterキーを押して先に進みます。
===============================================================================
Installing...
-------------

 [==================|==================|==================|==================]
 [------------------|------------------|------------------|------------------]


===============================================================================
Generating Agent Token...

Please Wait
-----------


===============================================================================
Creating softlink...

Please Wait
-----------


===============================================================================
File permission

Please Wait
-----------


===============================================================================
Installation Complete
---------------------

Congratulations. Informatica Cloud Secure Agent has been successfully
installed to:

/home/infa/infaagent

To start the agent, go to directory "<agent_directory>/apps/agentcore" and
then run "infaagent startup". Check the infaagent.log file
for errors, and then visit the Informatica Cloud site to verify that the
agent is active.

PRESS <ENTER> TO EXIT THE INSTALLER:
Enterキーを押して、インストールを完了します。
続いて、Secure Agentがインストールされたディレクトリを確認します。
デフォルトでは、/home/(インストールに使用したLinuxアカウント名)/infaagent/apps/agentcore/ です。
[infa@ip-10-75-**-** ~]$ cd /home/infa/infaagent/apps/agentcore/
[infa@ip-10-75-**-** agentcore]$ ll
total 56
drwxr--r--. 3 infa infa  4096 Aug  2 17:41 66.08
-rwxr--r--. 1 infa infa    78 Jun  8 16:05 abortAgentCore.sh
-rwxr--r--. 1 infa infa  2442 Jun  8 16:01 agent_start.sh
drwxr--r--. 2 infa infa   160 Aug  2 17:41 conf
-rwxr--r--. 1 infa infa   483 Jun  8 16:05 consoleAgentManager.sh
-rwxr--r--. 1 infa infa   143 Jun  8 16:01 customUninstallScript.sh
drwxr--r--. 2 infa infa     6 Aug  2 17:41 data
-rwxr--r--. 1 infa infa    88 Jun  8 16:05 generateAgentToken.sh
-rwxr--r--. 1 infa infa 15953 Jun  8 16:05 infaagent
-rwxr--r--. 1 infa infa   238 Jun  8 16:01 infaagent.sh
drwxr--r--. 2 infa infa     6 Aug  2 17:41 logs
-rwxr-xr-x. 1 infa infa   409 Jun  8 16:05 proxydetection.sh
-rwxr--r--. 1 infa infa  1413 Jun  8 16:05 runAgentCore.sh
-rwxr--r--. 1 infa infa   695 Jun  8 16:05 version.sh
Secure Agentを起動します。
[infa@ip-10-75-**-** agentcore]$ ./infaagent startup
続いて、Secure AgentをIDMCに登録します。
この際、先にIDMCから取得しておいたインストールトークンを使用します。
[infa@ip-10-75-**-** agentcore]$ ./consoleAgentManager.sh configureToken (IDMCのユーザー名) (インストールトークン)
ログインに成功すると、以下のメッセージが表示されます。
これで、IDMCにSecure Agentが登録されました。
Login with token
IDMC上で Secure Agent の登録完了と起動完了を確認
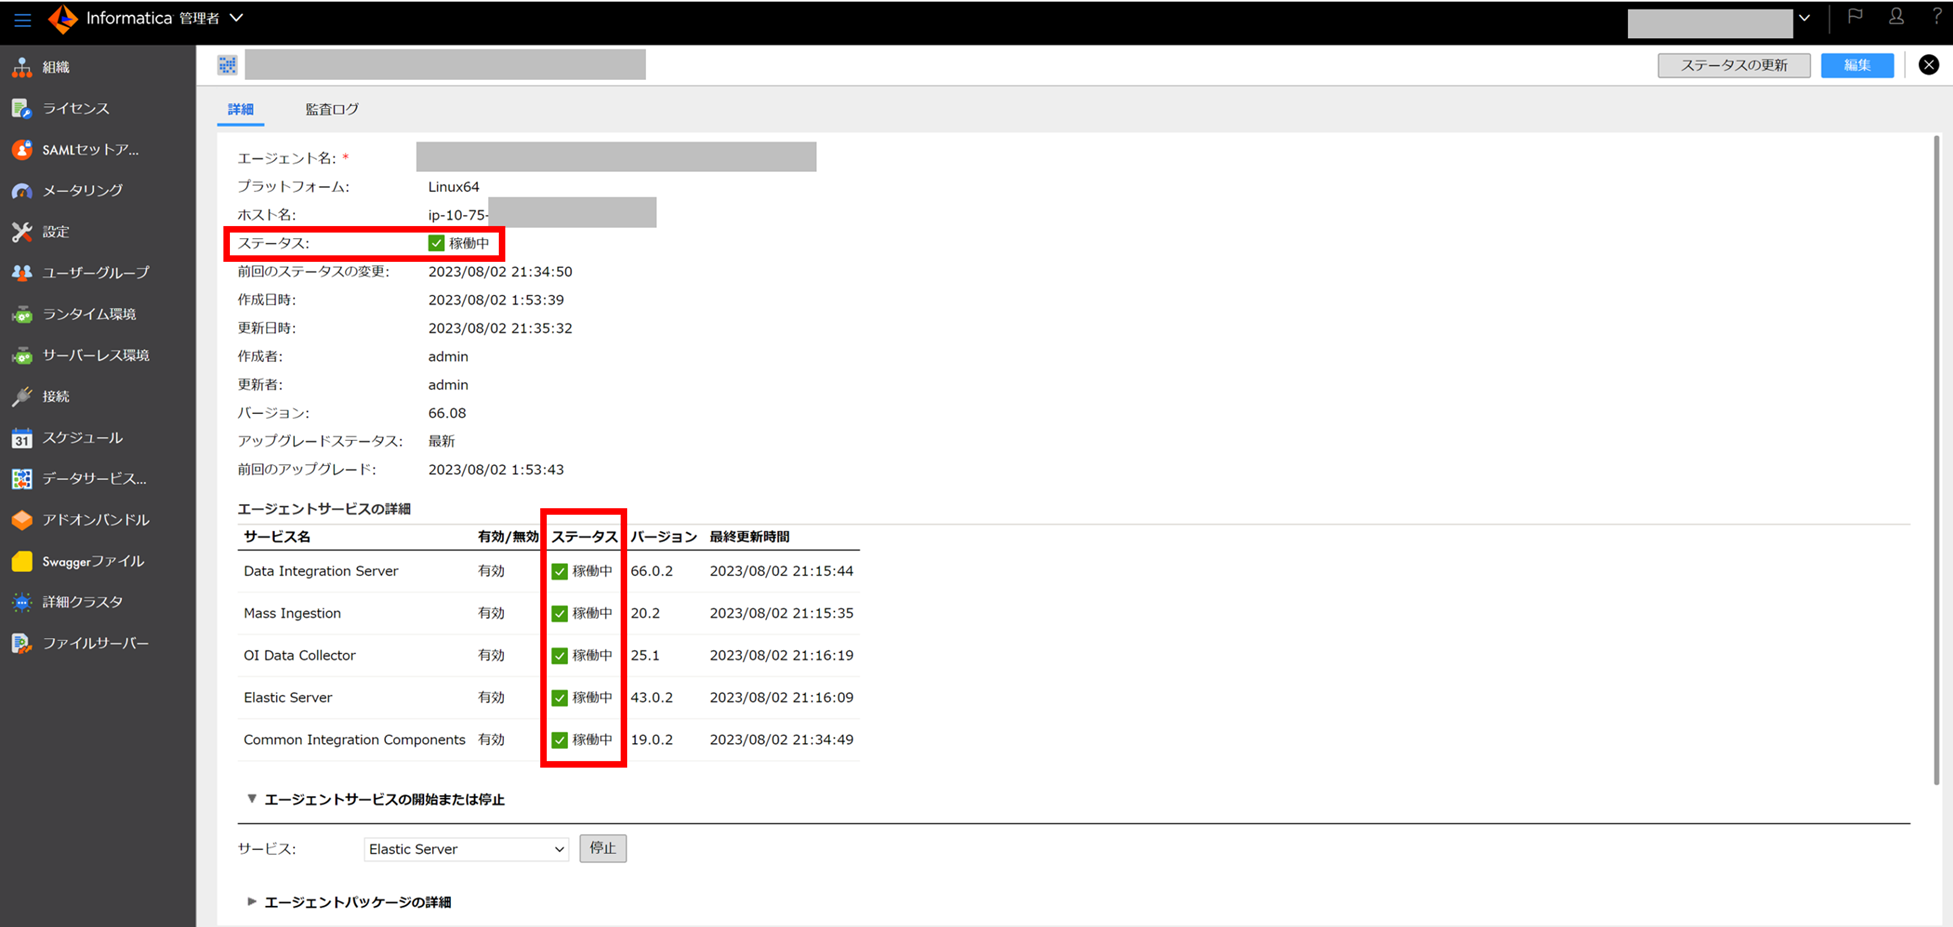
続いて、IDMC上でSecure Agentの登録状態を確認します。
1.ブラウザでIDMCにログインして管理者サービス画面を表示します。
2.ランタイム環境タブを開きます。
3.一覧に新しいSecure Agentが表示されていれば、IDMCへの登録は成功しています。
Secure Agentの名前
デフォルトで、Secure Agentインストール先のホスト名になります。
後から任意の名前に変更することも可能です。
Secure Agentのステータス
「実行されていないサービスがあります」となっていることにお気付きでしょうか?
Secure Agentの名前部分がリンクになっていますので、クリックしてSecure Agentの詳細を見てみます。

エージェントサービスの詳細のステータスが起動中と表示されています。
実は、この状態でSecure AgentのインストールとIDMCへの登録は完了していますが、
まだ起動中の為このような表示になっています。

しばらく待つと、起動プロセスが全て完了して以下のような表示に変わります。
これでSecure Agentの全てのサービスが正常に立ち上がりました。
振り返り(Look-back)
Secure Agent のインストールを、以下のステップで行いました。
1.IDMCからインストールトークンを取得
2.Secure Agentをダウンロード(IDMCのGUI上で取得 or リポジトリから直接取得)
3.Secure Agentをインストール
4.Secure AgentをIDMCに登録(インストールトークン使用)
5.IDMC上で Secure Agent の登録完了と起動完了を確認
参考リンク(References)
・Secure Agentのインストール(Informatica社の公式ドキュメント)
おことわり(Disclaimer)
投稿する記事は私個人の見解であり所属する会社の公式な見解ではありません。
All articles I post onto Qiita are based on just my personal understanding or opinion. That means the articles are not expressed as an official opinion of the company I am belonging to or have belonged to.