LambdaとGolangで通知システムを作成
Lambda + Golang + Dockerで通知システムを構築してみたので
ドキュメントにまとめてみました
Lambdaって聞くと結構難しく感じてたのですが
今回の目的を達成するための実装だとGolangとDockerの知識で意外となんとかなりました。
(最初はLambdaの関数をゴリゴリで使うもんだと思ってましたが,,,,)
やりたいこと
- CloudWatchから送られてきたパラメータを元にLambdaで処理を実行、その後LambdaからAPIにリクエストを送りレスポンスの内容によって振る舞いを変える処理を実装したい
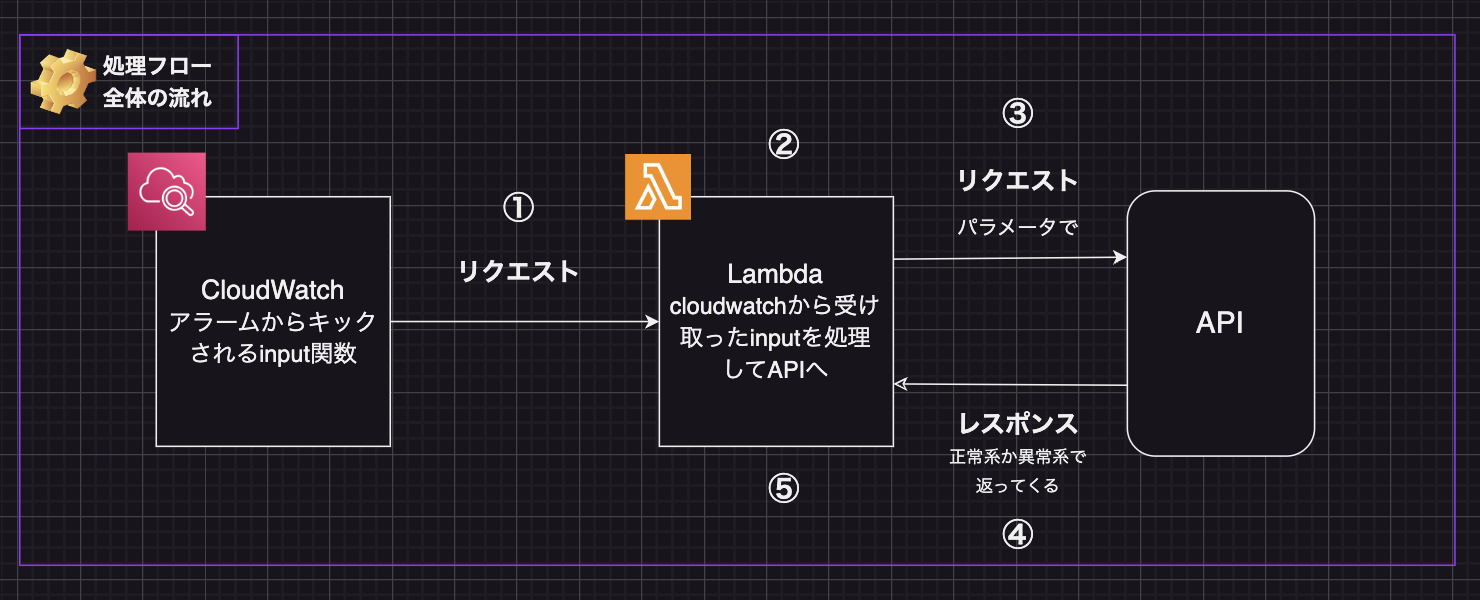
処理フローにすると以下のようになります。
処理の流れ
①CloudWatchからLambdaが起動される
②APIリクエストに必要な値をリクエストボディに格納する処理をLambda内で実行
③APIにリクエスト
④APIからレスポンスが返ってくる
⑤レスポンス内容によってLambda内で振る舞いを変える処理を実行する
※今回の処理の送り先をAPIからLINEやDiscordなどに変えれば他のサービスでも通知がいくようにできるはず,,,,
環境構築手順
環境構築から動作確認までを解説します。
1. pj用のディレクトリを作成する
mkdir golang-lambda-demo
2. go mod init ディレクトリ名でgoモジュールの初期化
go mod init golang-lambda-demo
3. main.goを新規作成して下記コードを添付する
ここは公式のサンプルコードをそのまま添付します
package main

import (
	"context"
	"github.com/aws/aws-lambda-go/events"
	"github.com/aws/aws-lambda-go/lambda"
)

func handler(ctx context.Context, event events.APIGatewayProxyRequest) (events.APIGatewayProxyResponse, error) {
	response := events.APIGatewayProxyResponse{
		StatusCode: 200,
		Body:       "\"Hello from Lambda!\"",
	}
	return response, nil
}

func main() {
	lambda.Start(handler)
}
4. Dockerflieを作成する
FROM golang:1.22.2-bookworm as build
WORKDIR /lambda
COPY go.mod go.sum ./
RUN go mod download
COPY main.go .
RUN CGO_ENABLED=0 go build -tags lambda.norpc -o main main.go

FROM public.ecr.aws/lambda/provided:al2
COPY --from=build /lambda/main ./main
RUN chmod +x /usr/local/bin/aws-lambda-rie ./main
ENTRYPOINT [ "/usr/local/bin/aws-lambda-rie", "./main" ]
※対応したエラーについて
RUN chmod +x /usr/local/bin/aws-lambda-rie ./main
を追加してあげないとsshのエラーになるので上記を追加します。
ここまでのディレクトリ構成は以下のようになっています
.
└── lambda
├── Dockerfile
├── go.mod
└── main.go
5. go mod tidyを実行
go mod tidyを実行します。
6. コンテナをビルドする
以下のコマンドを実行してコンテナをビルドしてあげてください
docker build -t my-lambda-function .
7. コンテナを起動する
以下のコマンドを叩きます。
docker run --platform=linux/arm64 -d -v ~/.aws-lambda-rie:/aws-lambda -p 9000:8080 --entrypoint /aws-lambda/aws-lambda-rie my-lambda-function ./main
私の環境だと上記コマンドでうまく起動しました
画像のようにコンテナが立ち上がっていればコンテナの起動成功です。
注意点として
--platform=linux/arm64
上記部分がマシンによってコマンドが違います
https://docs.aws.amazon.com/ja_jp/lambda/latest/dg/go-image.html#go-image-provided
公式にも書いてあるように
amd64かarm64でコマンドが変わってくるので注意が必要です
ちなみに私のPCはM2MacProだったので--platform=linux/arm64になります
8. main.goの実装
今回はこちらの記事を参考に送った内容によって動的に表示が変わるか確認します
package main

import (
    "context"
    "github.com/aws/aws-lambda-go/lambda"
)

type MyEvent struct {
    Name string `json:"name"`
}

func HandleRequest(ctx context.Context, event MyEvent) (string, error) {
    return "Hello " + event.Name, nil //Nameの値によって表示が変わる
}

func main() {
    lambda.Start(HandleRequest)
}
9. curlを叩いて動作確認
以下を叩いてみてちゃんと値が返ってきたら動作確認完了になります
curl -XPOST "http://localhost:9000/2015-03-31/functions/function/invocations" -d '{"name": "Yamada"}' -H "Content-Type: application/json"
lambda % curl -XPOST "http://localhost:9000/2015-03-31/functions/function/invocations" -d '{"name": "Yamada"}' -H "Content-Type: application/json"
"Hello Yamada"%
上記の例だと"Hello Yamada"%が返ってくれば成功になります。
機能実装手順 解説
ここからは動作確認も完了したので
要件を満たせるように実装していきます。

対象のAPIについて
例として今回は以下のサンプルAPIを用意しました
こちらのhogehogeAPIの仕様に従って実装していきます。
API仕様
仕様としてserverName: "hogehoge"だと200を返し

serverName: "fugafuga"だと500を返す仕様とします.

serverNameの値はJSONの以下から取得します。
AlarmData.Configuration.Metrics[0].MetricStat.Metric.Namespace
抜粋すると以下の部分です。
  "metricStat": {
                        "metric": {
                            "namespace": "hogehoge", //ここ
                            "name": "ResourceCount",
                            "dimensions": {
                                "Resource": "vCPU",
                                "Service": "Fargate",
                                "Type": "Resource",
                                "Class": "Standard/OnDemand"
                            }
                        },
1. 必要な構造体の定義
まずは必要な構造体の実装を行います。
以下が実装したコードになります。
CloudWatchから受け取ったパラメータの構造化
以下のCloudWatchから受け取ったJSON構造体を
Golangの構造体に変換します
{
    "source": "aws.cloudwatch",
    "alarmArn": "arn:aws:cloudwatch:ap-northeast-1:123456789012:alarm:hoge1223vcpualarm",
    "accountId": "123456789012",
    "time": "2023-12-22T22:15:48.857+0000",
    "region": "ap-northeast-1",
    "alarmData": {
        "alarmName": "hoge1223vcpualarm",
        "state": {
            "value": "ALARM",
            "reason": "test",
            "timestamp": "2023-12-22T22:15:48.857+0000"
        },
        "previousState": {
            "value": "OK",
            "reason": "Threshold Crossed: 1 out of the last 1 datapoints [0.0 (22/12/23 22:00:00)] was not greater than the threshold (100.0) (minimum 1 datapoint for ALARM -> OK transition).",
            "reasonData": "{\"version\":\"1.0\",\"queryDate\":\"2023-12-22T22:05:15.507+0000\",\"startDate\":\"2023-12-22T22:00:00.000+0000\",\"statistic\":\"Average\",\"period\":300,\"recentDatapoints\":[0.0],\"threshold\":100.0,\"evaluatedDatapoints\":[{\"timestamp\":\"2023-12-22T22:00:00.000+0000\",\"sampleCount\":5.0,\"value\":0.0}]}",
            "timestamp": "2023-12-22T22:05:15.510+0000"
        },
        "configuration": {
            "metrics": [
                {
                    "id": "b2c649c4-bbdd-9e1f-e239-9535e3c67e12",
                    "metricStat": {
                        "metric": {
                            "namespace": "hogehoged",
                            "name": "ResourceCount",
                            "dimensions": {
                                "Resource": "vCPU",
                                "Service": "Fargate",
                                "Type": "Resource",
                                "Class": "Standard/OnDemand"
                            }
                        },
                        "period": 300,
                        "stat": "Average"
                    },
                    "returnData": true
                }
            ]
        }
    }
}
苦戦したところ:構造体に変換できない
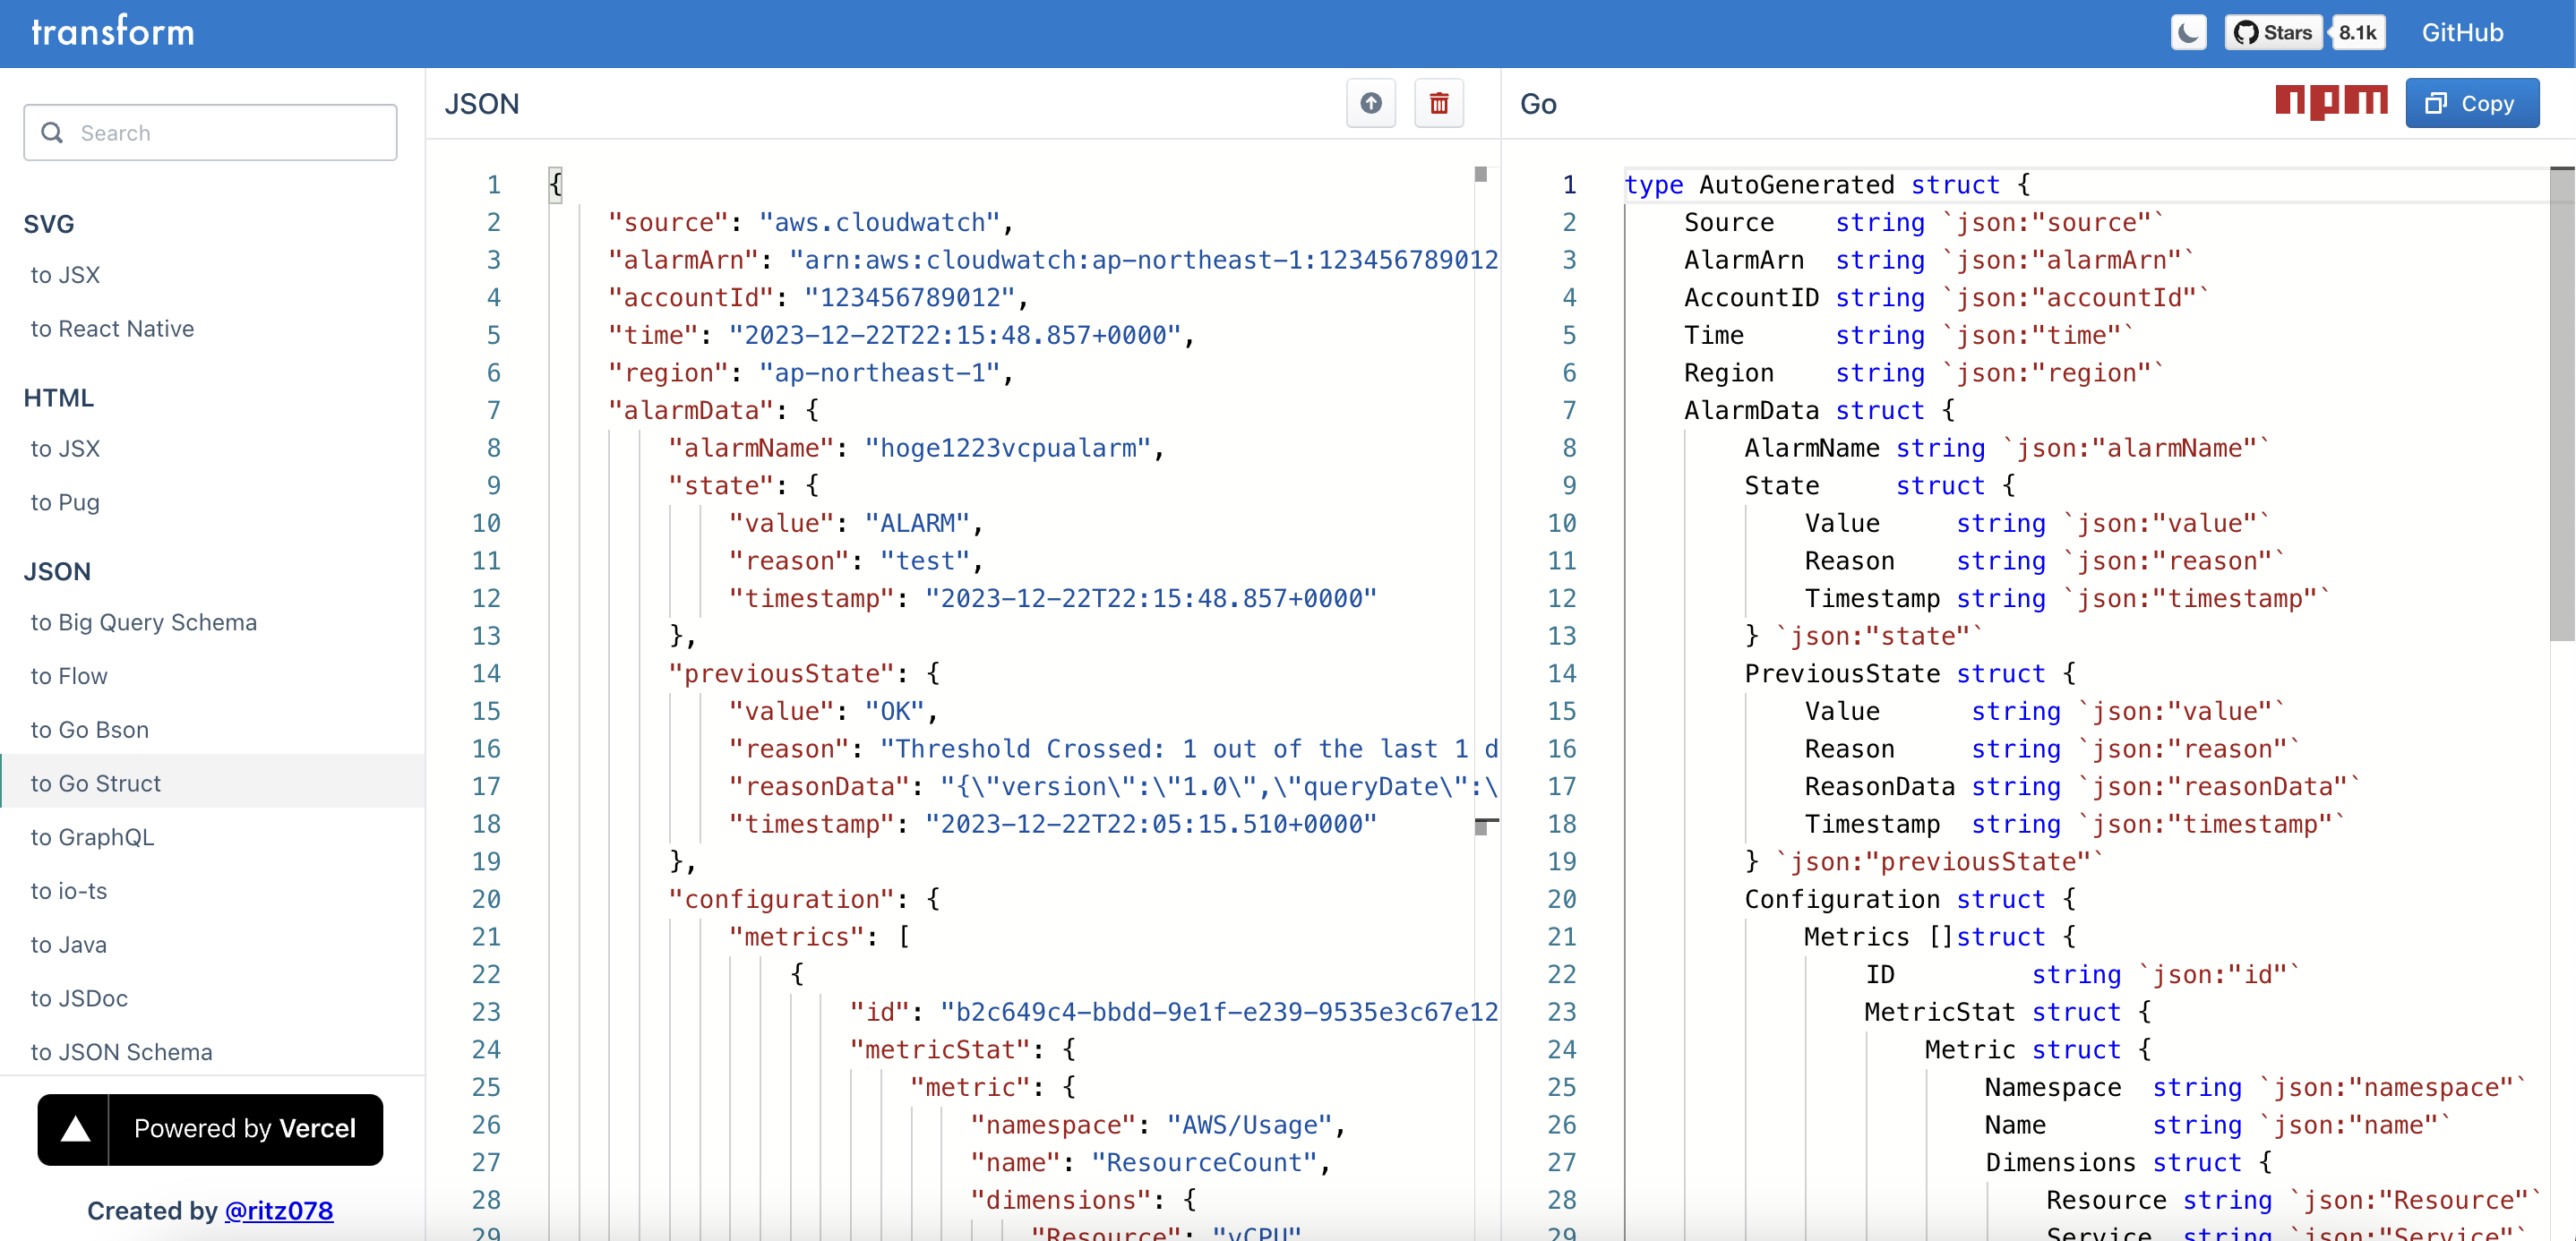
複雑な入れ子構造になっている上記のようなJSON構造体をGolangでどうやって構造化するのに苦戦しました,,,
結果的に以下サービスがおすすめでJSONの構造体をGolangの構造体に自動的に変換してくれます。こちらを使ってJSONをGolangの構造体に変換しました
以下のサービスでGolangの構造体に変換
type CloudWatchInput struct {
	Source    string `json:"source"`
	AlarmArn  string `json:"alarmArn"`
	AccountID string `json:"accountId"`
	Time      string `json:"time"`
	Region    string `json:"region"`
	AlarmData struct {
		AlarmName string `json:"alarmName"`
		State     struct {
			Value     string `json:"value"`
			Reason    string `json:"reason"`
			Timestamp string `json:"timestamp"`
		} `json:"state"`
		PreviousState struct {
			Value      string `json:"value"`
			Reason     string `json:"reason"`
			ReasonData string `json:"reasonData"`
			Timestamp  string `json:"timestamp"`
		} `json:"previousState"`
		Configuration struct {
			Metrics []struct {
				ID         string `json:"id"`
				MetricStat struct {
					Metric struct {
						Namespace  string `json:"namespace"`
						Name       string `json:"name"`
						Dimensions struct {
							Resource string `json:"Resource"`
							Service  string `json:"Service"`
							Type     string `json:"Type"`
							Class    string `json:"Class"`
						} `json:"dimensions"`
					} `json:"metric"`
					Period int    `json:"period"`
					Stat   string `json:"stat"`
				} `json:"metricStat"`
				ReturnData bool `json:"returnData"`
			} `json:"metrics"`
		} `json:"configuration"`
	} `json:"alarmData"`
}
リクエストボディとレスポンスボディの定義
次にAPIにリクエストするリクエストボディとレスポンスで受け取る内容を構造化していきます
type APIRequestParameter struct { // APIにリクエストするためのリクエストボディ
	AccountID string `json:"accountID"`
	ServerName string `json:"serverName"`
}

type APIResponse struct { //APIからレスポンスされたStatusCodeとDescriptionを構造化
	Code        int    `json:"code"`
	Description string `json:"description"`
}
ここまでのコードは以下になります。
package main

type CloudWatchInput struct {
	Source    string `json:"source"`
	AlarmArn  string `json:"alarmArn"`
	AccountID string `json:"accountId"`
	Time      string `json:"time"`
	Region    string `json:"region"`
	AlarmData struct {
		AlarmName string `json:"alarmName"`
		State     struct {
			Value     string `json:"value"`
			Reason    string `json:"reason"`
			Timestamp string `json:"timestamp"`
		} `json:"state"`
		PreviousState struct {
			Value      string `json:"value"`
			Reason     string `json:"reason"`
			ReasonData string `json:"reasonData"`
			Timestamp  string `json:"timestamp"`
		} `json:"previousState"`
		Configuration struct {
			Metrics []struct {
				ID         string `json:"id"`
				MetricStat struct {
					Metric struct {
						Namespace  string `json:"namespace"`
						Name       string `json:"name"`
						Dimensions struct {
							Resource string `json:"Resource"`
							Service  string `json:"Service"`
							Type     string `json:"Type"`
							Class    string `json:"Class"`
						} `json:"dimensions"`
					} `json:"metric"`
					Period int    `json:"period"`
					Stat   string `json:"stat"`
				} `json:"metricStat"`
				ReturnData bool `json:"returnData"`
			} `json:"metrics"`
		} `json:"configuration"`
	} `json:"alarmData"`
}

type APIRequestParameter struct {
	AccountID string `json:"accountID"`
	ServerName string `json:"serverName"`
}

type APIResponse struct {
	Code        int    `json:"code"`
	Description string `json:"description"`
}
2. CloudWatchから受け取ったリクエスト情報の中から必要な値をLambdaのパラメータに格納する処理の実装する
次にCloudWatchから受け取ったJSON構造体の中の
必要な値を取得して、先ほど定義したAPIRequestParameter構造体に格納する
ApiRequest関数の実装を行います。
func ApiRequest(ctx context.Context, input *CloudWatchInput) (*APIRequestParameter, error) {
	if input == nil {
		return nil, fmt.Errorf("received nil event")
	}
    // inputの中身が空だったエラーを返す

	serverName := input.AlarmData.Configuration.Metrics[0].MetricStat.Metric.Namespace
    // 取得したい値を指定してserverNameに格納

	APIRequestParameter := &APIRequestParameter{
        AccountID: input.AccountID,
		ServerName: serverName,
	}
    // APIRequestParameterに値を格納

	return APIRequestParameter, nil
}
以下のようにしてCloudWatchInputから値を取得することができます
	serverName := input.AlarmData.Configuration.Metrics[0].MetricStat.Metric.Namespace
    // 取得したい値を指定してserverNameに格納
ここまでのコードは以下になります。
package main

import (
	"context"
	"fmt"
)

type CloudWatchInput struct {
	Source    string `json:"source"`
	AlarmArn  string `json:"alarmArn"`
	AccountID string `json:"accountId"`
	Time      string `json:"time"`
	Region    string `json:"region"`
	AlarmData struct {
		AlarmName string `json:"alarmName"`
		State     struct {
			Value     string `json:"value"`
			Reason    string `json:"reason"`
			Timestamp string `json:"timestamp"`
		} `json:"state"`
		PreviousState struct {
			Value      string `json:"value"`
			Reason     string `json:"reason"`
			ReasonData string `json:"reasonData"`
			Timestamp  string `json:"timestamp"`
		} `json:"previousState"`
		Configuration struct {
			Metrics []struct {
				ID         string `json:"id"`
				MetricStat struct {
					Metric struct {
						Namespace  string `json:"namespace"`
						Name       string `json:"name"`
						Dimensions struct {
							Resource string `json:"Resource"`
							Service  string `json:"Service"`
							Type     string `json:"Type"`
							Class    string `json:"Class"`
						} `json:"dimensions"`
					} `json:"metric"`
					Period int    `json:"period"`
					Stat   string `json:"stat"`
				} `json:"metricStat"`
				ReturnData bool `json:"returnData"`
			} `json:"metrics"`
		} `json:"configuration"`
	} `json:"alarmData"`
}

type APIRequestParameter struct {
	AccountID string `json:"accountID"`
	ServerName string `json:"serverName"`
}

type APIResponse struct {
	Code        int    `json:"code"`
	Description string `json:"description"`
}

func ApiRequest(ctx context.Context, input *CloudWatchInput) (*APIRequestParameter, error) {
	if input == nil {
		return nil, fmt.Errorf("received nil event")
	}

	serverName := input.AlarmData.Configuration.Metrics[0].MetricStat.Metric.Namespace

	APIRequestParameter := &APIRequestParameter{
        AccountID: input.AccountID,
		ServerName: serverName,
	}

	return APIRequestParameter, nil
}
3. 対象のAPIにリクエストを送りレスポンスによって振る舞いを変える処理を実装する
LambdaからAPIにリクエストを送り、レスポンスによって振る舞いを変える処理を最後に実装します
func main() {


	lambda.Start(func(ctx context.Context, input *CloudWatchInput) (APIResponse, error) {

        // ApiRequestを呼び出す
		ApiRequest, err := ApiRequest(ctx, input)
		if err != nil {
			fmt.Printf("Error in ApiRequest: %v\n", err)
		}
        // リクエスト内容をJSONに変換する
		ApiRequestJSON, err := json.Marshal(ApiRequest)
		if err != nil {
			fmt.Printf("Error in JSON Marshal: %v\n", err)
		}
  }
まずは上記のようにApiRequestを呼び出してJSONに変換する処理を実装します。
		ApiResponse, err := http.Post("https://hogehoge/hogehoge", "application/json", bytes.NewBuffer(ApiRequestJSON))
		if err != nil {
			return APIResponse{Code: ApiResponse.StatusCode, Description: fmt.Sprintf("ERROR: %v", err)}, nil
		}
		defer ApiResponse.Body.Close()

		body, err := io.ReadAll(ApiResponse.Body)
		if err != nil {
			return APIResponse{Code: ApiResponse.StatusCode, Description: fmt.Sprintf("ERROR: %v", err)}, nil
		}
次にリクエストを実施し、返って来た値をAPIResponse構造体に格納する処理を実行します。
ApiResponse, err := http.Post("https://hogehoge/hogehoge", "application/json", bytes.NewBuffer(ApiRequestJSON))
上記処理部分で対象のAPIを指定して(今回はhttps://hogehoge/hogehoge) 指定したAPIにhttpリクエストでpostしています
statusCode := ApiResponse.StatusCode
		switch statusCode {
		case http.StatusOK:
			message = "CREATED: 送信が成功しました"
		case http.StatusInternalServerError:
			message = "ERROR: サーバーエラーが発生しました"
		}
最後にAPIから返ってきたStatusCodeによって表示内容を変更する処理を実装します。
今回はAPIから200が返ってきたらCREATED: 送信が成功しましたと表示し
500が返ってきたらERROR: サーバーエラーが発生しましたと表示されるようにします。
最終的なソースコードは以下になります。
package main

import (
	"bytes"
	"context"
	"encoding/json"
	"fmt"
	"io"
	"net/http"

	"github.com/aws/aws-lambda-go/lambda"
)

type CloudWatchInput struct {
	Source    string `json:"source"`
	AlarmArn  string `json:"alarmArn"`
	AccountID string `json:"accountId"`
	Time      string `json:"time"`
	Region    string `json:"region"`
	AlarmData struct {
		AlarmName string `json:"alarmName"`
		State     struct {
			Value     string `json:"value"`
			Reason    string `json:"reason"`
			Timestamp string `json:"timestamp"`
		} `json:"state"`
		PreviousState struct {
			Value      string `json:"value"`
			Reason     string `json:"reason"`
			ReasonData string `json:"reasonData"`
			Timestamp  string `json:"timestamp"`
		} `json:"previousState"`
		Configuration struct {
			Metrics []struct {
				ID         string `json:"id"`
				MetricStat struct {
					Metric struct {
						Namespace  string `json:"namespace"`
						Name       string `json:"name"`
						Dimensions struct {
							Resource string `json:"Resource"`
							Service  string `json:"Service"`
							Type     string `json:"Type"`
							Class    string `json:"Class"`
						} `json:"dimensions"`
					} `json:"metric"`
					Period int    `json:"period"`
					Stat   string `json:"stat"`
				} `json:"metricStat"`
				ReturnData bool `json:"returnData"`
			} `json:"metrics"`
		} `json:"configuration"`
	} `json:"alarmData"`
}

type APIRequestParameter struct {
	AccountID string `json:"accountID"`
	ServerName string `json:"serverName"`
}

type APIResponse struct {
	Code        int    `json:"code"`
	Description string `json:"description"`
}

func ApiRequest(ctx context.Context, input *CloudWatchInput) (*APIRequestParameter, error) {
	if input == nil {
		return nil, fmt.Errorf("received nil event")
	}

	serverName := input.AlarmData.Configuration.Metrics[0].MetricStat.Metric.Namespace

	APIRequestParameter := &APIRequestParameter{
        AccountID: input.AccountID,
		ServerName: serverName,
	}

	return APIRequestParameter, nil
}

func main() {
	lambda.Start(func(ctx context.Context, input *CloudWatchInput) (APIResponse, error) {
		ApiRequest, err := ApiRequest(ctx, input)
		if err != nil {
			fmt.Printf("Error in ApiRequest: %v\n", err)
		}

		ApiRequestJSON, err := json.Marshal(ApiRequest)
		if err != nil {
			fmt.Printf("Error in JSON Marshal: %v\n", err)
		}

		ApiResponse, err := http.Post("https://hogehoge/hogehoge", "application/json", bytes.NewBuffer(ApiRequestJSON))
		if err != nil {
			return APIResponse{Code: ApiResponse.StatusCode, Description: fmt.Sprintf("ERROR: %v", err)}, nil
		}
		defer ApiResponse.Body.Close()

		body, err := io.ReadAll(ApiResponse.Body)
		if err != nil {
			return APIResponse{Code: ApiResponse.StatusCode, Description: fmt.Sprintf("ERROR: %v", err)}, nil
		}

		message := string(body)
		statusCode := ApiResponse.StatusCode
		switch statusCode {
		case http.StatusOK:
			message = "CREATED: 送信が成功しました"
		case http.StatusInternalServerError:
			message = "ERROR: サーバーエラーが発生しました"
		}

		return APIResponse{Code: statusCode, Description: message}, nil
	})
}
4. 動作確認
curl -XPOST "http://localhost:9000/2015-03-31/functions/function/invocations" -d '{
    "source": "aws.cloudwatch",
    "alarmArn": "arn:aws:cloudwatch:ap-northeast-1:123456789012:alarm:hoge1223vcpualarm",
    "accountId": "123456789012",
    "time": "2023-12-22T22:15:48.857+0000",
    "region": "ap-northeast-1",
    "alarmData": {
        "alarmName": "hoge1223vcpualarm",
        "state": {
            "value": "ALARM",
            "reason": "test",
            "timestamp": "2023-12-22T22:15:48.857+0000"
        },
        "previousState": {
            "value": "OK",
            "reason": "Threshold Crossed: 1 out of the last 1 datapoints [0.0 (22/12/23 22:00:00)] was not greater than the threshold (100.0) (minimum 1 datapoint for ALARM -> OK transition).",
            "reasonData": "{\"version\":\"1.0\",\"queryDate\":\"2023-12-22T22:05:15.507+0000\",\"startDate\":\"2023-12-22T22:00:00.000+0000\",\"statistic\":\"Average\",\"period\":300,\"recentDatapoints\":[0.0],\"threshold\":100.0,\"evaluatedDatapoints\":[{\"timestamp\":\"2023-12-22T22:00:00.000+0000\",\"sampleCount\":5.0,\"value\":0.0}]}",
            "timestamp": "2023-12-22T22:05:15.510+0000"
        },
        "configuration": {
            "metrics": [
                {
                    "id": "b2c649c4-bbdd-9e1f-e239-9535e3c67e12",
                    "metricStat": {
                        "metric": {
                            "namespace": "hogehoge",
                            "name": "ResourceCount",
                            "dimensions": {
                                "Resource": "vCPU",
                                "Service": "Fargate",
                                "Type": "Resource",
                                "Class": "Standard/OnDemand"
                            }
                        },
                        "period": 300,
                        "stat": "Average"
                    },
                    "returnData": true
                }
            ]
        }
    }
}' -H "Content-Type: application/json"
上記を叩いて
{"code":200,"description":"CREATED: 送信が成功しました"}%
と返ってくる
curl -XPOST "http://localhost:9000/2015-03-31/functions/function/invocations" -d '{
    "source": "aws.cloudwatch",
    "alarmArn": "arn:aws:cloudwatch:ap-northeast-1:123456789012:alarm:hoge1223vcpualarm",
    "accountId": "123456789012",
    "time": "2023-12-22T22:15:48.857+0000",
    "region": "ap-northeast-1",
    "alarmData": {
        "alarmName": "hoge1223vcpualarm",
        "state": {
            "value": "ALARM",
            "reason": "test",
            "timestamp": "2023-12-22T22:15:48.857+0000"
        },
        "previousState": {
            "value": "OK",
            "reason": "Threshold Crossed: 1 out of the last 1 datapoints [0.0 (22/12/23 22:00:00)] was not greater than the threshold (100.0) (minimum 1 datapoint for ALARM -> OK transition).",
            "reasonData": "{\"version\":\"1.0\",\"queryDate\":\"2023-12-22T22:05:15.507+0000\",\"startDate\":\"2023-12-22T22:00:00.000+0000\",\"statistic\":\"Average\",\"period\":300,\"recentDatapoints\":[0.0],\"threshold\":100.0,\"evaluatedDatapoints\":[{\"timestamp\":\"2023-12-22T22:00:00.000+0000\",\"sampleCount\":5.0,\"value\":0.0}]}",
            "timestamp": "2023-12-22T22:05:15.510+0000"
        },
        "configuration": {
            "metrics": [
                {
                    "id": "b2c649c4-bbdd-9e1f-e239-9535e3c67e12",
                    "metricStat": {
                        "metric": {
                            "namespace": "fugafuga",
                            "name": "ResourceCount",
                            "dimensions": {
                                "Resource": "vCPU",
                                "Service": "Fargate",
                                "Type": "Resource",
                                "Class": "Standard/OnDemand"
                            }
                        },
                        "period": 300,
                        "stat": "Average"
                    },
                    "returnData": true
                }
            ]
        }
    }
}' -H "Content-Type: application/json"
{"code":500,"description": "ERROR: サーバーエラーが発生しました"}%
と返ってくれば成功です!
課題点
紹介した処理環境だといくつか課題点があり
1. ホットリロードできない,,,,問題
処理を反映させて動作確認やデバックするのにコンテナをいちいち再構築しなければならないのでair等を導入してホットリロードできるようにしたい
2. 単体テストができるようにしてあげたい,,,,
さっきの処理内容だと実際のAPIに向けて動作確認するようになっているので単体テスト等でAPIがなくても動作確認できるようにしてあげたい
というのが挙げられます。またこちら解決できたら記事化まで持って行けたらいいなと思います。
(書かない可能性ありなのでご了承ください笑)
参考


