正月休み最終日(2021/1/5)の思い出に, Raspberry Pi 4でKubernetesクラスタを構築した.
先人の構築例がいくらでもあるので楽々かと思いきや, 動作が安定するまで苦労した....
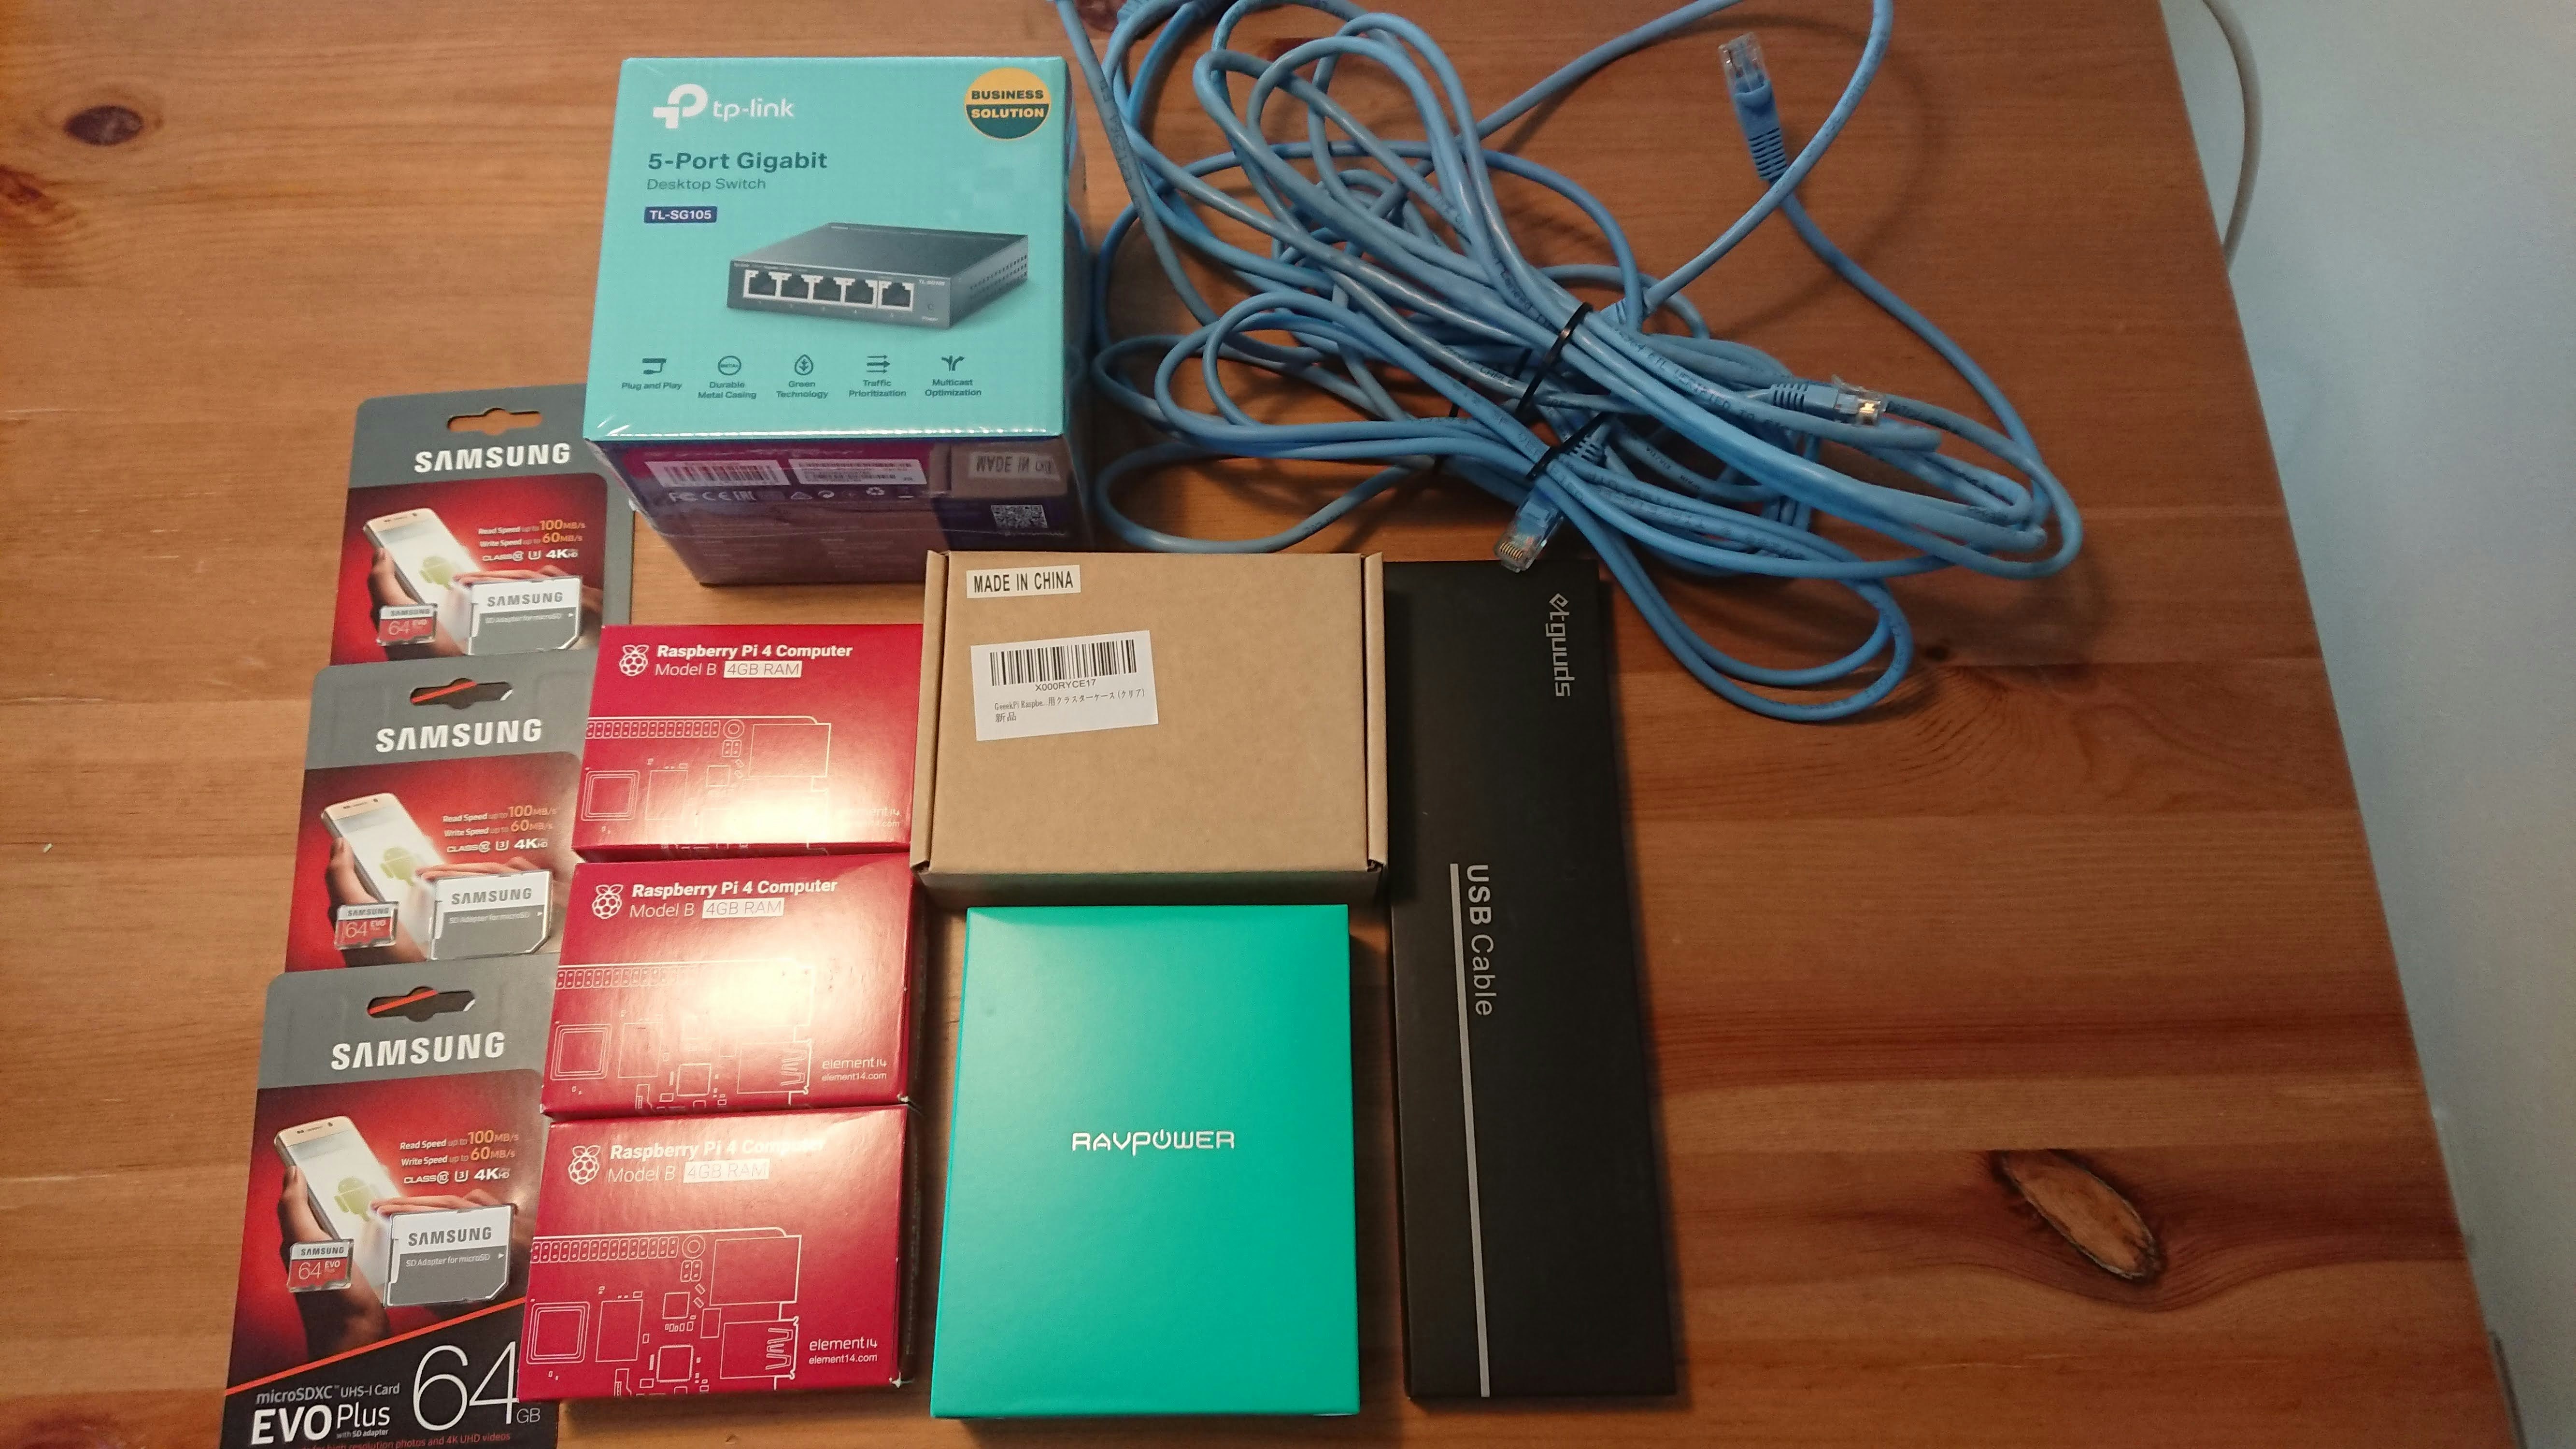
機材
| 機材 | 価格 | 数量 | コメント |
|---|---|---|---|
| Raspberry Pi 4 Computer Model B 4GB | ¥6,875 | 3 | ケチって4GB. |
| Samsung EVO Plus 64GB microSDXC UHS-I U3 100MB/s | ¥1,495 | 3 | リッチに64GB. |
| GeeekPi Raspberry Pi4クラスターケース | ¥2,499 | 1 | 4ノードまでスタックできるケース. 今回は3ノードで構成. |
| RAVPower USB充電器 (60W 6ポート) | ¥2,249 | 1 | ACケーブルを増やしたくなかったのでUSB給電で集約. |
| USB Type C ケーブル 【1m 3本】 | ¥999 | 1 | Raspberry Piの電源供給に使用. |
| TP-Link 5ポート スイッチングハブ 10/100/1000Mbps | ¥1,460 | 1 | ケチって5ポート. |
| LANケーブル (家にあったやつ) | ¥0 | 4 | 捨てないでとっておくと使い道があるもんよね. |
| 合計 | ¥32,317 | - |
構成
- Raspberry PI OS Lite(32bit) 2020-12-02
- kubeadm 1.20
- CRI-O 1.20
- Flannel
| ノード | ホスト名 | IPアドレス |
|---|---|---|
| コントロールプレーンノード | platypus-master | 192.168.11.100 |
| ワーカーノード | platypus-worker1 | 192.168.11.101 |
| ワーカーノード | platypus-worker2 | 192.168.11.102 |
組み立て
悪戦苦闘しつつ3時間くらい.
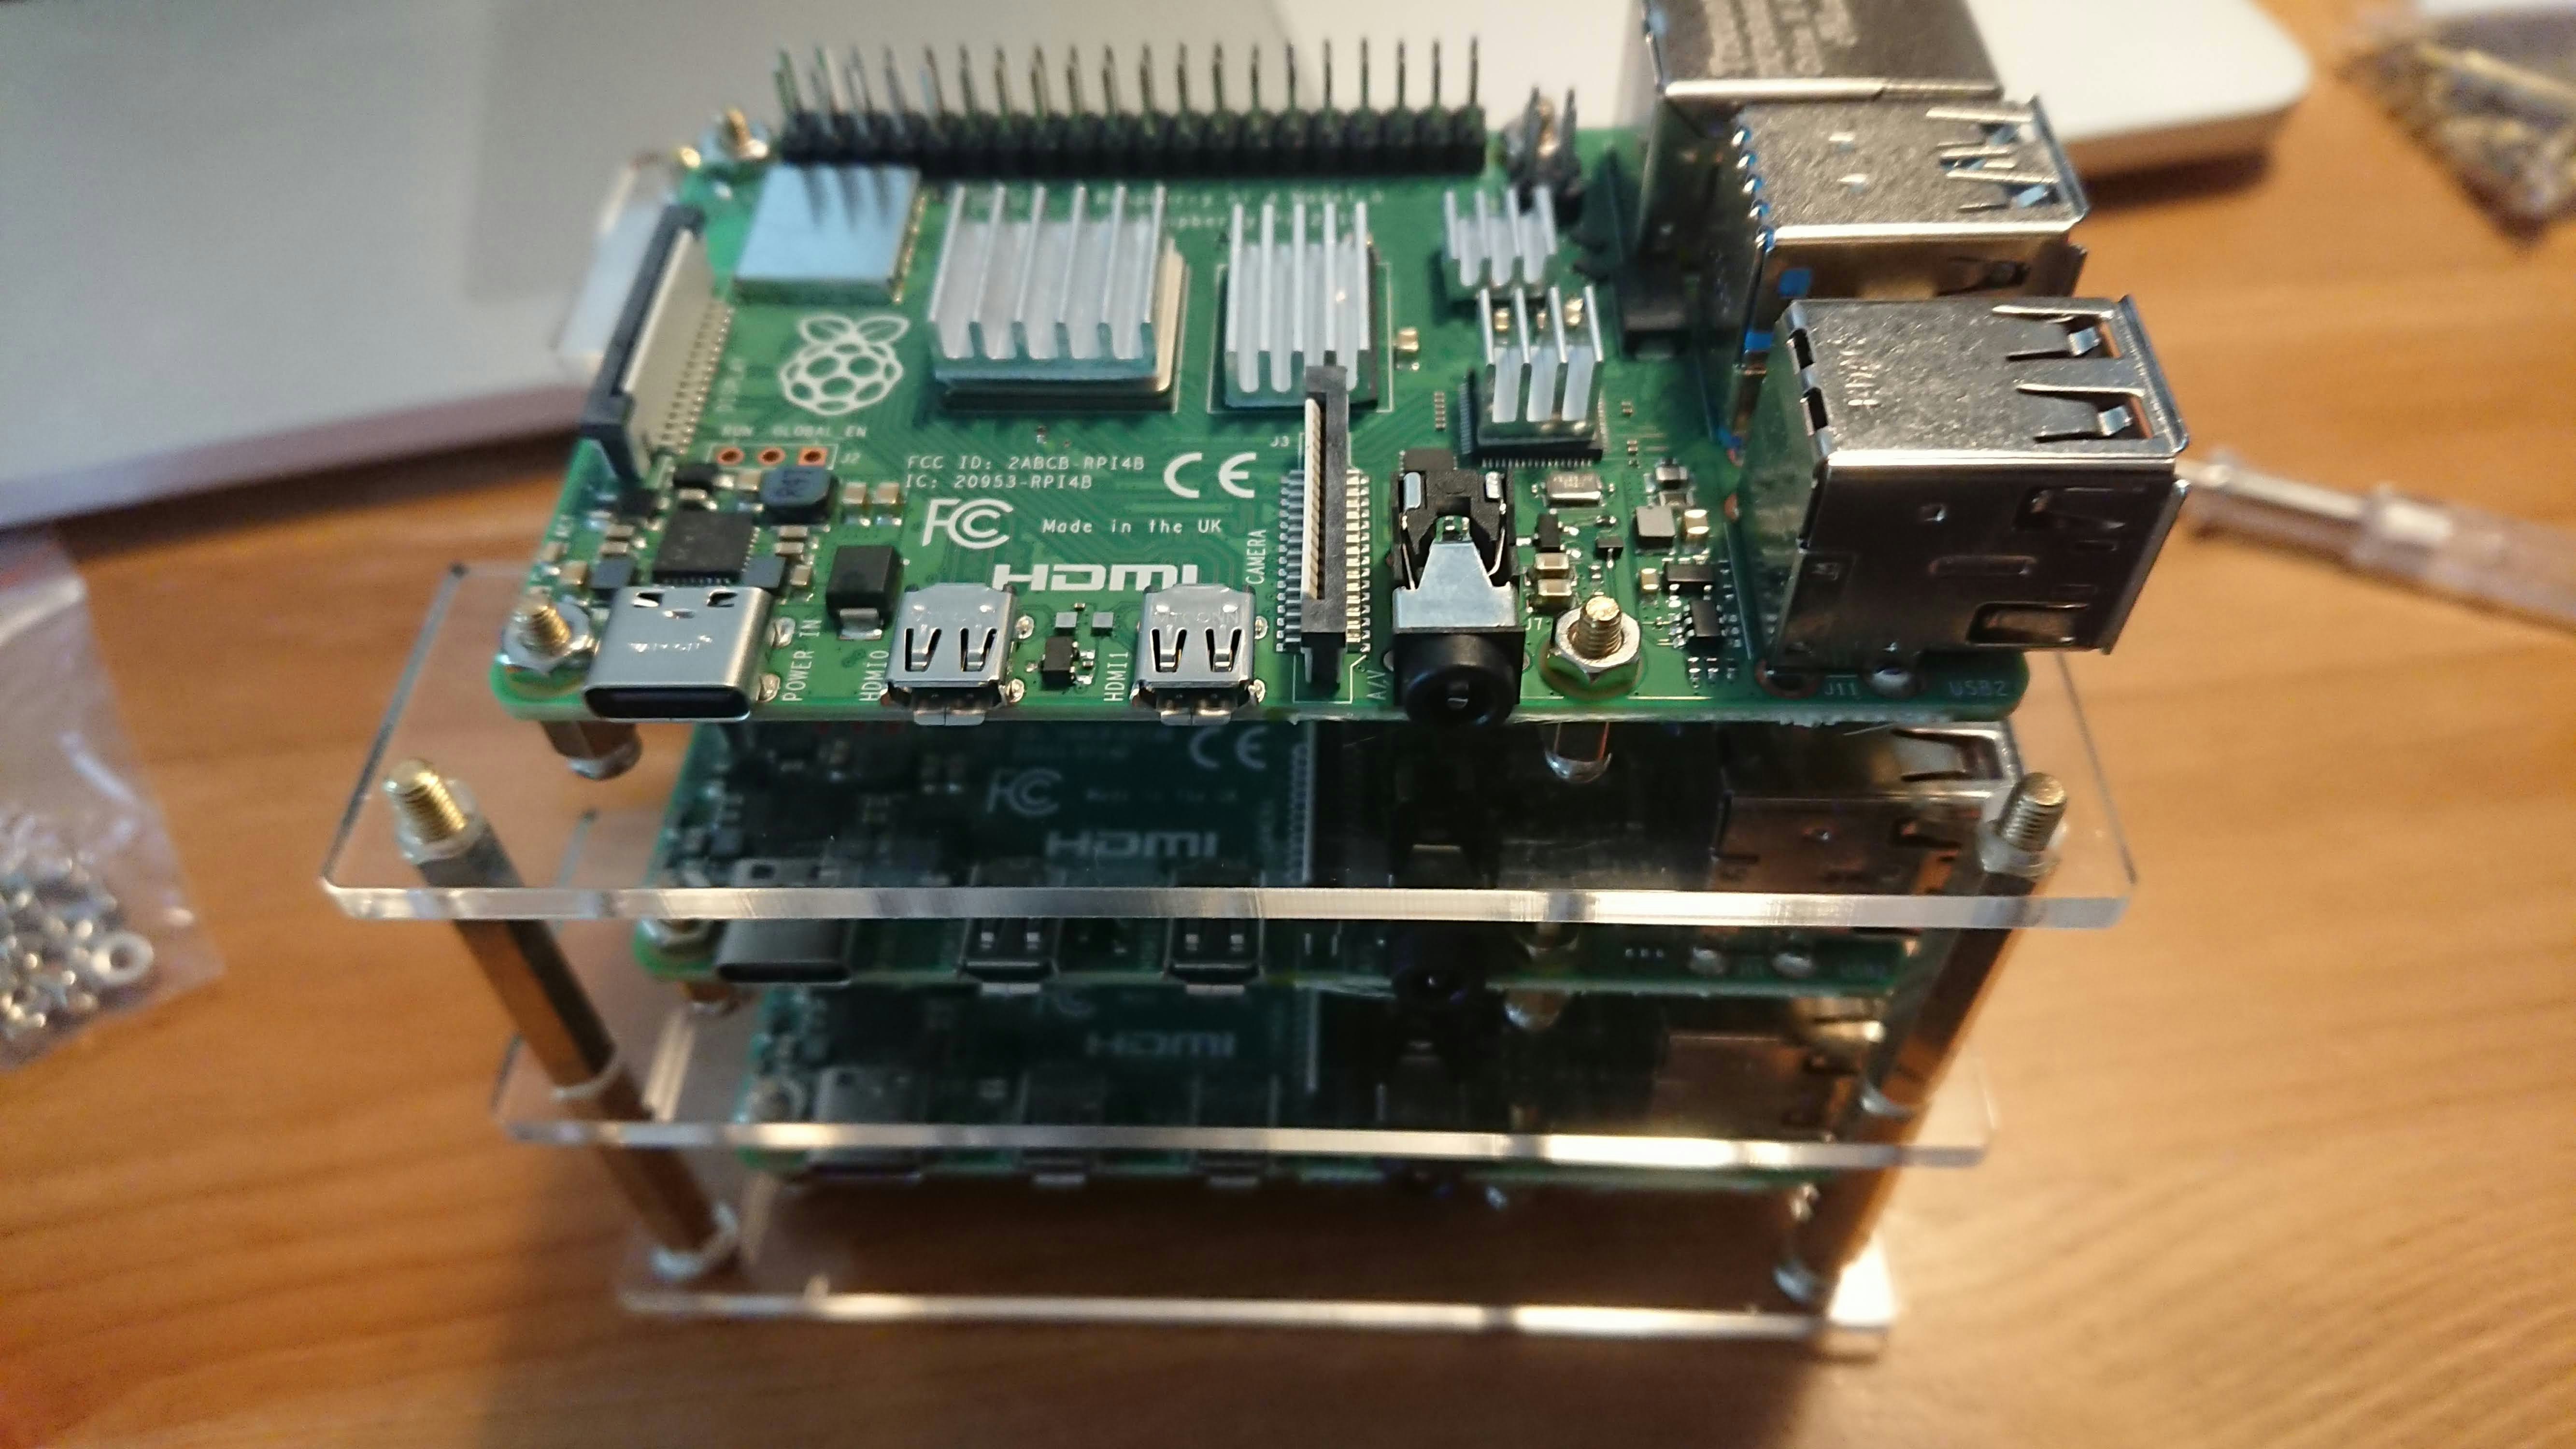
- ケース付属のとてもシンプルな説明書を参考に土台を組み上げる.
- プラスドライバが付属しているので特別な工具は不要だった. 細かいネジを掴むのにピンセットがあると捗ると思う.
- ケース付属のヒートシンクをRaspberry Piに取り付け, ケースの土台に組み付ける.
- RP4のヒートシンクは4個セットになっているほう.
- RP4のヒートシンクは4個セットになっているほう.
- 上段ケースにファンを取り付ける.
- ファンの電源は, Raspberry PiのGPIO 4番ピン(5V)に赤のケーブル, 6番ピン(Ground)に黒のケーブルを接続する. (参考:GPIOリファレンス)
- ファンはヒートシンク側に吹き出し口(ラベルが貼られている側)を向けるように取り付けた. (参考:ヒートシンクの効果検証)
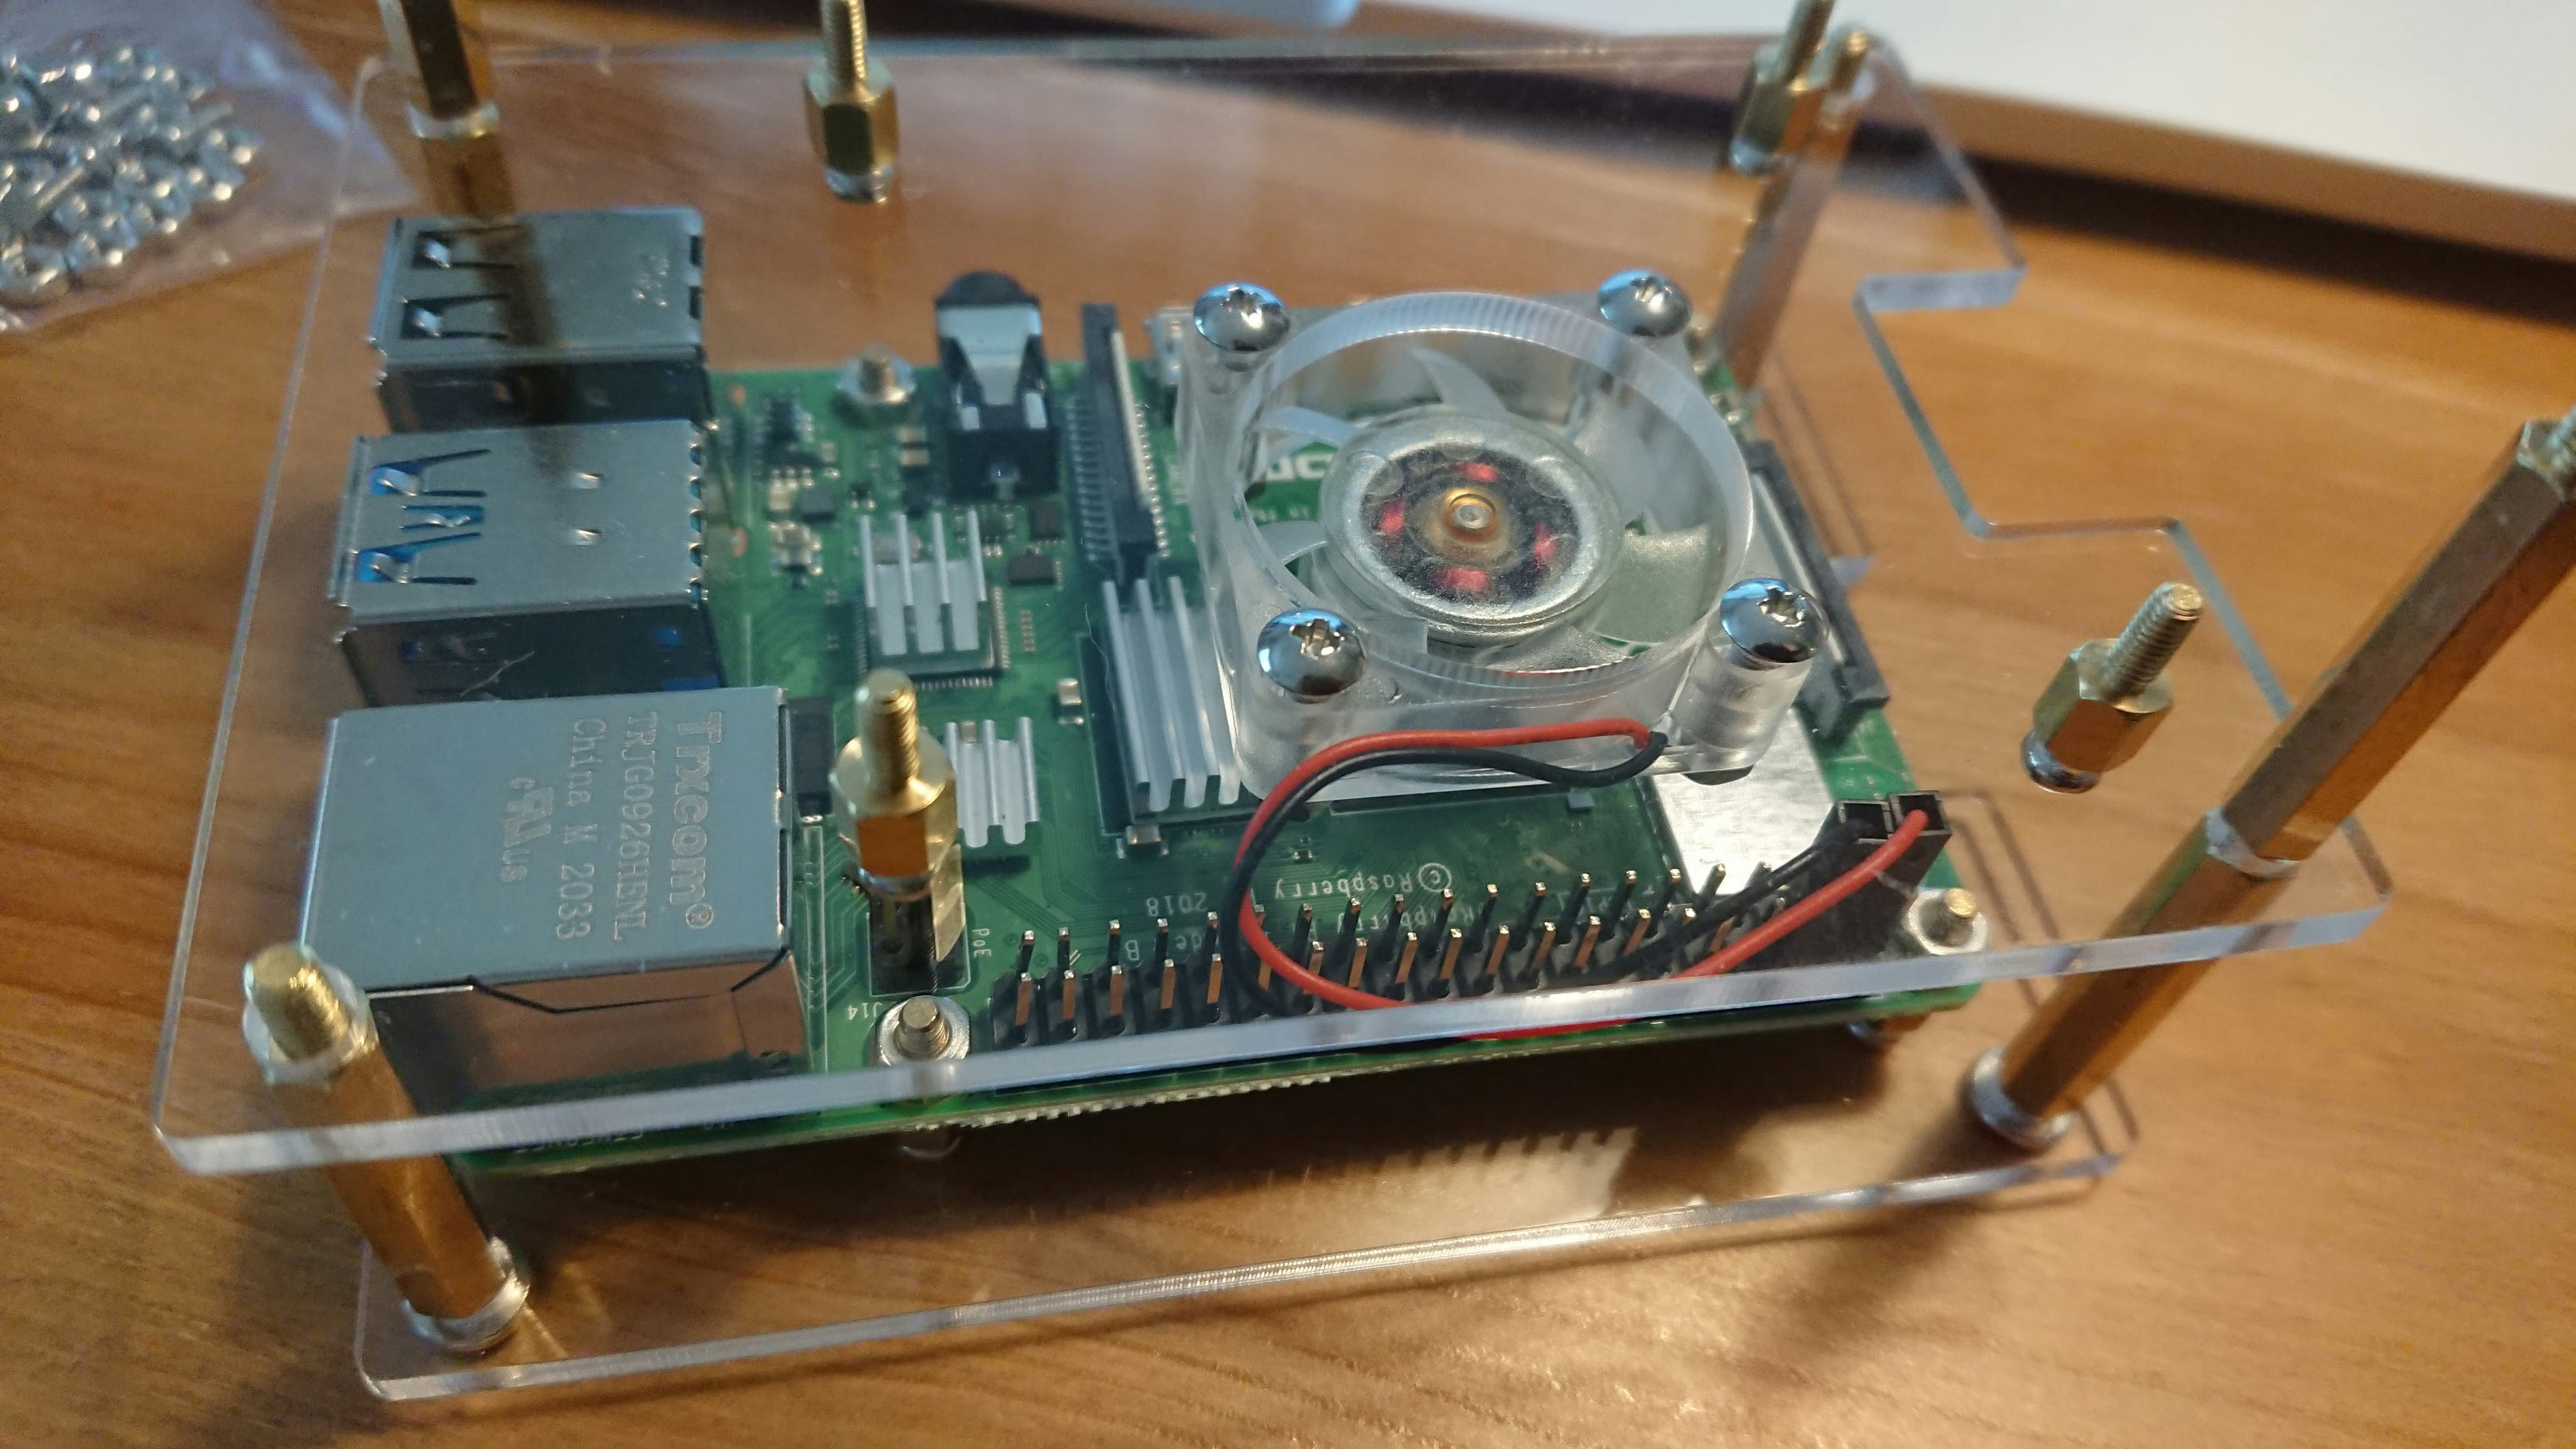
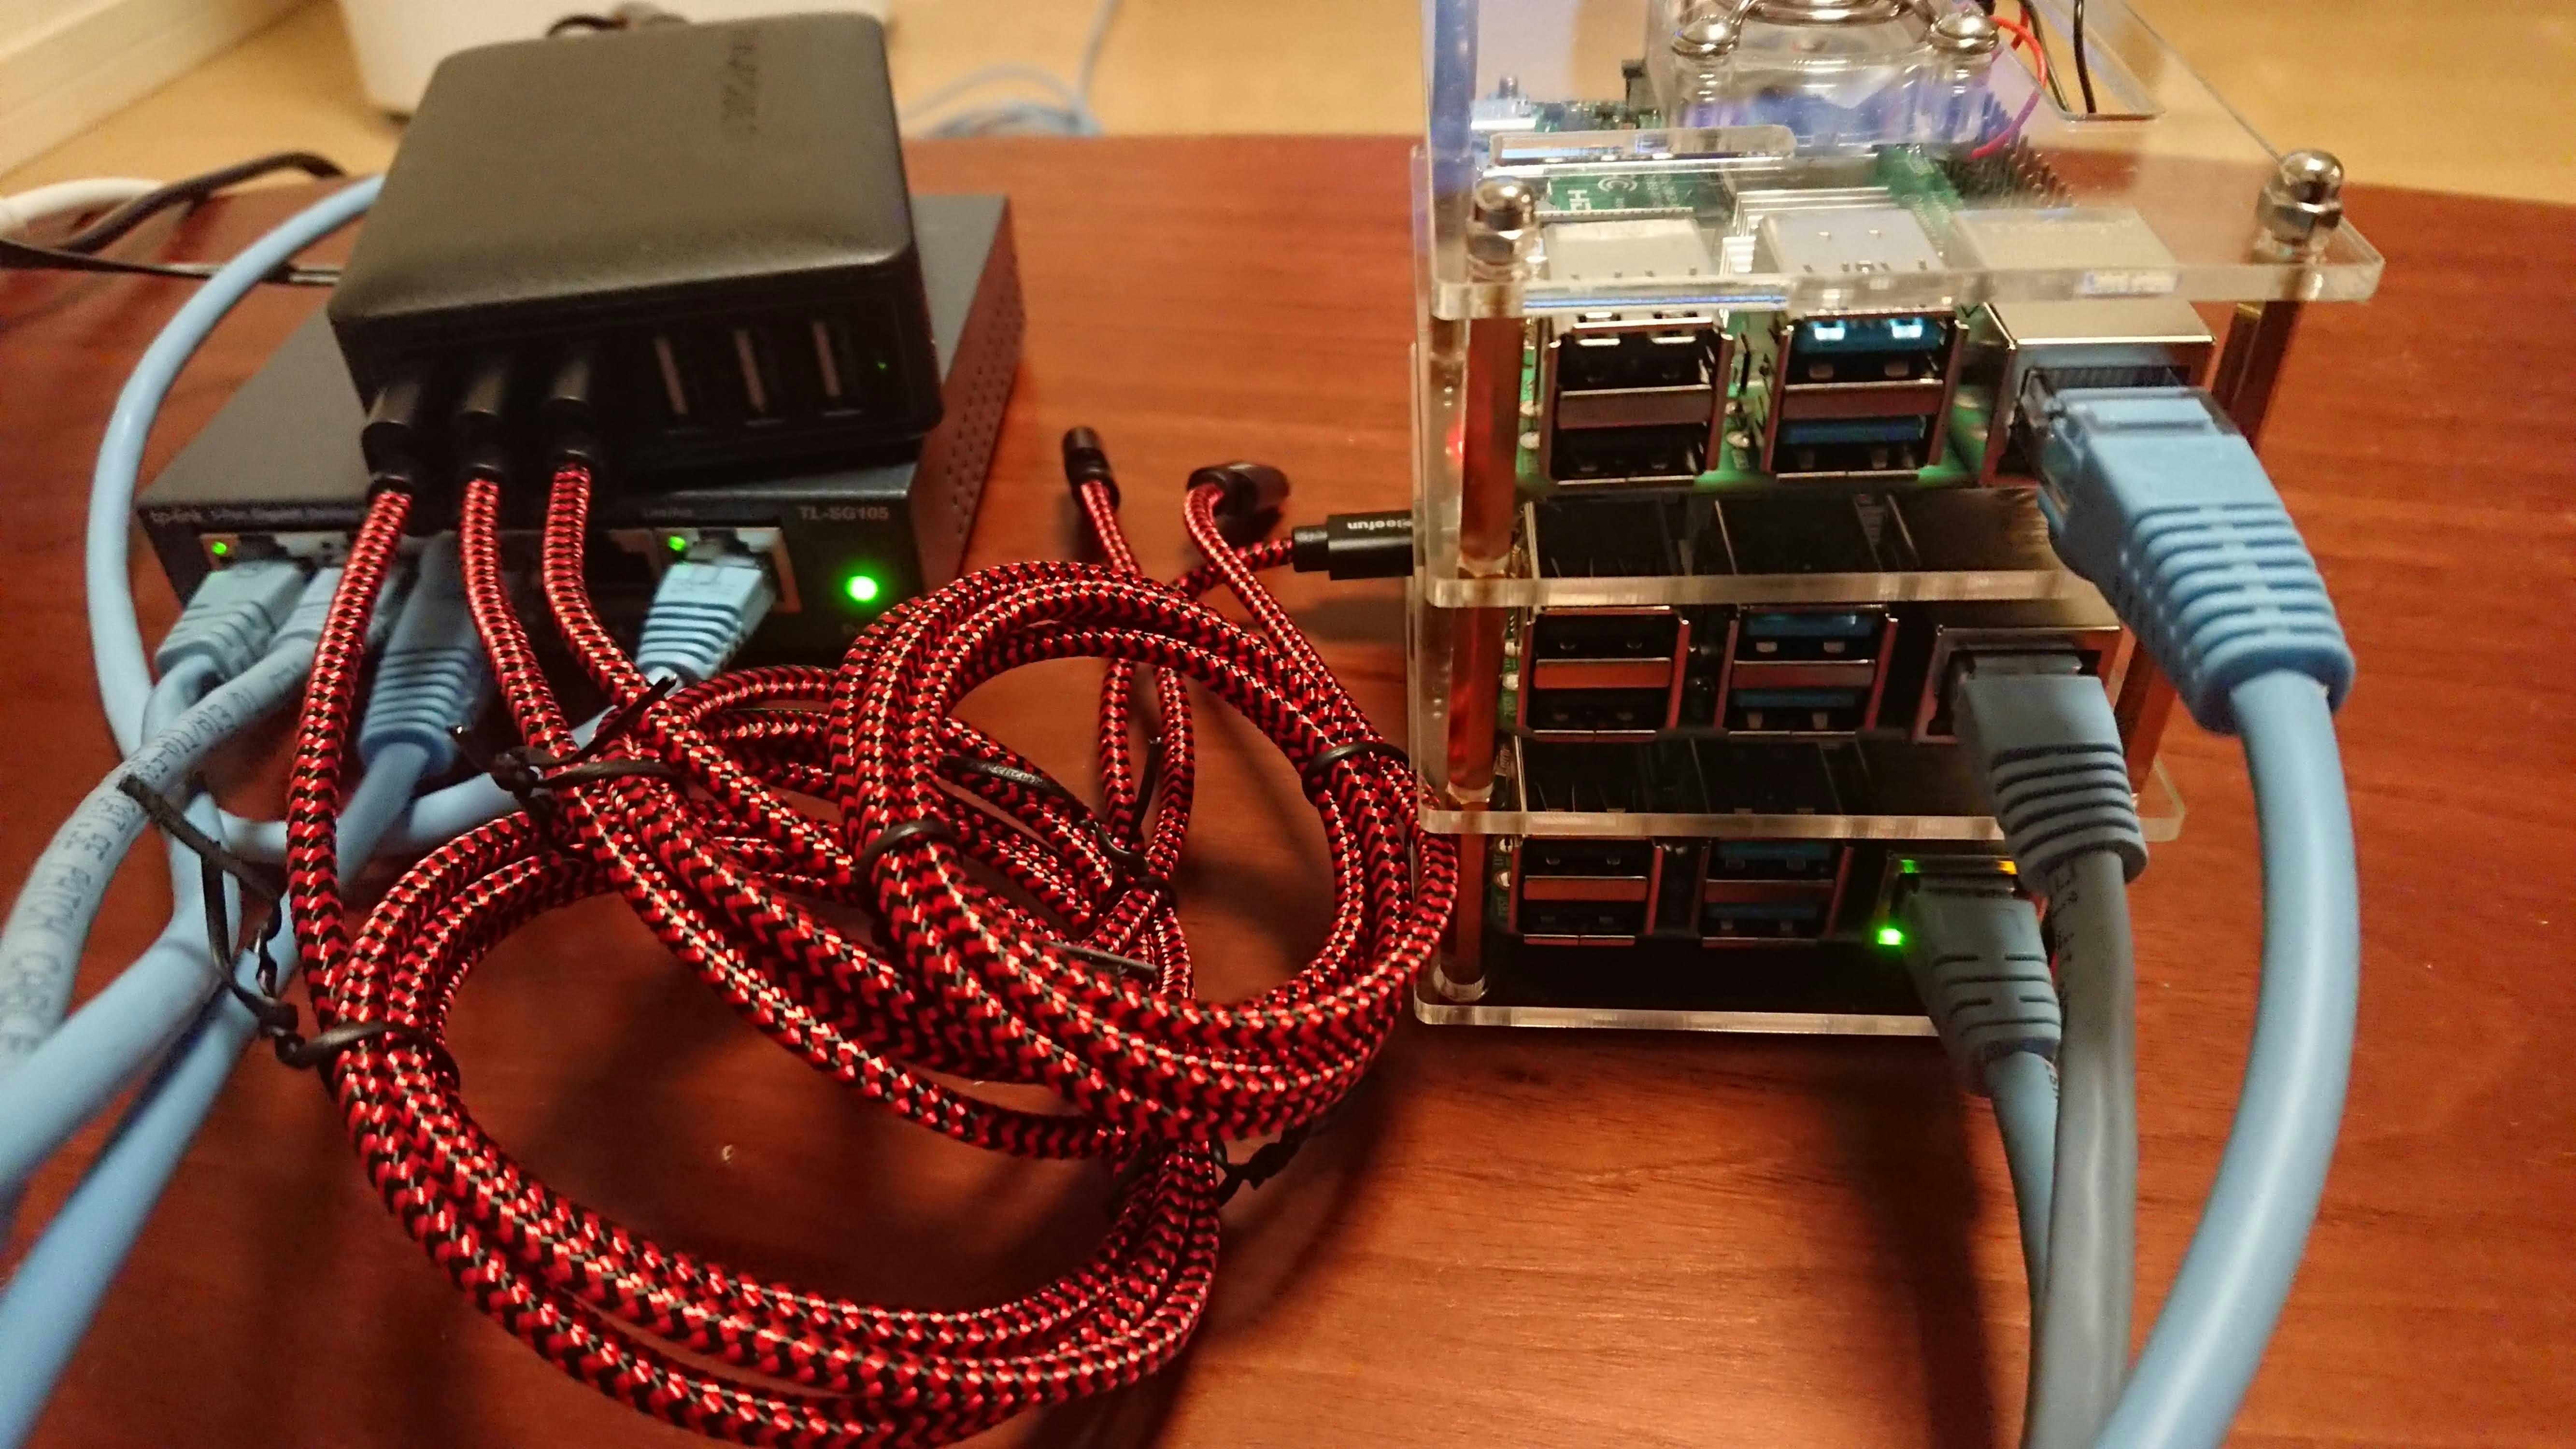
- 電源, LANをつないで完成.
OSセットアップ
インストール
- Raspberry Pi Imagerを使いOSインストールする. サーバ用途にするのでデスクトップ環境なしのRaspberry Pi OS Liteをチョイスした. ノードの台数分だけ繰り返す.
- Raspberry Pi OSでsshを使えるようにする. 母艦でSDカードをマウントし, マウントポイントのルートディレクトリ直下にファイル名"ssh"の空ファイルを作成.
初期設定
- 各ノードのIPアドレスを固定するため, 以降は1台ずつ電源およびネットワーク接続して作業する.
- raspi-configを実行し初期設定を行う.
- piユーザのパスワード変更: S3 Password
- ホスト名の変更: S4 Hostname
- ロケールを変更: L1 Locale
- タイムゾーンを変更: L2 Timezone
- IPアドレスの固定
- /etc/dhcpcd.confを編集.
pi@platypus-worker1:~ $ diff -u /etc/dhcpcd.conf.bak /etc/dhcpcd.conf
--- /etc/dhcpcd.conf.bak	2021-01-06 21:45:25.799969379 +0900
+++ /etc/dhcpcd.conf	2021-01-06 21:46:02.800444411 +0900
@@ -41,11 +41,11 @@
 slaac private

 # Example static IP configuration:
-#interface eth0
-#static ip_address=192.168.0.10/24
+interface eth0
+static ip_address=192.168.11.100/24
 #static ip6_address=fd51:42f8:caae:d92e::ff/64
-#static routers=192.168.0.1
-#static domain_name_servers=192.168.0.1 8.8.8.8 fd51:42f8:caae:d92e::1
+static routers=192.168.11.1
+static domain_name_servers=192.168.11.1

 # It is possible to fall back to a static IP if DHCP fails:
 # define static profile
kubeadmでクラスタ構築
kubeadmを使ってkubernetesクラスタのセットアップを行った. セットアップ手順は公式ドキュメントの手順を参考に進めた.
リファレンスを読んで, 試して, つまづいて...正月休みはとっくに終わり, 仕事終わりに作業してx日.
kubeadmのインストール (全ノードで実行)
kubeadmのインストール手順にしたがって進める.
swapの無効化
やっておかないとkubeadm initがエラー終了する.
sudo swapoff --all
sudo systemctl stop dphys-swapfile
sudo systemctl disable dphys-swapfile
systemctl status dphys-swapfile
swapが無効になっていることを確認.
$ free
              total        used        free      shared  buff/cache   available
Mem:        3919796       63144     3677240        8616      179412     3721364
Swap:             0           0           0
cgroups memoryの有効化
やっておかないとkubeadm initがエラー終了する. 設定内容はここを参照.
cgroups memoryが無効(enabled=0)になっている.
$ cat /proc/cgroups
# subsys_name	hierarchy	num_cgroups	enabled
cpuset	4	1	1
cpu	6	1	1
cpuacct	6	1	1
blkio	8	1	1
memory	0	71	0
devices	3	65	1
freezer	5	1	1
net_cls	2	1	1
perf_event	7	1	1
net_prio	2	1	1
pids	9	70	1
/boot/cmline.txtを編集し, cgroups memoryのカーネルパラメータを追加する.
--- /boot/cmdline.txt.bak	2021-01-07 20:53:34.000000000 +0900
+++ /boot/cmdline.txt	2021-01-07 20:55:22.000000000 +0900
@@ -1 +1 @@
-console=serial0,115200 console=tty1 root=PARTUUID=6d844f15-02 rootfstype=ext4 elevator=deadline fsck.repair=yes rootwait
+console=serial0,115200 console=tty1 root=PARTUUID=6d844f15-02 rootfstype=ext4 elevator=deadline fsck.repair=yes rootwait cgroup_enable=cpuset cgroup_enable=memory cgroup_memory=1
カーネルパラメータを反映させるため, OS再起動.
sudo shutdown -r now
再起動後, cgroups memoryが有効(enabled=1)になっていることを確認.
$ cat /proc/cgroups
# subsys_name	hierarchy	num_cgroups	enabled
cpuset	9	1	1
cpu	2	1	1
cpuacct	2	1	1
blkio	3	1	1
memory	4	64	1
devices	7	30	1
freezer	5	1	1
net_cls	6	1	1
perf_event	8	1	1
net_prio	6	1	1
pids	10	34	1
iptablesの設定
iptablesでブリッジフィルタを使えるようにする設定.
cat <<EOF | sudo tee /etc/modules-load.d/k8s.conf
br_netfilter
EOF

cat <<EOF | sudo tee /etc/sysctl.d/k8s.conf
net.bridge.bridge-nf-call-ip6tables = 1
net.bridge.bridge-nf-call-iptables = 1
EOF
sudo sysctl --system
CRI-Oのインストール
kubernetes 1.20以降はコンテナランタイムとしてdockerが非推奨となるので, containerdまたはCRI-Oを入れておきたい. 2021/1/5現在, containerdはRaspberry PI用のパッケージが提供されていないため, ソースコードからビルドしてインストールが必要な一方で, CRI-OはRaspberry PI用のdebパッケージが提供されているので利用することにした.
CRI-Oのインストール手順にしたがって進める.
前提となるカーネルモジュールのロードおよびsysctl設定
# Create the .conf file to load the modules at bootup
cat <<EOF | sudo tee /etc/modules-load.d/crio.conf
overlay
br_netfilter
EOF

sudo modprobe overlay
sudo modprobe br_netfilter

# Set up required sysctl params, these persist across reboots.
cat <<EOF | sudo tee /etc/sysctl.d/99-kubernetes-cri.conf
net.bridge.bridge-nf-call-iptables  = 1
net.ipv4.ip_forward                 = 1
net.bridge.bridge-nf-call-ip6tables = 1
EOF

sudo sysctl --system
CRI-Oのdebパッケージをインストールする. CRI-Oはkubeadmと同じバージョンをインストールする必要があるため, 1.20を指定する.
OS=Raspbian_10
VERSION=1.20

cat <<EOF | sudo tee /etc/apt/sources.list.d/devel:kubic:libcontainers:stable.list
deb https://download.opensuse.org/repositories/devel:/kubic:/libcontainers:/stable/$OS/ /
EOF

cat <<EOF | sudo tee /etc/apt/sources.list.d/devel:kubic:libcontainers:stable:cri-o:$VERSION.list
deb http://download.opensuse.org/repositories/devel:/kubic:/libcontainers:/stable:/cri-o:/$VERSION/$OS/ /
EOF

curl -L https://download.opensuse.org/repositories/devel:kubic:libcontainers:stable:cri-o:$VERSION/$OS/Release.key | sudo apt-key --keyring /etc/apt/trusted.gpg.d/libcontainers.gpg add -
curl -L https://download.opensuse.org/repositories/devel:/kubic:/libcontainers:/stable/$OS/Release.key | sudo apt-key --keyring /etc/apt/trusted.gpg.d/libcontainers.gpg add -

sudo apt-get update
sudo apt-get install cri-o cri-o-runc
サービスとして登録する.
sudo systemctl daemon-reload
sudo systemctl start crio
sudo systemctl enable crio
kubelet, kubeadm, kubectlパッケージのインストール
kubernetesのaptリポジトリを登録
sudo apt-get update && sudo apt-get install -y apt-transport-https curl

curl -s https://packages.cloud.google.com/apt/doc/apt-key.gpg | sudo apt-key add -

cat <<EOF | sudo tee /etc/apt/sources.list.d/kubernetes.list
deb https://apt.kubernetes.io/ kubernetes-xenial main
EOF
パッケージをインストール. CRI-Oとバージョンをあわせるために, バージョン指定したほうがよい.
sudo apt-get update
sudo apt-get install -y kubelet kubeadm kubectl
パッケージバージョンの固定
sudo apt-mark hold kubelet kubeadm kubectl
cgroup driverの設定
kubeadmは, コントロールプレーンノードのkubeletが使用するcgroup driverをコンテナランタイムに応じて自動検出する. ただし, kubeadm 1.20時点ではdockerのみ有効で, それ以外のコンテナランタイムを使っている場合は明示的に教えてやる必要がある.
CRI-Oを使う場合は, kubeletのデフォルト設定ファイルを配置しておく.
sudo wget -O /etc/default/kubelet https://gist.githubusercontent.com/haircommander/2c07cc23887fa7c7f083dc61c7ef5791/raw/73e3d27dcd57e7de237c08758f76e0a368547648/cri-o-kubeadm
これをやっておかないとkubeadm init実行時にkubeletが起動せずエラー終了する.
[etcd] Creating static Pod manifest for local etcd in "/etc/kubernetes/manifests"
[wait-control-plane] Waiting for the kubelet to boot up the control plane as static Pods from directory "/etc/kubernetes/manifests". This can take up to 4m0s
[kubelet-check] Initial timeout of 40s passed.

	Unfortunately, an error has occurred:
		timed out waiting for the condition

	This error is likely caused by:
		- The kubelet is not running
		- The kubelet is unhealthy due to a misconfiguration of the node in some way (required cgroups disabled)

	If you are on a systemd-powered system, you can try to troubleshoot the error with the following commands:
		- 'systemctl status kubelet'
		- 'journalctl -xeu kubelet'

	Additionally, a control plane component may have crashed or exited when started by the container runtime.
	To troubleshoot, list all containers using your preferred container runtimes CLI.

	Here is one example how you may list all Kubernetes containers running in cri-o/containerd using crictl:
		- 'crictl --runtime-endpoint /var/run/crio/crio.sock ps -a | grep kube | grep -v pause'
		Once you have found the failing container, you can inspect its logs with:
		- 'crictl --runtime-endpoint /var/run/crio/crio.sock logs CONTAINERID'

error execution phase wait-control-plane: couldn't initialize a Kubernetes cluster
To see the stack trace of this error execute with --v=5 or higher
クラスタの初期化 (コントロールプレーンノードで実行)
kubeadm initの実行
このあとインストールするPodネットワークアドオンにFlannelを使用するため, オプションでCIDRを指定する.
sudo kubeadm init --pod-network-cidr=10.244.0.0/16
数分かかってYour Kubernetes control-plane has initialized successfully! が出力されたらOK.
リファレンスの前提事項をちゃんと満たしているとうまくいくはず. 書いてあることがよく理解できないからといってスキップすると, ハマってトラシューに苦労する(私のこと).
$ sudo kubeadm init --pod-network-cidr=10.244.0.0/16
[init] Using Kubernetes version: v1.20.1
[preflight] Running pre-flight checks
	[WARNING SystemVerification]: missing optional cgroups: hugetlb
[preflight] Pulling images required for setting up a Kubernetes cluster
[preflight] This might take a minute or two, depending on the speed of your internet connection
[preflight] You can also perform this action in beforehand using 'kubeadm config images pull'
[certs] Using certificateDir folder "/etc/kubernetes/pki"
[certs] Generating "ca" certificate and key
[certs] Generating "apiserver" certificate and key
[certs] apiserver serving cert is signed for DNS names [kubernetes kubernetes.default kubernetes.default.svc kubernetes.default.svc.cluster.local platypus-master] and IPs [10.96.0.1 192.168.11.100]
[certs] Generating "apiserver-kubelet-client" certificate and key
[certs] Generating "front-proxy-ca" certificate and key
[certs] Generating "front-proxy-client" certificate and key
[certs] Generating "etcd/ca" certificate and key
[certs] Generating "etcd/server" certificate and key
[certs] etcd/server serving cert is signed for DNS names [localhost platypus-master] and IPs [192.168.11.100 127.0.0.1 ::1]
[certs] Generating "etcd/peer" certificate and key
[certs] etcd/peer serving cert is signed for DNS names [localhost platypus-master] and IPs [192.168.11.100 127.0.0.1 ::1]
[certs] Generating "etcd/healthcheck-client" certificate and key
[certs] Generating "apiserver-etcd-client" certificate and key
[certs] Generating "sa" key and public key
[kubeconfig] Using kubeconfig folder "/etc/kubernetes"
[kubeconfig] Writing "admin.conf" kubeconfig file
[kubeconfig] Writing "kubelet.conf" kubeconfig file
[kubeconfig] Writing "controller-manager.conf" kubeconfig file
[kubeconfig] Writing "scheduler.conf" kubeconfig file
[kubelet-start] Writing kubelet environment file with flags to file "/var/lib/kubelet/kubeadm-flags.env"
[kubelet-start] Writing kubelet configuration to file "/var/lib/kubelet/config.yaml"
[kubelet-start] Starting the kubelet
[control-plane] Using manifest folder "/etc/kubernetes/manifests"
[control-plane] Creating static Pod manifest for "kube-apiserver"
[control-plane] Creating static Pod manifest for "kube-controller-manager"
[control-plane] Creating static Pod manifest for "kube-scheduler"
[etcd] Creating static Pod manifest for local etcd in "/etc/kubernetes/manifests"
[wait-control-plane] Waiting for the kubelet to boot up the control plane as static Pods from directory "/etc/kubernetes/manifests". This can take up to 4m0s
[kubelet-check] Initial timeout of 40s passed.
[apiclient] All control plane components are healthy after 61.006692 seconds
[upload-config] Storing the configuration used in ConfigMap "kubeadm-config" in the "kube-system" Namespace
[kubelet] Creating a ConfigMap "kubelet-config-1.20" in namespace kube-system with the configuration for the kubelets in the cluster
[upload-certs] Skipping phase. Please see --upload-certs
[mark-control-plane] Marking the node platypus-master as control-plane by adding the labels "node-role.kubernetes.io/master=''" and "node-role.kubernetes.io/control-plane='' (deprecated)"
[mark-control-plane] Marking the node platypus-master as control-plane by adding the taints [node-role.kubernetes.io/master:NoSchedule]
[bootstrap-token] Using token: kjf1i0.f6ywmc4qg20uhhkh
[bootstrap-token] Configuring bootstrap tokens, cluster-info ConfigMap, RBAC Roles
[bootstrap-token] configured RBAC rules to allow Node Bootstrap tokens to get nodes
[bootstrap-token] configured RBAC rules to allow Node Bootstrap tokens to post CSRs in order for nodes to get long term certificate credentials
[bootstrap-token] configured RBAC rules to allow the csrapprover controller automatically approve CSRs from a Node Bootstrap Token
[bootstrap-token] configured RBAC rules to allow certificate rotation for all node client certificates in the cluster
[bootstrap-token] Creating the "cluster-info" ConfigMap in the "kube-public" namespace
[kubelet-finalize] Updating "/etc/kubernetes/kubelet.conf" to point to a rotatable kubelet client certificate and key
[addons] Applied essential addon: CoreDNS
[addons] Applied essential addon: kube-proxy

Your Kubernetes control-plane has initialized successfully!

To start using your cluster, you need to run the following as a regular user:

  mkdir -p $HOME/.kube
  sudo cp -i /etc/kubernetes/admin.conf $HOME/.kube/config
  sudo chown $(id -u):$(id -g) $HOME/.kube/config

Alternatively, if you are the root user, you can run:

  export KUBECONFIG=/etc/kubernetes/admin.conf

You should now deploy a pod network to the cluster.
Run "kubectl apply -f [podnetwork].yaml" with one of the options listed at:
  https://kubernetes.io/docs/concepts/cluster-administration/addons/

Then you can join any number of worker nodes by running the following on each as root:

kubeadm join 192.168.11.100:6443 --token kjf1i0.f6ywmc4qg20uhhkh \
    --discovery-token-ca-cert-hash sha256:0e6f4082148b4126d9be7863690bb7be35b6f2e1c920607b1ecd742b246281a9
.kube/configの作成
piユーザがkubectlを実行できるようにするため, メッセージにある対応を行う.
mkdir -p $HOME/.kube
sudo cp -i /etc/kubernetes/admin.conf $HOME/.kube/config
sudo chown $(id -u):$(id -g) $HOME/.kube/config
kubeadm initがエラー終了した場合
この時点ではコントロールプレーンノードでkubeadm resetすればよい.
sudo kubeadm reset
コントロールプレーンノードのpodマニフェストなどが削除される.
[reset] Reading configuration from the cluster...
[reset] FYI: You can look at this config file with 'kubectl -n kube-system get cm kubeadm-config -o yaml'
W0107 22:47:16.752713   15009 reset.go:99] [reset] Unable to fetch the kubeadm-config ConfigMap from cluster: failed to get config map: Get "https://192.168.11.100:6443/api/v1/namespaces/kube-system/configmaps/kubeadm-config?timeout=10s": dial tcp 192.168.11.100:6443: connect: connection refused
[reset] WARNING: Changes made to this host by 'kubeadm init' or 'kubeadm join' will be reverted.
[reset] Are you sure you want to proceed? [y/N]: y
[preflight] Running pre-flight checks
W0107 22:47:38.363722   15009 removeetcdmember.go:79] [reset] No kubeadm config, using etcd pod spec to get data directory
[reset] Stopping the kubelet service
[reset] Unmounting mounted directories in "/var/lib/kubelet"
[reset] Deleting contents of config directories: [/etc/kubernetes/manifests /etc/kubernetes/pki]
[reset] Deleting files: [/etc/kubernetes/admin.conf /etc/kubernetes/kubelet.conf /etc/kubernetes/bootstrap-kubelet.conf /etc/kubernetes/controller-manager.conf /etc/kubernetes/scheduler.conf]
[reset] Deleting contents of stateful directories: [/var/lib/etcd /var/lib/kubelet /var/lib/dockershim /var/run/kubernetes /var/lib/cni]

The reset process does not clean CNI configuration. To do so, you must remove /etc/cni/net.d

The reset process does not reset or clean up iptables rules or IPVS tables.
If you wish to reset iptables, you must do so manually by using the "iptables" command.

If your cluster was setup to utilize IPVS, run ipvsadm --clear (or similar)
to reset your system's IPVS tables.

The reset process does not clean your kubeconfig files and you must remove them manually.
Please, check the contents of the $HOME/.kube/config file.
Flannelのインストール
よく見かけるFlannelを選択した.
コントロールプレーンノードにインストールする. 手順はGetting Startedを参考にした.
CNIプラグインの選択肢は非常に多いがarm32が用意されているとは限らない(例えばCalico).
kubectl apply -f https://raw.githubusercontent.com/coreos/flannel/master/Documentation/kube-flannel.yml
以下のようなリソースが作成される.
podsecuritypolicy.policy/psp.flannel.unprivileged created
clusterrole.rbac.authorization.k8s.io/flannel created
clusterrolebinding.rbac.authorization.k8s.io/flannel created
serviceaccount/flannel created
configmap/kube-flannel-cfg created
daemonset.apps/kube-flannel-ds created
CoreDNS Podのステータス確認
Podネットワークが機能していることを確認するため, CoreDNS Podの状態がRunningになっていることを確認する.
 $ kubectl get pods --all-namespaces
NAMESPACE     NAME                                      READY   STATUS    RESTARTS   AGE
kube-system   coredns-74ff55c5b-kxfqn                   1/1     Running   0          24m
kube-system   coredns-74ff55c5b-phtgg                   1/1     Running   0          24m
kube-system   etcd-platypus-master                      1/1     Running   0          24m
kube-system   kube-apiserver-platypus-master            1/1     Running   3          24m
kube-system   kube-controller-manager-platypus-master   1/1     Running   3          24m
kube-system   kube-flannel-ds-hw77h                     1/1     Running   0          17m
kube-system   kube-proxy-gmx7q                          1/1     Running   0          24m
kube-system   kube-scheduler-platypus-master            1/1     Running   3          24m
ワーカーノードの登録 (ワーカーノードで実行)
kubeadm init実行時のメッセージに従いワーカーノードをクラスタに登録する.
sudo su -
kubeadm join 192.168.11.100:6443 --token kjf1i0.f6ywmc4qg20uhhkh \
    --discovery-token-ca-cert-hash sha256:0e6f4082148b4126d9be7863690bb7be35b6f2e1c920607b1ecd742b246281a9
[preflight] Running pre-flight checks
	[WARNING SystemVerification]: missing optional cgroups: hugetlb
[preflight] Reading configuration from the cluster...
[preflight] FYI: You can look at this config file with 'kubectl -n kube-system get cm kubeadm-config -o yaml'
[kubelet-start] Writing kubelet configuration to file "/var/lib/kubelet/config.yaml"
[kubelet-start] Writing kubelet environment file with flags to file "/var/lib/kubelet/kubeadm-flags.env"
[kubelet-start] Starting the kubelet
[kubelet-start] Waiting for the kubelet to perform the TLS Bootstrap...
[kubelet-check] Initial timeout of 40s passed.

This node has joined the cluster:
* Certificate signing request was sent to apiserver and a response was received.
* The Kubelet was informed of the new secure connection details.

Run 'kubectl get nodes' on the control-plane to see this node join the cluster.
コントロールプレーンノードで参加ノードを確認.
$ kubectl get nodes
NAME               STATUS   ROLES                  AGE     VERSION
platypus-master    Ready    control-plane,master   59m     v1.20.1
platypus-worker1   Ready    <none>                 6m23s   v1.20.1
platypus-worker2   Ready    <none>                 99s     v1.20.1
クラスタ完成!
Kubernetesのバグを踏んだ
クラスタ動作開始させると, controller-manager, api-server, schedulerが定期的に再起動する病にかかる.
$ kubectl get pods --all-namespaces
NAMESPACE     NAME                                      READY   STATUS    RESTARTS   AGE
kube-system   coredns-74ff55c5b-8jst7                   1/1     Running   0          76m
kube-system   coredns-74ff55c5b-t5kdg                   1/1     Running   0          76m
kube-system   etcd-platypus-master                      1/1     Running   0          76m
kube-system   kube-apiserver-platypus-master            1/1     Running   6          76m
kube-system   kube-controller-manager-platypus-master   1/1     Running   7          76m
kube-system   kube-flannel-ds-7xsvf                     1/1     Running   1          18m
kube-system   kube-flannel-ds-9pj72                     1/1     Running   0          26m
kube-system   kube-flannel-ds-q79l4                     1/1     Running   0          23m
kube-system   kube-proxy-bxfqx                          1/1     Running   0          18m
kube-system   kube-proxy-mbmmx                          1/1     Running   0          76m
kube-system   kube-proxy-tqd65                          1/1     Running   0          23m
kube-system   kube-scheduler-platypus-master            1/1     Running   6          76m
controller-managerのlogをみていると以下がキッカケで停止しているようだ. 原因がよくわからず, 調査中.
E0110 14:44:06.792089       1 leaderelection.go:361] Failed to update lock: Put "https://192.168.11.100:6443/apis/coordination.k8s.io/v1/namespaces/kube-system/leases/kube-controller-manager?timeout=10s": context deadline exceeded
I0110 14:44:06.792198       1 leaderelection.go:278] failed to renew lease kube-system/kube-controller-manager: timed out waiting for the condition
F0110 14:44:06.792406       1 controllermanager.go:294] leaderelection lost
leaderelectionのタイムアウトに関連したIssueを発見. https://github.com/kubernetes/kubernetes/issues/96923#issuecomment-747877261
→ duration変更してみるも症状改善せず.
leader-electはマルチマスタ構成向けの機能だから, 無効にしてしまえばよいのでは?
→ controller-manager, scheduler で leader-elect=false として controller-manager, schedulerの再起動は治ったが, api-serverの再起動が止まらない.
api-server停止時のログは以下.
E0111 22:58:27.581604       1 storage_flowcontrol.go:137] failed creating mandatory flowcontrol settings: failed getting mandatory FlowSchema exempt due to the server was unable to return a response in the time allotted, but may still be processing the request (get flowschemas.flowcontrol.apiserver.k8s.io exempt), will retry later
I0111 22:58:52.331897       1 client.go:360] parsed scheme: "passthrough"
I0111 22:58:52.332296       1 passthrough.go:48] ccResolverWrapper: sending update to cc: {[{https://127.0.0.1:2379  <nil> 0 <nil>}] <nil> <nil>}
I0111 22:58:52.332503       1 clientconn.go:948] ClientConn switching balancer to "pick_first"
W0111 22:59:22.170976       1 watcher.go:220] watch chan error: etcdserver: mvcc: required revision has been compacted
E0111 22:59:27.626527       1 repair.go:118] unable to refresh the service IP block: the server was unable to return a response in the time allotted, but may still be processing the request (get services)
E0111 22:59:27.627660       1 repair.go:75] unable to refresh the port block: the server was unable to return a response in the time allotted, but may still be processing the request (get services)
E0111 22:59:28.153623       1 controller.go:203] unable to create required kubernetes system namespace kube-system: the server was unable to return a response in the time allotted, but may still be processing the request (post namespaces)
E0111 22:59:28.336371       1 controller.go:223] unable to sync kubernetes service: the server was unable to return a response in the time allotted, but may still be processing the request (post namespaces)
error: http2: server sent GOAWAY and closed the connection; LastStreamID=3, ErrCode=NO_ERROR, debug=""
leader-electとは違う要因でapi-serverは停止しているらしいと判明. 対応しそうなissueを発見
https://github.com/kubernetes/kubernetes/issues/97525
→ workaroundを試すと改善. Kubernetes 1.20のバグらしい?
pi@raspberrypi:~ $ sudo cp /etc/kubernetes/manifests/kube-apiserver.yaml /tmp/kube-apiserver.yaml.old
pi@raspberrypi:~ $ sudo vi /etc/kubernetes/manifests/kube-apiserver.yaml
pi@raspberrypi:~ $ sudo diff -buaN /tmp/kube-apiserver.yaml.old /etc/kubernetes/manifests/kube-apiserver.yaml
--- /tmp/kube-apiserver.yaml.old	2020-12-26 17:55:23.951810685 +0000
+++ /etc/kubernetes/manifests/kube-apiserver.yaml	2020-12-26 17:56:22.711052668 +0000
@@ -41,6 +41,8 @@
     - --service-cluster-ip-range=10.96.0.0/12
     - --tls-cert-file=/etc/kubernetes/pki/apiserver.crt
     - --tls-private-key-file=/etc/kubernetes/pki/apiserver.key
+    - --feature-gates=APIPriorityAndFairness=false
+    - --runtime-config=flowcontrol.apiserver.k8s.io/v1beta1=false
     image: k8s.gcr.io/kube-apiserver:v1.20.1
     imagePullPolicy: IfNotPresent
     livenessProbe: