資産状況を簡単にグラフ化出来ないかと考えて挑戦。家計簿サービスの中でもZaimはAPIを公開しており、jsonでデータの取得ができる。これをPythonを使って取得し、勉強も兼ねてAmazon Elasticsearch Serviceへ投入する形でグラフ化を実現してみた。なお、大量のjsonの投入にはせっかくなのでElastic製のlogstashに挑戦している。
Amazon Elasticsearch Service
AWSの提供するElasticsearchのマネージドサービス。バージョンが最新より若干古いもので提供されているのがネックではあるが、最も簡単かつ高速にElasticsearchを使える手段の一つかと。Kibanaもデフォルトで提供される。
特に設定上難しい箇所はないので、Webコンソールからさくさくと作成する。アクセス制御のポリシーは今回IPによる許可を行なった。これはElasticsearchだけではなく、Kibanaのアクセス制御でもあるので、例えばデータ投入はクラウド上のサーバーから行い、Kibanaの確認はローカルPCで行うような場合には、それぞれIPを指定する必要がある。
{
  "Version": "2012-10-17",
  "Statement": [
    {
      "Sid": "",
      "Effect": "Allow",
      "Principal": {
        "AWS": "*"
      },
      "Action": "es:*",
      "Resource": "arn:aws:es:ap-northeast-1:xxxxx:domain/xxxxx/*",
      "Condition": {
        "IpAddress": {
          "aws:SourceIp": [
            "xx.xx.xx.xx"
          ]
        }
      }
    }
  ]
}
Zaim API via Python
Zaim APIを叩くのにはPythonのrequestsを使用した。書き方はrequestsのドキュメントを参考にしている。
# coding: utf-8
import requests
from requests_oauthlib import OAuth1Session
from requests_oauthlib import OAuth1

consumer_key = u"XXXXX"
consumer_secret = u"XXXXX"

request_token_url = u"https://api.zaim.net/v2/auth/request"
authorize_url = u"https://www.zaim.net/users/auth"
access_token_url = u"https://api.zaim.net/v2/auth/access"
callback_uri = u"http://chroju.net/"
get_money_url = u"https://api.zaim.net/v2/home/money"

def oauth_requests():
    auth = OAuth1Session(consumer_key, client_secret=consumer_secret, callback_uri=callback_uri)
    r = auth.fetch_request_token(request_token_url)
    resource_owner_key = r.get('oauth_token')
    resource_owner_secret = r.get('oauth_token_secret')

    authorization_url = auth.authorization_url(authorize_url)
    print 'Please go here and authorize,', authorization_url
    redirect_response = raw_input('Paste the full redirect URL here:')
    oauth_response = auth.parse_authorization_response(redirect_response)
    verifier = oauth_response.get('oauth_verifier')

    auth = OAuth1Session(client_key=consumer_key, client_secret=consumer_secret, resource_owner_key=resource_owner_key, resource_owner_secret=resource_owner_secret, verifier=verifier)
    oauth_token = auth.fetch_access_token(access_token_url)

    resource_owner_key = oauth_token.get('oauth_token')
    resource_owner_secret = oauth_token.get('oauth_token_secret')

    get_json(resource_owner_key, resource_owner_secret)

def get_json(resource_owner_key, resource_owner_secret):
    headeroauth = OAuth1(consumer_key, consumer_secret, resource_owner_key, resource_owner_secret, signature_type='auth_header')
    r = requests.get(get_money_url, auth=headeroauth)
    print r.content

if __name__ == "__main__":
  oauth_requests()
これを実行するとjsonで愚直に家計簿データが出力されるので、jqを介して整形した上でファイルへ保存しておく。
$ python27 get_zaim.py | jq > zaim.json
Elasticsearch
mapping
一度Amazon ESを立ち上げれば、その後の利用方法は通常のElasticsearch同様。まずzaim APIで取得できるjsonファイルの書式に合わせ、mappingをあらかじめ行う。
$ curl -XPUT "http://xxx.ap-northeast-1.es.amazonaws.com/lifelog" -d '
{"mappings" : {
"zaim" : {
"properties" : {
"id" : { "type" : "integer"},
"user_id" : { "type" : "integer"},
"date" : { "type" : "date", "format" : "yyyy-MM-dd"},
"mode" : { "type" : "string" },
"category_id" : { "type" : "integer" },
"genre_id" : { "type" : "integer" },
"from_account_id" : {"type" : "integer"},
"to_account_id" : {"type" : "integer"},
"amount" : {"type" : "integer"},
"comment" : {"type" : "string"},
"active" : {"type" : "integer"},
"created" : {"type" : "date", "format" : "yyyy-MM-dd HH:mm:ss"},
"currency_code" : {"type" : "string"},
"name" : {"type" : "string"},
"receipt_id" : {"type" : "integer"},
"place_uid" : {"type" : "integer"},
"place" : {"type" : "string"},
"path" : {"type":"string"}
}
}
}
}'
mapping設定が問題ないことを確認。
$ curl -XGET "http://xxx.ap-northeast-1.es.amazonaws.com/lifelog/_mapping" | jq
  % Total    % Received % Xferd  Average Speed   Time    Time     Time  Current
                                 Dload  Upload   Total   Spent    Left  Speed
100   733  100   733    0     0  58050      0 --:--:-- --:--:-- --:--:-- 61083
{
  "lifelog": {
    "mappings": {
      "zaim": {
        "properties": {
          "@timestamp": {
            "type": "date",
            "format": "dateOptionalTime"
...
logstash
Elasticsearchに複数のjsonを同時に投入するには、おそらくbulk APIを利用するのが最も一般的である。しかしbulk APIで投入するjsonは、データ部分とindexを交互に記述したものとしなくてはならないため、今回のようにAPIで一括取得したjsonを流すには向いていない。
代替手段としてはfluentdなどを利用する手法もあるが、Elastic社が提供しているということで logstash を活用してみた。logstashはfluentdと似たストリームデータの解析、処理を行うためのツール。特にElasticsearch専用というわけではなく、例えばDatadogやinfluxDBへデータを流していくこともできる。
今回はjsonをすでにファイルへ出力済みなので、ファイルをcatしてstdinのinput pluginで投入し、Elasticsearchをoutput pluginとして設定した。inputとoutputにどんなpluginが用意されているかは、ドキュメントを眺めてみると感覚がつかめると思う。
インストール
Officialの記載に従ってyumでインストール。
$ sudo yum install logstash
confファイルの作成
logstashは処理したい内容を記載したconfファイルを利用してデータ処理を行わせる。ファイルには大きく分けてデータの受信元を書いた「input」、解析方法を書いた「filter」、出力先を書いた「output」の3つのplugin設定を記載する。今回利用したconfファイルは以下の通り。
input {
  stdin {
    codec => json
  }
}
filter {
  json {
    source => "message"
  }
}
output {
  elasticsearch {
    hosts => ["http://xxx.ap-northeast-1.es.amazonaws.com/"]
    index => "lifelog"
    document_type => "zaim"
    document_id => "%{id}"
  }
  stdout {
    codec => rubydebug
  }
}
「input」は標準入力(stdin plugin)とし、jsonとして解釈させた。
ファイルが入力元になるので、file pluginで指定することも可能であるが、この際注意すべきは、当たり前かもしれないがlogstash起動以降の入力が処理の対象になる、すなわちfile pluginをinputとして指定した場合は、追記部分が処理対象だということ。ファイル内に元々書かれた内容を頭から処理させるには、start_position => beginningの指定が必要になる。また一度読み込んだファイルは読み込み位置が~/.sincedb_...に記録されるので、このファイルを削除しない限りstart_position => beginningは機能せず、途中からの読み込みになる。
「filter」ではjsonのどの部分を読み込むか設定している。codec => jsonとしてinputされたデータは生でjson処理されるわけではなく、メタ属性などが追加されるので、データ部分だけを純粋に取り出すときはmessage field以下を明示的に指定する必要がある。
「output」ではelasticsearch pluginとstdout pluginを指定。前者ではdocument IDの指定ができるので、Zaimのjsonデータに元々含まれているid fieldを使うよう指定している。stdout pluginはデバッグ目的で指定した。codecはrubydebugとするのがどうも通例の模様。
実行
設定ファイルを作成したら、logstashを実際に実行する。
$ cat zaim.json | logstash -f pipeline.conf
Elasticsearchにリクエストをかけて、登録できたことを確認する。
$ curl -XGET "http://xxx.ap-northeast-1.es.amazonaws.com/lifelog/zaim/_count" | jq
  % Total    % Received % Xferd  Average Speed   Time    Time     Time  Current
                                 Dload  Upload   Total   Spent    Left  Speed
100    62  100    62    0     0    384      0 --:--:-- --:--:-- --:--:--   385
{
  "count": 1976,
  "_shards": {
    "total": 5,
    "successful": 5,
    "failed": 0
  }
}
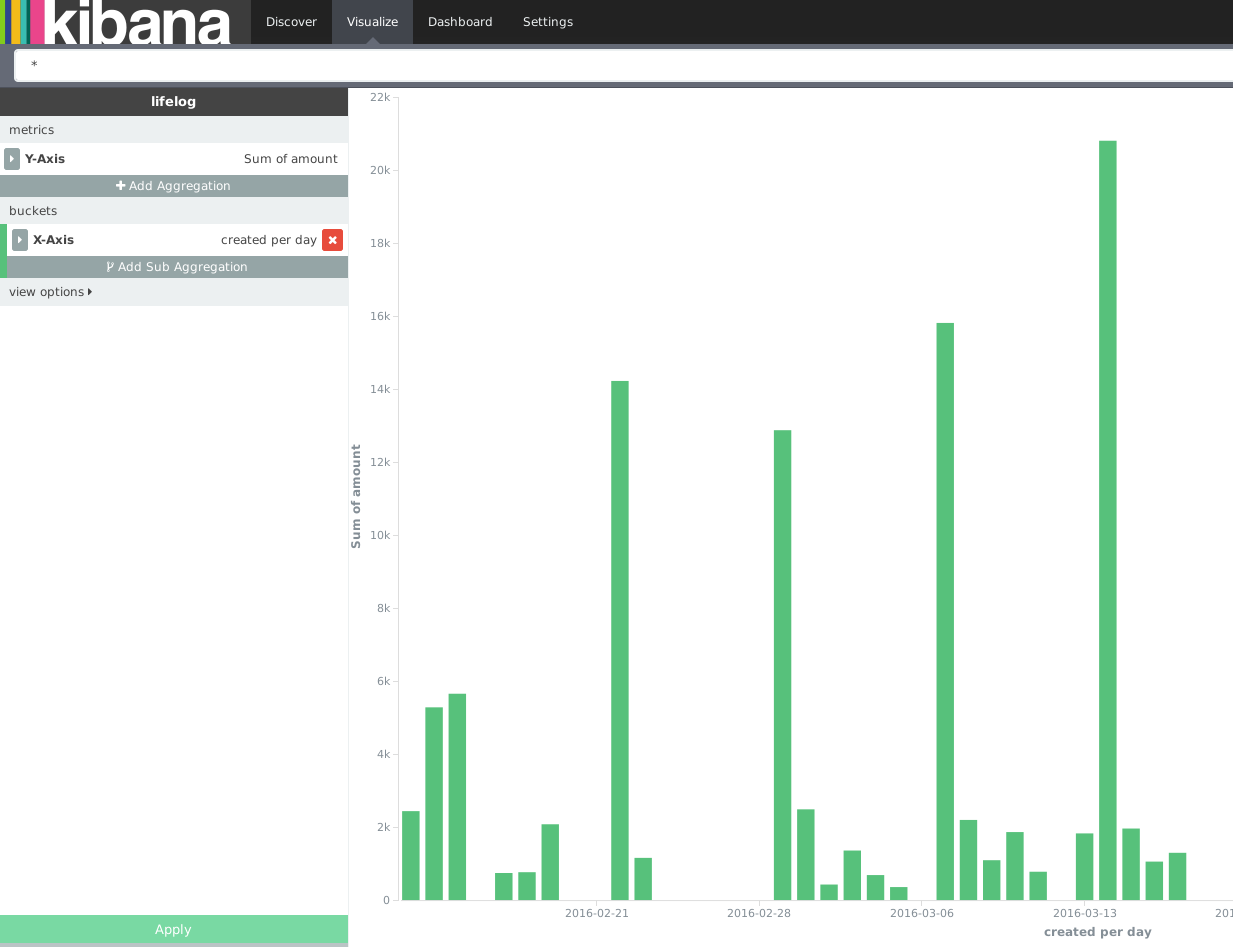
Kibana
Elasticsearchへの登録が問題なく完了していれば、すでにKibanaからも閲覧が可能になっている。