経緯
Google Apps Script(以降GAS)を使ってGmailのメールに添付された添付ファイルをBacklogの指定の課題に添付したいと思いました。
そこで、以下の流れでGASのコードを書いて実行しました。
- Gmailから添付ファイルのあるメールを取得する
- Backlogに添付ファイルを送信して発行されたIDを取得する
- 利用するBacklog API : 添付ファイルの送信 | Backlog Developer API | Nulab
- 指定の課題に発行されたIDを使って添付ファイルを添付する
- 利用するBacklog API : 課題コメントの追加 | Backlog Developer API | Nulab
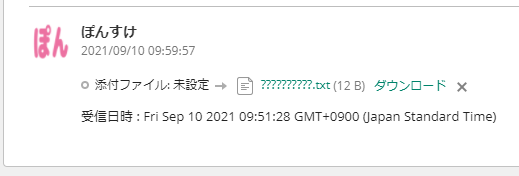
問題発生 : 日本語の添付ファイルが文字化けする
「Backlogに添付ファイルを送信して発行されたIDを取得する」ところで日本語の添付ファイルが文字化けしてしまいました。
当然、課題にも文字化けしたファイルが添付されてしまいました。
// ファイル名が英語の場合
{"id":10018291,"name":"english_attachment.md","size":8}
// ファイル名が日本語の場合
{"id":10027495,"name":"??????????.txt","size":12}
「Backlogに添付ファイルを送信して発行されたIDを取得する」処理の中で、
Backlogに送信するファイルにGmail(GmailMessage)から取得したBlobであるGmailAttachmentオブジェクトをそのまま指定しました。
getAttachments()
Gets all the attachments for this message.
Return
GmailAttachment[]— An array of Blob attachments for this message.
Class GmailMessage | Apps Script | Google Developers
Class GmailAttachment
An attachment from Gmail. This is a regularBlobexcept that it has an extragetSize()method that is faster than callinggetBytes().lengthand does not count against the Gmail read quota.
Class GmailAttachment | Apps Script | Google Developers
/**
 * Backlogに添付ファイルを送信して発行されたIDを取得する.
 * @param {GmailAttachment} attachment メッセージのBlob添付ファイル.
 * @return {string} 添付ファイルに発行されたID.
 */
function post_attachment(attachment) {
  let params = {
    method : 'POST',
    payload : {
      file : attachment
    }
  };

  /** 添付ファイル送信のAPIのエンドポイント. */
  let endpoint = backlog_url + '/api/v2/space/attachment?apiKey=' + backlog_apikey;
  /** @type {string} 文字列としてエンコードされたHTTPレスポンスのコンテンツ. */
  let contentText = UrlFetchApp.fetch(endpoint, params).getContentText();
  console.log(contentText);
  return JSON.parse(contentText).id.toString();
}
Gmailの添付ファイルをBacklogに送信したらファイル名が文字化けした時の対応方法
「Backlogに添付ファイルを送信して発行されたIDを取得する」処理の中のBacklogに送信するファイルをGmailAttachmentオブジェクトにするのではなく新たにBlobを作り直すようにしました。
//...省略...
function post_attachment(attachment) {
  /** @type {string} 添付ファイル情報の境界となる文字. */
  let boundary = 'boundary';
  /** @type {string} 改行文字. */
  let lineBreak = '\r\n';

  /** @type {Array.<Byte>} 添付ファイルのBlobの元となるバイト配列. */
  let blobByte = Utilities.newBlob(
    // 「Content-Disposition」「Content-Type」を指定する.
    '--' + boundary + lineBreak
    + 'Content-Disposition: form-data; name="file"; filename="' + attachment.getName() + '"' + lineBreak
    + 'Content-Type: ' + attachment.getContentType() + lineBreak + lineBreak
  ).getBytes().concat(
    // 添付ファイルの情報を付加する.
    attachment.getBytes()
  ).concat(
    // 最後のboundaryを付加する.
    Utilities.newBlob(lineBreak + '--' + boundary + '--').getBytes()
  );
  let blob = Utilities.newBlob('').setBytes(blobByte);

  let params = {
    method : 'POST',
    contentType: 'multipart/form-data; boundary=' + boundary,
    payload : {
      file : blob
    }
  };

  /** 添付ファイル送信のAPIのエンドポイント. */
//...省略...
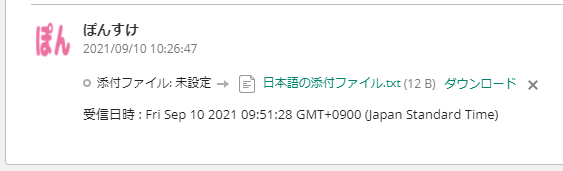
Backlogに添付ファイルを送信しても文字化けせず、課題にも文字化けせずに添付できました。
{"id":10028390,"name":"日本語の添付ファイル.txt","size":12}
方法
▶をクリックすると今回使用したコード全体を表示します
/** BacklogのURL */
const backlog_url = 'https://example.backlog.com';
/** BacklogのAPI KEY */
const backlog_apikey = 'BacklogのAPIキー';

function GmailAttachmentToBacklog() {
  /** @type {string} Gmailの検索条件. */
  let query = 'has:attachment after:2021-09-10';
  /** @type {Array.<GmailThread>} クエリに一致したGmailスレッド. */
  let threads = GmailApp.search(query);
  /** @type {Array.<GmailMessage[]>} メッセージの配列の配列で、外側の配列の各項目はスレッドに対応し、内側の配列にはそのスレッドのメッセージが含まれる. */
  let gmailMessages = GmailApp.getMessagesForThreads(threads);

  gmailMessages.forEach(function(messages){
    messages.forEach(function(message) {
      /** @type {Array.<GmailAttachment>} メッセージのBlob添付ファイルの配列. */
      let attachments = message.getAttachments();
      if (attachments.length) {
        // 添付ファイルがある場合
        let payload = {
          'content' : '受信日時 : ' + message.getDate()
        };

        for (let i = 0; i < attachments.length; i++) {
          // Backlogに添付ファイルを送信して発行されたIDをペーロードに追加する.
          payload['attachmentId[' + i + ']'] = post_attachment(attachments[i]);
        }

        /** @type {string} 登録対象の課題キー. */
        let issueKey = 'PROJECT_KEY-2';
        /** @type {string} 課題コメントの追加のAPIのエンドポイント. */
        let endpoint = backlog_url + '/api/v2/issues/' + issueKey + '/comments?apiKey=' + backlog_apikey;
        let params = {
          method : 'POST',
          payload : payload
        };
        // 課題コメントの追加で添付ファイルを課題に添付する.
        UrlFetchApp.fetch(endpoint, params);
      }
    });
  });
}


/**
 * Backlogに添付ファイルを送信して発行されたIDを取得する.
 * @param {GmailAttachment} attachment メッセージのBlob添付ファイル.
 * @return {string} 添付ファイルに発行されたID.
 */
function post_attachment(attachment) {
  /** @type {string} 添付ファイル情報の境界となる文字. */
  let boundary = 'boundary';
  /** @type {string} 改行文字. */
  let lineBreak = '\r\n';
  /** @type {Array.<Byte>} 添付ファイルのBlobの基となるバイト配列. */
  let blobByte = Utilities.newBlob(
    // 「Content-Disposition」「Content-Type」を指定する.
    '--' + boundary + lineBreak
    + 'Content-Disposition: form-data; name="file"; filename="' + attachment.getName() + '"' + lineBreak
    + 'Content-Type: ' + attachment.getContentType() + lineBreak + lineBreak
  ).getBytes().concat(
    // 添付ファイル本体を追加する.
    attachment.getBytes()
  ).concat(
    // 最後の境界文字を追加する.
    Utilities.newBlob(lineBreak + '--' + boundary + '--').getBytes()
  );
  let blob = Utilities.newBlob('').setBytes(blobByte);

  let params = {
    method : 'POST',
    contentType: 'multipart/form-data; boundary=' + boundary,
    payload : {
      file : blob
    }
  };

  /** 添付ファイル送信のAPIのエンドポイント. */
  let endpoint = backlog_url + '/api/v2/space/attachment?apiKey=' + backlog_apikey;
  /** @type {string} 文字列としてエンコードされたHTTPレスポンスのコンテンツ. */
  let contentText = UrlFetchApp.fetch(endpoint, params).getContentText();
  console.log(contentText);
  return JSON.parse(contentText).id.toString();
}
  let params = {
    method : 'POST',
    contentType: 'multipart/form-data; boundary=' + boundary,
Advanced parameters(Class UrlFetchApp | Apps Script | Google Developersより引用)
| Name | Type | Description |
|---|---|---|
| contentType | String | the content type (defaults to 'application/x-www-form-urlencoded'). Another example of content type is 'application/xml; charset=utf-8'. |
2. boundaryで添付ファイルに情報を付加してバイト配列を作る
添付ファイルに「Content-Disposition」「Content-Type」の情報を付加します。この時に境界文字としてboundaryを使用します。
情報を付加するために各情報を一旦バイト配列にしてくっつけます。
  let blobByte = Utilities.newBlob(
    '--' + boundary + lineBreak
    + 'Content-Disposition: form-data; name="file"; filename="' + attachment.getName() + '"' + lineBreak
    + 'Content-Type: ' + attachment.getContentType() + lineBreak + lineBreak
  ).getBytes().concat(
    attachment.getBytes()
  ).concat(
    Utilities.newBlob(lineBreak + '--' + boundary + '--').getBytes()
  );
boundaryは、「--で始まる」「最後のboundaryは最後にも--をつける」というルールがあるので気を付けてください。
boundary
マルチパートの本文では boundary ディレクティブが必要で、これはメールゲートウェイを通過しても大丈夫だと知られている文字の中から 1~70 文字で構成され、ホワイトスペースで終了しないものです。これはメッセージの複数パートの境界を囲むために使用します。ふつう、ヘッダーの境界は 2 本のダッシュで始まり、最後の境界には最後にも 2 本のダッシュが入ります。
Content-Type - HTTP | MDN
3. バイト配列からBlobを作る
作ったバイト配列からUtilities.newBlob関数でBlobを作ります。
そして、このBlobをBacklogに送るとファイル名文字化けしませんでした。
let blob = Utilities.newBlob('').setBytes(blobByte);
失敗した方法
たくさん失敗したのでご紹介します。
添付ファイルの情報だけでBlobを作り直して失敗
付加情報もなく・・・Utilities.newBlob関数でBlobを作り直してみました。
何も変わらず文字化けしました。
  let blob = Utilities.newBlob(
    attachment.getDataAsString(),
    attachment.getContentType(),
    attachment.getName()
  );

  let params = {
    method : 'POST',
    payload : {
      file : blob
    }
  };
ファイル名をUTF-8指定してBlobを作り直して失敗
「ファイル名さえ何とかなればいい!」と思いやってみた・・・けれど、何も変わらず文字化けしました。
  let blob = Utilities.newBlob(
    attachment.getDataAsString(),
    attachment.getContentType(),
    // 試しに「Shift_JIS」も指定してみましたが、やはり文字化けしました。
    Utilities.newBlob('').setDataFromString(attachment.getName(), 'UTF-8').getDataAsString()
  );

  let params = {
    method : 'POST',
    payload : {
      file : blob
    }
  };
リクエストにmultipart/form-dataを指定して失敗
リクエストパラメーターのサンプルに「Content-Type:multipart/form-data」とあるので指定してみました。
「boundaryがないよと」エラーになりました・・・。
リクエストパラメーター
// 全体
--- Content-Type:multipart/form-data
添付ファイルの送信 | Backlog Developer API | Nulab
  let params = {
    method : 'POST',
    contentType: 'multipart/form-data;',
    payload : {
      file : attachment
    }
  };
Exception: Request failed for https://example.backlog.com returned code 400. Truncated server response: {"errors":[{"message":"Invalid Request. Missing boundary header","code":7,"moreInfo":""}]} (use muteHttpExceptions option to examine full response)
リクエストにmultipart/form-dataとboundaryを指定して失敗
「boundaryがないよと」エラーになるなら指定してみました。
「添付ファイル情報の終わりがどこかわからない」のかエラーになりました。
  let params = {
    method : 'POST',
    contentType: 'multipart/form-data; boundary="boundary"',
    payload : {
      file : attachment
    }
  };
Exception: Request failed for https://example.backlog.com returned code 400. Truncated server response: {"errors":[{"message":"Invalid Request. Unexpected end of input","code":7,"moreInfo":""}]} (use muteHttpExceptions option to examine full response)
Content-Dispositionにattachmentを指定して失敗
添付ファイルだからと思いattachmentを指定したところ・・・エラーになりました。
  let blobByte = Utilities.newBlob(
    // 「Content-Disposition」「Content-Type」を指定する.
    '--' + boundary + lineBreak
    + 'Content-Disposition: attachment; name="file"; filename="' + attachment.getName() + '"' + lineBreak
//...省略...
  let params = {
    method : 'POST',
    contentType: 'multipart/form-data; boundary=' + boundary,
    payload : {
      file : blob
    }
  };
Exception: Request failed for https://example.backlog.com returned code 400. Truncated server response: {"errors":[{"message":"No file parameter.","code":7,"moreInfo":""}]} (use muteHttpExceptions option to examine full response)
attachmentは「ダウンロードすべきもの」でした。
本文に適用するレスポンスヘッダーとして
この用法では、inline (既定値。ウェブページの一部として、またはウェブページとして表示可能であることを示します)、もしくは attachment (ダウンロードすべきであることを示します。多くのブラウザーは filename 引数の値を使い、「名前を付けて保存」ダイアログを表示します) を最初の引数して指定します。
Content-Disposition - HTTP | MDN