はじめに
ルーティーンと化した決まり切った行為を日々真面目に行うのは非常に大変です。こういった仕事はプログラムに任せましょう。1
D社で働いているK君は、毎日slackに流れて来る 「出前の人数確認のGoogle Form」 を埋めるのが面倒だと考えました。そこで、slackにフォームが流れてきた際に自動的にフォームを埋める slack bot を作ることにしました。
- Google Formは定型文と一緒に流れて来るとする。(そうでない場合でも、正規表現等でFormのリンクを認識すれば問題ありません。)
- フォームの内容は、「mail address」や「自由記述欄」などの 決まった形をしている とする。(そうでない場合は自然言語処理等を入れ込めばもっと面白いものが作れるかもしれません。)
| slack に Google Form が投稿される | Google Form に自動で回答 | DMで知らせる |
|---|---|---|
 |
 |
 こんな素敵な秘書が欲しい… |
こんな感じのが作りたい!!
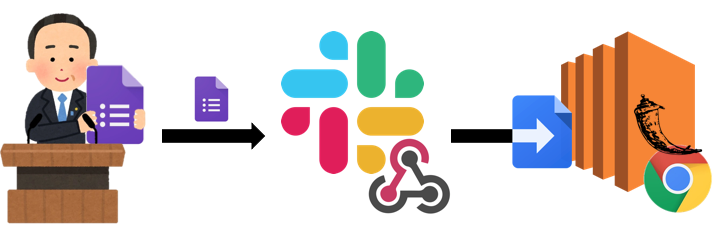
構成
※ 使用したコードは全て Github に載せてあります。
| Google Apps Script(GAS) | Slack |
Outgoing Webhooks Incoming Webhooks |
Amazon EC2 | Google Forms | Flask | Google Chrome |
|---|---|---|---|---|---|---|
 |
 |
 |
 |
 |
 |
 |
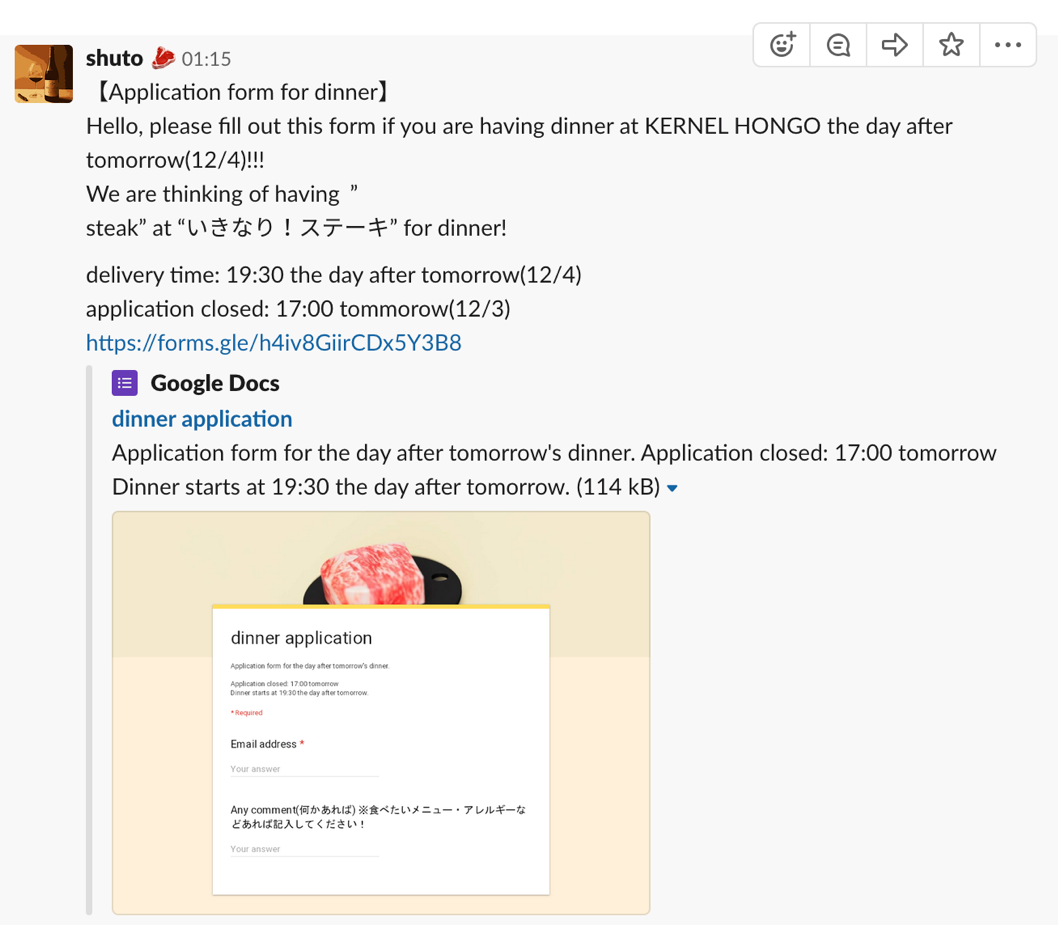
- Google Form が slack に流れて来る。
- Outgoing Webhooks が認識して GAS を起動する。
- AWS の Flask アプリケーションに処理を投げる。
- Flask アプリケーションが Chrome を立ち上げ、Google Forms に回答。
- 実行結果を Incoming Webhooks を用いて slack の DM で通知。
AWS
AWSをはじめとするクラウドサービスは 初期費用がかからず従量課金 のため、使った分だけ料金を払えば良いサービスです。今回のような趣味程度の目的でも気軽に利用することができるので、ありがたく使わせていただきましょう。
Selenium
まずは、Google Chrome をAWSで動かすために様々なパッケージをインストールします。「この部分は本質的ではない」 & 「他の記事が詳しい」 ので、割愛します。なお、コードが知りたい方は「▶︎」ボタンを押すか、元の記事(『EC2 UbuntuでGoogle Chromeをヘッドレス実行してスクリーンショットを採取する手順』)に飛んでください。
Google Chrome のインストール
# === Google Chrome をインストール ===
$ wget https://dl.google.com/linux/direct/google-chrome-stable_current_amd64.deb
$ sudo dpkg -i google-chrome-stable_current_amd64.deb
""" ! 依存関係のエラー発生 ! """
# 指定されたパッケージをインストール
$ sudo apt-get install fonts-liberation
""" ! 依存関係のエラー発生 !
Reading package lists... Done
Building dependency tree
Reading state information... Done
You might want to run 'apt --fix-broken install' to correct these.
The following packages have unmet dependencies:
 google-chrome-stable : Depends: fonts-liberation but it is not going to be installed
                        Depends: libappindicator3-1 but it is not going to be installed
                        Depends: libasound2 (>= 1.0.16)
                        Depends: libnspr4 (>= 2:4.9-2~) but it is not going to be installed
                        Depends: libnss3 (>= 2:3.22) but it is not going to be installed
                        Depends: xdg-utils (>= 1.0.2) but it is not going to be installed
                        Recommends: libu2f-udev but it is not going to be installed
E: Unmet dependencies. Try 'apt --fix-broken install' with no packages (or specify a solution).
"""
# 指示通りのコマンドを打つ。
$ sudo apt --fix-broken install
# 再度チャレンジ
$ sudo dpkg -i google-chrome-stable_current_amd64.deb
$ which google-chrome
/usr/bin/google-chrome
# === Seleniumをインストール ===
$ sudo apt install python3-selenium
# === ChromeDriverをインストール ===
$ sudo apt install unzip
# バージョンに注意!
$ wget https://chromedriver.storage.googleapis.com/78.0.3904.105/chromedriver_linux64.zip
$ unzip chromedriver_linux64.zip -d ~/bin/
$ which chromedriver
/usr/bin/chromedriver
すると、以下のようなプログラムでクロームのスクリーンショットを取得できます。
from selenium import webdriver
from selenium.webdriver.chrome.options import Options

options = Options()
options.binary_location = '/usr/bin/google-chrome'
options.add_argument('--headless')
options.add_argument('--window-size=1280,1024')

driver = webdriver.Chrome('chromedriver', chrome_options=options)

driver.get('https://www.google.co.jp')
driver.save_screenshot('screenshot.png')
driver.quit()
なお、撮影したスクリーンショットは、以下のコマンドをローカルで実行することでローカルに送ることができます。
$ scp -i path/to/sshkey.pem ubuntu@ec2-AA-BBB-CCC-DDD.ap-northeast-1.compute.amazonaws.com:/path/to/screenshot.png .
上記プログラムで撮影された画像
selenium が正しく動くことが確認できました!!
Flask
※ 設定ファイルの中身は 『PythonかければWebアプリぐらい作れる。』 と同じです。
Flask実行プログラムである main.py は、以下のプログラムに置き換わっています。
ここでポイントとなるのが 「webdriver.Chrome() の初期化をグローバルな空間で行うこと」です。なぜそうしないといけないのかきちんと理解していないのですが、tensorflow のモデルを定義する時も同じだった記憶があります。 (詳しい方教えてください🙇♂️)
# coding: utf-8
from selenium_chrome import SeleniumChrome
from flask import Flask, render_template, send_file, request

chrome = SeleniumChrome()
app = Flask(__name__)

@app.route('/')
def index():
    return render_template('index.html')

@app.route('/form', methods=['POST'])
def form():
    email    = request.form["email"]
    password = request.form["password"]
    form_url = request.form["form_url"]
    chrome.loginGoogleAccount(email, password)
    formkwargs = {
        "email": email,
        "number": 2929292929,
        "text": "お肉が食べたいです。"
    }
    filename = chrome.ansGoogleForm(form_url, screenshot=True, **formkwargs)
    return send_file(filename, mimetype='image/png')

if __name__ == "__main__":
    app.run()
なお、ここで import している自作モジュール( selenium_chrom.py )は main.py と同じ階層においてください。中身は以下です。
selenium_chrom.py
# coding: utf-8
import time
from selenium import webdriver
from selenium.webdriver.support.ui import WebDriverWait, Select
from selenium.webdriver.support import expected_conditions as EC
from selenium.webdriver.common.by import By
from selenium.webdriver.chrome.options import Options
import chromedriver_binary

options = Options()
options.add_argument('--headless')
options.add_argument('--no-sandbox')
options.add_argument('--disable-gpu')
options.add_argument('--window-size=1280,1024')

BY_ELEMENTS = [v for k,v in By.__dict__.items() if k[0]!="_"]

class SeleniumChrome():
    def __init__(self, executable_path="chromedriver", port=0):
        self.driver = webdriver.Chrome(executable_path=executable_path, port=port, chrome_options=options)
        self.driver.maximize_window()
        self.email = None
        self.password = None

    @staticmethod
    def _checkByElements(by, element):
        if by not in BY_ELEMENTS:
            raise KeyError(f"Please select `tag` from {', '.join(BY_ELEMENTS)}")
        locator = (by, element)
        return locator

    def align2fnFormat(self, fn=None, extentions=".png"):
        if fn is None:
            fn = self.driver.title + extentions
        elif not fn.endswith(extentions):
            fn += extentions
        print(f"Filename: {fn}")
        return fn

    def waitUnitilElement(self, by, element, wait_time=30):
        locator = self._checkByElements(by, element)
        WebDriverWait(self.driver, wait_time).until(EC.presence_of_element_located(locator))
        time.sleep(1) # Additional wait time.

    def fill(self, by, element, content):
        locator = self._checkByElements(by, element)
        self.driver.find_element(*locator).send_keys(content)
        time.sleep(1) # Additional wait time.

    def select(self, by, element, value):
        locator = self._checkByElements(by, element)
        select_element = self.driver.find_element(*locator)
        select_element = Select(select_element)
        select_element.select_by_value(value)

    def click(self, by, element):
        locator = self._checkByElements(by, element)
        self.driver.find_element(*locator).click()
        time.sleep(1) # Additional wait time.

    def takeScreenShot(self, fn=None):
        fn = self.align2fnFormat(fn, extentions=".png")
        self.driver.save_screenshot(fn)

    def getPageSource(self, fn=None):
        fn = self.align2fnFormat(fn, extentions=".html")
        html = self.driver.page_source
        with open(fn, mode="w", encoding="utf-8") as f:
            f.write(html)

    def loginGoogleAccount(self, email, password, google_url='https://www.google.com/accounts'):
        self.driver.get(google_url)
        #=== Email Address ===
        self.waitUnitilElement(by="name", element="Email") # element="identifier"
        self.fill(by="name", element="Email", content=email)
        # self.click(by="name", element="signIn")
        self.driver.find_element_by_name("signIn").click()

        #=== Pass Word ===
        self.waitUnitilElement(by="name", element="Passwd")
        self.fill(by="name", element="Passwd", content=password)
        # self.click(by="name", element="signIn")
        self.driver.find_element_by_name("signIn").click()

        time.sleep(5)
        self.email = email
        self.password = password

    def ansGoogleForm(self, form_url, screenshot=True, default="お肉が食べたいです。", **formkwargs):
        filename = form_url.split('/')[-1] + ".png"
        form_q_class   = "quantumWizTextinputPaperinputInput"
        form_btn_class = "quantumWizButtonPaperbuttonLabel"

        self.driver.get(form_url)
        self.waitUnitilElement(by="class name", element=form_q_class, wait_time=30)
        time.sleep(5)

        for question in self.driver.find_elements_by_class_name(form_q_class):
            question.send_keys(formkwargs.get(question.get_attribute("type"), default))

        if screenshot:
            self.takeScreenShot(fn=filename)
        self.click(by="class name", element=form_btn_class)
        time.sleep(5)
        return filename
ここで、設定ファイルが正しく記述できており、templates/index.html と main.py が正しく配置できていれば、すでに
| 名前 | 例 |
|---|---|
| 『IPv4 パブリック IP』 | AA.BBB.CCC.DDD |
| 『パブリック DNS(IPv4)』 | http://ec2-AA-BBB-CCC-DDD.ap-northeast-1.compute.amazonaws.com |
にアクセスすれば 以下のようなサイト(templates/index.html) が表示できているはずです。
templates/index.html
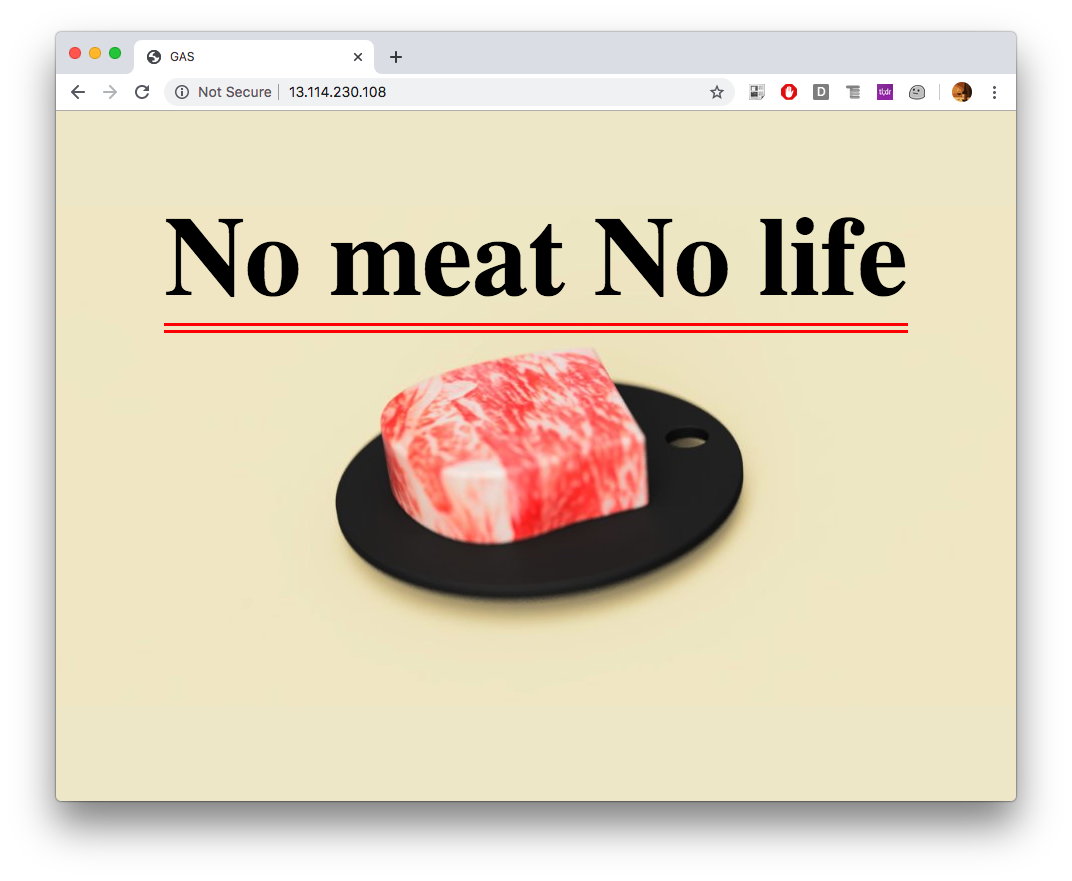
↑なお、上記サイトのお肉は3D CADで作成したものをレンダリングした画像です。まだ一回しか使ったことはないのですが、思ったより簡単にできたので何かに使えないか模索しています。
このタイミングでエラーが出ている場合は、以下のコマンドを打ってエラーを確認してください。
※ おそらくモジュールが足りないことが原因だと思われます。
# エラーの確認
$ sudo vi /var/log/uwsgi/uwsgi.log
# 再起動
$ sudo systemctl stop uwsgi.service
$ sudo systemctl start uwsgi.service
なお、いちいち打つのが面倒な場合は以下のシェルスクリプトを作成しておくと楽です。
シェルスクリプトの作成
# 以下の流れで作成&aliasの登録をする。
$ vi /home/ubuntu/restart.sh
$ chmod +x /home/ubuntu/restart.sh
$ alias r='/home/ubuntu/restart.sh'
# !/bin/bash
sudo systemctl stop uwsgi.service
sudo systemctl start uwsgi.service
echo "Restarted."
# !/bin/bash
sudo vi /var/log/uwsgi/uwsgi.log
Slack
それでは、いよいよ GAS(Google Apps Script) を使ってslackの投稿に自動的に反応するアプリを作りましょう。
※ 今更ですが、GASと言ったら普通はGoogle Apps Scriptのことを指します。
GAS
slackと連携する前に、AWSのFlaskアプリが正しく動いているかの確認を行います。
function sendHttpPost(){
  const AWS_url = "http://ec2-AA-BBB-CCC-DDD.ap-northeast-1.compute.amazonaws.com/form"
  var payload = {
    "email" : "<EMAIL>",
    "password": "<PASSWAR>",
    "form_url": "<GOOGLE FORM URL>"
  };
  var options = {
    "method" : "post",
    "payload" : payload
  };
  var response = UrlFetchApp.fetch(AWS_url, options);
  Logger.log(response);
}
上記のプログラムを GAS で実行して、正しく動作していれば問題ありません。
なお、2段階認証 を設定している方は新規デバイスからログインする際にpinコードの入力等を求められるので、それの対応方法についても記載しておきます。この作業は一度行うだけで構いません。
2段階認証をくぐり抜ける方法
from seleniumchrome import SeleniumChrome

chrome = SeleniumChrome()
chrome.loginGoogleAccount(email="<EMAIL>", password="<PASS>")
# 日本を選択
chrome.select(by='name', element='countryCode', value='JP')
chrome.fill(by='name', element='phoneNumber', content=90XXXXXXXX)
# テキストメッセージでpinコードを伝える。
chrome.click(by='name', element='sendMethod')
""" 指定した電話番号先に G-YYYYYY というGoogle確認コードが届く """
chrome.fill(by='name', element='pin', content=YYYYYY)
chrome.click(by='id', element='submit')
""" 完了。なお、不都合がある場合は適宜以下のメソッドで状態を確かめてください。
chrome.takeScreenShot()
chrome.getPageSource()
"""
また、上記のバージョンのChromeをインストールした場合、Flaskで動かす際にエラーが発生することを確認しました。以下のように修正すると正しく動作します。
$ sudo apt install xvfb
# パスは適宜変更してください。
$ sudo vi /usr/lib/python3/dist-packages/selenium/webdriver/common/service.py
 # vim を使っている際は `:set number` で行数が確認できます。
 61     def start(self):
 62         """
 63         Starts the Service.
 64
 65         :Exceptions:
 66          - WebDriverException : Raised either when it can't start the service
 67            or when it can't connect to the service
 68         """
 69         try:
 70             cmd = ["sudo", "xvfb-run"] + [self.path]
 71             # cmd = [self.path]
 72             cmd.extend(self.command_line_args())
SlackBot
ここまでくれば、あとは
- slackに投稿された特定のメッセージに対して反応する。
- formのURLを取得してAWSに投げる。
- (必要であれば)回答後のスクリーンショットを自分のDMに投げる。
を行うbotを作るだけです。ここら辺の内容もかなり記事が充実しているので割愛させていただきます。
- Slack BotをGASでいい感じで書くためのライブラリを作った
- Slack上のメッセージをGoogleAppsScriptで受け取ってよしなに使う
- SlackのOutgoing WebHooksとGoogleAppsScriptで簡単な会話botを作ってみた
Slack Botの設定
- 【GAS】https://drive.google.com/drive/my-drive にアクセスし、左上の[+New]からGoogle Apps Scriptを選択。見つからなければ[More]>[Connect More Apps]から追加する。
-
【GAS】[Resources]>[Libraries...]から先人が作ってくださったライブラリを追加する。(プロジェクトキー:
M3W5Ut3Q39AaIwLquryEPMwV62A3znfOO) -
【Slack】https://api.slack.com/appsにアクセスし、[Create New App]からアプリを作成し、[Permissions]の設定を済ませる。(Scopesに
chat:write:botとincoming-webhookを追加する。) -
【Slack】
Bot User OAuth Access Tokenをコピーしておく。 -
【Slack】https:// [WORK SPACE NAME] .slack.com/apps/A0F7VRG6Q-outgoing-webhookからOutgoing WebHooksを追加する。
-
Tokenをコピーしておく。 -
URLにはGASをウェブアプリケーションとして公開した際のURLを入力する。
-
-
【Slack】https:// [WORK SPACE NAME] .slack.com/apps/A0F7XDUAZ--incoming-webhookからIncoming Webhook を追加する。この時
Webhook URLをコピーしておく。 -
【GAS】必要なコードを書く。この時、[File]>[Project properties]>[Script properties] に先ほどコピーした
Bot User OAuth Access TokenやTokenを登録しておけば、それらの情報をPropertiesService.getScriptProperties().getProperty( KEYNAME )で取得できます。 -
【GAS】[Publish]>[Deploy as web app...]からウェブアプリケーションとして公開する。
-
Project version: New -
Who has access to the app: Anyone, even anonymous
-
作成したGASのプロジェクトファイルは以下のようになりました。
function post2AWS(aws_url, email, password, form_url){
var payload = {
"email" : email,
"password": password,
"form_url": form_url
};
var options = {
"method" : "post",
"payload" : payload
};
var image = UrlFetchApp.fetch(aws_url, options).getBlob();
return image;
}
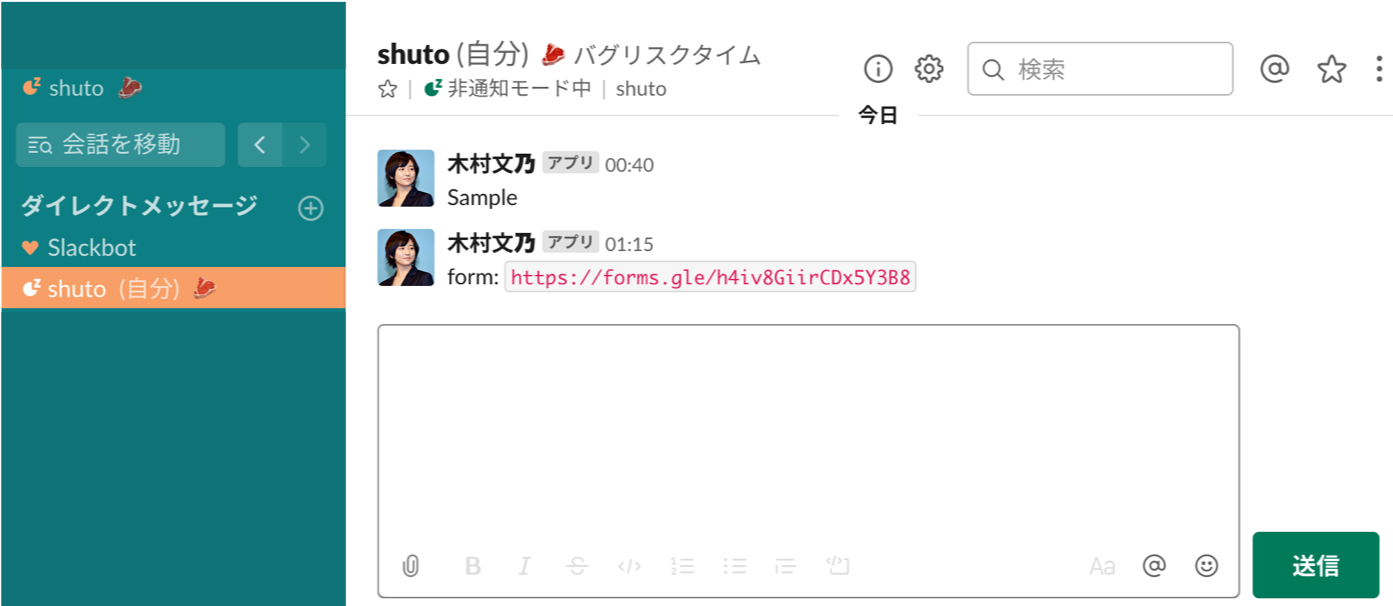
function noticeFormURL(incoming_url, form_url, channel_id){
var payload = {
"text" : "form: `" + form_url + "`",
"channel" : channel_id,
"username" : "木村文乃"
}
var options = {
"method" : "POST",
"contentType" : "application/json",
"payload" : JSON.stringify(payload)
};
var response = UrlFetchApp.fetch(incoming_url, options);
return response;
}
function postImage(slack_token, image, channel_id){
var payload = {
token: slack_token,
file: image,
channels: channel_id,
title: 'image'
};
var option={
'method':'POST',
'payload': JSON.stringify(payload)
};
var res = UrlFetchApp.fetch('https://slack.com/api/files.upload', option);
return res
}
function doPost(e) {
const P = PropertiesService.getScriptProperties();
const slack_token = P.getProperty('SLACK_ACCESS_TOKEN');
const outgoing_url = P.getProperty('OUTGOING_WEBHOOKS_TOKEN');
const incoming_url = P.getProperty('INCOMING_WEBHOOKS_TOKEN');
const channel_id = P.getProperty('SLACL_DM_URL');
const aws_url = P.getProperty('AWS_URL');
const email = P.getProperty('EMAIL');
const password = P.getProperty('PASSWORD');
const form_url = e.parameter.text.match(/https:\/\/.*/g)[0].slice(0, -1)// Remove ">"
var image = post2AWS(aws_url, email, password, form_url);
var res = noticeFormURL(incoming_url, form_url, channel_id);
var res = postImage(slack_token, image, channel_id); // うまく動作していません。
}
完成したもの(再掲)
| slack に Google Form が投稿される | Google Form に自動で回答 | DMで知らせる |
|---|---|---|
|
|
こんな素敵な秘書が欲しい… |
※ 本当はDM時にフォームの回答結果を画像として載せたかったのですが失敗しています。(最近のGoogleFormはメール通知が来るので必要ない機能かと思い、追求していません。)
あとがき
一応望み通りのものはできましたが、本当はAWS使わずにGASで完結させたかったので、
- ログインする際に Cookie 等の情報をどのように受け渡しすれば良いのか
- セッション(情報) とはなんなのか
あたりをしっかり理解したいと思います。 (詳しい方教えてください🙇♂️)
参考
- 【Googleログイン自動化】Python×seleniumでGoogleにログインする
- EC2 UbuntuでGoogle Chromeをヘッドレス実行してスクリーンショットを採取する手順
- PythonかければWebアプリぐらい作れる。
- Slack BotをGASでいい感じで書くためのライブラリを作った
- Slack上のメッセージをGoogleAppsScriptで受け取ってよしなに使う
- SlackのOutgoing WebHooksとGoogleAppsScriptで簡単な会話botを作ってみた
-
「確かにプログラムに任せる事で効率化できるが、その反面 『人間がわざわざ時間をかけて』 行わないと意識しなくなってしまう事もある。」という意見を聞いたことがあり、確かになあと思ったことが強く印象に残っています。難しいですね…。 ↩