

はじめに
RHEL on IBM Power 環境において、SMTP サーバーとして Postfix、IMAP サーバーとして Dovecot を利用した(AI を頼りにしながら) メールサーバーを構築した記録です。
- TLS による通信暗号化(SMTP / IMAP の両方)
- SMTP AUTH によるユーザー認証(Dovecot への委譲)
- Open Relay 防止設定
- TLS 1.2 以上の利用
- Submission (587) / IMAPS (993) の有効化
構成イメージ:
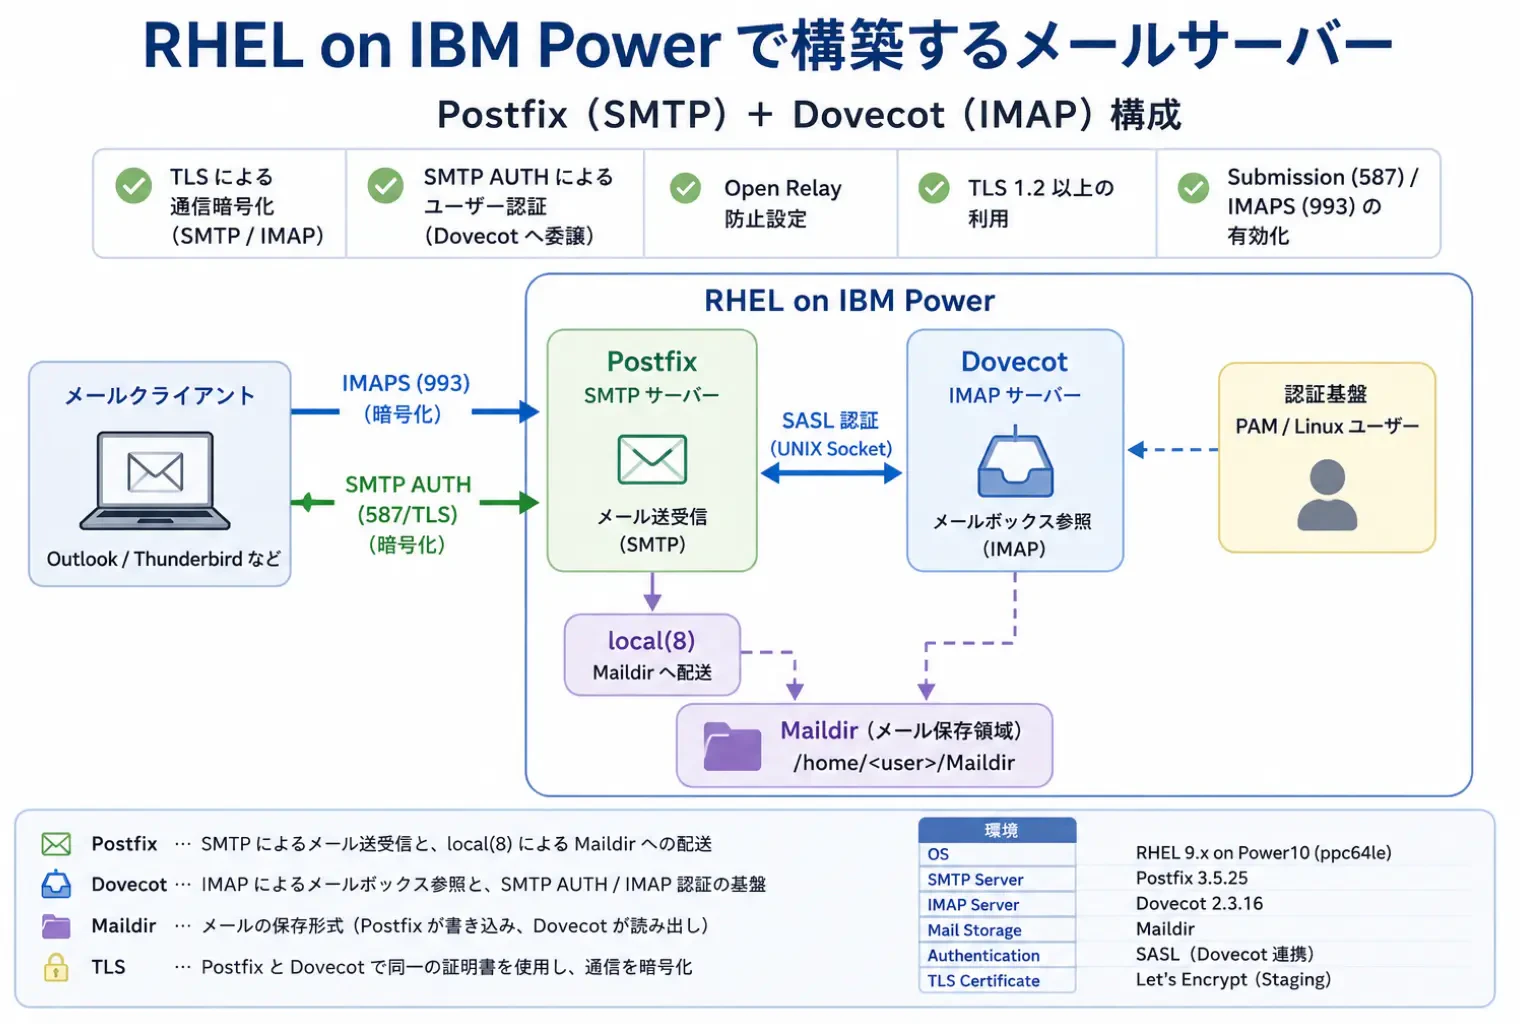
Postfix 自身は認証機能を持たないため、認証は Dovecot に委譲します。これにより SMTP 認証と IMAP 認証を一元管理できます。なお Maildir への書き込みは Postfix の local(8) が行い、Dovecot は読み出す側になります。
TLS 証明書は Postfix と Dovecot で同一のものを使用します。検証環境では Let's Encrypt の Staging 証明書を利用していますが、商用証明書や社内 CA 証明書でも同様の手順で構築できます。
メールの保存形式には Maildir を採用しています。
環境
今回の検証環境は以下の通りです。
| 項目 | 内容 |
|---|---|
| OS | RHEL 9.x on Power10 (ppc64le) |
| SMTP Server | Postfix 3.5.25 |
| IMAP Server | Dovecot 2.3.16 |
| Mail Storage | Maildir |
| Authentication | SASL (Dovecot 連携) |
| TLS Certificate | Let's Encrypt (Staging) |
今回の構築において IBM Power 固有の設定は不要でした。Postfix / Dovecot / cyrus-sasl はいずれも ppc64le 版が標準リポジトリから提供されており、設定ファイルや運用方法も x86_64 版と同一です。
メールサーバー構成の概要
今回の構成では以下の役割分担を行います。
| コンポーネント | 役割 |
|---|---|
| Postfix | SMTP によるメール送受信、Maildir への配送 |
| Dovecot | IMAP アクセス、認証基盤 |
| SASL | SMTP AUTH 認証(Dovecot が提供) |
| Maildir | メール保存形式 |
| TLS 証明書 | 通信暗号化 |
メール送信時の認証フローは以下のようになります。
Mail Client
      |
      | SMTP AUTH (587/TLS)
      v
   Postfix
      |
      | SASL (UNIX socket)
      v
   Dovecot
      |
      | PAM
      v
 Linux User
手順:事前準備(変数定義)
以降の手順で利用する変数を定義します。ご自身の環境に合わせて読み替えてください。
# export HOSTNAME_FQDN="cert-test01.cert-d.net"
# export DOMAIN="cert-d.net"
# export CERT_DIR="/etc/pki/mail"
HOSTNAME はシェルの予約変数と衝突するため、本記事では HOSTNAME_FQDN を使用します。
手順:パッケージインストール
まず OS を最新化します。
# dnf update -y
Updating Subscription Management repositories.
Last metadata expiration check: 14:04:15 ago on Tue May 19 05:32:51 2026.
Dependencies resolved.
Nothing to do.
Complete!
インストールするパッケージ
| パッケージ | 用途 |
|---|---|
| postfix | SMTP サーバー |
| dovecot | IMAP/POP3 サーバー |
| cyrus-sasl | SASL ライブラリ |
| cyrus-sasl-plain | LOGIN/PLAIN 認証 |
| s-nail | CLI メール送信ツール |
Postfix と Dovecot はメールシステム本体であり、cyrus-sasl は SMTP AUTH を実現するために利用します。
# dnf install -y postfix dovecot cyrus-sasl cyrus-sasl-plain s-nail firewalld
Updating Subscription Management repositories.
Last metadata expiration check: 14:04:20 ago on Tue May 19 05:32:51 2026.
Package firewalld-1.3.4-9.el9_5.noarch is already installed.
Dependencies resolved.
====================================================================================================
 Package              Arch        Version                                  Repository          Size
====================================================================================================
Installing:
 cyrus-sasl           ppc64le     2.1.27-21.el9                            RHEL-BaseOS         83 k
 cyrus-sasl-plain     ppc64le     2.1.27-21.el9                            RHEL-BaseOS         28 k
 dovecot              ppc64le     1:2.3.16-15.el9                          RHEL-AppStream     5.3 M
 postfix              ppc64le     2:3.5.25-1.el9                           RHEL-AppStream     1.6 M
 s-nail               ppc64le     14.9.22-6.el9                            RHEL-AppStream     682 k
Installing dependencies:
 clucene-core         ppc64le     2.3.3.4-42.20130812.e8e3d20git.el9       RHEL-AppStream     594 k
 libexttextcat        ppc64le     3.4.5-11.el9                             RHEL-AppStream     250 k

Transaction Summary
====================================================================================================
Install  7 Packages

Total size: 8.4 M
Installed size: 34 M
Downloading Packages:
Running transaction check
Transaction check succeeded.
Running transaction test
Transaction test succeeded.
Running transaction
  Preparing        :                                                                            1/1
  Installing       : libexttextcat-3.4.5-11.el9.ppc64le                                         1/7
  Installing       : clucene-core-2.3.3.4-42.20130812.e8e3d20git.el9.ppc64le                    2/7
  Running scriptlet: dovecot-1:2.3.16-15.el9.ppc64le                                            3/7
  Installing       : dovecot-1:2.3.16-15.el9.ppc64le                                            3/7
  Running scriptlet: dovecot-1:2.3.16-15.el9.ppc64le                                            3/7
  Running scriptlet: s-nail-14.9.22-6.el9.ppc64le                                               4/7
  Installing       : s-nail-14.9.22-6.el9.ppc64le                                               4/7
  Running scriptlet: s-nail-14.9.22-6.el9.ppc64le                                               4/7
  Running scriptlet: postfix-2:3.5.25-1.el9.ppc64le                                             5/7
  Installing       : postfix-2:3.5.25-1.el9.ppc64le                                             5/7
  Running scriptlet: postfix-2:3.5.25-1.el9.ppc64le                                             5/7
  Installing       : cyrus-sasl-plain-2.1.27-21.el9.ppc64le                                     6/7
  Running scriptlet: cyrus-sasl-2.1.27-21.el9.ppc64le                                           7/7
  Installing       : cyrus-sasl-2.1.27-21.el9.ppc64le                                           7/7
  Running scriptlet: cyrus-sasl-2.1.27-21.el9.ppc64le                                           7/7
  Running scriptlet: dovecot-1:2.3.16-15.el9.ppc64le                                            7/7
  Running scriptlet: cyrus-sasl-2.1.27-21.el9.ppc64le                                           7/7
  Verifying        : cyrus-sasl-2.1.27-21.el9.ppc64le                                           1/7
  Verifying        : cyrus-sasl-plain-2.1.27-21.el9.ppc64le                                     2/7
  Verifying        : clucene-core-2.3.3.4-42.20130812.e8e3d20git.el9.ppc64le                    3/7
  Verifying        : dovecot-1:2.3.16-15.el9.ppc64le                                            4/7
  Verifying        : libexttextcat-3.4.5-11.el9.ppc64le                                         5/7
  Verifying        : postfix-2:3.5.25-1.el9.ppc64le                                             6/7
  Verifying        : s-nail-14.9.22-6.el9.ppc64le                                               7/7
Installed products updated.

Installed:
  clucene-core-2.3.3.4-42.20130812.e8e3d20git.el9.ppc64le      cyrus-sasl-2.1.27-21.el9.ppc64le
  cyrus-sasl-plain-2.1.27-21.el9.ppc64le                       dovecot-1:2.3.16-15.el9.ppc64le
  libexttextcat-3.4.5-11.el9.ppc64le                           postfix-2:3.5.25-1.el9.ppc64le
  s-nail-14.9.22-6.el9.ppc64le

Complete!
すべて ppc64le パッケージが標準リポジトリから取得できていることが確認できます。
firewalld を起動します。
# systemctl enable --now firewalld
手順:TLS 証明書準備
メールクライアントから送信される認証情報やメールデータは盗聴される可能性があります。そのため SMTP、IMAP の両方で TLS を利用し通信を暗号化します。
今回の構成では Postfix と Dovecot が同一サーバー上で動作するため、同一のサーバー証明書を利用します。秘密鍵が漏洩するとサーバーになりすました攻撃が可能となるため、適切な権限管理が重要です。
# chmod 0644 "$CERT_DIR/postfix.crt"
# chmod 0640 "$CERT_DIR/postfix.key"
# chgrp postfix "$CERT_DIR/postfix.key"
Postfix の smtpd は postfix ユーザーで鍵を読むためグループ権限が必要ですが、Dovecot は root で読み込むため dovecot ユーザーへの権限付与は不要です。
証明書有効期限の確認
# openssl x509 -in "$CERT_DIR/postfix.crt" -noout -dates
notBefore=May  8 11:20:52 2026 GMT
notAfter=Aug  6 11:20:51 2026 GMT
運用環境では証明書失効によるメールサービス停止を防ぐため、定期的な期限確認や自動更新の導入が推奨されます。
以下は Ansible Automation Platform と HashiCorp Vault で証明書管理を自動化した例です。
ご参考:
手順:Postfix 設定
基本設定
Postfix の動作に必要なホスト名やドメイン情報を設定します。
# postconf -e "myhostname = $HOSTNAME_FQDN"
# postconf -e "mydomain = $DOMAIN"
# postconf -e "myorigin = \$mydomain"
# postconf -e "inet_interfaces = all"
# postconf -e "inet_protocols = ipv4"
# postconf -e "mydestination = \$myhostname, localhost.\$mydomain, localhost, \$mydomain"
# postconf -e "home_mailbox = Maildir/"
主なパラメーターは以下の通りです。
| パラメーター | 説明 |
|---|---|
| myhostname | サーバーホスト名(FQDN) |
| mydomain | メールドメイン |
| myorigin | 送信元ドメイン |
| mydestination | ローカル配送対象 |
| home_mailbox | Maildir 保存先 |
Maildir 形式について
メール保存形式には mbox と Maildir の 2 種類があります。
Maildir は以下のようなディレクトリ構造を利用します。
Maildir/
├── cur
├── new
└── tmp
メール 1 通につき 1 ファイルとして保存されるため、
- ファイルロック競合が少ない
- マルチユーザー環境に強い
- バックアップしやすい
といったメリットがあります。
現在では Postfix + Dovecot 構成において事実上の標準構成となっているそうです。
手順:Postfix TLS 設定
SMTP 通信を暗号化します。
# postconf -e "smtpd_tls_cert_file = $CERT_DIR/postfix.crt"
# postconf -e "smtpd_tls_key_file  = $CERT_DIR/postfix.key"

# postconf -e "smtpd_tls_security_level = may"
# postconf -e "smtpd_tls_loglevel = 1"

# postconf -e 'smtpd_tls_protocols = !SSLv2,!SSLv3,!TLSv1,!TLSv1.1'
# postconf -e 'smtp_tls_protocols  = !SSLv2,!SSLv3,!TLSv1,!TLSv1.1'
smtpd_tls_security_level について
smtpd_tls_security_level = may は、
- TLS 対応クライアント → 暗号化通信
- 非対応クライアント → 平文通信
を許可する設定です(日和見 TLS)。
25 番を encrypt にすると TLS 非対応の送信元 MTA からの受信ができなくなるため、25 番は may のままとし、クライアント送信を受ける 587 番側で encrypt を指定します(後述の master.cf)。
また SSLv2、SSLv3、TLS 1.0、TLS 1.1 は既知の脆弱性を持つため無効化しています。TLS 1.2 以上を利用する構成です。
なお smtpd_tls_protocols は日和見 TLS の経路に適用されるパラメーターです。587 番のように encrypt を指定した経路には smtpd_tls_mandatory_protocols が適用されるため、そちらを厳格化する場合は別途設定が必要です。
手順:SASL 認証設定
SMTP プロトコル自体には認証機能がありません。そのため現在のメールシステムでは SMTP AUTH を利用して認証を行います。
# postconf -e "smtpd_sasl_auth_enable = yes"
# postconf -e "smtpd_sasl_type = dovecot"
# postconf -e "smtpd_sasl_path = private/auth"
# postconf -e "smtpd_sasl_security_options = noanonymous"
今回の構成では Postfix は認証を Dovecot に委譲しています。認証処理を Dovecot に集約することで、IMAP 認証と SMTP 認証を一元管理できます。
手順:Open Relay 防止
メールサーバー構築時に最も重要な設定が第三者中継防止です。
# postconf -e "smtpd_recipient_restrictions = permit_mynetworks,permit_sasl_authenticated,reject_unauth_destination"
各パラメーターの意味は以下の通りです。
| 設定値 | 意味 |
|---|---|
| permit_mynetworks |
mynetworks に含まれる送信元を許可 |
| permit_sasl_authenticated | SMTP AUTH 認証済みの送信元を許可 |
| reject_unauth_destination | 自ドメイン宛以外への中継を拒否 |
これにより、
- 自サーバー(
mynetworks) - 認証済みクライアント
のみがメール送信可能となります。この設定が無い場合は Open Relay 状態となり、スパムメール送信の踏み台になる危険があります。
手順:Submission ポート (587) 有効化
現在のメールクライアントは SMTP の 25 番ではなく、Submission ポートである 587 番を利用します。
Port 25  : MTA 間配送
Port 587 : クライアントからの送信(Submission)
/etc/postfix/master.cf の submission 定義を有効化します。
# if ! grep -qE '^submission' /etc/postfix/master.cf; then
  sed -i 's/^#submission/submission/' /etc/postfix/master.cf
  if ! grep -qE '^submission' /etc/postfix/master.cf; then
    cat >> /etc/postfix/master.cf <<'EOF'
submission inet n       -       n       -       -       smtpd
  -o smtpd_tls_security_level=encrypt
  -o smtpd_sasl_auth_enable=yes
  -o smtpd_recipient_restrictions=permit_sasl_authenticated,reject
EOF
  fi
fi
587 番ポートでは TLS を必須化(encrypt)し、SMTP AUTH で認証されたクライアントのみを許可しています。
なお RFC 8314 では 465 番(submissions / Implicit TLS)の利用が推奨されています。本記事では 587 番のみを対象としますが、実運用では smtpd_tls_wrappermode=yes を指定した 465 番の併用も検討してください。
手順:Dovecot 設定
プロトコル設定
Dovecot はメールボックスへのアクセスを提供します。
# sed -i 's|^#\?protocols\s*=.*|protocols = imap pop3 lmtp|'  /etc/dovecot/dovecot.conf

# sed -i 's|^#\?mail_location\s*=.*|mail_location = maildir:~/Maildir|' /etc/dovecot/conf.d/10-mail.conf

# sed -i 's|^#\?disable_plaintext_auth\s*=.*|disable_plaintext_auth = yes|'   /etc/dovecot/conf.d/10-auth.conf

# sed -i 's|^#\?auth_mechanisms\s*=.*|auth_mechanisms = plain login|'  /etc/dovecot/conf.d/10-auth.conf
今回の設定では IMAP、POP3 の両方を有効化しています。
| プロトコル | 特徴 |
|---|---|
| POP3 | ローカル保存型 |
| IMAP | サーバー管理型 |
| LMTP | ローカル配送用 |
protocols に lmtp を含めていますが、Postfix 側で mailbox_transport を設定していないため、実際の配送は local(8) が行います。LMTP を経由させる場合は以下の設定が必要です。
# postconf -e "mailbox_transport = lmtp:unix:private/dovecot-lmtp"
Sieve によるフィルタリングや共有メールボックスを利用する場合は LMTP 経由の構成を検討してください。
Dovecot TLS 設定
認証情報保護のため disable_plaintext_auth = yes を指定しています。これにより TLS が有効でない接続での認証を拒否できます。
# sed -i 's|^#\?ssl\s*=.*|ssl = required|'  /etc/dovecot/conf.d/10-ssl.conf

# sed -i "s|^#\?ssl_cert\s*=.*|ssl_cert = <$CERT_DIR/postfix.crt|" /etc/dovecot/conf.d/10-ssl.conf

# sed -i "s|^#\?ssl_key\s*=.*|ssl_key = <$CERT_DIR/postfix.key|"  /etc/dovecot/conf.d/10-ssl.conf

# sed -i 's|^#\?ssl_min_protocol\s*=.*|ssl_min_protocol = TLSv1.2|' /etc/dovecot/conf.d/10-ssl.conf
ssl_cert / ssl_key の値の先頭にある < は「ファイルから読み込む」という Dovecot 2.3 系の記法です。省略できないため注意してください。
Postfix 連携用認証ソケット
Postfix が Dovecot に認証を問い合わせるための UNIX ソケットを作成します。
# if ! grep -q 'var/spool/postfix/private/auth' \
    /etc/dovecot/conf.d/10-master.conf; then
  cat >> /etc/dovecot/conf.d/10-master.conf <<'EOF'

service auth {
  unix_listener /var/spool/postfix/private/auth {
    mode = 0660
    user = postfix
    group = postfix
  }
}
EOF
fi
ソケットは Postfix の chroot 環境内(/var/spool/postfix)に作成する必要があります。Postfix の smtpd_sasl_path = private/auth は、この chroot からの相対パスを指しています。
手順:Maildir 初期化
新規ユーザー作成時に Maildir が自動作成されるよう、skel にディレクトリを作成します。
# mkdir -p /etc/skel/Maildir/{new,cur,tmp}
既存ユーザーには適用されないため、必要に応じて個別に作成してください。
手順:Firewall 設定
必要なポートを開放します。
# firewall-cmd --permanent --add-port=587/tcp
success

# firewall-cmd --permanent --add-service=imap
success

# firewall-cmd --permanent --add-service=imaps
success

# firewall-cmd --permanent --add-port=25/tcp
success

# firewall-cmd --reload
success

(確認)
# firewall-cmd --permanent --list-ports
587/tcp
使用ポート
| ポート | 用途 |
|---|---|
| 25/tcp | SMTP |
| 587/tcp | Submission |
| 143/tcp | IMAP |
| 993/tcp | IMAPS |
サービス起動
# systemctl enable postfix dovecot
Created symlink /etc/systemd/system/multi-user.target.wants/postfix.service → /usr/lib/systemd/system/postfix.service.
Created symlink /etc/systemd/system/multi-user.target.wants/dovecot.service → /usr/lib/systemd/system/dovecot.service.
# systemctl restart postfix dovecot
# echo $?
0
状態確認
# systemctl status dovecot
● dovecot.service - Dovecot IMAP/POP3 email server
     Loaded: loaded (/usr/lib/systemd/system/dovecot.service; enabled; preset: disabled)
     Active: active (running) since Tue 2026-05-19 19:46:18 EDT; 30s ago
       Docs: man:dovecot(1)
             https://doc.dovecot.org/
    Process: 9299 ExecStartPre=/usr/libexec/dovecot/prestartscript (code=exited, status=0/SUCCESS)
   Main PID: 9306 (dovecot)
     Status: "v2.3.16 (7e2e900c1a) running"
      Tasks: 4 (limit: 4475)
     Memory: 16.5M
        CPU: 57ms
     CGroup: /system.slice/dovecot.service
             ├─9306 /usr/sbin/dovecot -F
             ├─9307 dovecot/anvil
             ├─9308 dovecot/log
             └─9309 dovecot/config

May 19 19:46:18 cert-test01.cert-d.net systemd[1]: Starting Dovecot IMAP/POP3 email server...
May 19 19:46:18 cert-test01.cert-d.net dovecot[9306]: master: Dovecot v2.3.16 (7e2e900c1a) sta>
May 19 19:46:18 cert-test01.cert-d.net systemd[1]: Started Dovecot IMAP/POP3 email server.
ポート確認
# ss -tlnp | grep dovecot
LISTEN 0      100          0.0.0.0:143       0.0.0.0:*    users:(("dovecot",pid=9306,fd=39))
LISTEN 0      100          0.0.0.0:110       0.0.0.0:*    users:(("dovecot",pid=9306,fd=21))
LISTEN 0      100          0.0.0.0:995       0.0.0.0:*    users:(("dovecot",pid=9306,fd=23))
LISTEN 0      100          0.0.0.0:993       0.0.0.0:*    users:(("dovecot",pid=9306,fd=41))
LISTEN 0      100             [::]:143          [::]:*    users:(("dovecot",pid=9306,fd=40))
LISTEN 0      100             [::]:110          [::]:*    users:(("dovecot",pid=9306,fd=22))
LISTEN 0      100             [::]:995          [::]:*    users:(("dovecot",pid=9306,fd=24))
LISTEN 0      100             [::]:993          [::]:*    users:(("dovecot",pid=9306,fd=42))
動作確認
Maildir 作成確認
# mkdir -p /root/Maildir/{cur,new,tmp}
# ls -l /root/Maildir/
total 0
drwxr-xr-x. 2 root root 6 May 19 19:55 cur
drwxr-xr-x. 2 root root 6 May 19 19:55 new
drwxr-xr-x. 2 root root 6 May 19 19:55 tmp
ローカルメール送信
# echo "test mail" | mail -s "test subject" root
# echo $?
0
送信後にキューを確認します。キューが空であれば、滞留せずに配送が完了しています。
# mailq
Mail queue is empty
メール配送確認
# ls -l /root/Maildir/new
total 4
-rw-------. 1 root root 443 May 19 20:03 1779235437.Vfd03I32b752M907659.cert-test01.cert-d.net
メールファイルが作成されていれば配送成功です。内容を確認します。
# cat /root/Maildir/new/1779235437.Vfd03I32b752M907659.cert-test01.cert-d.net
Return-Path: <root@cert-d.net>
X-Original-To: root
Delivered-To: root@cert-d.net
Received: by cert-test01.cert-d.net (Postfix, from userid 0)
	id DB69B13809E97; Tue, 19 May 2026 20:03:57 -0400 (EDT)
Date: Tue, 19 May 2026 20:03:57 -0400
To: root@cert-d.net
Subject: test subject
User-Agent: s-nail v14.9.22
Message-Id: <20260520000357.DB69B13809E97@cert-test01.cert-d.net>
From: root <root@cert-d.net>

test mail
test mail という内容が確認できました。
ログ確認
# tail -f /var/log/maillog
May 19 20:03:57 cert-test01 postfix/pickup[9294]: DB69B13809E97: uid=0 from=<root>
May 19 20:03:57 cert-test01 postfix/cleanup[10240]: DB69B13809E97: message-id=<20260520000357.DB69B13809E97@cert-test01.cert-d.net>
May 19 20:03:57 cert-test01 postfix/qmgr[9295]: DB69B13809E97: from=<root@cert-d.net>, size=362, nrcpt=1 (queue active)
May 19 20:03:57 cert-test01 postfix/local[10242]: DB69B13809E97: to=<root@cert-d.net>, orig_to=<root>, relay=local, delay=0.02, delays=0.01/0/0/0, dsn=2.0.0, status=sent (delivered to maildir)
May 19 20:03:57 cert-test01 postfix/qmgr[9295]: DB69B13809E97: removed
status=sent (delivered to maildir) が出力されています。relay=local から、Postfix の local(8) が Maildir へ直接配送していることが読み取れます。
IMAPS 接続確認
IMAPS (993/tcp) に TLS 接続できることを確認します。
# openssl s_client -connect localhost:993
Connecting to ::1
CONNECTED(00000003)
depth=3 C=US, O=(STAGING) Internet Security Research Group, CN=(STAGING) Bogus Broccoli X2
verify error:num=20:unable to get local issuer certificate
verify return:1
depth=2 C=US, O=ISRG, CN=(STAGING) Yearning Yucca Root YE
verify return:1
depth=1 C=US, O=Let's Encrypt, CN=(STAGING) Baloney Bulgur YE2
verify return:1
depth=0 CN=*.cert-d.net
verify return:1
---
Certificate chain
 0 s:CN=*.cert-d.net
   i:C=US, O=Let's Encrypt, CN=(STAGING) Baloney Bulgur YE2
   a:PKEY: id-ecPublicKey, 256 (bit); sigalg: ecdsa-with-SHA384
   v:NotBefore: May  8 11:20:52 2026 GMT; NotAfter: Aug  6 11:20:51 2026 GMT
 1 s:C=US, O=Let's Encrypt, CN=(STAGING) Baloney Bulgur YE2
   i:C=US, O=ISRG, CN=(STAGING) Yearning Yucca Root YE
   a:PKEY: id-ecPublicKey, 384 (bit); sigalg: ecdsa-with-SHA384
   v:NotBefore: Sep  3 00:00:00 2025 GMT; NotAfter: Sep  2 23:59:59 2028 GMT
 2 s:C=US, O=ISRG, CN=(STAGING) Yearning Yucca Root YE
   i:C=US, O=(STAGING) Internet Security Research Group, CN=(STAGING) Bogus Broccoli X2
   a:PKEY: id-ecPublicKey, 384 (bit); sigalg: ecdsa-with-SHA384
   v:NotBefore: Sep  3 00:00:00 2025 GMT; NotAfter: Sep  2 23:59:59 2032 GMT
 3 s:C=US, O=(STAGING) Internet Security Research Group, CN=(STAGING) Bogus Broccoli X2
   i:C=US, O=(STAGING) Internet Security Research Group, CN=(STAGING) Pretend Pear X1
   a:PKEY: id-ecPublicKey, 384 (bit); sigalg: RSA-SHA256
   v:NotBefore: Sep  3 00:00:00 2025 GMT; NotAfter: Sep  2 23:59:59 2032 GMT
---
Server certificate
-----BEGIN CERTIFICATE-----
(略)
-----END CERTIFICATE-----
subject=CN=*.cert-d.net
issuer=C=US, O=Let's Encrypt, CN=(STAGING) Baloney Bulgur YE2
---
New, TLSv1.3, Cipher is TLS_AES_256_GCM_SHA384
Server public key is 256 bit
This TLS version forbids renegotiation.
Verify return code: 20 (unable to get local issuer certificate)
---
* OK [CAPABILITY IMAP4rev1 SASL-IR LOGIN-REFERRALS ID ENABLE IDLE LITERAL+ AUTH=PLAIN AUTH=LOGIN] Dovecot ready.
正常時の応答が表示されていることが確認できます。
* OK [CAPABILITY IMAP4rev1 SASL-IR LOGIN-REFERRALS ID ENABLE IDLE LITERAL+ AUTH=PLAIN AUTH=LOGIN] Dovecot ready.
TLS 1.3 でハンドシェイクが完了し、AUTH=PLAIN AUTH=LOGIN がアドバタイズされていることから、TLS 上での認証が可能な状態です。
証明書エラーが発生する場合
以下のようなエラーが表示される場合があります。
Verify return code: 20 (unable to get local issuer certificate)
主な原因は以下です。
- Let's Encrypt Staging 証明書を使用している(今回の検証環境がこれに該当します)
- 中間証明書が不足している
- CA 証明書をクライアントが信頼していない
今回は Staging 証明書を使用しているためこのエラーとなります。本番環境では正式な CA 証明書チェーンを利用してください。中間証明書が不足している場合は fullchain.pem を指定します。
本記事の対象範囲
本記事はサーバー単体でのローカル配送と、TLS / 認証の疎通確認までを対象としています。
インターネット越しに外部ドメイン宛の送信を行う場合は、逆引き(PTR)レコード、SPF / DKIM / DMARC の設定が別途必要です。また ISP やクラウド事業者によっては outbound の 25 番がブロックされている点にも注意が必要です。
まとめ
(AIに聞きながらですが、) 証明書を使用する検証用のPostfix + Dovecot による メールサーバーを設定できました。
RHEL on Power 環境特有の設定は特になく、以下を実現しています。
- SMTP サーバー (Postfix)
- IMAP サーバー (Dovecot)
- TLS 暗号化通信(TLS 1.2 以上)
- SMTP AUTH 認証(Dovecot への委譲による一元管理)
- Open Relay 防止(
mynetworksの明示を含む) - Maildir 形式でのメール保存
- Submission (587) 対応
- IMAPS (993) 対応