はじめに
iOSアプリの中でスライドショーを作る必要があって、かつフリックではなくボタンで前後にスライドするという要件。意外にそのものが見当たらなかったので、備忘録として。
実行環境
- Xcode 13.4.1
- macOS Monterey(12.1)
前提
- 基本は最後に書いたリンクに詳しいので、そちらを見てもらう前提で(備忘録なので)。
- スライドショーで使う画像のサイズが、表示エリアに対して大きいサイズだったので、SliderCollectionViewCell.swiftの中の「func resize(image: UIImage, width: Double) -> UIImage」でサイズ調整しています(本題とは無関係なので、不要な方は無視していいです)。
実装内容
-
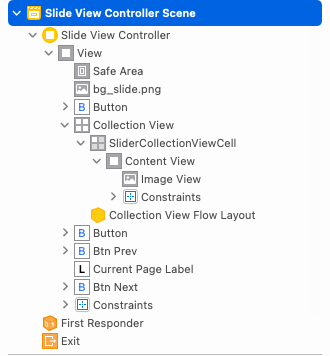
レイアウトはstoryboardを使ってます。パーツの構成はこんな感じ。
-
「@IBOutlet weak var」してないボタン(storyboard上は「Button」で表示されているもの)は、このControllerへの画面遷移用なので、無視してください。
-
今回はフリックさせないので、Collection ViewのScroll View>Scrollingのチェックはいらないです(下記の画像参照)。
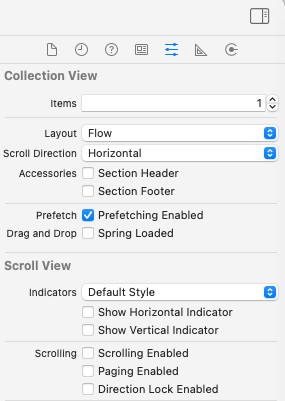
-
最初に動かしたときに下記のエラーが発生。
Exception NSException * "could not dequeue a view of kind: UICollectionElementKindCell with identifier SliderCollectionViewCell - must register a nib or a class for the identifier or connect a prototype cell in a storyboard" 0x0000600002b6a3d0
「SliderCollectionViewCell」が登録されてないって怒られてるんですが、storyboard上でSliderCollectionViewCellのidentifierを設定していなかったというミス。storyboard上でSliderCollectionViewCellを選択して、下記のようにパネルで設定してOK。

・スライドさせるimageViewの間に隙間ができてしまった(今回は隙間なく繋げてスライドしたかった)。storyboard上でCollection Viewを選択して、下記のようにパネルの「Min Spacing」を両方「0」にすることで解決。

完成
出来上がったのがこちら。storyboardのパーツ構成と、@IBOutlet、@IBActionの紐付けが間違ってなければ、これで動作します。
・こちらがController
import UIKit

class SlideViewController: UIViewController, UICollectionViewDelegate, UICollectionViewDataSource {

    @IBOutlet weak var collectionView: UICollectionView!
    @IBOutlet weak var currentPageLabel: UILabel!

    @IBOutlet weak var btnPrev: UIButton!
    @IBOutlet weak var btnNext: UIButton!

    let imageArr = [
        UIImage(named: "d04_01.png")!,
        UIImage(named: "d04_02.png")!,
        UIImage(named: "d04_03.png")!,
        UIImage(named: "d04_04.png")!
      ]

    var currentIndex = 0

    override func viewDidLoad() {
        super.viewDidLoad()

        // Do any additional setup after loading the view.

        collectionView.delegate = self
        collectionView.dataSource = self

        // ページ数:表示制御
        showPageInfo()
    }

    // 前の画面に戻るためのボタンなので、この記事とは無関係なのでなくてOKです。
    @IBAction func tapBack(_ sender: Any) {

        self.dismiss(animated: false, completion: nil)
    }


    func collectionView(_ collectionView: UICollectionView, numberOfItemsInSection section: Int) -> Int {
        return imageArr.count
    }

    func collectionView(_ collectionView: UICollectionView, cellForItemAt indexPath: IndexPath) -> UICollectionViewCell {
        let cell = collectionView.dequeueReusableCell(withReuseIdentifier: "SliderCollectionViewCell", for: indexPath) as! SliderCollectionViewCell
        cell.image = imageArr[indexPath.item]
        return cell
    }

    func collectionView(_ collectionView: UICollectionView, layout collectionViewLayout: UICollectionViewLayout, sizeForItemAt indexPath: IndexPath) -> CGSize {
      return CGSize(width: collectionView.frame.width, height: collectionView.frame.height)
    }

    func scrollViewDidScroll(_ scrollView: UIScrollView) {
        // ページ数:表示制御
        showPageInfo()
    }


    // 前のページへ
    @IBAction func tapPrev(_ sender: UIButton) {
        changeSlidePage(-1)
    }

    // 次のページへ
    @IBAction func tapNext(_ sender: UIButton) {
        changeSlidePage(1)
    }

    // ページ切り替え
    func changeSlidePage(_ addPage:Int){
        var scrollPosition = 0
        if (addPage < 0){
            // 前へ(index:0 が下限)
            scrollPosition = (currentIndex > 0) ? currentIndex - 1 : 0
        } else {
            // 次へ(index:imageArr.count - 1 が上限)
            scrollPosition = (currentIndex < imageArr.count - 1) ? currentIndex + 1 : imageArr.count - 1
        }

        // ページを切り替える
        collectionView!.scrollToItem(at: IndexPath(item: scrollPosition, section: 0), at: .right, animated: true)

        // ページ:現在位置をセット
        currentIndex = scrollPosition
    }

    // ページ数:表示制御
    func showPageInfo(){
        // ページ数:表示
        currentPageLabel.text = String(currentIndex+1) + "/" + String(imageArr.count)

        // ボタンの表示制御
        if (currentIndex == 0){
            btnPrev.isHidden = true
        } else if (currentIndex == (imageArr.count - 1)){
            btnNext.isHidden = true
        } else {
            btnPrev.isHidden = false
            btnNext.isHidden = false
        }
    }
}
・こちらがCollectionViewのCell用のクラス
import UIKit

class SliderCollectionViewCell: UICollectionViewCell {

    @IBOutlet weak var imageView: UIImageView!

    var image: UIImage! {
        didSet {
            imageView.image = resize(image: image, width: image.size.width*0.5)
            imageView.contentMode = .scaleAspectFit
        }
      }

    // imageが大きい場合のリサイズ用関数
    func resize(image: UIImage, width: Double) -> UIImage {

        // オリジナル画像のサイズからアスペクト比を計算
        let aspectScale = image.size.height / image.size.width

        // widthからアスペクト比を元にリサイズ後のサイズを取得
        let resizedSize = CGSize(width: width, height: width * Double(aspectScale))

        // リサイズ後のUIImageを生成して返却
        UIGraphicsBeginImageContext(resizedSize)
        image.draw(in: CGRect(x: 0, y: 0, width: resizedSize.width, height: resizedSize.height))
        let resizedImage = UIGraphicsGetImageFromCurrentImageContext()
        UIGraphicsEndImageContext()

        return resizedImage!
    }

}
まとめ
駆け足ですが、ざっとまとめました。前の投稿から2年以上空いてました...(^^;
もうちょっとマメに書きたいところです。
以下の記事が参考になりました。ありがとうございます。