本記事について
今後の開発の参考になればと思い、Herokuを使用したDeployについて、実体験をまとめたもの。
Herokuについて
Herokuはアプリの構築、提供、監視、スケールに役立つクラウドプラットフォームで、
アイデアを出してから運用を開始するまでのプロセスを迅速に進めることが可能です。
また、インフラストラクチャの管理の問題からも解放されます。
(公式:https://jp.heroku.com/what)
原因
MacOSが古いことが災いし、homebrewがうまくインストールできていなかった。
heroku command not foundのエラーメッセージが表示され続けていた。
herokuがうまくダウンロードできていないと思い込み、無駄なコマンドを打って時間を溶かした(4時間くらい...)
環境
PC:MacBookAir M1
OS:BigSur
言語:php
DB:ローカルはXAMPP×phpmyadmin、デプロイはmysql workbench
試したこと
homebrew、heroku、nodeを再インストールした
##実際の手順
Herokuにdeployするぞ!意気込んでアカウント発行&heroku loginコマンドを打った
▼Herokuのアカウント登録
https://blog.proglus.jp/1438/
▼Herokuアカウントのクレジットカード情報登録
http://kakedashi-xx.com:25214/index.php/2021/12/19/post-3879/
よし!まずは、herokuにloginしよう!
$ heroku login
>-bash: heroku: command not found
あれ?効かない...
Herokuがインストールされているか確認するため、Herokuがどこにインストールされているか 見てみることに...
$ which heroku
何も返ってこない...
ググって出てきた結果から、Herokuの再インストールを試みるも、エラーが返ってきた...
$ brew tap heroku/brew && brew install heroku
Running `brew update --preinstall`...
==> Auto-updated Homebrew!
~中略~
Error: Your Command Line Tools are too outdated.
Update them from Software Update in System Preferences or run:
 softwareupdate --all --install --force
If that doesn’t show you any updates, run:
 sudo rm -rf /Library/Developer/CommandLineTools
 sudo xcode-select --install
Alternatively, manually download them from:
 https://developer.apple.com/download/all/.
You should download the Command Line Tools for Xcode 13.2.1.
Error: Your Command Line Tools are too outdated.をググって出てきた対処法を試す
コマンドラインツールが古い??
$ HOMEBREW_NO_AUTO_UPDATE=1 brew install heroku
▼結果
==> Downloading https://cli-assets.heroku.com/homebrew/node-12.16.2.tar.xz
######################################################################## 100.0%
==> Downloading https://cli-assets.heroku.com/heroku-v7.50.0/heroku-v7.50.0.tar.
######################################################################## 100.0%
==> Installing heroku from heroku/brew
 〜中略〜
==> Summary
:🍺: /usr/local/Cellar/heroku/7.50.0: 28,544 files, 62.4MB, built in 21 seconds
==> Running `brew cleanup heroku`...
Disable this behaviour by setting HOMEBREW_NO_INSTALL_CLEANUP.
Hide these hints with HOMEBREW_NO_ENV_HINTS (see `man brew`).
==> Caveats
==> heroku
To use the Heroku CLI’s autocomplete --
 Via homebrew’s shell completion:
  1) Follow homebrew’s install instructions https://docs.brew.sh/Shell-Completion
    NOTE: For zsh, as the instructions mention, be sure compinit is autoloaded
       and called, either explicitly or via a framework like oh-my-zsh.
  2) Then run
   $ heroku autocomplete --refresh-cache
 OR
 Use our standalone setup:
  1) Run and follow the install steps:
   $ heroku autocomplete
Bash completion has been installed to:
 /usr/local/etc/bash_completion.d
Bash completion has been installed toと言われているのでインストールできたっぽい
念のため、確認する。
heroku --version
>heroku/7.50.0 darwin-x64 node-v12.16.2
できてる??念のため、nodeのversionを確認してみる...
/usr/local/bin/node --version
>-bash: /usr/local/bin/node: No such file or directory
そんなディレクトリないよと言われる...
再度、ググって出てきたbrewのupdateを試す
brew upgrade
▼結果
Running `brew update --preinstall`...
==> Auto-updated Homebrew!
Updated 1 tap (heroku/brew).
==> Updated Formulae
Updated 2 formulae.
==> Upgrading 2 outdated packages:
heroku/brew/heroku 7.50.0 -> 7.59.4
heroku/brew/heroku-node 12.16.2 -> 12.21.0
==> Downloading https://nodejs.org/download/release/v12.21.0/node-v12.21.0-darwi
Already downloaded:
==> Upgrading heroku/brew/heroku-node
12.16.2 -> 12.21.0
 ~中略~
==> Caveats
==> heroku
To use the Heroku CLI’s autocomplete --
 Via homebrew’s shell completion:
  1) Follow homebrew’s install instructions https://docs.brew.sh/Shell-Completion
    NOTE: For zsh, as the instructions mention, be sure compinit is autoloaded
       and called, either explicitly or via a framework like oh-my-zsh.
  2) Then run
   $ heroku autocomplete --refresh-cache
 OR
 Use our standalone setup:
  1) Run and follow the install steps:
   $ heroku autocomplete
Bash completion has been installed to:
 /usr/local/etc/bash_completion.d
completionと言われているので、ひとまずherokuとnodeのversionを確認してみる
$ heroku --version
>heroku/7.59.4 darwin-x64 node-v12.21.0
$ /usr/local/bin/node --version
>v12.21.0
成功🍻
今度こそ、できるはず!!元々やろうとしていたdeploy手順通り進めていく
$ heroku login
heroku: Press any key to open up the browser to login or q to exit:
いずれかのKeyでloginできるとあるので、Enterキーを押下すると、
ブラウザでherokuのlogin ボタンがある画面が表示される
deployしたいファイルがあるディレクトリへ移動して、git initを初期化後、アプリ名をつける
$ cd deployしたいファイルがあるディレクトリ

$ git init
$ heroku create アプリ名
※アプリ名にはプロダクト名などの任意の名前をつける。
※禁止事項=数字のみ、大文字使用、記号使用
※ここでアプリ名の禁止事項を破ると以下のようなエラーが出る
悪い例: heroku create Great_happiness
Creating ⬢ Great_happiness... !
 ▸    Name must start with a letter, end with a letter or digit and can only
 ▸    contain lowercase letters, digits, and dashes.
大文字と_を使用しているためエラーが出ている(letterは小文字なので使えないよ、と言われている)
cleardbをインストール
$ heroku addons:add cleardb
CLEARDB_DATABASE_URL で自分のデータベース情報を確認する
$ heroku config | grep CLEARDB_DATABASE_URL
返ってきた結果をユーザ名、パスワード、ホスト名、データベース名に分解する
「mysql://[ユーザー名]:[パスワード]@[ホスト名]/[データベース名]?reconnect=true」
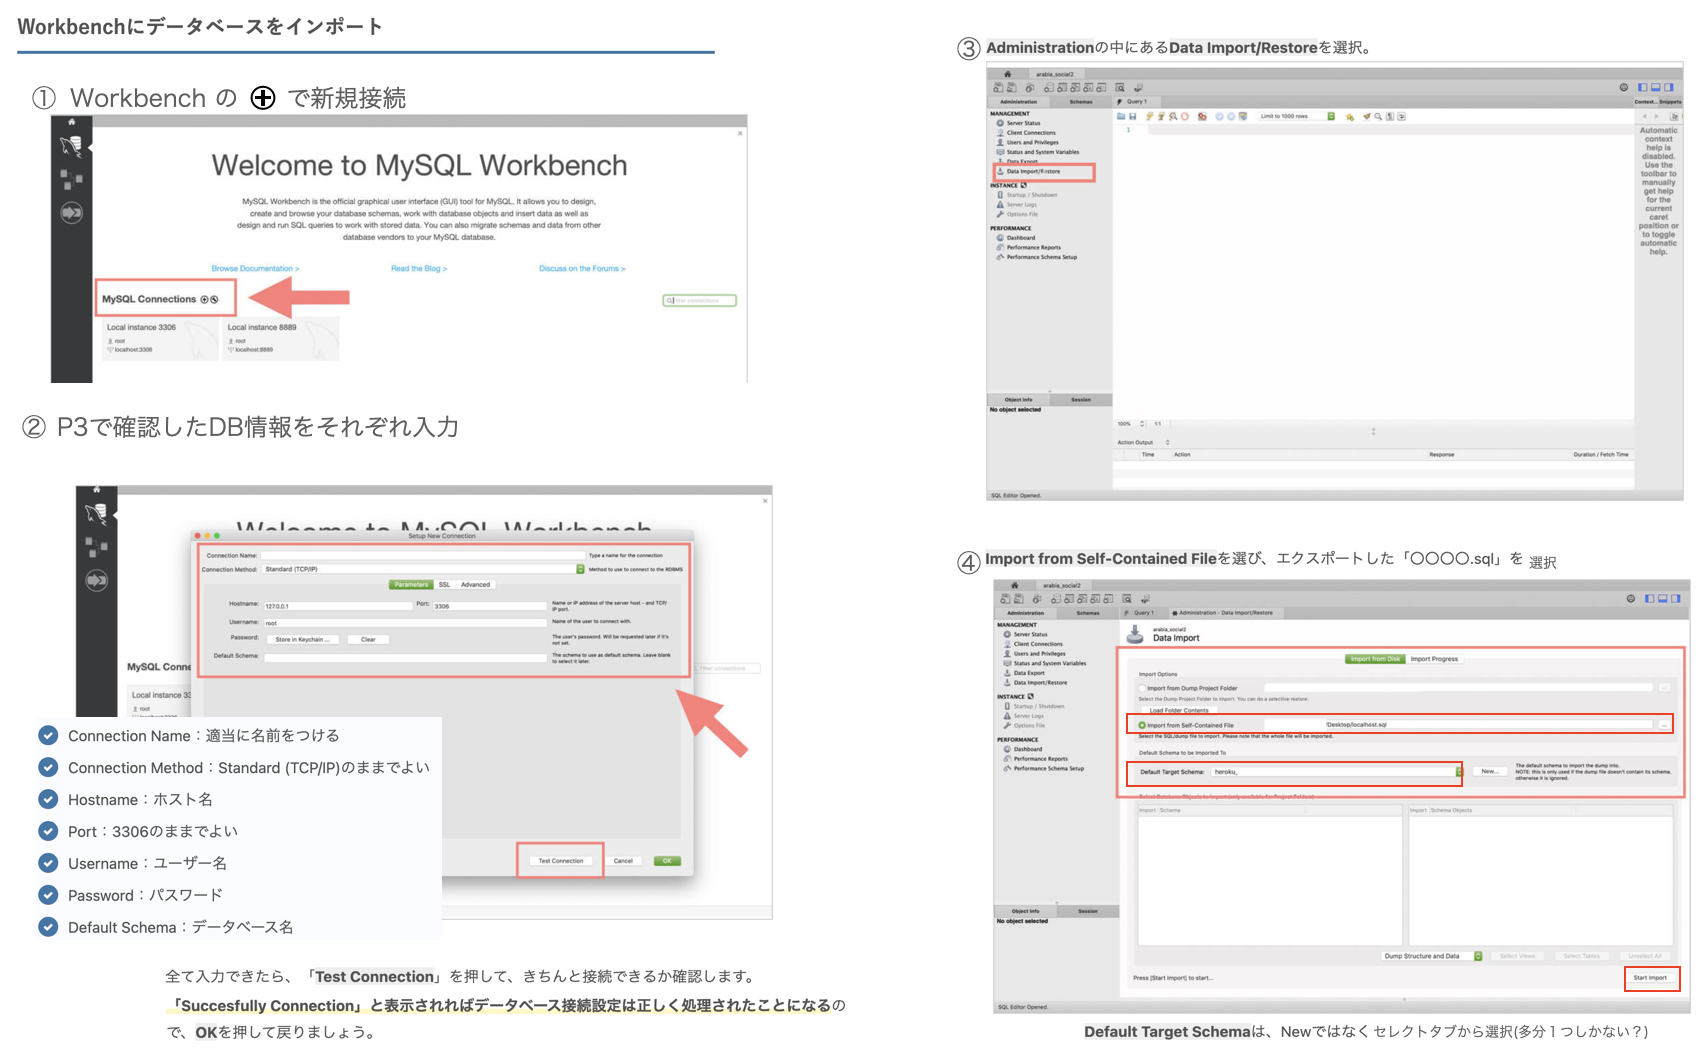
Mysql workbenchに接続情報を登録&sqlファイルをインポート(事前にmyphpadminからダウンロードしたもの)
functions.php(DB接続情報)を書き換える
$dbn = 'mysql:dbname=[データベース名];charset=utf8mb4;port=3306;host=[ホスト名]';
$user = '[ユーザー名]';
$pwd = '[パスワード]';
デプロイ対象のディレクトの一番上の階層に以下のファイルを作成(ファイルの中身は何もコードを記述しなくてOK)
composer.json
$ git add .
$ git commit -m “commit message”
herokuにpush
※masterではなくmainにpush
参考:https://qiita.com/flour/items/985b4628672a85b8e4f3
$ git push heroku main
▼結果
Enumerating objects: 5, done.
Counting objects: 100% (5/5), done.
〜中略〜
remote: -----> Launching...
remote:    Released v6
remote:    https://アプリ名.herokuapp.com/ deployed to Heroku
remote:
remote: Verifying deploy... done.
To https://git.heroku.com/アプリ名.git
  22d58bc..25c94c2 main -> main
アプリをブラウザで開く
$ heroku open
以上。