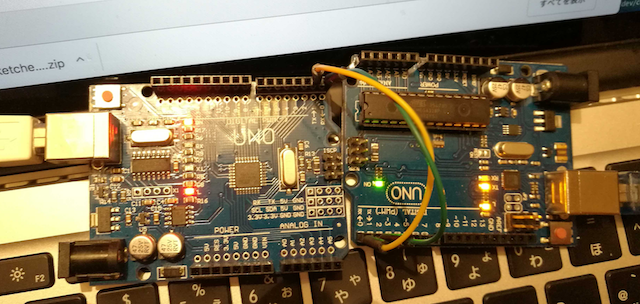
本ドキュメントは、Arduino同士でシリアル接続して文字列を送受信する方法についての解説です。

上記写真の様にお互いに TX<->RX, RX<->TX をクロスさせてジャンパーピンを接続します。これだけでシリアル通信が可能になります。ただし、ArduinoのSketchを書き込み時はこのシリアル通信が書き込みの邪魔になってエラーを起こすので結線を外して書き込みし、結線して受信側をシリアルモニタで確認するという手順を繰り返しながら実装して行くという流れになります。
送信側プログラム
どちらかのArduinoを送信側と決めて、下記のスケッチをアップロードします。
int LED = 13;
String sendstr = "arduino";

void setup(){
  Serial.begin(9600);
  pinMode(LED, OUTPUT);
  Serial.println("Start writeing.");
}

void loop(){
  digitalWrite(LED, LOW);
  for (int i = 0; i < sendstr.length(); i++){
    Serial.write(sendstr.charAt(i));
  }
  Serial.write(0);
  digitalWrite(LED, HIGH);
  delay(2000);
}
受信側プログラム
もう一方のArduinoを受信側として下記のスケッチをアップロードします。アップロードしたら、TX,RXをクロスして結線し、両方のUSBケーブルをパソコンに接続します。
char buff[255];
int counter = 0;
int LED = 13;

void setup(){
  Serial.begin(9600);
  pinMode(LED, OUTPUT);
  Serial.println("Start reading.");
}

void loop(){
  while(Serial.available()){
    char inChar = char(Serial.read());
    //Serial.print(inChar);
    buff[counter] = inChar;
    counter++;
    if (inChar == '\0'){
      Serial.println(buff);
      digitalWrite(LED, HIGH);
      counter = 0;
    }else{
      digitalWrite(LED, LOW);
    }
  }
}
受信側モニタ状況
Arduino IDEで受信側をシリアルモニタにしてモニタの通信速度はシリアル接続に設定した値と同じにします。すると以下の様に送信側から送られて来る文字列が表示されます。
Start reading.
arduino
arduino
arduino
arduino
arduino
arduino
arduino