CentOS6.7上にnginxでSSL設定する際にHTTP/2も設定してみましたが、Google ChromeではHTTP/2が有効にならずとても大変だったので今回の手順を記録します。
追記 2016/09/05 nginx stable(1.10以下)でHTTP/2を利用する場合、iOS SafariでPostする場合にエラーが発生する場合があります。後述参照。
追記 2016/09/30 mainlineバージョンをSRPMからビルドできました。(コメントありがとうございます。)
追記 2017/12/02 nginx側の記事でNPN/ALPN対応表(引用)更新しました。
追記 2017/12/02 各種ブラウザのNPN非対応を追記しました。
Google ChromeでHTTP/2が有効にならない理由
Google Chrome51(2016/4)で SPDY/3.1,NPNが削除され ALPNのみ対応 になりました。
Remove Support for SPDY/3.1
API Deprecations and Removals in Chrome 51 | Web Updates - Google Developers
Remove TLS Next Protocol Negotiation (NPN)
CentOS6.7にyumでnginxをインストールした場合、NPNのみ対応しておりALPNは対応していません。ChromeはALPNに対応していないサーバーに接続すると、HTTP/2接続をあきらめHTTP/1.1にフォールバックします。
(Firefox48.0.2はNPMに対応しているので、HTTP/2で接続されます。)
NPN・ALPNとは?
ブラウザとWEBサーバーの間で接続方式を決定する手順です。ALPNではクライアントがHTTP/2・SPDY・HTTP/1.1等の接続方式リストをサーバーに提示し、その中からサーバーが接続方式を選択します。
TLS上でのプロトコルネゴシエーションの仕組み、NPNとALPN - あすのかぜ
追記)各種ブラウザのNPN非対応状況(2017年)
NPNに対応していないブラウザです。
However, by mid‑2017 all of the most popular browser vendors except Safari (version 10) had dropped support for NPN, starting with the following versions (see the Protocol Details section on the page for each browser at Qualys SSL Labs): >
Chrome 51
Edge 12
Firefox 53
Internet Explorer 11
Opera 38
nginxでALPNに対応する方法
nginxは1.9.5でHTTP/2に対応しています。
The ngx_http_v2_module module (1.9.5) provides support for HTTP/2 and supersedes the ngx_http_spdy_module module.
Module ngx_http_v2_module
ただし、nginxはTLS接続にOpenSSLを利用しており、OpenSSLは 1.0.2以上でALPNに対応しています。
OpenSSL 1.0.2以上を利用すればよいのですが、現時点でのLinuxディストリビューションのほとんどはALPN未対応のOpenSSL1.0.1系です。
2016年時点
The table summarizes operating system support for ALPN and NPN.
Supporting HTTP/2 for Google Chrome Users | NGINX
Operating System OpenSSL Version ALPN and NPN Support CentOS/Oracle Linux/RHEL 5.10+ 0.9.8e Neither CentOS/Oracle Linux/RHEL 6.5+, 7.0+ 1.0.1e NPN Ubuntu 12.04 LTS 1.0.1 NPN Ubuntu 14.04 LTS 1.0.1f NPN Ubuntu 16.04 LTS 1.0.2g ALPN and NPN Debian 7.0 1.0.1e NPN Debian 8.0 1.0.1k NPN
2017年9月時点
The table summarizes Linux operating system support for ALPN and NPN as of September 2017.Supporting HTTP/2 for Google Chrome Users | NGINX https://www.nginx.com/blog/supporting-http2-google-chrome-users/
Operating System OpenSSL Version ALPN/NPN Support CentOS/Oracle Linux/RHEL 6.5+, 7.0–7.3 1.0.1e NPN CentOS/Oracle Linux/RHEL 7.4+ 1.0.2k ALPN and NPN Debian 7.0 1.0.1e NPN Debian 8.0 1.0.1k NPN Debian 9.0 1.1.0f ALPN and NPN Ubuntu 12.04 LTS 1.0.1 NPN Ubuntu 14.04 LTS 1.0.1f NPN Ubuntu 16.04 LTS 1.0.2g ALPN and NPN
試しに nginx -V で確認してみると、利用しているのはOpenSSL1.0.1系です。
# nginx -V
nginx version: nginx/1.10.1
built by gcc 4.4.7 20120313 (Red Hat 4.4.7-16) (GCC)
built with OpenSSL 1.0.1e-fips 11 Feb 2013
OSにインストールされたOpenSSLをバージョンアップすると、OpenSSLを利用している他のプログラムに影響が出そうで困難そうです。
そのためnginxをソースからビルドし、--with-opensslでOpenSSL 1.0.2を静的リンクします。
注 OpenSSLやnginxのアップデートがあった場合は再度コンパイルする必要があります。
The NGINX sources support OpenSSL 1.0.2 (and the forthcoming 1.1.0 release), so another option is to recompile NGINX from source and link against a private OpenSSL 1.0.2 build by including the --with-openssl argument.
Supporting HTTP/2 for Google Chrome Users | NGINX
nginxソースビルド
nginxのソース一式からビルドする手順です。
ビルドツール・依存関係ライブラリをインストールします。(root権限で行っています。)
# yum groupinstall  "Development Tools"
# yum install  pcre pcre-devel zlib zlib-devel
openssl-1.0.2をダウンロード・展開します。
# curl -L -O https://www.openssl.org/source/openssl-1.0.2h.tar.gz
# tar xvfz openssl-1.0.2h.tar.gz
nginx-1.10.1をダウンロード・展開します。
# curl -L -O https://nginx.org/download/nginx-1.10.1.tar.gz
# tar xvfz nginx-1.10.1.tar.gz
./configureします。
末尾の 「 --with-openssl=../openssl-1.0.2h/ 」 でOpenSSL一式のフォルダを指定します。
# cd nginx-1.10.1
# ./configure  \
  --prefix=/etc/nginx \
  --sbin-path=/usr/sbin/nginx \
  --conf-path=/etc/nginx/nginx.conf \
  --error-log-path=/var/log/nginx/error.log \
  --http-log-path=/var/log/nginx/access.log \
  --pid-path=/var/run/nginx.pid \
  --lock-path=/var/run/nginx.lock \
  --http-client-body-temp-path=/var/cache/nginx/client_temp \
  --http-proxy-temp-path=/var/cache/nginx/proxy_temp \
  --http-fastcgi-temp-path=/var/cache/nginx/fastcgi_temp \
  --http-uwsgi-temp-path=/var/cache/nginx/uwsgi_temp \
  --http-scgi-temp-path=/var/cache/nginx/scgi_temp \
  --user=nginx \
  --group=nginx \
  --with-http_ssl_module \
  --with-http_realip_module \
  --with-http_addition_module \
  --with-http_sub_module \
  --with-http_dav_module \
  --with-http_flv_module \
  --with-http_mp4_module \
  --with-http_gunzip_module \
  --with-http_gzip_static_module \
  --with-http_random_index_module \
  --with-http_secure_link_module \
  --with-http_stub_status_module \
  --with-http_auth_request_module \
  --with-threads \
  --with-stream \
  --with-stream_ssl_module \
  --with-http_slice_module \
  --with-mail \
  --with-mail_ssl_module \
  --with-file-aio \
  --with-http_v2_module \
  --with-ipv6 \
  --with-openssl=../openssl-1.0.2h/
make、インストールします。
# make
# make install
nginx -V で確認すると、 OpenSSL 1.0.2系になっています。
# nginx -V
nginx version: nginx/1.10.1
built by gcc 4.4.7 20120313 (Red Hat 4.4.7-17) (GCC)
built with OpenSSL 1.0.2h  3 May 2016
TLS SNI support enabled
参考)
- Configureオプションはnginx.orgに記載されている内容を参考にしています。
- 起動スクリプトは以下にあります。(動作未確認)
Red Hat NGINX Init Script | NGINX
- logrotate等は別途設定が必要です。
nginxのSRPMビルド
運用サーバーにセットアップするにはやはりrpmパッケージの方が便利です。nginxではSourceRPMも配布されているので、rpmパッケージを再作成可能です。
(最終的には virtualPC上のCentOSでrpmパッケージを作成し、サーバーにはrpmパッケージを適用しました。)
以下、nginxのrpmパッケージの作成手順です。
ビルドツール・依存関係ライブラリをインストールします。
※ GeoIP-develは epel から配布されるのでepel リポジトリを追加します。
# rpm -ivh http://ftp.riken.jp/Linux/fedora/epel/6/i386/epel-release-6-8.noarch.rpm
# yum install rpm-build
# yum groupinstall "Development Tools"
# yum install zlib-devel pcre-devel perl-devel perl-ExtUtils-Embed GeoIP-devel libxslt-devel gd-devel
rpmビルドはroot権限で行うと危険らしいので、builderというユーザーを作成します。
useradd builder
builderユーザーに切り替えます。
su builder -
.rpmmacros (rpmbuildの設定ファイル)を作成します。
cd
echo '%_topdir %(echo $HOME)/rpmbuild' > ~/.rpmmacros
nginxのSRPMを取得し展開します。
curl -L -O http://nginx.org/packages/centos/6/SRPMS/nginx-1.10.1-1.el6.ngx.src.rpm
rpm -ivh nginx-1.10.1-1.el6.ngx.src.rpm
※ nginx1.11系(mainline)を使う場合、http://nginx.org/packages/mainline/centos/6/SRPMS/ からSRPMSがダウンロードできます。
curl -L -O http://nginx.org/packages/mainline/centos/6/SRPMS/nginx-1.11.4-1.el6.ngx.src.rpm
rpm -ivh nginx-1.11.4-1.el6.ngx.src.rpm
※ nginxのソースを適用してバージョンを変える場合は、該当のソース一式をダウンロードしておきます。
例ではnginx-1.11.3のソースコード一式を使う場合
cd rpmbuild/SOURCES
curl -L -O https://nginx.org/download/nginx-1.11.3.tar.gz
nginx.specを編集します。(★の箇所を編集します。)
%if 0%{?rhel}  == 6
%define _group System Environment/Daemons
%define with_http2 1
Requires(pre): shadow-utils
Requires: initscripts >= 8.36
Requires(post): chkconfig

★ opensslをコメントに
# Requires: openssl >= 1.0.1
# BuildRequires: openssl-devel >= 1.0.1

BuildRequires: perl-devel
BuildRequires: perl-ExtUtils-Embed
BuildRequires: GeoIP-devel
%endif

~ 中略 ~

%define COMMON_CONFIGURE_ARGS $(echo "\
        --prefix=%{_sysconfdir}/nginx \
        --sbin-path=%{_sbindir}/nginx \
        --modules-path=%{_libdir}/nginx/modules \
        --conf-path=%{_sysconfdir}/nginx/nginx.conf \
        --error-log-path=%{_localstatedir}/log/nginx/error.log \
        --http-log-path=%{_localstatedir}/log/nginx/access.log \
        --pid-path=%{_localstatedir}/run/nginx.pid \
        --lock-path=%{_localstatedir}/run/nginx.lock \
        --http-client-body-temp-path=%{_localstatedir}/cache/nginx/client_temp \
        --http-proxy-temp-path=%{_localstatedir}/cache/nginx/proxy_temp \
        --http-fastcgi-temp-path=%{_localstatedir}/cache/nginx/fastcgi_temp \
        --http-uwsgi-temp-path=%{_localstatedir}/cache/nginx/uwsgi_temp \
        --http-scgi-temp-path=%{_localstatedir}/cache/nginx/scgi_temp \
        --user=%{nginx_user} \
        --group=%{nginx_group} \
        --with-http_ssl_module \
        --with-http_realip_module \
        --with-http_addition_module \
        --with-http_sub_module \
        --with-http_dav_module \
        --with-http_flv_module \
        --with-http_mp4_module \
        --with-http_gunzip_module \
        --with-http_gzip_static_module \
        --with-http_random_index_module \
        --with-http_secure_link_module \
        --with-http_stub_status_module \
        --with-http_auth_request_module \
        --with-http_xslt_module=dynamic \
        --with-http_image_filter_module=dynamic \
        --with-http_geoip_module=dynamic \
        --with-http_perl_module=dynamic \
        --add-dynamic-module=njs-%{module_njs_shaid}/nginx \
        --with-threads \
        --with-stream \
        --with-stream_ssl_module \
        --with-http_slice_module \
        --with-mail \
        --with-mail_ssl_module \
        --with-file-aio \
        --with-ipv6 \
        --with-openssl=/home/builder/openssl-1.0.2h/ \  ★追加
        %{?with_http2:--with-http_v2_module}")


~ 中略 ~

# end of distribution specific definitions

★ main_version を変更します。(nginxのソースコードを変更してバージョンを変える場合のみ)
# %define main_version                 1.10.1
%define main_version                 1.11.3
%define main_release                 1%{?dist}.ngx
%define module_xslt_version          %{main_version}
%define module_xslt_release          1%{?dist}.ngx
%define module_geoip_version         %{main_version}
%define module_geoip_release         1%{?dist}.ngx
rpmbuild -bb rpmbuild/SPECS/nginx.spec -D 'debug_package %{nil}'
成功すると rpmファイルが作成されます。
rpmbuild/RPMS/x86_64/nginx-1.10.1-1.el6.ngx.x86_64.rpm
作成したrpmファイルをインストール先のサーバーでインストールします
rpm -ihv nginx-1.10.1-1.el6.ngx.x86_64.rpm
nginxの default.confを編集します。(SSL証明書の設定と、HTTP/2の設定)
server {
    server_name  XXXX.com;
    listen       80;
    listen      443  ssl http2;
    ssl_certificate      /etc/pki/tls/certs/XXXX.crt;
    ssl_certificate_key  /etc/pki/tls/private/XXXX.private.key;

     ・
     ・
     ・
nginxを起動します。
/etc/init.d/nginx start
HTTP/2の接続確認
SSLで接続して、HTTP/2が有効になっているか確認します。developper toolでprotocol列を表示すると**’h2’**となっています。
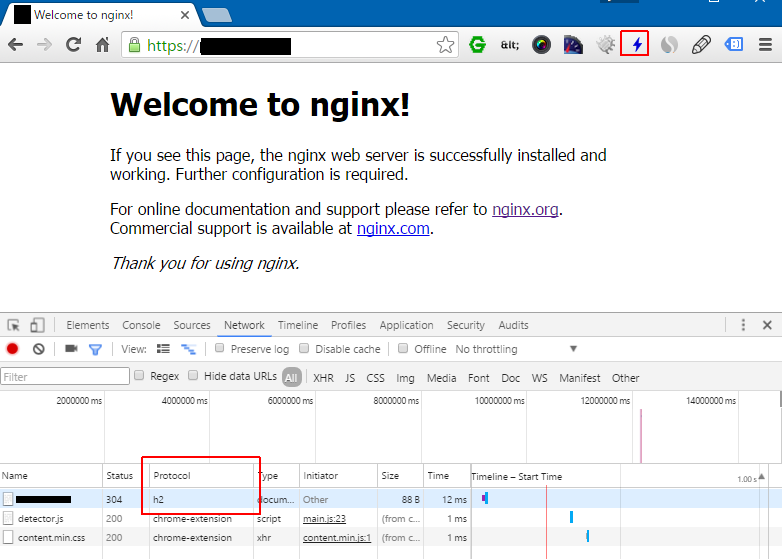
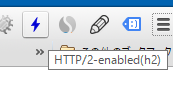
またChrome拡張 HTTP/2 and SPDY indicator でも確認できます。
追記) Mac OS Xでの注意事項(Windowsでも同様のことがある可能性あり。)
使っているウイルス対策ソフトによってはHTTP/2が使えない場合がありました。
Mac OS XでHTTP/2が有効にならない
追記) iOS SafariでPOSTする際にエラーが発生する。
iOSのSafariでAjaxPostする際にnginx + HTTP/2だとブラウザで次のようなエラーが発生することがありました。
(nginx側のログには記録されません。)
Failed to load resource: request body stream exhausted
Failed to load resource: Could not connect to the server.
次のnginxのissueが関係しているようです。
- #959 (Permit post before acking settings) – nginx
- HTTP/2: implemented preread buffer for request body
MS IE/Edge, Safari, iOS applicationsが影響を受けるようです。
- Some clients (notably MS IE/Edge, Safari, iOS applications) show an error
or even crash if a stream is rejected;
対策として考えられる方法です。
- nginxのソースにパッチを当てる(未確認です)
- nginx1.11系(mainline)を使う (やってみました。)
nginx1.11系(mainline)を使う
現在のところ(2016.09.06) nginx-1.11.0にこの修正が入っているようです。
HTTP/2: implemented preread buffer for request body (closes #959). …
HTTP/2にはその後も修正が入っています。(segfaultも入っている)
nginx-1.11.3を試してみたところ、iOS SaferiからHTTP/2でPOST時にエラーは出なかったです。
nginx-1.11.3でrpmを作る方法は「nginxのSRPMビルド」に追記しています。
参考サイト・感想
単にnginxの設定でhttp2と記述するだけのつもりだったのでとても苦労しました。Apache2.4系でも同様のことがあるのかもしれません。
参考にさせていただいたサイト、素晴らしい情報をありがとうございます。
注釈
-
-bbオプションは Build a binary package (after doing the %prep, %build, and %install stages).rpmbuild ↩
-
-D 'debug_package %{nil}'は debugパッケージを作らない。未指定だと途中でdebugeditがエラーになった。extracting debug info from /home/builder/rpmbuild/BUILDROOT/nginx-1.10.1-1.el6.ngx.x86_64/usr/lib64/perl5/vendor_perl/auto/nginx/nginx.so /usr/lib/rpm/debugedit: canonicalization unexpectedly shrank by one character error: Bad exit status from /var/tmp/rpm-tmp.Ibuv0o (%install) ↩