
*こちらの記事は2026年3月の執筆したものです。現在はコマンドやGUIなどが変わっている可能性があります。
はじめに
個人開発の際、Next.jsとSupabaseを利用する人は多いと思います。今回はこれらのスタックを使う際によく利用されるSupabase Authを用いたGoogle認証機能の実装手順について備忘録も兼ねて書いていこうと思います。
手順
以下のような手順で進めていきます。
- Next.jsの環境構築
- Supabaseのプロジェクト作成
- Google認証実装
- SupabaseとGCPの設定
- (おまけ)サインアップ時にusersテーブルにレコードを自動挿入する
1. Next.jsの環境構築
まずは公式ドキュメントを参考にNext.jsをインストールします。サーバーが無事立ち上がったら完了です。
% npx create-next-app@latest my-app --yes
% cd my-app
% npm run dev
2. Supabaseのプロジェクト作成
「New project」からSupabaseのプロジェクトを作成します。Supabaseのアカウントがない方はSignupしてください。

プロジェクト名やDBのパスワードなどを設定してプロジェクトを立ち上げます。

3. Google認証
早速実装に入っていきましょう。まずはSupabaseの公式ドキュメントでNext.jsとの連携をする箇所を見ていきます。以下ドキュメントではNext.jsの環境構築の段階でSupabaseを導入していますが、今回はNext.jsを別でインストールしたので環境変数の設定の箇所から行います。
Next.jsプロジェクトのルートディレクトリに.env.localファイルを作成します。NEXT_PUBLIC_SUPABASE_URLとNEXT_PUBLIC_SUPABASE_PUBLISHABLE_KEYは上記ドキュメントからプロジェクトを指定するとコピペできる場所があります。Publishable keyとAnon keyの2つありますが、今回は新しい方のPublishable keyの方を使います。
NEXT_PUBLIC_SUPABASE_URL=your-project-url
NEXT_PUBLIC_SUPABASE_PUBLISHABLE_KEY=sb_publishable_... or anon key
次にアプリケーションからSupabaseを呼び出すための処理を書いていきます。必要なパッケージをインストールしたら、プロジェクトのルートディレクトリ(またはsrc配下など)にlib/supabaseディレクトリを作成し、その下にclient.tsとserver.tsを作成してください。
% npm install @supabase/supabase-js @supabase/ssr
import { createBrowserClient } from '@supabase/ssr'

export function createClient() {
  return createBrowserClient(
    process.env.NEXT_PUBLIC_SUPABASE_URL!,
    process.env.NEXT_PUBLIC_SUPABASE_PUBLISHABLE_KEY!
  )
}
import { createServerClient } from '@supabase/ssr'
import { cookies } from 'next/headers'

export async function createClient() {
  const cookieStore = await cookies()

  return createServerClient(
    process.env.NEXT_PUBLIC_SUPABASE_URL!,
    process.env.NEXT_PUBLIC_SUPABASE_PUBLISHABLE_KEY!,
    {
      cookies: {
        getAll() {
          return cookieStore.getAll()
        },
        setAll(cookiesToSet) {
          try {
            cookiesToSet.forEach(({ name, value, options }) => cookieStore.set(name, value, options))
          } catch {
            // The `setAll` method was called from a Server Component.
            // This can be ignored if you have middleware refreshing
            // user sessions.
          }
        },
      },
    }
  )
}
次にSupabase認証セッションを自動的に更新できるプロキシを作成していきます。ルートディレクトリとlib/supabase配下にそれぞれproxy.tsを作成してください。
import { type NextRequest } from "next/server"
import { updateSession } from "@/lib/supabase/proxy"

export async function proxy(request: NextRequest) {
  return await updateSession(request)
}

export const config = {
  matcher: [
    /*
     * Match all request paths except for the ones starting with:
     * - _next/static (static files)
     * - _next/image (image optimization files)
     * - favicon.ico (favicon file)
     * Feel free to modify this pattern to include more paths.
     */
    "/((?!_next/static|_next/image|favicon.ico|.*\\.(?:svg|png|jpg|jpeg|gif|webp)$).*)",
  ],
}
import { createServerClient } from '@supabase/ssr'
import { NextResponse, type NextRequest } from 'next/server'

export async function updateSession(request: NextRequest) {
  let supabaseResponse = NextResponse.next({
    request,
  })

  // With Fluid compute, don't put this client in a global environment
  // variable. Always create a new one on each request.
  const supabase = createServerClient(
    process.env.NEXT_PUBLIC_SUPABASE_URL!,
    process.env.NEXT_PUBLIC_SUPABASE_PUBLISHABLE_KEY!,
    {
      cookies: {
        getAll() {
          return request.cookies.getAll()
        },
        setAll(cookiesToSet) {
          cookiesToSet.forEach(({ name, value }) => request.cookies.set(name, value))
          supabaseResponse = NextResponse.next({
            request,
          })
          cookiesToSet.forEach(({ name, value, options }) => supabaseResponse.cookies.set(name, value, options))
        },
      },
    }
  )

  // Do not run code between createServerClient and
  // supabase.auth.getClaims(). A simple mistake could make it very hard to debug
  // issues with users being randomly logged out.

  // IMPORTANT: If you remove getClaims() and you use server-side rendering
  // with the Supabase client, your users may be randomly logged out.
  const { data } = await supabase.auth.getClaims()

  const user = data?.claims

  if (
    !user &&
    !request.nextUrl.pathname.startsWith('/login') &&
    !request.nextUrl.pathname.startsWith('/auth')
  ) {
    // no user, potentially respond by redirecting the user to the login page
    const url = request.nextUrl.clone()
    url.pathname = '/login'
    return NextResponse.redirect(url)
  }

  // IMPORTANT: You *must* return the supabaseResponse object as it is. If you're
  // creating a new response object with NextResponse.next() make sure to:
  // 1. Pass the request in it, like so:
  //    const myNewResponse = NextResponse.next({ request })
  // 2. Copy over the cookies, like so:
  //    myNewResponse.cookies.setAll(supabaseResponse.cookies.getAll())
  // 3. Change the myNewResponse object to fit your needs, but avoid changing
  //    the cookies!
  // 4. Finally:
  //    return myNewResponse
  // If this is not done, you may be causing the browser and server to go out
  // of sync and terminate the user's session prematurely!

  return supabaseResponse
}
次にログインページやGoogle認証を行うコードなどを作成していきます。appディレクトリ配下にloginディレクトリを作成し、その配下にpage.tsxとactions.tsを作成してください。本来page.tsxに直接コードを置くのは微妙そうですが今回はそのまま書きます。
import { signInWithGoogle } from "./actions";

export default function LoginPage() {
  return (
    <form>
      <button formAction={signInWithGoogle}>ログイン</button>
    </form>
  );
}
"use server";

import { createClient } from "@/lib/supabase/server";
import { redirect } from "next/navigation";

export async function signInWithGoogle() {
    const supabase = await createClient();
    const { data, error } = await supabase.auth.signInWithOAuth({
        provider: 'google',
        options: {
          redirectTo: 'http://localhost:3000/auth/callback',
        },
      })

      if (data.url) {
        redirect(data.url) // use the redirect API for your server framework
      }
}

export async function signOut() {
    const supabase = await createClient();
    const { error } = await supabase.auth.signOut()
    redirect('/login')
}
PKCEフローを行うコールバック処理を作成します。app/auth/callback/route.tsファイルを作成してください。(PKCEフローについては記事の終わりに参考記事を載せておきます)
import { createClient } from '@/lib/supabase/server'
import { NextResponse } from 'next/server'
// The client you created from the Server-Side Auth instructions


export async function GET(request: Request) {
  const { searchParams, origin } = new URL(request.url)
  const code = searchParams.get('code')
  // if "next" is in param, use it as the redirect URL
  let next = searchParams.get('next') ?? '/'
  if (!next.startsWith('/')) {
    // if "next" is not a relative URL, use the default
    next = '/'
  }

  if (code) {
    const supabase = await createClient()
    const { error } = await supabase.auth.exchangeCodeForSession(code)
    if (!error) {
      const forwardedHost = request.headers.get('x-forwarded-host') // original origin before load balancer
      const isLocalEnv = process.env.NODE_ENV === 'development'
      if (isLocalEnv) {
        // we can be sure that there is no load balancer in between, so no need to watch for X-Forwarded-Host
        return NextResponse.redirect(`${origin}${next}`)
      } else if (forwardedHost) {
        return NextResponse.redirect(`https://${forwardedHost}${next}`)
      } else {
        return NextResponse.redirect(`${origin}${next}`)
      }
    }
  }

  // return the user to an error page with instructions
  return NextResponse.redirect(`${origin}/auth/auth-code-error`)
}
今回は取り急ぎログアウトのページをルートのpage.tsxに作成します。自分のアプリケーションに合わせて好きな場所に置くようにしてください。
import { signOut } from "./login/actions";

export default function Home() {
  return (
    <form>
      <button formAction={signOut}>ログアウト</button>
    </form>
  );
}
4. SupabaseとGCPの設定
GCPにアクセスしてコンソールに入り、プロジェクトを作成します。
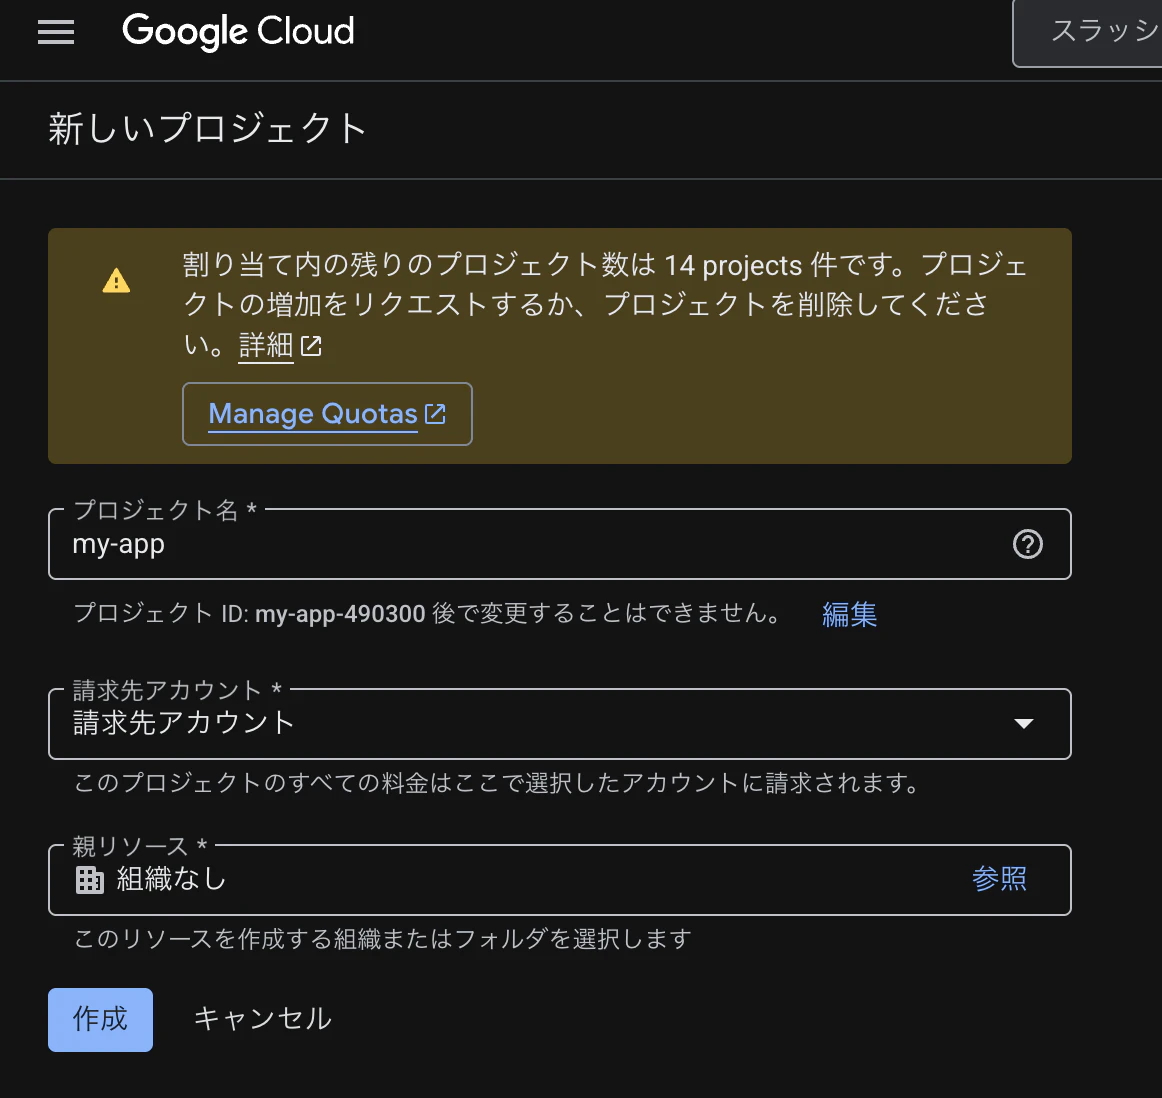
プロジェクトができたらAPIとサービス < OAuth同意画面にいき初期設定を行います。対象の箇所は外部を指定してください。

次にAPIとサービス < 認証情報 < 認証情報を作成からOAuthクライアントIDの作成を行います。

以下のような画面が出ると思います。

承認済のJavaScript生成元にはhttp://localhost:3000にを指定してください。
ここで一度Supabaseのプロジェクトに戻ります。はじめに作成したSupabaseプロジェクトからAuthentication < Sign In / Providersに入り、下の方にスクロールしていくとGoogleを選択できる箇所があるのでそこをクリックするとCallback URL (for OAuth)がコピーできます。
コピーしたURLを先ほどの承認済みのリダイレクトURIという箇所で設定し、OAuthクライアントIDの作成を完了します。

作成が完了するとクライアントIDとクライアントシークレットがポップアップで表示されるので、それらの値をコピーし、先ほどCallback URL(for OAuth)を取得した箇所で設定します。Enableのチェックも有効にしてください。

これでGoogle認証ができるようになったはずです。

最後にGCPプロジェクトのAPIとサービス < OAuth同意画面 < データアクセスの箇所で非機密のスコープを指定します。公式ドキュメントと同じく3つの範囲にチェックを入れて更新してください。更新が終わったらデータアクセスの画面のした方に設定の保存ボタンがあるのでそちらも忘れずに押してください。

5. (おまけ)サインアップ時にusersテーブルにレコードを自動挿入する
実際のアプリケーションではSignUpしたユーザーの情報をデータベースで管理したくなると思います。おまけとしてSignUp時にusersテーブルにレコードを自動挿入できるようにします。
まずはusersテーブルを作成します。サイドバーからTable Editorを開き、New tableをクリックしてください。この際IDカラム右横のボタンから認証テーブルと紐付ける必要があります。


次はSignUp時にusersテーブルにレコードを挿入する関数を作成します。サイドバーのDatabase < Functionsに入り、Create a new functionをクリックしてください。以下の内容で関数を登録します。
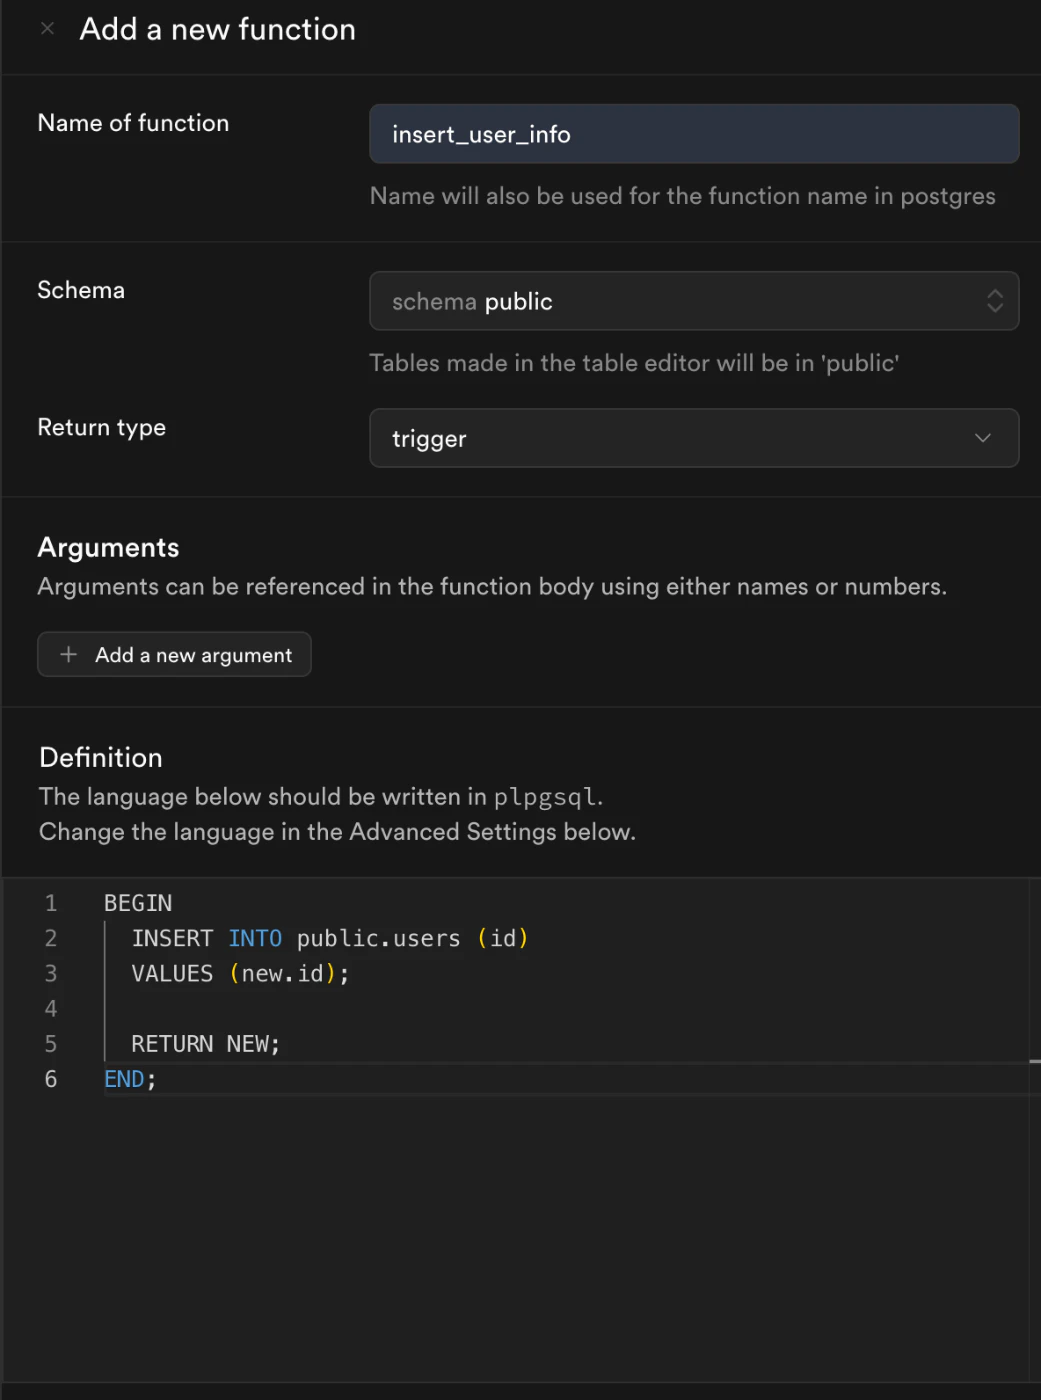

最後に認証テーブルにレコードが挿入されたことを検知して先ほど作成したinsert_user_info関数を実行させるトリガーを作成します。サイドバーからSQL Editorを開いて以下のSQLを実行してください(GUI上でトリガーを作成する場所もありますが、なぜか動かなかったので今回はSQLで直接やります)。
create trigger insert_user_info_trigger
after insert on auth.users for each row
execute function insert_user_info ();
トリガーが登録できているか確認します。
select
  trigger_name,
  event_object_table,
  action_timing,
  event_manipulation
from information_schema.triggers;
ここまでやれば実際にログイン・ログアウト、そして初ログイン(SignUp)時にusersテーブルにユーザー情報のレコードが挿入されるはずです。この記事ではコードの具体の解説やオプションなどについては解説できていないので、その辺りは公式ドキュメントなどを読む必要があると思います。記事の終わりに参考となりそうなドキュメントを色々置いておきます。
おわりに
お手軽に実装できるので個人開発やハッカソンなどで使えそうだと思いました。今回はGoogle認証のみ行いましたが、Email/Password、他のプロバイダーでの認証も基本的なやり方は同じなので是非ドキュメントを読みながら試してみてください。認証機能自体は他にもClerkなどのライブラリがあると思うので今後違うものも触ってみたいと思います。
参考資料
Supabase Auth概要
Google認証
PKCEフロー
トリガー