1. はじめに
前回の記事では、Ubuntu 22.04環境にOpenFOAM-11をインストールし、動作確認として2次元キャビティ流れのチュートリアルを実行しました。ただ、その際はケース構造をあまり理解せずに進めてしまったため、今回は改めてその中身を整理してみることにしました。
この記事では、海辺のケミカルエンジニアさんの「OpenFOAM : Cavity flow チュートリアルをしっかりやってみます。その1」[1]を参考にしつつ、
- 2次元キャビティ流れケースのディレクトリ構成や設定内容の確認
- メッシュを 20×20 から 30×30 に変更するカスタマイズ
といった点を中心にまとめています。
また公式のチュートリアル[2]も一部参考にしています。
2. 実行環境
- CPU: CORE i7 7th Gen
- メモリ: 32GB
- GPU: GeForce RTX 2070
- OS: Ubuntu22.04(WSL2ではなくPCに直接インストール)
3. 構造理解のための確認項目と手順
海辺のケミカルエンジニアさんの記事[1]を参考に、OpenFOAM の cavity チュートリアルの構造と設定の要点を以下のように把握してきました。
全体構成
まずは以下のコマンドでファイルの構造を出しました。
cd $FOAM_RUN/cavity
tree -L 2
出力は以下のようになりました、一部省略しています
├── 0
│   ├── epsilon
│   ├── k
│   ├── nut
│   ├── nuTilda
│   ├── omega
│   ├── p
│   └── U
・・・
├── 9.5
│   ├── epsilon
│   ├── k
│   ├── nut
│   ├── p
│   ├── phi
│   ├── U
│   └── uniform
├── constant
│   ├── momentumTransport
│   ├── physicalProperties
│   └── polyMesh
├── log.foamRun
└── system
    ├── blockMeshDict
    ├── controlDict
    ├── fvSchemes
    └── fvSolution
フォルダはおおよそ以下の構成でした
- 0/:初期条件
- 数字のフォルダ:各タイムステップごとの出力結果
- constant/:物性値・乱流モデル・メッシュ設定など
- system/:計算の制御条件やスキーム設定
blockMeshDict を読む
$FOAM_RUN/cavityの直下において以下のコマンドを実行しました。
cat system/blockMeshDict
そして出力の結果が以下です
/*--------------------------------*- C++ -*----------------------------------*\
  =========                 |
  \\      /  F ield         | OpenFOAM: The Open Source CFD Toolbox
   \\    /   O peration     | Website:  https://openfoam.org
    \\  /    A nd           | Version:  11
     \\/     M anipulation  |
\*---------------------------------------------------------------------------*/
FoamFile
{
    format      ascii;
    class       dictionary;
    object      blockMeshDict;
}
// * * * * * * * * * * * * * * * * * * * * * * * * * * * * * * * * * * * * * //

convertToMeters 0.1;

vertices
(
    (0 0 0)
    (1 0 0)
    (1 1 0)
    (0 1 0)
    (0 0 0.1)
    (1 0 0.1)
    (1 1 0.1)
    (0 1 0.1)
);

blocks
(
    hex (0 1 2 3 4 5 6 7) (20 20 1) simpleGrading (1 1 1)
);

boundary
(
    movingWall
    {
        type wall;
        faces
        (
            (3 7 6 2)
        );
    }
    fixedWalls
    {
        type wall;
        faces
        (
            (0 4 7 3)
            (2 6 5 1)
            (1 5 4 0)
        );
    }
    frontAndBack
    {
        type empty;
        faces
        (
            (0 3 2 1)
            (4 5 6 7)
        );
    }
);


// ************************************************************************* //
これらの結果から以下のことが読み取れると考えられます。
- vertices: 節点座標(単位スケール)
- blocks: (20 20 1) → z方向1セルで2D化
- boundary: movingWall / fixedWalls / frontAndBackを定義
- frontAndBack が type emptyとすることで2D化している
境界条件を読む(圧力・速度)
$FOAM_RUN/cavityの直下において以下のコマンドを実行しました。
cat 0/p
cat 0/U
以下がそれぞれの出力結果です
/*--------------------------------*- C++ -*----------------------------------*\
  =========                 |
  \\      /  F ield         | OpenFOAM: The Open Source CFD Toolbox
   \\    /   O peration     | Website:  https://openfoam.org
    \\  /    A nd           | Version:  11
     \\/     M anipulation  |
\*---------------------------------------------------------------------------*/
FoamFile
{
    format      ascii;
    class       volScalarField;
    object      p;
}
// * * * * * * * * * * * * * * * * * * * * * * * * * * * * * * * * * * * * * //

dimensions      [0 2 -2 0 0 0 0];

internalField   uniform 0;

boundaryField
{
    movingWall
    {
        type            zeroGradient;
    }

    fixedWalls
    {
        type            zeroGradient;
    }

    frontAndBack
    {
        type            empty;
    }
}

// ************************************************************************* //
/*--------------------------------*- C++ -*----------------------------------*\
  =========                 |
  \\      /  F ield         | OpenFOAM: The Open Source CFD Toolbox
   \\    /   O peration     | Website:  https://openfoam.org
    \\  /    A nd           | Version:  11
     \\/     M anipulation  |
\*---------------------------------------------------------------------------*/
FoamFile
{
    format      ascii;
    class       volVectorField;
    object      U;
}
// * * * * * * * * * * * * * * * * * * * * * * * * * * * * * * * * * * * * * //

dimensions      [0 1 -1 0 0 0 0];

internalField   uniform (0 0 0);

boundaryField
{
    movingWall
    {
        type            fixedValue;
        value           uniform (1 0 0);
    }

    fixedWalls
    {
        type            noSlip;
    }

    frontAndBack
    {
        type            empty;
    }
}

// ************************************************************************* //
これらの結果から以下のことが読み取れると考えられます。
- 0/U の movingWall が fixedValue uniform (1 0 0) → 上壁が+Xへ1 m/sで駆動していることを表していると考えられます。
- 側壁と底は noSlip(速度0)
物性
$FOAM_RUN/cavityの直下において以下のコマンドを実行しました。
cat constant/momentumTransport
cat constant/physicalProperties
以下がそれぞれの出力結果です
/*--------------------------------*- C++ -*----------------------------------*\
  =========                 |
  \\      /  F ield         | OpenFOAM: The Open Source CFD Toolbox
   \\    /   O peration     | Website:  https://openfoam.org
    \\  /    A nd           | Version:  11
     \\/     M anipulation  |
\*---------------------------------------------------------------------------*/
FoamFile
{
    format      ascii;
    class       dictionary;
    location    "constant";
    object      momentumTransport;
}
// * * * * * * * * * * * * * * * * * * * * * * * * * * * * * * * * * * * * * //

simulationType  RAS;

RAS
{
    model           kEpsilon;

    turbulence      on;

    printCoeffs     on;
}

// ************************************************************************* //
/*--------------------------------*- C++ -*----------------------------------*\
  =========                 |
  \\      /  F ield         | OpenFOAM: The Open Source CFD Toolbox
   \\    /   O peration     | Website:  https://openfoam.org
    \\  /    A nd           | Version:  11
     \\/     M anipulation  |
\*---------------------------------------------------------------------------*/
FoamFile
{
    format      ascii;
    class       dictionary;
    location    "constant";
    object      physicalProperties;
}
// * * * * * * * * * * * * * * * * * * * * * * * * * * * * * * * * * * * * * //

viscosityModel  constant;

nu              [0 2 -1 0 0 0 0] 1e-05;

// ************************************************************************* //
これらの結果から以下のことが読み取れると考えられます。
- physicalProperties に nu(動粘度)を定義
- 乱流モデルはRAS設定がデフォルト
制御条件
$FOAM_RUN/cavityの直下において以下のコマンドを実行しました。
cat system/controlDict
以下が出力結果です
/*--------------------------------*- C++ -*----------------------------------*\
  =========                 |
  \\      /  F ield         | OpenFOAM: The Open Source CFD Toolbox
   \\    /   O peration     | Website:  https://openfoam.org
    \\  /    A nd           | Version:  11
     \\/     M anipulation  |
\*---------------------------------------------------------------------------*/
FoamFile
{
    format      ascii;
    class       dictionary;
    location    "system";
    object      controlDict;
}
// * * * * * * * * * * * * * * * * * * * * * * * * * * * * * * * * * * * * * //

application     foamRun;

solver          incompressibleFluid;

startFrom       startTime;

startTime       0;

stopAt          endTime;

endTime         10;

deltaT          0.005;

writeControl    timeStep;

writeInterval   100;

purgeWrite      0;

writeFormat     ascii;

writePrecision  6;

writeCompression off;

timeFormat      general;

timePrecision   6;

runTimeModifiable true;


// ************************************************************************* //
これらの結果から以下のことが読み取れると考えられます。
- このバージョンではapplication foamRun; + solver incompressibleFluidで構成されている
- 出力周期を決めるdeltaT, writeControl, writeInterval はここで定義
スキームと解法
$FOAM_RUN/cavityの直下において以下のコマンドを実行しました。
cat system/fvSchemes
cat system/fvSolution
以下がそれぞれの出力結果です
/*--------------------------------*- C++ -*----------------------------------*\
  =========                 |
  \\      /  F ield         | OpenFOAM: The Open Source CFD Toolbox
   \\    /   O peration     | Website:  https://openfoam.org
    \\  /    A nd           | Version:  11
     \\/     M anipulation  |
\*---------------------------------------------------------------------------*/
FoamFile
{
    format      ascii;
    class       dictionary;
    location    "system";
    object      fvSchemes;
}
// * * * * * * * * * * * * * * * * * * * * * * * * * * * * * * * * * * * * * //

ddtSchemes
{
    default         Euler;
}

gradSchemes
{
    default         Gauss linear;
}

divSchemes
{
    default         none;
    div(phi,U)      Gauss limitedLinearV 1;
    div(phi,k)      Gauss limitedLinear 1;
    div(phi,epsilon) Gauss limitedLinear 1;
    div(phi,omega)  Gauss limitedLinear 1;
    div(phi,R)      Gauss limitedLinear 1;
    div(R)          Gauss linear;
    div(phi,nuTilda) Gauss limitedLinear 1;
    div((nuEff*dev2(T(grad(U))))) Gauss linear;
}

laplacianSchemes
{
    default         Gauss linear corrected;
}

interpolationSchemes
{
    default         linear;
}

snGradSchemes
{
    default         corrected;
}


// ************************************************************************* //
/*--------------------------------*- C++ -*----------------------------------*\
  =========                 |
  \\      /  F ield         | OpenFOAM: The Open Source CFD Toolbox
   \\    /   O peration     | Website:  https://openfoam.org
    \\  /    A nd           | Version:  11
     \\/     M anipulation  |
\*---------------------------------------------------------------------------*/
FoamFile
{
    format      ascii;
    class       dictionary;
    location    "system";
    object      fvSolution;
}
// * * * * * * * * * * * * * * * * * * * * * * * * * * * * * * * * * * * * * //

solvers
{
    p
    {
        solver          GAMG;
        tolerance       1e-06;
        relTol          0.1;
        smoother        GaussSeidel;
    }

    pFinal
    {
        $p;
        tolerance       1e-06;
        relTol          0;
    }

    "(U|k|epsilon|omega|R|nuTilda).*"
    {
        solver          smoothSolver;
        smoother        GaussSeidel;
        tolerance       1e-05;
        relTol          0;
    }
}

PIMPLE
{
    nCorrectors     2;
    nNonOrthogonalCorrectors 0;
    pRefCell        0;
    pRefValue       0;
}


// ************************************************************************* //
これらの結果から以下のことが読み取れると考えられます。
- div(phi,U) Gauss limitedLinearV 1; など対流項の離散化はここで定義
- GAMG(圧力)と smoothSolver(速度・乱流量)等の設定もここで定義
4. メッシュ変更実験(20×20→30×30)
STEP1: system/blockMeshDict を編集
cd $FOAM_RUN/cavity/system
vim blockMeshDict
変更前 (0 1 2 3 4 5 6 7) (20 20 1) simpleGrading (1 1 1)
変更後 (0 1 2 3 4 5 6 7) (30 30 1) simpleGrading (1 1 1)
STEP2: 既存メッシュ削除→再生成(v11は-overwrite なし)
cd $FOAM_RUN/cavity
rm -rf constant/polyMesh
blockMesh
STEP3:メッシュ確認
checkMesh # cells: 900 と出れば (30×30×1)
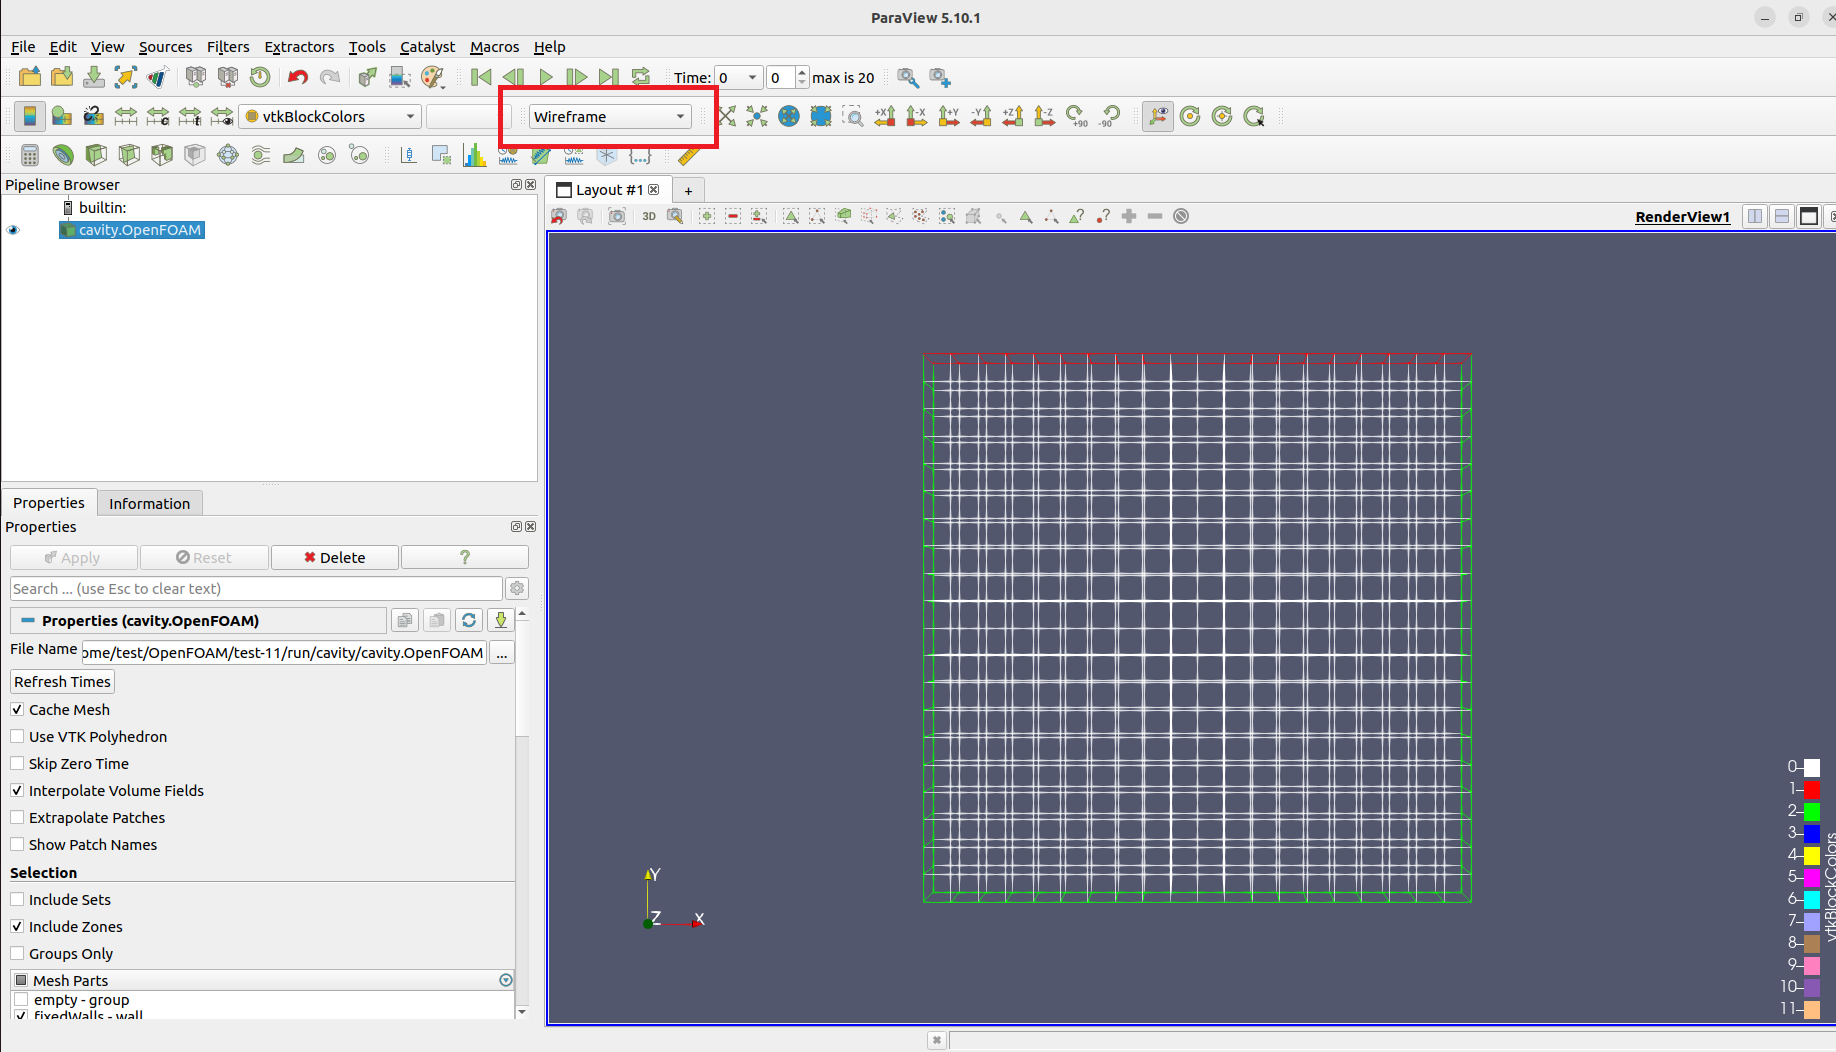
ちなみに ParaView で見ようとするときは以下の図で赤枠で囲んだところをSurfaceをWireframeに変更することで確認できます。
👇:20×20のメッシュの時
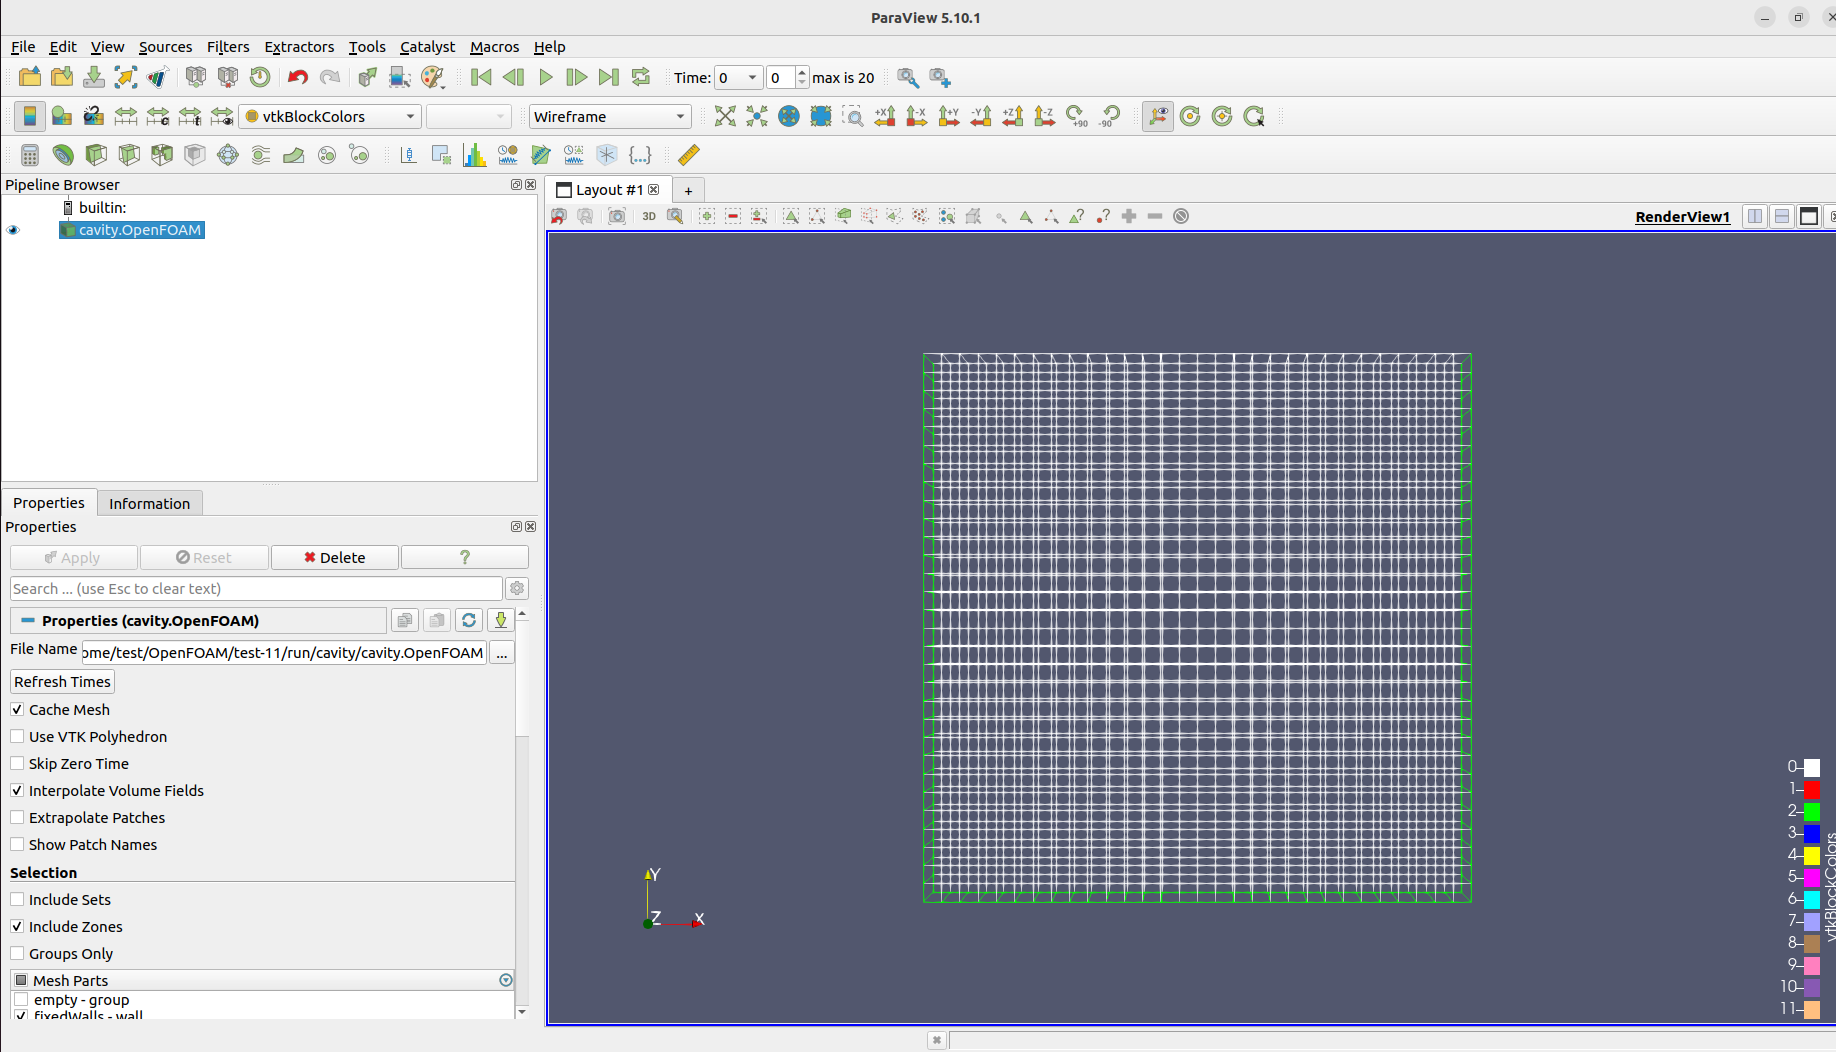
👇:30×30のメッシュの時
STEP4:再計算
foamCleanCase
blockMesh
checkMesh
source ~/OpenFOAM/OpenFOAM-11/etc/bashrc
foamRun
以下の実行でもOK
cd $FOAM_RUN/cavity
source ~/OpenFOAM/OpenFOAM-11/etc/bashrc
foamRun
5. ParaViewで可視化(流速ベクトルの調整+見やすさの工夫)
ファイルを開く
まずは以下のコマンドでParaViewを開きました。
cd $FOAM_RUN/cavity
paraFoam
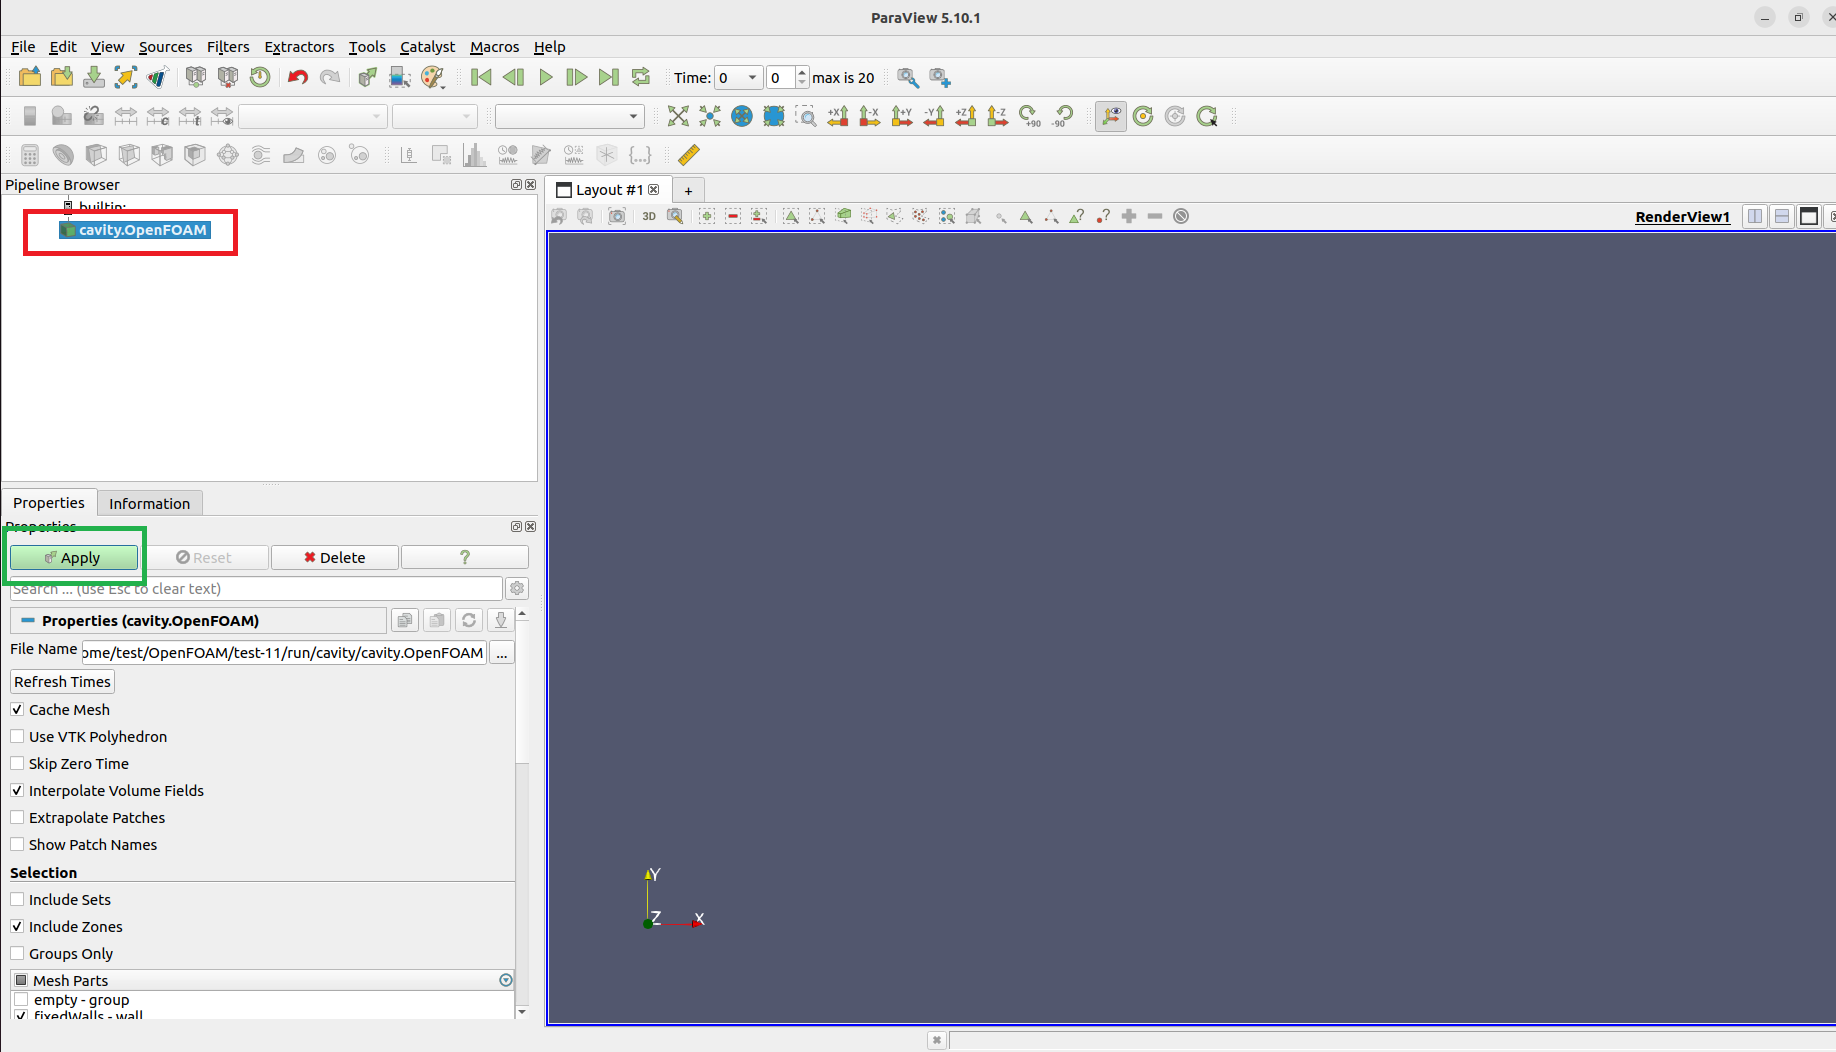
そしてcavity.OpenFOAMを読み込み(以下の図の赤枠) → Applyを押下します(以下の図の緑枠)(v11 は post.foam を作らなくてOK)
方向ベクトルの調整(Calculator)
これは必須ではないのですが、速度0でも流速ベクトルが表示されてしまって、紛らわしくなるのでこの設定をします。
Pipeline Browser で cavity.OpenFOAM を選択した後に、Filters(上部のメニューバーにあり) → Alphabetical → Calculatorを選択
そして以下のように設定をします
Propertiesの以下の部分を次のように設定します(下図の赤枠部分)
- Result Array Name: U_dir
- U/(mag(U)+1e-12)(Result Array Name の下の空欄 = Expression欄):
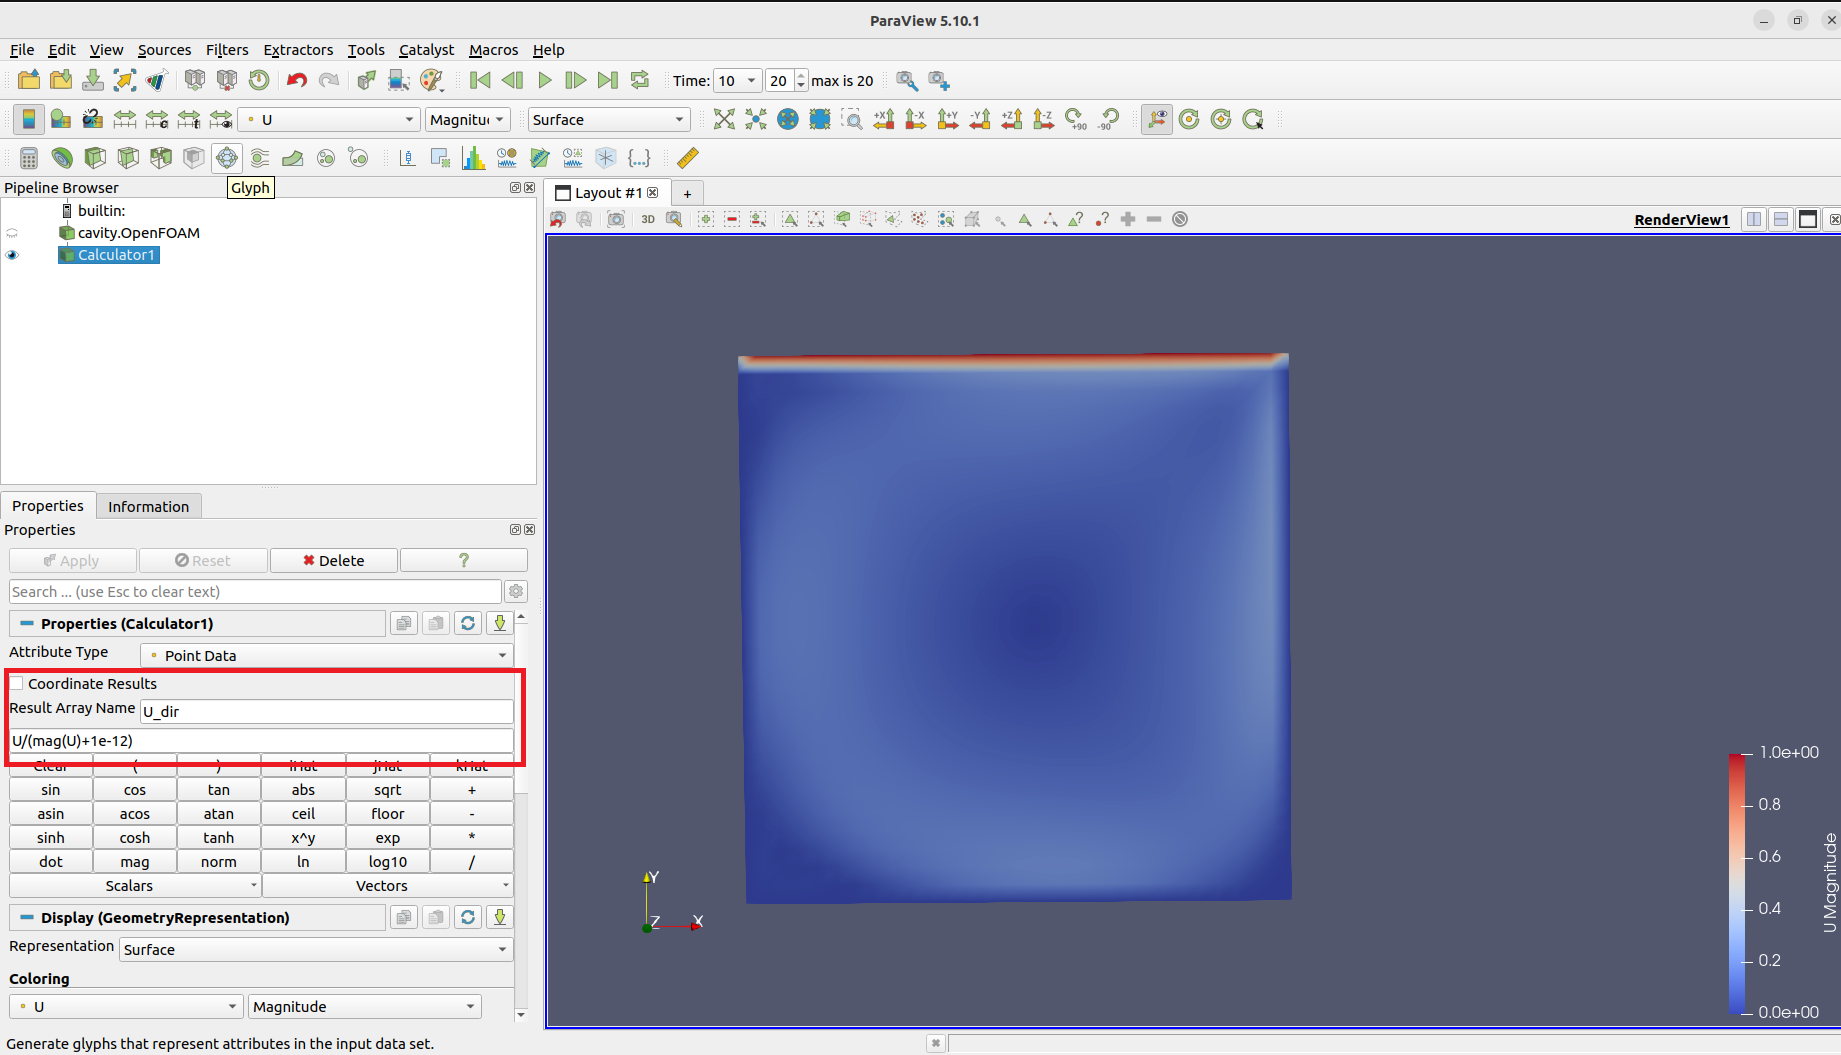
そしてApplyを押下すると、 U_dir フィールドが生成されます。
Glyph(一定長さ、色で速度)で流速ベクトルを矢印で表示する
Calculator1 を選択 → Filters(上部のメニューバーにあり) → Glyphを選択
そしてPropertiesの設定は以下のようにしました(下図の赤枠部分)
- Orientation: U_dir
- Scale Array: U_dir
- Scale Factor: 0.01(0.01〜0.03で調整)
- Masking > Maximum Number of Sample Points: 500(矢印密度を下げて見やすくしました)
そして表示できた流速ベクトルが以下になります(上記の設定のところは赤枠で囲んでいます)
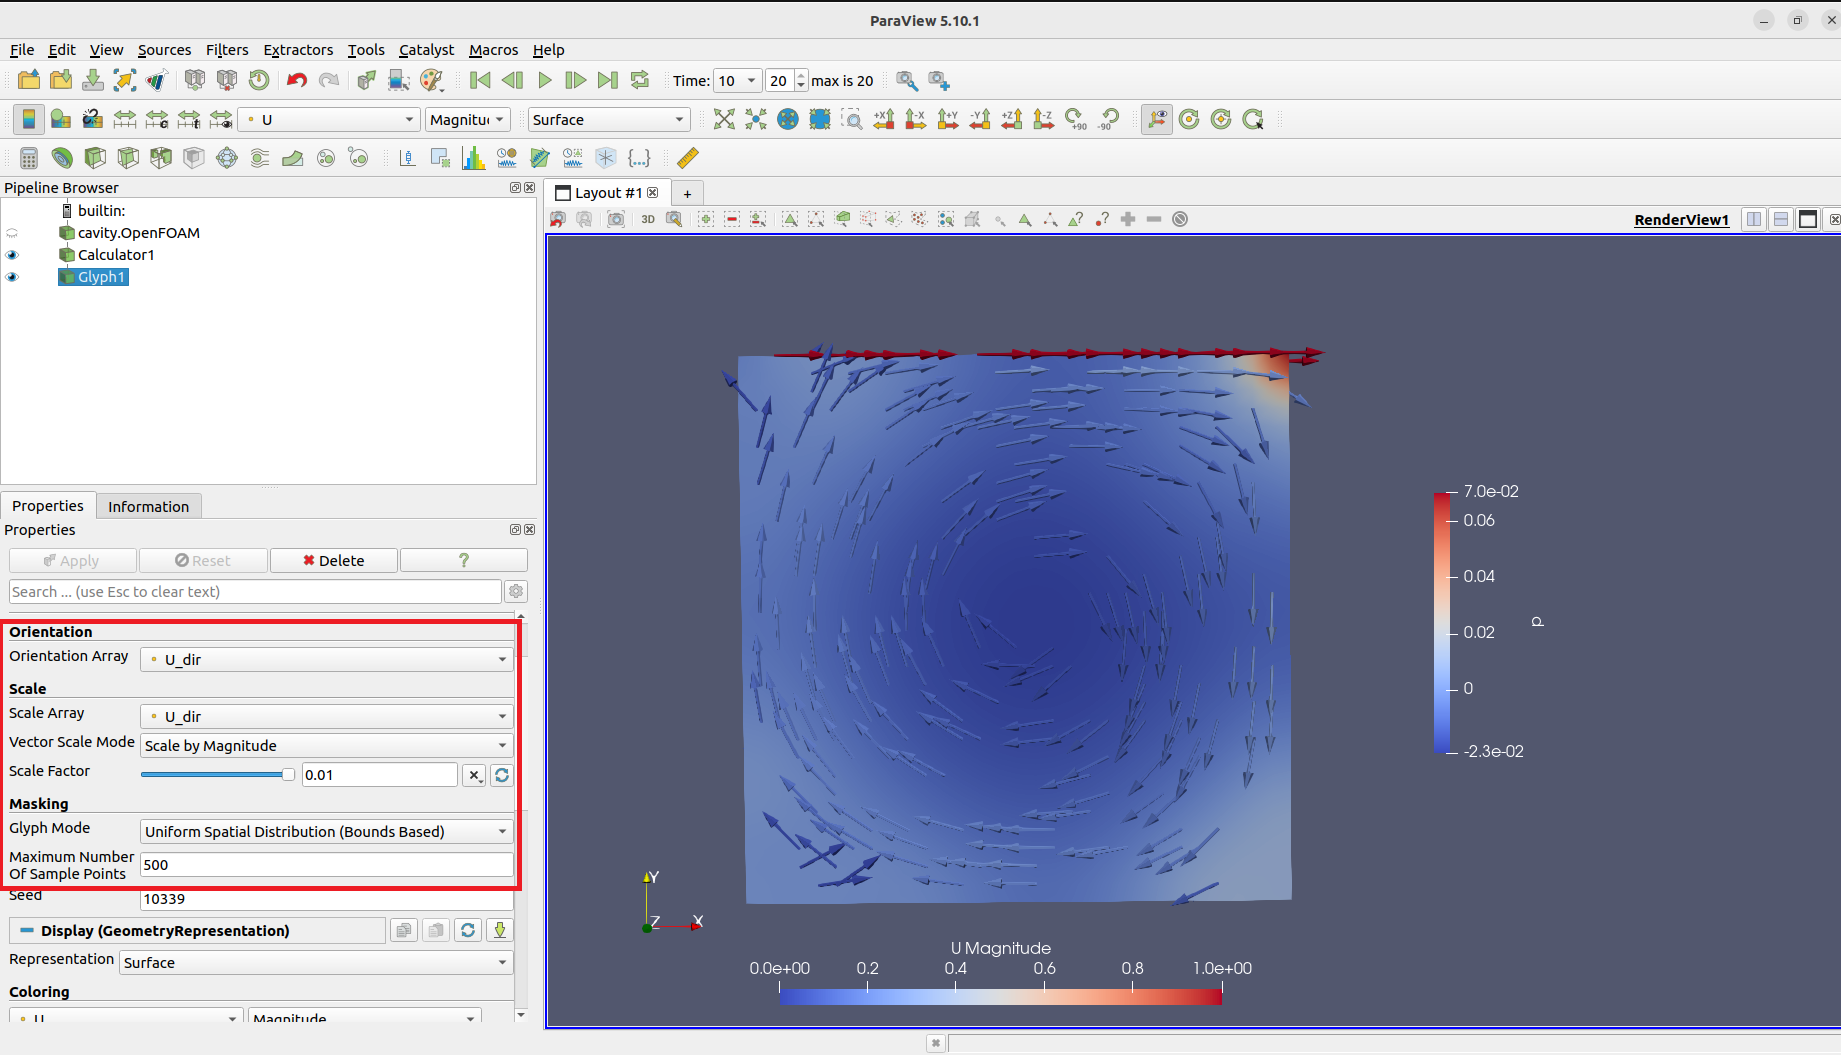
ちなみに「方向ベクトルの調整(Calculator)」と「## Glyph(一定長さ、色で速度)で流速ベクトルを矢印で表示する」での設定はなぜしたかというと、これで矢印は一定長さ、色で速さが分かり、上壁付近だけが強調され過ぎる問題と、t=0の一様矢印問題を回避するためです。
6. 参考にした記事との主な違い(v11の実務差分)
| 項目 | 参考にした記事 | 本記事 |
|---|---|---|
| 実行 | icoFoam |
foamRun |
| 物性/乱流 | transportProperties |
physicalProperties / momentumTransport
|
| 可視化入口 |
post.foam を作る流儀あり |
cavity.OpenFOAM を開く(自動生成) |
7. まとめ
今回は、OpenFOAM-11で2次元キャビティ流れのチュートリアルを実行し、その内容の確認やメッシュ変更の試行を行い、流速ベクトルの可視化まで行うことができました。今後は、別のチュートリアルや3次元解析にも挑戦していきたいと考えています。
参考記事やサイト
[1] OpenFOAM : Cavity flow チュートリアルをしっかりやってみます。その1
[2] 2.1 Lid-driven cavity flow