はじめに
TensorFlowと仲良くなりたいので、勉強がてら記載しております。
今回はこちらの意訳です。
https://www.tensorflow.org/programmers_guide/estimators
前提
すべてDatalab上で動かしています。
(っていうか内容都合で動かしていないです。)
参考
「 GCP Cloud Datalab」と「Cloud Translate API」を使ってみたよ
https://qiita.com/barcarunrun/items/77f57e819278d8858b56
イントロ
TensorFlowを使う際にはHigh LevelなAPIとLow LevelなAPIがあります。これは抽象的なAPIと具体的な詳細なAPIがあるくらいの意味です。
今回の対象のEstimatorはHigh LevelなAPIとなります。
(ハイレベルだからと言って難しいわけではない)
Estimatorには下記のアクションが予め準備されています。
・training
・evaluation
・prediction
・export for serving
また、Estimatorには pre-madeかcustom--があるのですが両方とも、下記のclassに則っています。
「tf.estimator.Estimator」class
https://www.tensorflow.org/api_docs/python/tf/estimator/Estimator
Estimatorの利点
以下6点あります。
・基本的にどんな環境でも動く
・オープンだから共有が簡単
・使うのがそもそも簡単
・カスタマイズも簡単
・TensorFlowの中で重要なグラフが予め作成されている
・グラフを1から作った際の、グラフの作成、変数の初期化、データの挿入、例外処理への対応みたいなことをやらなくてよい
注意
データ入力に関してはEstimatorから分離する必要があります。
Pre-made Estimatorsについて
上記の内容と被りますが、あらかじめTensorFlow上で大切なグラフやセッションが作成されているので、コードの変更は最小限で済みます。
Pre-made Estimatorsについて
Pre-made Estimatorを用いるプログラムは4つのステップで構成されます。
1.データインポート関数の定義
下記の2つが必ず必要になります。
・特徴量のキーと特量量データのテンソル
・ラベルをもつテンソル
def input_fn(dataset):
   ...  # manipulate dataset, extracting feature names and the label
   return feature_dict, label
2.特徴列の定義
それぞれの名前、型、入力の仕方を定義する必要があります。
# Define three numeric feature columns.
population = tf.feature_column.numeric_column('population')
crime_rate = tf.feature_column.numeric_column('crime_rate')
median_education = tf.feature_column.numeric_column('median_education',
                    normalizer_fn='lambda x: x - global_education_mean')
3.Estimatorのインスタンスを作成
# Instantiate an estimator, passing the feature columns.
estimator = tf.estimator.Estimator.LinearClassifier(
    feature_columns=[population, crime_rate, median_education],
    )
4.学習、評価、予測のMethodの呼び出し
# my_training_set is the function created in Step 1
estimator.train(input_fn=my_training_set, steps=2000)
これらはこちらに書いてある内容と同じです。
https://www.tensorflow.org/get_started/premade_estimators
Pre-made Estimatorsのメリットについて
予め準備されているからどんな環境でもぱっと動かせて、モデルの概要ももぱっとわかるから便利です。
Custom Estimatorsについて
1からモデルを作る際はこちらを読んでね〜。
https://www.tensorflow.org/get_started/custom_estimators
(読むか)
おすすめの実装の仕方
以下の4ステップがモデル作成のおすすめフローです。
1.TensorFlowに組み込まれているEstimatorを使って、基本となるモデルを作成しましょう。
2.上記で作ったモデルでテストしてみましょう。
3.他にも良さそうなものがあれば、そちらも構築して比較してみましょう。
4.余裕があれば色々とカスタムしてみましょう。
当たり前のことです。
Keras modelsを使ってEstimatorsを作ってみよう
KerasのモデルをEstimatorsを使って実装できると分散学習とかできて便利だから作ってみましょう。
その前にKerasについてお勉強
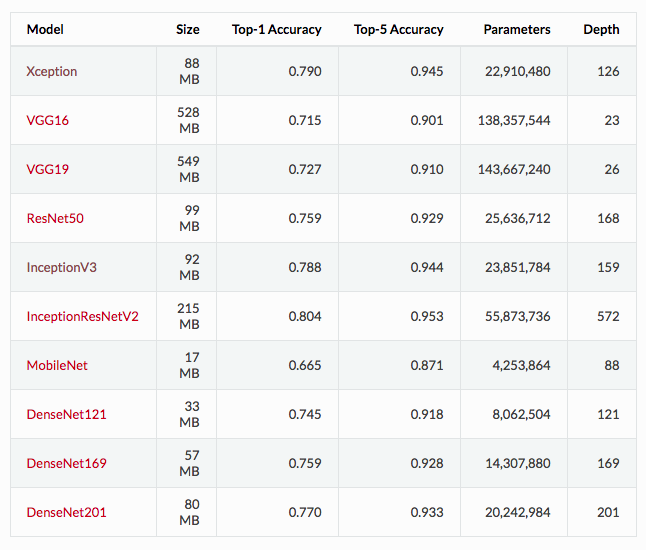
KerasにはImageNetで予め学習させてた重みがオープンになっております。
https://keras.io/ja/applications/
内容を見ます
# Instantiate a Keras inception v3 model.
keras_inception_v3 = tf.keras.applications.inception_v3.InceptionV3(weights=None)
KerasとTensorFlowには互換性があって、 tf.kerasというモジュールがあります。
https://www.tensorflow.org/api_docs/python/tf/keras
Kerasの中のApplicationsを使ってます。
https://keras.io/ja/applications/
# Compile model with the optimizer, loss, and metrics you'd like to train with.
keras_inception_v3.compile(optimizer=tf.keras.optimizers.SGD(lr=0.0001, momentum=0.9),
                          loss='categorical_crossentropy',
                          metric='accuracy')
こちらもKerasの関数です。
Kerasでは、モデルの学習を始める前に, compile メソッドを用いどのような学習処理を行なうかを設定する必要があります。
# Create an Estimator from the compiled Keras model. Note the initial model
# state of the keras model is preserved in the created Estimator.
est_inception_v3 = tf.keras.estimator.model_to_estimator(keras_model=keras_inception_v3)
そして再度tf.kerasを用いて、Estimatorを作成します。
# Treat the derived Estimator as you would with any other Estimator.
# First, recover the input name(s) of Keras model, so we can use them as the
# feature column name(s) of the Estimator input function:
keras_inception_v3.input_names  # print out: ['input_1']
名前だけ出力してます。
# Once we have the input name(s), we can create the input function, for example,
# for input(s) in the format of numpy ndarray:
train_input_fn = tf.estimator.inputs.numpy_input_fn(
    x={"input_1": train_data},
    y=train_labels,
    num_epochs=1,
    shuffle=False)
# To train, we call Estimator's train function:
est_inception_v3.train(input_fn=train_input_fn, steps=2000)
あとは、データをインプットして学習メソッドを呼んでいます。
具体的にはEstimatorにはどんなモデルがあるのか
こうなってくるとどんなのが予め準備されているのか気になって眠れなくなるわけです。
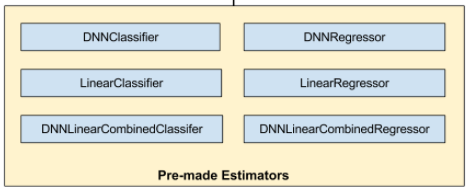
え、これだけ...。
まとめ
まだまだ勉強の必要がありますね。
次回はこちら。
https://www.tensorflow.org/get_started/custom_estimators