はじめに
確信的にTensorFlowは今後の機械学習のコアフレームワークになると思っています。
そのため、仲良くなっておきたい。
現状(2018/3月中旬時点)
まだまだ日本語にドキュメントが少ないという問題があります。英語が全く問題なく、TensorFlowを触ろうと思っていてかつ、ビジネス応用も含めた社会実装をしようという方は極めて少ないという問題意識から勉強がてら記載します。
内容について
下記の意訳.verです。
前提
インストールは前提とします。
Installing TensorFlow
https://www.tensorflow.org/install/
また全てDatalab上で動かしています。
参考:
「 GCP Cloud Datalab」と「Cloud Translate API」を使ってみたよ
https://qiita.com/barcarunrun/items/77f57e819278d8858b56
1.とりあえず動かす
1.1まずはインポート
import tensorflow as tf
1.2続いてサンプルコードの取得をします
下記の「コマンドラインから git を使用する」を参考にcloneを作成します。
https://cloud.google.com/datalab/docs/how-to/working-with-notebooks?hl=ja
git clone https://github.com/tensorflow/models
1.3とりあえず、実行
移動をして、
os.chdir('models/samples/core/get_started')
実行!!
run premade_estimator.py
なんかしら結果が表示されます。
Test set accuracy: 0.967
INFO:tensorflow:Restoring parameters from /tmp/tmpekek2z_l/model.ckpt-1000

Prediction is "Setosa" (99.4%), expected "Setosa"

Prediction is "Versicolor" (98.5%), expected "Versicolor"

Prediction is "Virginica" (98.2%), expected "Virginica"
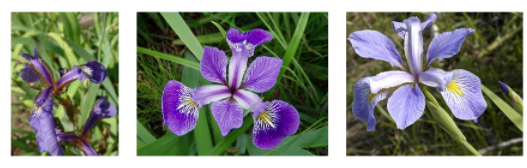
2.今回のモデルの概要について
以下の3つの花の画像を萼と花弁の長さと幅のデータから分類を行うというものです。
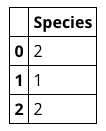
3.データを見ましょう
train_xにはIDがついて、萼と花弁の長さと幅があります。
また、train_yには判別のための番号が記載されています。
番号と名称の関係は下記になります。
Iris setosa (0)
Iris versicolor (1)
Iris virginica (2)
import iris_data
import pandas as pd
 (train_x, train_y), (test_x, test_y) = iris_data.load_data()
pd.DataFrame(train_x).head(3)
pd.DataFrame(train_y).head(3)
train_x

train_y
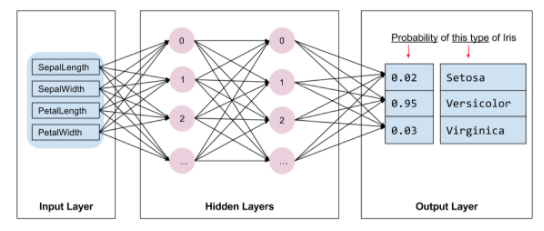
4.アルゴリズムの内容について
下記のようなモデルを実装します。
・2つの隠れ層
・各隠れ層には10個のノード
また、インプットはtrain_xにあった、萼と花弁の長さと幅
アウトプットは対象となる花である確率を出力をします。
5.今回のモデルの実装について
色々と細かく設定できるものの、今回はTensorFlowに予め作成されているEstimatorを用いて実装します。
このEstimatorを用いて実装する際には以下を準備する必要があります。
・1つまたは複数の入力関数を作成します。
・モデルの特徴量列を定義します。
・特徴量の列とさまざまなハイパーパラメータを指定して、Estimatorをインスタンス化します。
・Estimatorオブジェクトの1つ以上のメソッドを呼び出し、適切な入力関数にデータを渡す
以下詳しく見ます。
5.1入力関数の作成について
モデルを作成する際に必ず必要で以下の2つをreturnする関数を定義する必要があります。
・features
・label
import numpy as np
def input_evaluation_set():
    features = {'SepalLength': np.array([6.4, 5.0]),
                'SepalWidth':  np.array([2.8, 2.3]),
                'PetalLength': np.array([5.6, 3.3]),
                'PetalWidth':  np.array([2.2, 1.0])}
    labels = np.array([2, 1])
    return features, labels
ここではシンプルに定義しておきます。
5.2特徴量列の定義について
my_feature_columns = []
for key in train_x.keys():
    my_feature_columns.append(tf.feature_column.numeric_column(key=key))
中身はこんな感じ。
my_feature_columns

[_NumericColumn(key='SepalLength', shape=(1,), default_value=None, dtype=tf.float32, normalizer_fn=None),
 _NumericColumn(key='SepalWidth', shape=(1,), default_value=None, dtype=tf.float32, normalizer_fn=None),
 _NumericColumn(key='PetalLength', shape=(1,), default_value=None, dtype=tf.float32, normalizer_fn=None),
 _NumericColumn(key='PetalWidth', shape=(1,), default_value=None, dtype=tf.float32, normalizer_fn=None)]
5.3Estimatorのインスタンス化 について
今回は分類器の問題で、TensorFlowには以下の3つがあるが、今回はtf.estimator.DNNClassifierを使います。
・tf.estimator.DNNClassifier
・tf.estimator.DNNLinearCombinedClassifier
・tf.estimator.LinearClassifier
# Build a DNN with 2 hidden layers and 10 nodes in each hidden layer.
classifier = tf.estimator.DNNClassifier(
    feature_columns=my_feature_columns,
    # Two hidden layers of 10 nodes each.
    hidden_units=[10, 10],
    # The model must choose between 3 classes.
    n_classes=3)
ここの内容はとてもわからやすくて、
特徴量をmy_feature_columnsとして、
隠し層を2層でノードを10個ずつにしてhidden_units=[10, 10],
クラスを3つに分類する、分類器を設定しました。
5.4学習, 評価, そして 予測
5.4.1学習
# Train the Model.
classifier.train(
 input_fn=lambda:iris_data.train_input_fn(train_x, train_y, args.batch_size),
    steps=args.train_steps)
lambdaについてはこちら
https://docs.python.org/3/tutorial/controlflow.html
ざっくり言うと、包括的関数です。
5.4.2評価
# Evaluate the model.
eval_result = classifier.evaluate(
    input_fn=lambda:iris_data.eval_input_fn(test_x, test_y, args.batch_size))

print('\nTest set accuracy: {accuracy:0.3f}\n'.format(**eval_result))
5.4.3予測
# Generate predictions from the model
expected = ['Setosa', 'Versicolor', 'Virginica']
predict_x = {
    'SepalLength': [5.1, 5.9, 6.9],
    'SepalWidth': [3.3, 3.0, 3.1],
    'PetalLength': [1.7, 4.2, 5.4],
    'PetalWidth': [0.5, 1.5, 2.1],
}

predictions = classifier.predict(
    input_fn=lambda:iris_data.eval_input_fn(predict_x,
                                            batch_size=args.batch_size))
どれになるのかを判別する確率を表示することもできます。
for pred_dict, expec in zip(predictions, expected):
    template = ('\nPrediction is "{}" ({:.1f}%), expected "{}"')

    class_id = pred_dict['class_ids'][0]
    probability = pred_dict['probabilities'][class_id]

    print(template.format(iris_data.SPECIES[class_id],
                          100 * probability, expec))
実行結果はこちらになります。
...
Prediction is "Setosa" (99.6%), expected "Setosa"

Prediction is "Versicolor" (99.8%), expected "Versicolor"

Prediction is "Virginica" (97.9%), expected "Virginica"
6.まとめ
なんとなくわかった気になるのですが、よくわからない...。
理由はきっと2点。
1.実際のコードと説明にギャップがあって、概要レベルはわかるが、詳細がわからない。(それにこのコードを上からベタベタ貼っただけでは動かない)
2.TenserFlow自体が持っているAPIというかMethodが多すぎてなにをやっているののか完全にわからないことが原因かと思われます。
7.ってことで、やり直し!!!
コードを頭から読みます。
https://github.com/tensorflow/models/blob/master/samples/core/get_started/premade_estimator.py
7.1 インポート
from __future__ import absolute_import
from __future__ import division
from __future__ import print_function
import argparse
import tensorflow as tf
import iris_data
まずたくさんimportしております。
下2つ誰が見ても明らかなので省略します。
上の3つはPython2とのPython3との関係らしい。
(知りませんでした)
from __future__ import absolute_import
from __future__ import division
from __future__ import print_function
「future モジュールについて」
http://salinger.github.io/python/20140211-future-module/
import argparse
「16.4. argparse — コマンドラインオプション、引数、サブコマンドのパーサー」
https://docs.python.jp/3/library/argparse.html
恥ずかしながら、pythonをコマンドラインから実行したことありませんでした...。
7.2 コマンドからゴニョゴニョ
parser = argparse.ArgumentParser()
parser.add_argument('--batch_size', default=100, type=int, help='batch size')
parser.add_argument('--train_steps', default=1000, type=int,
                    help='number of training steps')
実行時のオプションの追加をしております。
def main(argv):
    args = parser.parse_args(argv[1:])
コマンドラインからの変数を格納。
7.3 データのロード
# Fetch the data
    (train_x, train_y), (test_x, test_y) = iris_data.load_data()
データのロードです。
こちらの関数はiris_dataに記載があります。(省略)
7.4 特徴列の格納
# Feature columns describe how to use the input.
    my_feature_columns = []
    for key in train_x.keys():
        my_feature_columns.append(tf.feature_column.numeric_column(key=key))
my_feature_columnsリストにtf.feature_column.numeric_column(key=key)を突っ込んでいます。
下記のように実行結果を見るとなにをやっているのかよくわかりますね。
train_x.keys()
Index(['SepalLength', 'SepalWidth', 'PetalLength', 'PetalWidth'], dtype='object')
numeric_column(key=key)
_NumericColumn(key='PetalWidth', shape=(1,), default_value=None, dtype=tf.float32, normalizer_fn=None)
7.5 学習、評価、予測
 # Build 2 hidden layer DNN with 10, 10 units respectively.
    classifier = tf.estimator.DNNClassifier(
        feature_columns=my_feature_columns,
        # Two hidden layers of 10 nodes each.
        hidden_units=[10, 10],
        # The model must choose between 3 classes.
        n_classes=3)

    # Train the Model.
    classifier.train(
        input_fn=lambda:iris_data.train_input_fn(train_x, train_y,
                                                 args.batch_size),
        steps=args.train_steps)

    # Evaluate the model.
    eval_result = classifier.evaluate(
        input_fn=lambda:iris_data.eval_input_fn(test_x, test_y,
                                                args.batch_size))

    print('\nTest set accuracy: {accuracy:0.3f}\n'.format(**eval_result))

    # Generate predictions from the model
    expected = ['Setosa', 'Versicolor', 'Virginica']
    predict_x = {
        'SepalLength': [5.1, 5.9, 6.9],
        'SepalWidth': [3.3, 3.0, 3.1],
        'PetalLength': [1.7, 4.2, 5.4],
        'PetalWidth': [0.5, 1.5, 2.1],
    }

    predictions = classifier.predict(
        input_fn=lambda:iris_data.eval_input_fn(predict_x,
                                                labels=None,
                                                batch_size=args.batch_size))

    template = ('\nPrediction is "{}" ({:.1f}%), expected "{}"')

    for pred_dict, expec in zip(predictions, expected):
        class_id = pred_dict['class_ids'][0]
        probability = pred_dict['probabilities'][class_id]

        print(template.format(iris_data.SPECIES[class_id],
                              100 * probability, expec))
ここは大体全部説明があったので、省略。
7.6 実行
if __name__ == '__main__':
    tf.logging.set_verbosity(tf.logging.INFO)
    tf.app.run(main)
まず、こちら。
「Python 「if name == ‘main’:」の意味」
https://qiita.com/taigamikami/items/2713856b9f3c3b90f6fd
「tf.logging.set_verbosity」
ログに記録されるメッセージのしきい値を決める関数。
https://www.tensorflow.org/api_docs/python/tf/logging/set_verbosity
「tf.logging.INFO」
エラーメッセージの内容です。
ゴリゴリ読む気はしませんでした。。。
https://www.tensorflow.org/api_docs/python/tf/logging/info
「tf.app.run(main)」
詳細読んで誰かまとめてほしい...。
https://www.tensorflow.org/api_docs/python/tf/app/run
7.7 まとめ
コマンドラインからのゴニョゴニョがなければとてもシンプル。
っていうか知らなかっただけ。
おわりに
だいぶ、すっきりした。
次はこちらを勉強します。
https://www.tensorflow.org/programmers_guide/estimators