Gatsby+Firestoreでステートフックを利用したCRUD
参考チュートリアルはこちらBuild a CRUD Firestore App in React/Gatsby with Hooks
前提
- すでにnpmとGitをインストール済み。
- Firebase(https://firebase.google.com) にログインできる状態。
- ReactとFirestoreの基本。
参考:
React.js & Next.js超入門のチャプター6を改変:Firestore使用するようにした①
React.js & Next.js超入門のチャプター6を改変:Firestore使用するようにした②
- フックについてさらっと(任意)
参考:
ステートフックの利用法 、
副作用フックの利用法
でははじめよう。
firebaseでfirestoreを準備
https://firebase.google.com/ にログインし新規プロジェクト作成。

新しくFirestoreデータベースを作成

練習なのでテストモードで。

Gatsbyプロジェクトを準備
プロジェクト作成
- コマンドプロンプトでGatsby CLIをインストール
npm install -g gatsby-cli - 任意のディレクトリでGatsbyプロジェクト作成
gatsby new CRUD-sample - CRUD-sampleというフォルダができてるのでそこに移動
-
gatsby developで開発環境が立ち上がる。http://localhost:8000/をブラウズ - デフォルトページが表示される

そしたら、srcの下のpagesフォルダにindex.jsファイルがデフォルトで存在するのでそれを、もしくは同じ階層にtest.jsなどを新規作成してもよい。
そこに以下のコードを記述。
// pages/test.js

import React from "react"

export default () => (
  <div>
    <h1>Firestore CRUD App </h1>
    <h2>Item List</h2>
    <h2>Add Item</h2>
  </div>
)
http://localhost:8000/testにアクセスするとブラウザは以下のように表示される。

GatsbyプロジェクトにFirebase設定
デフォルトでsrcの下にcomponentsフォルダがあるのでそこにitemlist.jsxファイルとfirestore.jsファイルを作成する。Firebaseコンソールに戻り</>のところをクリック。

ニックネームを適当に入力してアプリを登録ボタンをクリック

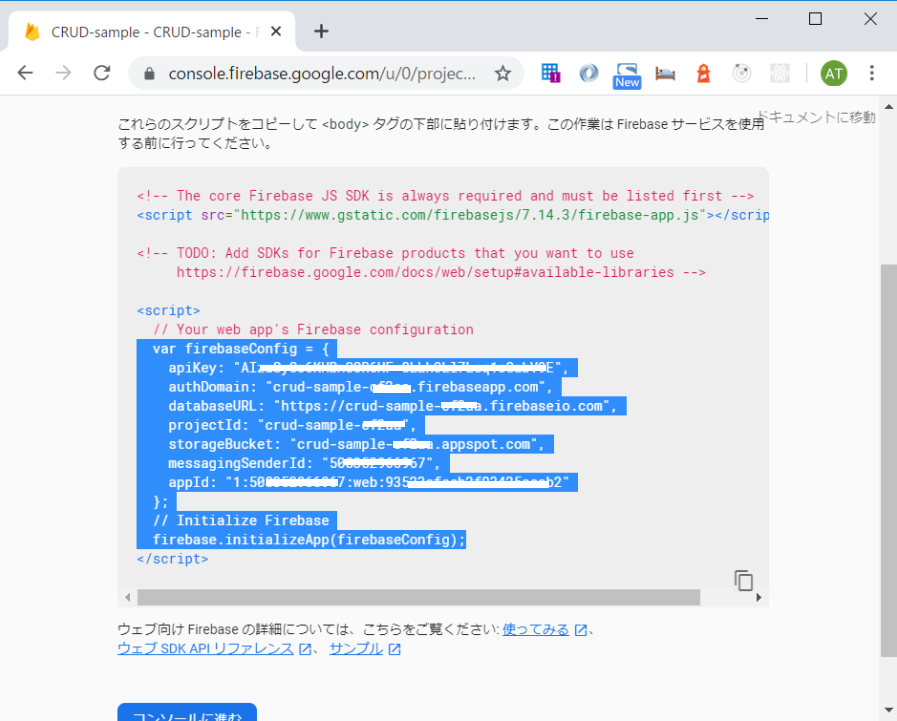
<scrip />タグ内にあるコンフィグスクリプトをコピーしてどこかに保存しておく。
Firebase関連モジュールをインストール
コマンドプロンプトでプロジェクトルートにて以下のコマンドでインストール
$ npm install -g firebase-tools

$ npm install firebase --save
完了したらいちおうgatsby developでさっきと同じ画面がブラウズできるか確認。
Firebaseコンフィグ設定
components/firebase.jsを開いて、コピーしておいたコンフィグをペースト
// components/firebase.js

import firebase from "firebase/app"
import 'firebase/firestore'

  var firebaseConfig = {
    apiKey: "AIzxxxxxxxxxxxxx6HF-8LLhOxxxxxxxxabV9E",
    authDomain: "crud-sample-cxxXxxa.firebaseapp.com",
    databaseURL: "https://crud-sample-cxXxxa.firebaseio.com",
    projectId: "crud-sample-cxXxxa",
    storageBucket: "crud-sample-cxXxxa.appspot.com",
    messagingSenderId: "508xxxxxxx67",
    appId: "1:50xxxxxx967:web:9352xxxxxxxxxx5aeab2"
  };
  // Initialize Firebase
  firebase.initializeApp(firebaseConfig);

export default firebase
import~文とexport default firebaseを忘れずに。
###Firestore接続テスト
test.jsに以下のコードを記述。
// pages/test.js

import React from "react"
import firebase from "./components/firebase"

export default () => {
  firebase
    .firestore()
    .collection("items")
    .add({
      name: "Heineken",
      type: "beer",
      qty: 5,
      description:
        "Pale lager beer with 5% alcohol by volume produced by the Dutch brewing company Heineken International",
    })
    .then(ref => {
      console.log("Added document with ID: ", ref.id)
    })

  return (
    <div>
      <h1>Firestore CRUD App </h1>
      <h2>Item List</h2>
      <h2>Add Item</h2>
    </div>
  )
}
そしたらhttp://localhost:8000/testをリロード。すると…
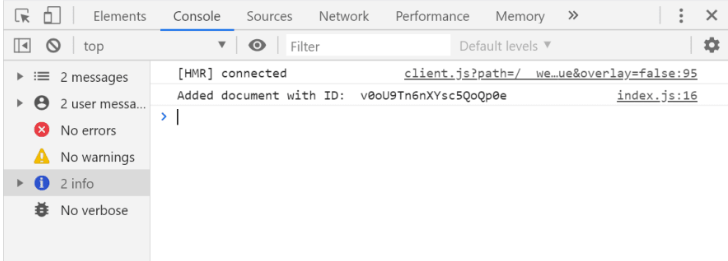
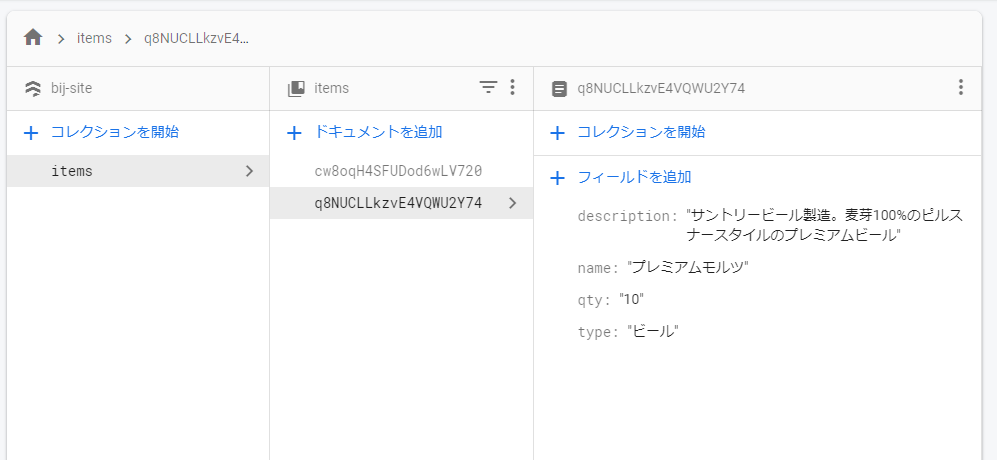
Firestoreにコレクションが追加されている!
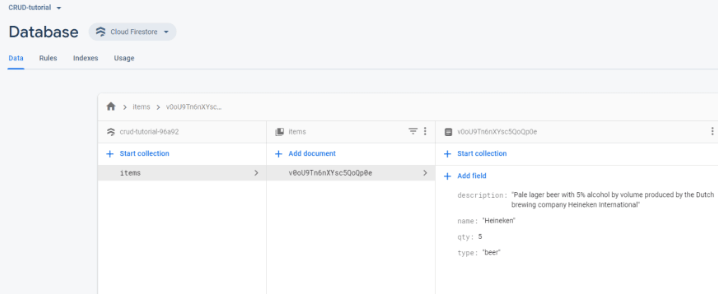
はずです。ここまでミスなければ。
Firestoreに接続し書き込みができることがわかった。test.jsのテストコードは消去する。
データ閲覧
データをとってきて画面に表示させる。itemlist.jsxを開いて以下のように記述。
// components/itemlist.jsx

import React, { useState, useEffect } from "react"
import firebase from "./firebase"
import "../styles/global.css"

const ItemList = () => {
    return (

        <table className="tg">
            <tbody>
            <tr>
                <th>名称</th>
                <th>タイプ</th>
                <th>数</th>
                <th>備考</th>
                <th></th>
            </tr>
            </tbody>

            {listItem.map(item => (
            <tbody key={item.id}>
            <tr>
                <td>{item.name}</td>
                <td>{item.type}</td>
                <td>{item.qty}</td>
                <td>{item.description}</td>
                <td>
                    <button>Edit</button>
                    <button>Delete</button>
                </td>
            </tr>
            </tbody>
            ))}

        </table>
    )

}

export default ItemList
これでまずはカラのテーブルが表示される。
ステートフックを使うのでuseState, useEffectをインポートする。 Firestoreに接続するのfirebase をインポートする。
import React, { useState, useEffect } from "react"
import firebase from "./firebase"
import "../styles/global.css"
・・・略・・・
ちなみにスタイルはsrcの下のstylesフォルダのglobal.cssというファイルに記述する(なかったら作る)。ここで使うスタイルは以下の通り。
// styles/global.css

.tg {
  border-collapse: collapse;
  border-spacing: 0;
  border-color: #000000;
}
.tg td {
  font-family: Arial, sans-serif;
  font-size: 14px;
  padding: 10px 5px;
  border-style: solid;
  border-width: 1px;
  overflow: hidden;
  word-break: normal;
  border-color: #000000;
  color: #333;
  background-color: #fff;
}
.tg th {
  font-family: Arial, sans-serif;
  font-size: 14px;
  font-weight: normal;
  padding: 10px 5px;
  border-style: solid;
  border-width: 1px;
  overflow: hidden;
  word-break: normal;
  border-color: #000000;
  color: #333;
  background-color: #f0f0f0;
}
そしたらgatsby-browser.jsにインポート文を記述。
// gatsby-browser.js

import "./src/styles/global.css"
ではステートフックを使ってFirestoreからデータをもってくるコード。
// components/itemlist.jsx

const useItems = () => {
    const [items, setItems] = useState([]);

    useEffect(() => {
        const unsubscribe = firebase
        firebase
          .firestore()
          .collection("items")
          .onSnapshot(snapshot => {
            const data = []
            snapshot.forEach(d => data.push({ // snapshot.doc.mapではだめだった
                id: d.id,
                ...d.data(),
              }));
              setItems(data)
          });
        return () => unsubscribe();
    }, []);

    return items;
};
・・・略・・・
【コラム】ステートフック:useStateとuseEffect
この一行
const [items, setItems] = useState([]);
これで、例えばReactクラスのコンストラクタ内でステート変数をセットするのと同じこと。こんな感じ↓
  constructor(props) {
    super(props);
    this.state = { items: null };
  }
フックの場合、変数が二つあるが、“分割代入 (destructuring)” とか呼ばれるらしいが、まあ要はふたつめのsetItems(名前は自由に決められる)は関数変数みたいなものでステート変数Itemsを更新する関数的に使う。こんな感じ↓
setItem({ id: 01, name: "生茶", type: "ソフトドリンク", qty: "8", description: "アサヒビバレッジ製造のお茶" });
ざっくりいうと、useState()でステート変数をセット、setItems()でステート変数を更新。
じゃあuseEffect()はなんなの?
それもステート変数を更新する。だけどsetItems()がイベントドリブンぽく使うのに対して、useEffectはコンポーネントをマウントしたとき、コンポーネントが更新されたとき、アンマウントされたとき、いずれの場合も発火して“ハイヨ”って動いてくれる。ライフサイクルを気にせずにそこに書いとけばあとはReactがやってくれるよ~という便利なやつ。とりあえずuseEffectもステート変数を更新。
return () => unsubscribe();
のところでは、Firestoreの接続を切る、ということをしている。電気のつけっぱなしはイカンよということであろう。
ここまでのlistitem.jsx
// components/listitem.jsx

import React, { useState, useEffect } from "react"
import firebase from "./firebase"
import "../styles/global.css"

const useItems = () => {
    const [items, setItems] = useState([]);

    useEffect(() => {
        const unsubscribe = firebase
        firebase
          .firestore()
          .collection("items")
          .onSnapshot(snapshot => {
            const data = []
            snapshot.forEach(d => data.push({ // snapshot.doc.mapではだめだった
                id: d.id,
                ...d.data(),
              }));
              setItems(data)
          });
        return () => unsubscribe();
    }, []);

    return items;
};

const ItemList = () => {
    /* useItem() API を listItem変数に格納 */
    const listItem = useItems()

    return (

        <table className="tg">
            <tbody>
            <tr>
                <th>名称</th>
                <th>タイプ</th>
                <th>数</th>
                <th>備考</th>
                <th></th>
            </tr>
            </tbody>

            {listItem.map(item => ( // listItemに格納されたデータをひとつづつ取り出してitemオブジェクトに格納. Itemごとに<tr><td>...</td></tr>に吐き出す.
            <tbody key={item.id}>
            <tr>
                <td>{item.name}</td>
                <td>{item.type}</td>
                <td>{item.qty}</td>
                <td>{item.description}</td>
                <td>
                    <button>Edit</button>
                    <button>Delete</button>
                </td>
            </tr>
            </tbody>
            ))}

        </table>
    )

}

export default ItemList
test.js(Firestore接続テストに使ったコードは全部消して)
// pages/test.js

import React from "react"
import ItemList from "../components/itemlist"
import "../styles/global.css"

export default () => {
  return (
    <div>
      <h1>Firestore CRUD App </h1>
      <h2>Item List</h2>
      <ItemList />
      <h2>Add Item</h2>
    </div>
  )
}
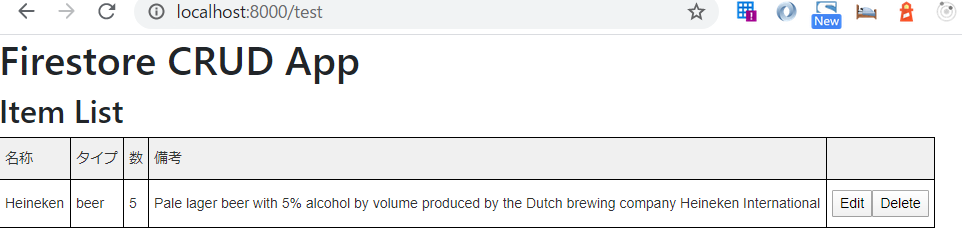
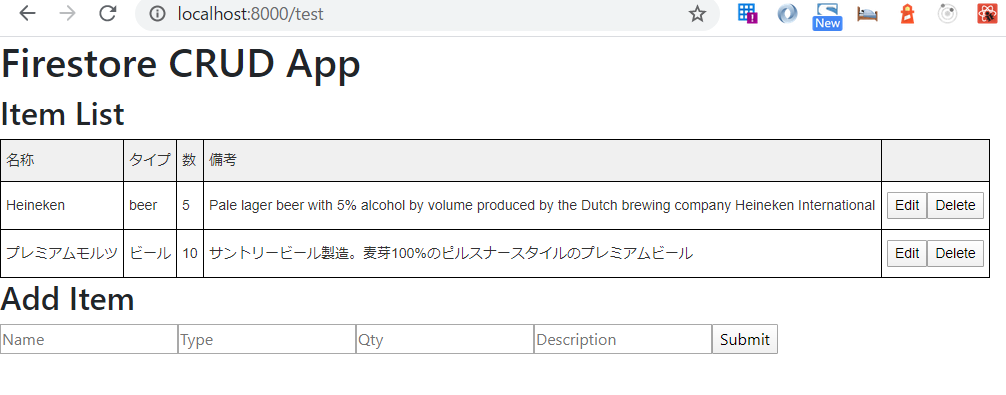
こんなふうに表示される。はず。
データ追加
これは簡単。
componentsの下にadditemform.jsxファイルを作成。
以下のようにコードを。
//components/additemform.jsx

import React, { useState } from "react"
import firebase from "firebase"

const AddItemForm = () => {

    const [name, setName] = useState("")
    const [type, setType] = useState("")
    const [qty, setQty] = useState(null)
    const [description, setDescription] = useState("")

const onSubmit = e => { // eはevent
    /*
    preventDefaultでページがリロードされるのを防ぐ
    */
    e.preventDefault()
    firebase
        .firestore()
        .collection("items")
        .add({
            name,
            type,
            qty,
            description,
        })
        //.then でフォームクリア
        .then(() => setName(""), setType(""), setQty(''), setDescription(""))
}

    return (
      <form onSubmit={onSubmit}>
        <input placeholder="Name"
          value={name}
          name="name"
          /*  e.currentTarget.value にインプットされた値が入る */
          onChange={e => setName(e.currentTarget.value)}
          type="text"
        />
        <input placeholder="Type"
          value={type}
          name="type"
          onChange={e => setType(e.currentTarget.value)}
          type="text"
        />
        <input placeholder="Qty"
          value={qty}
          name="qty"
          onChange={e => setQty(e.currentTarget.value)}
          type="number"
        />
        <input placeholder="Description"
          value={description}
          name="description"
          onChange={e => setDescription(e.currentTarget.value)}
          type="text"
        />
        <button>Submit</button>
      </form>
    )

 }
export default AddItemForm
test.jsは以下のように編集。
// pages/test.js

import React from "react"
import ItemList from "../components/itemlist"
import AddItemForm from '../components/additemform' //追加
import "../styles/global.css"

export default () => {
  return (
    <div>
      <h1>Firestore CRUD App </h1>
      <h2>Item List</h2>
      <ItemList />
      <h2>Add Item</h2>
     <AddItemForm /> //追加
    </div>
  )
}
では書き込んでみる。

Submitボタンをクリック。
リロードしなくともすぐにページに反映される。
Firestoreにも反映されている。
データ削除
これも簡単。
itemlist.jsxを編集する。
HTMLのテーブルにDeleteボタンがあると思う。
deleteItem関数を作ってそのDeleteボタンに割り当てるだけ。
// components/itemlist.jsx
・・・略・・・
const deleteItem = (id) => {  // 追加
    firebase
      .firestore()
      .collection("items")
      .doc(id)
      .delete()
}
・・・略・・・
            {listItem.map(item => (
            <tbody key={item.id}>
            <tr>
                <td>{item.name}</td>
                <td>{item.type}</td>
                <td>{item.qty}</td>
                <td>{item.description}</td>
                <td>
                    <button>Edit</button>
                    <button onClick={() => deleteItem(item.id)}>Delete</button>  // 更新
                </td>
            </tr>
・・・略・・・
データ更新
これがややこしい!
3つのステップがある。
まずは更新用のupdateitemコンポーネントを表示・非表示させるためのフラッグをオフオンする機能
2つめ、更新したいitemデータを特定する機能
最後、実際のデータ更新。
ではcomponentsフォルダにupdateitem.jsxファイルを作成。そして以下のコードを。
// components/updateitem.jsx

import React from "react"

const UpdateItem = () => {
  return (
    <>
      <h2>Update Item</h2>
      <form>
        <label htmlFor="Update Item">Update Item:</label>
        <input type="text" name="name" />
        <input type="text" name="type" />
        <input type="number" name="qty" />
        <input type="text" name="description" />
        <button>Update</button>
        <button>Cancel</button>
      </form>
    </>
  )
}
export default UpdateItem
test.jsを編集
import React, { useState } from "react" // 変更
import ItemList from '../components/itemlist'
import AddItemForm from '../components/additemform'
import UpdateItem from "../components/updateitem" // 追加
import "../styles/global.css"


export default () => {
  return (
    <div>
      <h1>Firestore CRUD App </h1>
      <h2>Item List</h2>
      <ItemList />
      <h2>Add Item</h2>
      <UpdateItem /> // 追加
      <AddItemForm />
    </div>
  )
}
つぎに以下のコードをtest.jsに追加する。2つのステート変数をセットするもの。
// pages/test.js

・・・略・・・
export default () => {
  /* 初期化するためのカラ変数配列 */
  const initialItemState = [
    { id: null, name: "", type: "", qty: "", description: "" },
  ]
  /* currentItemステート変数をセット */
  const [currentItem, setCurrentItem] = useState(initialItemState)

  /* 編集モードフラッグになるステート変数をセット */
  const [editing, setEditing] = useState(false)
・・・略・・・
currentItemは「いま選んでいるItem」を格納するステート変数。initialItemState は初期化のためだけのもの。つまりcurrentItemを何も選んでいないステート(状態)にするためのものでカラ。
editingは編集モードかそうでないかのフラグboolean。初期値はfalse。
編集モード
ということでまずは編集モードを操作する。editingフラグがtrueの場合はupdateitem.jsxコンポーネントを表示し、falseの場合は同コンポーネントを非表示にする、という機能を追加していく。ではitemlist.jsxを編集する。
// components/itemlist.jsx

・・・略・・・
const ItemList = ({ editItem }) => {... // 変更

  <button onClick={() => editItem()}>Edit</button> // 変更

  ...}
・・・略・・・
HTMLのテーブルにEditボタンがあると思う。
そこにeditItem()関数を割り当ててる。editItem()関数はtest.jsに書くので、その返り値をプロパティとして貰ってくるためにconst ItemList = ({ editItem }) =>という具合に{ editItem }プロパティを記述。
EditボタンをクリックするとeditItem()関数を呼びそこで編集モードフラッグeditingをtrueにする。editItem()関数はあとでtext.jsに書く。
つぎにupdateitem.jsxを以下のように編集。
// components/updateitem.jsx
・・・略・・・
const UpdateItem = ({setEditing}) => { //変更

  return (...
    <button onClick={()=>setEditing(false)}>Cancel</button> // 変更
  ...)
・・・略・・・
setEditing()関数をCancelボタンに割り当ててる。setEditing()はtest.jsにセットしたステートフックconst [editing, setEditing] = useState(false)の分割代入された変数2つめsetEditingのこと。。
CancelボタンをクリックするとsetEditing()を呼び編集モードフラッグeditingをfalseにする。

そしたらtest.jsにeditItem()関数を記述しよう。
// pages/test.js

import React, { useState } from "react"
import ItemList from '../components/itemlist'
import AddItemForm from '../components/additemform'
import UpdateItem from "../components/updateitem"
import "../styles/global.css"

export default () => {

  /* 初期化するためのカラのステート変数s */
  const initialItemState = [
    { id: null, name: "", type: "", qty: "", description: "" },
  ]
  /* currentItemステートにカラのステート変数sを割り当て */
  const [currentItem, setCurrentItem] = useState(initialItemState)

  /* editモードフラッグを初期化 */
  const [editing, setEditing] = useState(false)


  /* editモードをtrueに */
  const editItem = (item) => {
    setEditing(true)
  }

  return (
    <div>
      <h1>Firestore CRUD App </h1>
      <h2>Item List</h2>
      <ItemList editItem={editItem} />
      <h2>Add Item</h2>
      {editing ? <UpdateItem setEditing={setEditing}/> : <AddItemForm />} // 変更. ternary operation(三項演算子)
    </div>
  )
}
これで編集モードの切り替えができた。
「いま選んでいるItem」
「いま選んでいるItem」とはアイテムリストで該当ItemのEditボタンをクリックしたItemのこと。

currentItemをもってくる機能を追加しよう。updateitem.jsxを以下のように編集。
// components/updateitem.jsx

import React, { useState, useEffect } from "react"; // 変更

const UpdateItem = ({ setEditing, currentItem }) => {

  const [item, setItem] = useState(currentItem); // 追加

  useEffect(() => { // 追加
    setItem(currentItem);
    console.log("useEffectが渡したcurrentItem: ", currentItem);
  }, [currentItem]);

  const onSubmit = e => { // 追加
    e.preventDefault();
    console.log("onSubmitで渡されたidとitems", { item });
  };

  return (
    <>
      <h2>Update Item</h2>
      <form onSubmit={onSubmit}> // 変更
        <label htmlFor="Update Item">Update Item:</label>
        <input type="text" name="name" value={item.name} />
        <input type="text" name="type" value={item.type} />
        <input type="number" name="qty" value={item.qty} />
        <input type="text" name="description" value={item.description} />
        <button>Update</button>
        <button onClick={() => setEditing(false)}>Cancel</button> // 変更
      </form>
    </>
  );
};
export default UpdateItem;
itemlist.jsxのEditボタンのところを以下のように編集。
// components/itemlist.jsx

・・・略・・・
<button onClick={() => editItem(item)}>Edit</button>
・・・略・・・
test.jsのeditItem()関数と<UpdateItem />コンポーネントを編集。
// pages/test.js

export default () => {...

  const editItem = (item) => {
    setEditing(true)
    setCurrentItem({ // 追加
      id: item.id,
      name: item.name,
      type: item.type,
      qty: item.qty,
      description: item.description,
    })
  }
  return (...
<UpdateItem setEditing={setEditing} currentItem={currentItem} /> // 変更
したらEditボタンをクリックして現れたUpdateフォームでUpdateボタンをクリックしてみる。
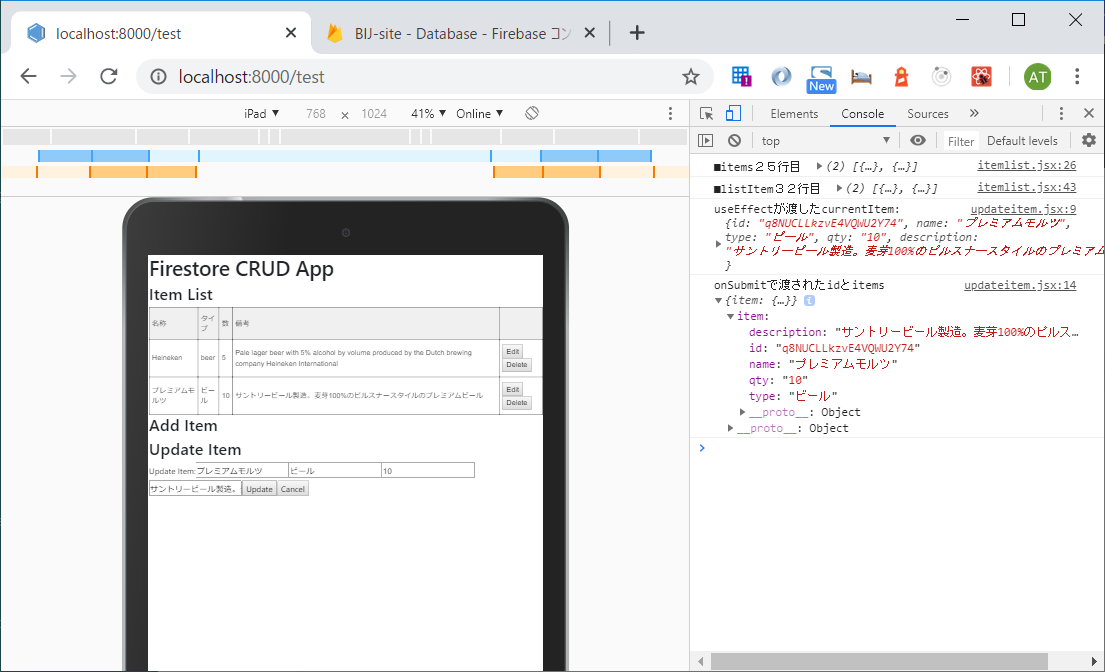
選んだ(該当ItemのEditボタンをクリックした)Itemの名前や数量や備考などのデータがコンソールログに吐かれている。
これでだいたい完成。
データ更新する関数
あとはFirestoreに更新命令をするだけなので簡単。
test.jsにupdateItem関数をつくる。また<UpdateItem />にプロパティを加える。
// pages/test.js

・・・略・・・
  /* firestoreのデータを更新 */
  const updateItem = ({ currentItem }, updatedItem) => { // 追加
    console.log(
      "Firestoreで更新するデータ: ",
      updatedItem,
      currentItem.id
    );
    //editフラグをfalseに
    setEditing(false)
    firebase
      .firestore()
      .collection("items")
      .doc(currentItem.id)
      .update(updatedItem);
  };

  return (
    <div>
      <h1>Firestore CRUD App </h1>
      <h2>Item List</h2>
      <ItemList editItem={editItem} />
      <h2>Add Item</h2>
      {editing ? <UpdateItem setEditing={setEditing} currentItem={currentItem} updateItem={updateItem} /> : <AddItemForm />} // 更新
    </div>
  )
}
最後。
updateitem.jsxにonChangeイベントハンドラーを。
// components/updateitem.jsx

・・・略・・・

    const onSubmit = e => {
        e.preventDefault();
        console.log("onSubmitで渡されたidとitems", { item });
        updateItem({ currentItem }, item); // 追加
    };


    const onChange = e => { // 追加
        const { name, value } = e.target;
        setItem({ ...item, [name]: value });
    };


    return (
        <>
        <h2>Update Item</h2>
        <form onSubmit={onSubmit}>
            <label htmlFor="Update Item">Update Item:</label>
            <input type="text" name="name" value={item.name} onChange={onChange} /> // 変更
            <input type="text" name="type" value={item.type} onChange={onChange} /> // 変更
            <input type="number" name="qty" value={item.qty} onChange={onChange} /> // 変更
            <input type="text" name="description" value={item.description} onChange={onChange} /> // 変更
            <button>Update</button>
            <button onClick={()=>setEditing(false)}>Cancel</button>
        </form>
        </>
    )
}
export default UpdateItem
コード最終形
もし一部うまくいかなくても、この最終形でちゃんと動く。Dont Worry❢
test.js
// pages/test.js

import React, { useState } from "react"
import firebase from "../components/firebase";
import ItemList from '../components/itemlist'
import AddItemForm from '../components/additemform'
import UpdateItem from "../components/updateitem"
import "../styles/global.css"

export default () => {

  /* 初期化するためのカラ変数配列 */
  const initialItemState = [
    { id: null, name: "", type: "", qty: "", description: "" },
  ]
  /* currentItemステート変数をセット */
  const [currentItem, setCurrentItem] = useState(initialItemState)

  /* 編集モードフラッグステート変数をセット */
  const [editing, setEditing] = useState(false)


  /* editモードをtrueにしてcurrentItemにEditボタンを押下したitemを格納 */
  const editItem = (item) => {
    setEditing(true)
    setCurrentItem({
      id: item.id,
      name: item.name,
      type: item.type,
      qty: item.qty,
      description: item.description,
    })
  }

  /* firestoreのデータを更新 */
  const updateItem = ({ currentItem }, updatedItem) => {
    console.log(
      "Firestoreで更新するデータ: ",
      updatedItem,
      currentItem.id
    );
    //editフラグをfalseに
    setEditing(false)
    firebase
      .firestore()
      .collection("items")
      .doc(currentItem.id)
      .update(updatedItem);
  };

  return (
    <div>
      <h1>Firestore CRUD App </h1>
      <h2>Item List</h2>
      <ItemList editItem={editItem} />
      <h2>Add Item</h2>
      {editing ? <UpdateItem setEditing={setEditing} currentItem={currentItem} updateItem={updateItem} /> : <AddItemForm />}
    </div>
  )
}
itemlist.jsx
// components/itemlist.jsx

import React, { useState, useEffect } from "react"
import firebase from "./firebase"
import "../styles/global.css"


const useItems = () => {
    const [items, setItems] = useState([]);

    useEffect(() => {
        const unsubscribe = firebase
        firebase
          .firestore()
          .collection("items")
          .onSnapshot(snapshot => {
            const data = []
            snapshot.forEach(d => data.push({ // snapshot.doc.mapではだめだった
                id: d.id,
                ...d.data(),
              }));
              console.log('◆data19行目 ', data);
              setItems(data)
          });
        return () => unsubscribe();
    }, []);

    console.log('■items25行目 ', items);
    return items;
};

const deleteItem = (id) => {
    firebase
      .firestore()
      .collection("items")
      .doc(id)
      .delete()
}


const ItemList = ({editItem}) => {

    /* useItem() API を listItem変数に格納 */
    const listItem = useItems()
    console.log('■listItem32行目 ', listItem);
    return (

        <table className="tg">
            <tbody>
            <tr>
                <th>名称</th>
                <th>タイプ</th>
                <th>数</th>
                <th>備考</th>
                <th></th>
            </tr>
            </tbody>

            {listItem.map(item => (
            <tbody key={item.id}>
            <tr>
                <td>{item.name}</td>
                <td>{item.type}</td>
                <td>{item.qty}</td>
                <td>{item.description}</td>
                <td>
                    <button onClick={() => editItem(item)}>Edit</button>
                    <button onClick={() => deleteItem(item.id)}>Delete</button>
                </td>
            </tr>
            </tbody>
            ))}

        </table>
    )

}

export default ItemList
additemform.jsx
// components/additemform.jsx

import React, { useState } from "react"
import firebase from "firebase"

const AddItemForm = () => {

    const [name, setName] = useState("")
    const [type, setType] = useState("")
    const [qty, setQty] = useState(null)
    const [description, setDescription] = useState("")

const onSubmit = e => { // eはevent
    /*
    preventDefaultでページがリロードされるのを防ぐ
    */
    e.preventDefault()
    firebase
        .firestore()
        .collection("items")
        .add({
            name,
            type,
            qty,
            description,
        })
        //.then でフォームクリア
        .then(() => setName(""), setType(""), setQty(''), setDescription(""))
}

    return (
      <form onSubmit={onSubmit}>
        <input placeholder="Name"
          value={name}
          name="name"
          /*  e.currentTarget.value にインプットされた値が入る */
          onChange={e => setName(e.currentTarget.value)}
          type="text"
        />
        <input placeholder="Type"
          value={type}
          name="type"
          onChange={e => setType(e.currentTarget.value)}
          type="text"
        />
        <input placeholder="Qty"
          value={qty}
          name="qty"
          onChange={e => setQty(e.currentTarget.value)}
          type="number"
        />
        <input placeholder="Description"
          value={description}
          name="description"
          onChange={e => setDescription(e.currentTarget.value)}
          type="text"
        />
        <button>Submit</button>
      </form>
    )

 }
export default AddItemForm
updateitem.jsx
// components/updateitem.jsx

import React, { useState, useEffect } from "react";

const UpdateItem = ({setEditing, currentItem, updateItem }) => {

    const [item, setItem] = useState(currentItem);

    useEffect(() => {
        setItem(currentItem);
        console.log("useEffectが渡したcurrentItem: ", currentItem);
    }, [currentItem]);

    const onSubmit = e => {
        e.preventDefault();
        console.log("onSubmitで渡されたidとitems", { item });
       // updateItem({ currentItem }, item);
    };


    const onChange = e => {
        const { name, value } = e.target;
        setItem({ ...item, [name]: value });
    };


    return (
        <>
        <h2>Update Item</h2>
        <form onSubmit={onSubmit}>
            <label htmlFor="Update Item">Update Item:</label>
            <input type="text" name="name" value={item.name} onChange={onChange} />
            <input type="text" name="type" value={item.type} onChange={onChange} />
            <input type="number" name="qty" value={item.qty} onChange={onChange} />
            <input type="text" name="description" value={item.description} onChange={onChange} />
            <button>Update</button>
            <button onClick={()=>setEditing(false)}>Cancel</button>
        </form>
        </>
    )
}
export default UpdateItem
global.css
// styles/global.css


.tg {
  border-collapse: collapse;
  border-spacing: 0;
  border-color: #000000;
}
.tg td {
  font-family: Arial, sans-serif;
  font-size: 14px;
  padding: 10px 5px;
  border-style: solid;
  border-width: 1px;
  overflow: hidden;
  word-break: normal;
  border-color: #000000;
  color: #333;
  background-color: #fff;
}
.tg th {
  font-family: Arial, sans-serif;
  font-size: 14px;
  font-weight: normal;
  padding: 10px 5px;
  border-style: solid;
  border-width: 1px;
  overflow: hidden;
  word-break: normal;
  border-color: #000000;
  color: #333;
  background-color: #f0f0f0;
}
本の宣伝
Gatsbyバージョン5>>>>改訂2版
前編の『Gatsby5前編ー最新Gatsbyでつくるコーポレートサイト』と後編の『Gatsby5後編ー最新GatsbyとmicroCMSでつくるコーポレートサイト《サイト内検索機能付き》』を合わせ、次のようなデモサイトを構築します。
→ https://yah-space.work
静的サイトジェネレーターGatsby最新バージョン5の基本とFile System Route APIを使用して動的にページを生成する方法を解説。またバージョン5の新機能《Slicy API》《Script API》《Head API》を紹介、実装方法も。《Gatsby Functions》での問い合わせフォーム実装やGatsby Cloudへのアップロード方法も!
Gatsby5前編ー最新Gatsbyでつくるコーポレートサイト ~基礎の基礎から応用、新機能の導入まで(書籍2,980円)

最新Gatsby5とmicroCMSを組み合わせてのコーポレートサイト作成手順を解説。《サイト内検索機能》をGatsbyバージョン4からの新機能《Gatsby Functions》と《microCMSのqパラメータ》で実装。また、SEOコンポーネントをカスタマイズしてmicroCMS APIをツイッターカードに表示させるOGPタグ実装方法も解説。
Gatsby5後編ー最新GatsbyとmicroCMSでつくるコーポレートサイト《サイト内検索機能付き》(書籍 2,790円)

##参考: [Build a CRUD Firestore App in React/Gatsby with Hooks](https://dev.to/vetswhocode/build-a-crud-firestore-app-in-react-gatsby-with-hooks-4ig9) [ステートフックの利用法](https://ja.reactjs.org/docs/hooks-state.html) [副作用フックの利用法](https://ja.reactjs.org/docs/hooks-effect.html)