はじめに
本記事では、コンテナオーケストレーションツールである Kubernetes を、自宅環境にインストールする手順を解説します。
Kubernetesは、Dockerなどのコンテナを効率的に管理・自動化できる仕組みです。
「とりあえず一度触ってみたい」「小規模なラボ環境で検証したい」そんな初心者の方向けに、最小限の構成で動作させる手順を紹介します。
構成図
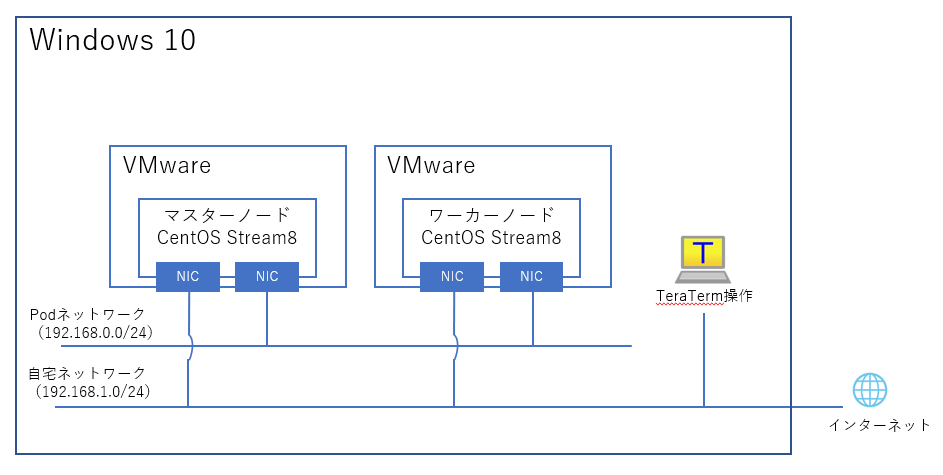
・マスターノード:192.168.1.30(自宅NW)
・ワーカーノード:192.168.1.31(自宅NW)
・各VMのリソース構成:CPU 1 Core / メモリ 2GB / ディスク 30GB
Kubernetesの前提設定【マスター・ワーカー共通】
パッケージの更新
# dnf update -y
SELinux無効化
# setenforce 0
# sed -i --follow-symlinks 's/SELINUX=enforcing/SELINUX=disabled/g' /etc/sysconfig/selinux
Firewalldの停止・無効化
# systemctl disable --now firewalld
br_netfilterモジュールの有効化(Pod間通信に必須)
# modprobe br_netfilter
# cat <<EOF > /etc/sysctl.d/k8s.conf
net.bridge.bridge-nf-call-ip6tables = 1
net.bridge.bridge-nf-call-iptables = 1
EOF
カーネルパラメータ反映(/etc/sysctl.d/配下)
# sysctl --system
スワップの無効化
# swapoff -a
# sed -i -e '/swap/s/^/# /g' /etc/fstab
Dockerのインストールと設定
Dockerリポジトリの追加とインストール
# dnf config-manager --add-repo=https://download.docker.com/linux/centos/docker-ce.repo
# dnf install -y https://download.docker.com/linux/centos/7/x86_64/stable/Packages/containerd.io-1.6.9-3.1.el7.x86_64.rpm
# dnf install docker-ce --nobest -y
Dockerの起動・自動起動設定
# systemctl enable --now docker
systemdのcgroupドライバを使用する設定
# echo '{
"exec-opts": ["native.cgroupdriver=systemd"]
}' > /etc/docker/daemon.json
Docker再起動
# systemctl restart docker
Kubernetesのインストール
リポジトリ設定
# cat <<EOF > /etc/yum.repos.d/kubernetes.repo
[kubernetes]
name=Kubernetes
baseurl=https://packages.cloud.google.com/yum/repos/kubernetes-el7-x86_64
enabled=1
gpgcheck=1
repo_gpgcheck=1
gpgkey=https://packages.cloud.google.com/yum/doc/yum-key.gpg https://packages.cloud.google.com/yum/doc/rpm-package-key.gpg
EOF
Kubernetes関連パッケージのインストール
# dnf upgrade -y
# dnf install -y kubelet kubeadm kubectl --disableexcludes=kubernetes
# systemctl enable --now kubelet
containerd設定ファイルの削除(kubeadm initでのエラー回避)
# rm -f /etc/containerd/config.toml
# systemctl restart containerd
クラスタの初期化【マスターノードのみ】
# kubeadm init --pod-network-cidr 192.168.0.0/16
※Podに割り当てるIPアドレスの範囲を指定する:--pod-network-cidr
出力された kubeadm join コマンドを控えておきましょう(後述のワーカーノード参加に使用)。
kubectl コマンドを実行する権限を付与
# mkdir -p $HOME/.kube
# cp -i /etc/kubernetes/admin.conf $HOME/.kube/config
# chown $(id -u):$(id -g) $HOME/.kube/config
Calico ネットワークアドオンの適用
# kubectl apply -f https://docs.projectcalico.
org/v3.15/manifests/calico.yaml
クラスタへの参加【ワーカーノード】
マスターノードで kubeadm init 実行時に出力された以下のようなコマンドを、ワーカーノードで実行します。
kubeadm join 192.168.1.30:6443 --token XXXXX.XXXXXXXXXX --discovery-token-ca-cert-hash sha256:XXXXXXXXXXXXXXXX
ノードの確認(マスターで実施)
# kubectl get nodes
NAME            STATUS   ROLES           AGE     VERSION
kubernetes      Ready    control-plane   8m10s   v1.26.1
worker-node-1   Ready    <none>          57s     v1.26.1
参考URL
https://kubernetes.io/ja/docs/tasks/tools/install-kubectl/
https://upcloud.com/resources/tutorials/install-kubernetes-cluster-centos-8
https://github.com/containerd/containerd/issues/4581