ROSロボットにトピックを送信するAndroidアプリを作るチュートリアルです。
通信にはRowmaというシステムを使っています。Rowmaについて詳しくは Rowma: ROSロボットネットワーク化システム に書いてます。
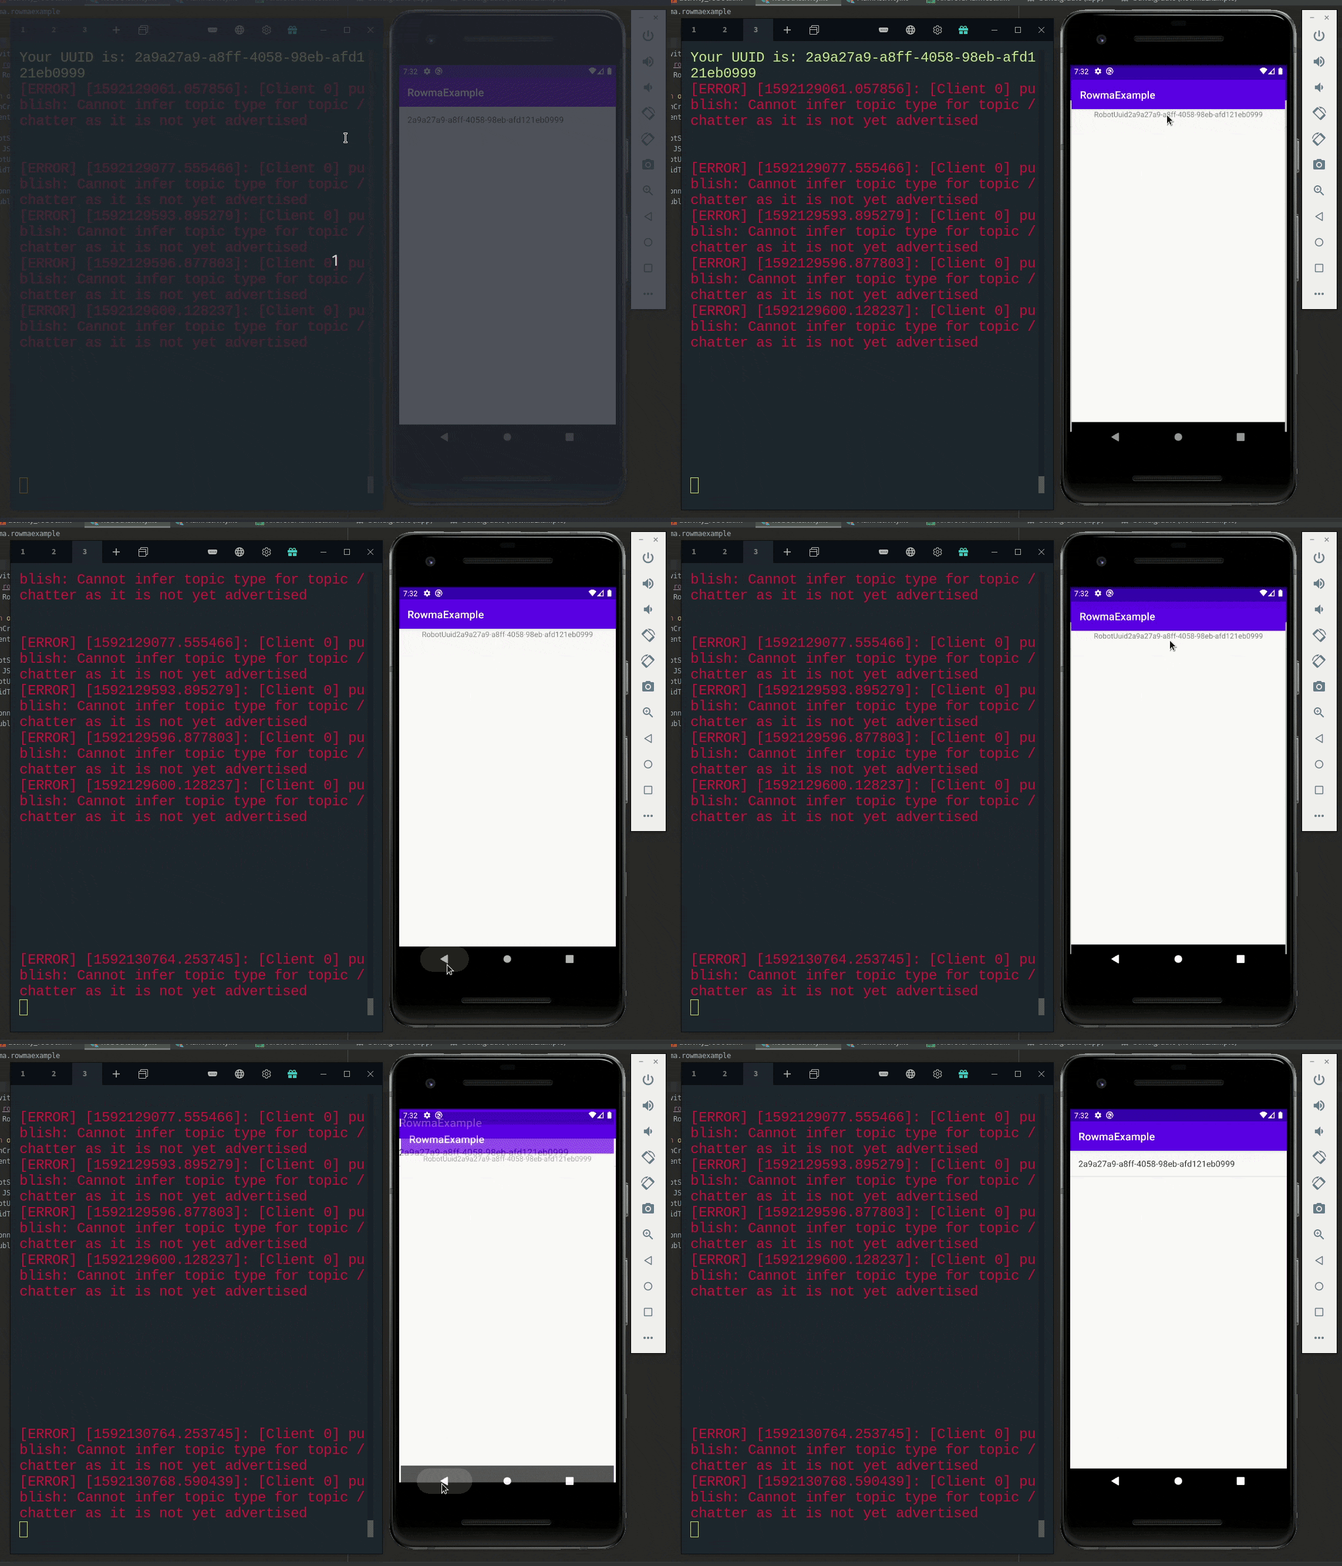
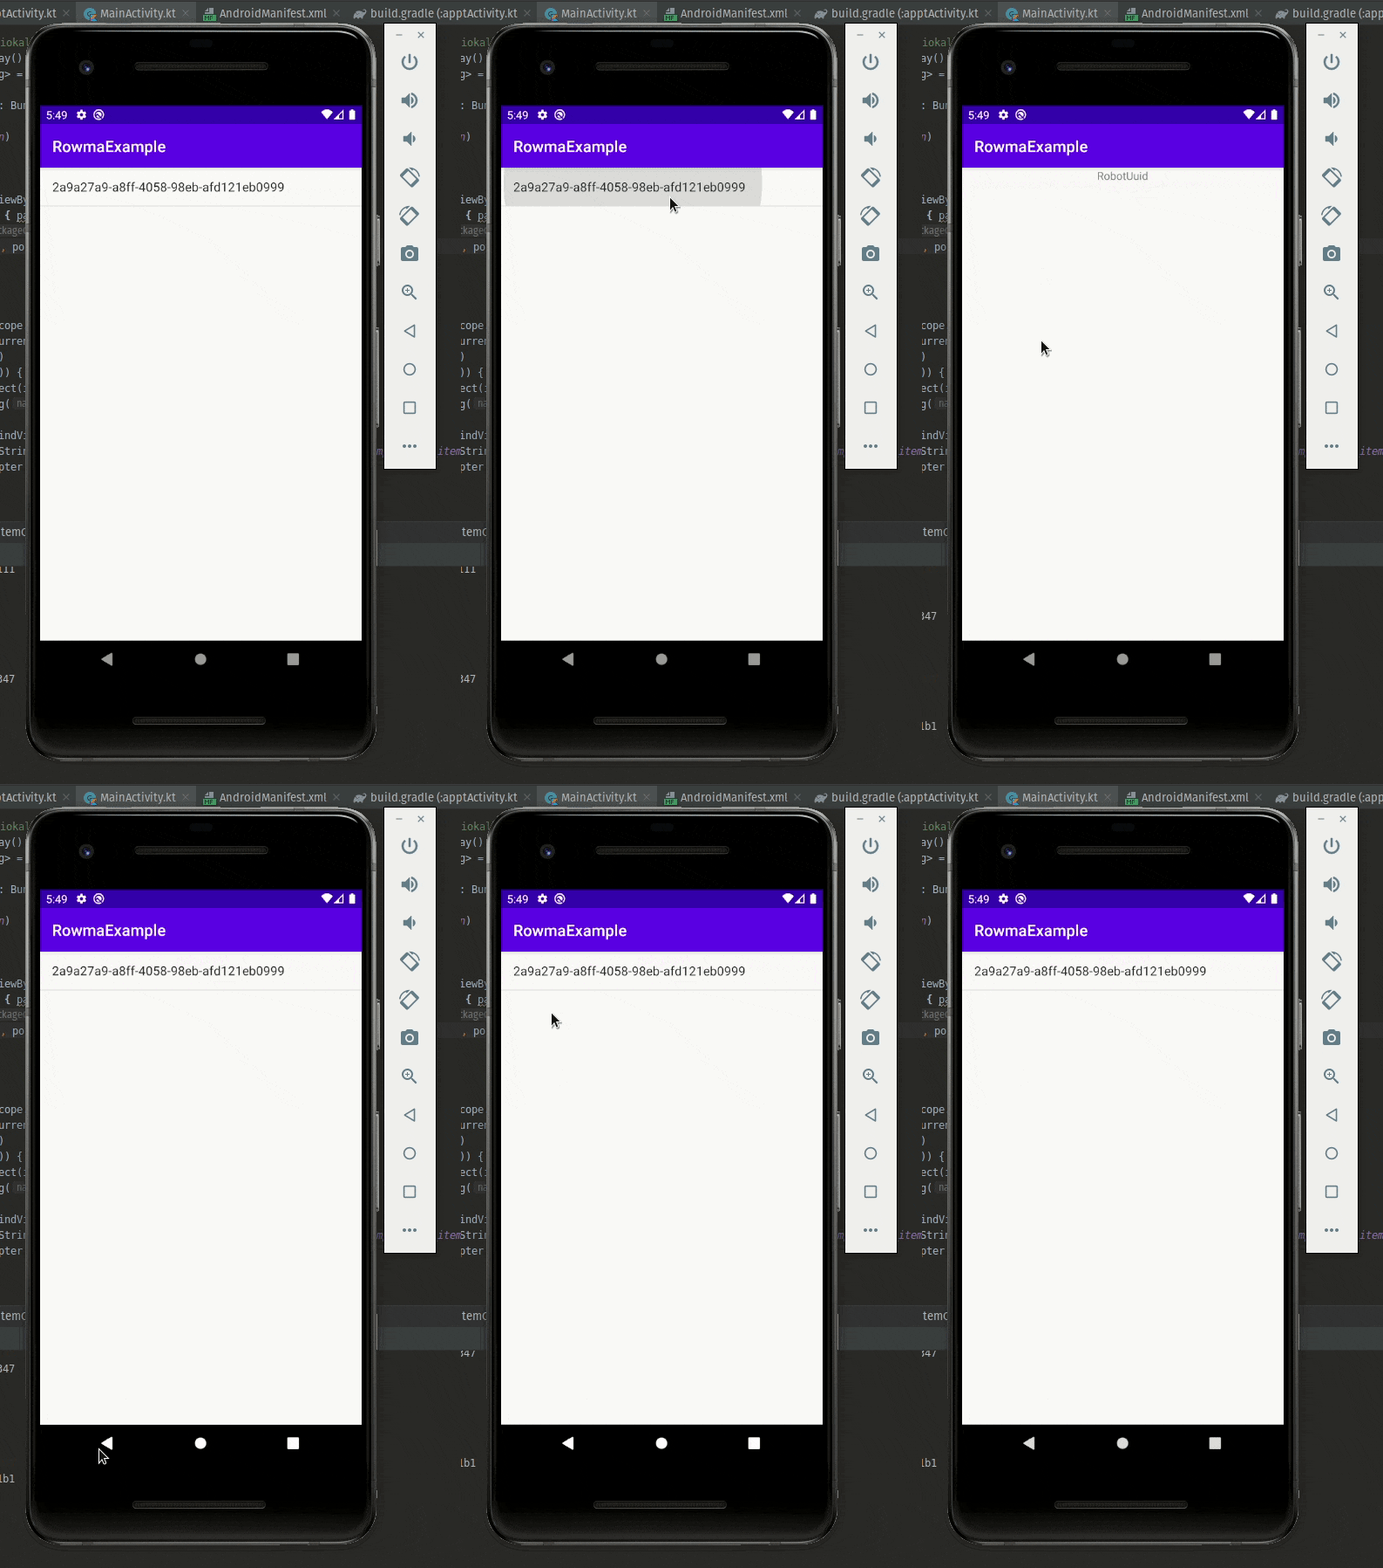
完成図はこちら。ロボット一覧を表示してどれかをタップしたらロボットにアクセスして/chatterにトピックを送っています。
準備
Android Studioのバージョン: 4.0
Kotlinのバージョン: 1.3.72
Rowma ROSパッケージを起動しておきます。
インストールはこちらのコマンドから。
python <(curl "https://raw.githubusercontent.com/rowma/rowma_ros/master/install.py" -s -N)
起動は
rosrun rowma_ros rowma
です。
新規プロジェクト作成
まずはプロジェクトを作成します。「File」->「New」-> 「New Project」で新規プロジェクトを作成。
NameにRowmaExample、Package nameにcom.rowma.rowmaexampleと入力してFinishボタンをクリック。
とりあえず実行します。エミュレーター環境が無い方はAVDマネージャーから作成します。
参考: 公式ドキュメント 仮想デバイスの作成と管理
エミュレーターが表示されてアプリが起動したら成功です。
rowma-kotlinをインストール
左のファイルツリーからbuild.gradle(Module: app)を開きます。
dependencies{}に以下を追加します。
dependencies {
    implementation fileTree(dir: "libs", include: ["*.jar"])
    implementation "org.jetbrains.kotlin:kotlin-stdlib:$kotlin_version"
    implementation 'androidx.core:core-ktx:1.3.0'
    implementation 'androidx.appcompat:appcompat:1.1.0'
    implementation 'androidx.constraintlayout:constraintlayout:1.1.3'
    testImplementation 'junit:junit:4.12'
    androidTestImplementation 'androidx.test.ext:junit:1.1.1'
    androidTestImplementation 'androidx.test.espresso:espresso-core:3.2.0'

    implementation 'com.rowma.rowma-kotlin:rowma-kotlin:+' //追加部分
}
ここを変更するとAndroid Studioのコードエディター部分の上に「Sync Now」と出るのでこれをクリックします。
エラー無く成功したらインストール完了です。
Rowmaサーバーへの接続
「java」->「com.rowma.rowmaexample」->「MainActivity」を開いて編集します。
rowma変数を追加して初期化します。
package com.rowma.rowmaexample

import androidx.appcompat.app.AppCompatActivity
import android.os.Bundle
import com.rowma.rowma_kotlin.Rowma

class MainActivity : AppCompatActivity() {
    val rowma = Rowma("https://rowma.moriokalab.com") // 追加

    override fun onCreate(savedInstanceState: Bundle?) {
        super.onCreate(savedInstanceState)
        setContentView(R.layout.activity_main)
    }
}
「manifests」->「AndroidManifest.xml」を開いてインターネット接続の許可を与えます。
<?xml version="1.0" encoding="utf-8"?>
<manifest xmlns:android="http://schemas.android.com/apk/res/android"
    package="com.rowma.rowmaexample">
    <uses-permission android:name="android.permission.INTERNET"/> // ここを追加

    <application>
      (中略)
    </application>

</manifest>
rowma.currentConnectionList()を使ってロボット一覧を取得する
サーバーとの接続にはコルーチンというものを使います。コルーチンを使うためには新しくライブラリをbuild.gradleに追加します。build.graldeのdependencies{}にimplementation 'org.jetbrains.kotlinx:kotlinx-coroutines-core:1.3.7'を追加します。
dependencies {
    implementation fileTree(dir: "libs", include: ["*.jar"])
    (中略)

    // ここから3行を追加
    implementation 'com.rowma.rowma-kotlin:rowma-kotlin:+'
    implementation 'org.jetbrains.kotlinx:kotlinx-coroutines-core:1.3.7'
    implementation 'org.jetbrains.kotlinx:kotlinx-coroutines-android:1.3.7'
}
追加したらSync Nowをクリックします。
次にgetCurrentRobots()を追加します。
package com.rowma.rowmaexample

import android.os.Bundle
import android.widget.ArrayAdapter
import android.widget.ListView
import androidx.appcompat.app.AppCompatActivity
import com.rowma.rowma_kotlin.Rowma
import kotlinx.coroutines.Dispatchers
import kotlinx.coroutines.GlobalScope
import kotlinx.coroutines.async
import kotlinx.coroutines.launch
import org.json.JSONArray

class MainActivity : AppCompatActivity() {
    val rowma = Rowma("https://rowma.moriokalab.com")

    override fun onCreate(savedInstanceState: Bundle?) {
        super.onCreate(savedInstanceState)
        setContentView(R.layout.activity_main)
    }

    private fun getCurrentRobots() = GlobalScope.launch(Dispatchers.Main) {
        async(Dispatchers.Default) { rowma.currentConnectionList() }.await().let {
            val res = JSONArray(it.toString())
            println(res)
        }
    }
}
ロボットリスト(ListView)の追加
右のファイルリストから「res」->「layout」->「activity_main.xml」を開きます。開いたら右上にある「Design」タブをクリックします。
スクリーンが表示されたらデフォルトで配置されているコンポーネントを全て削除します。
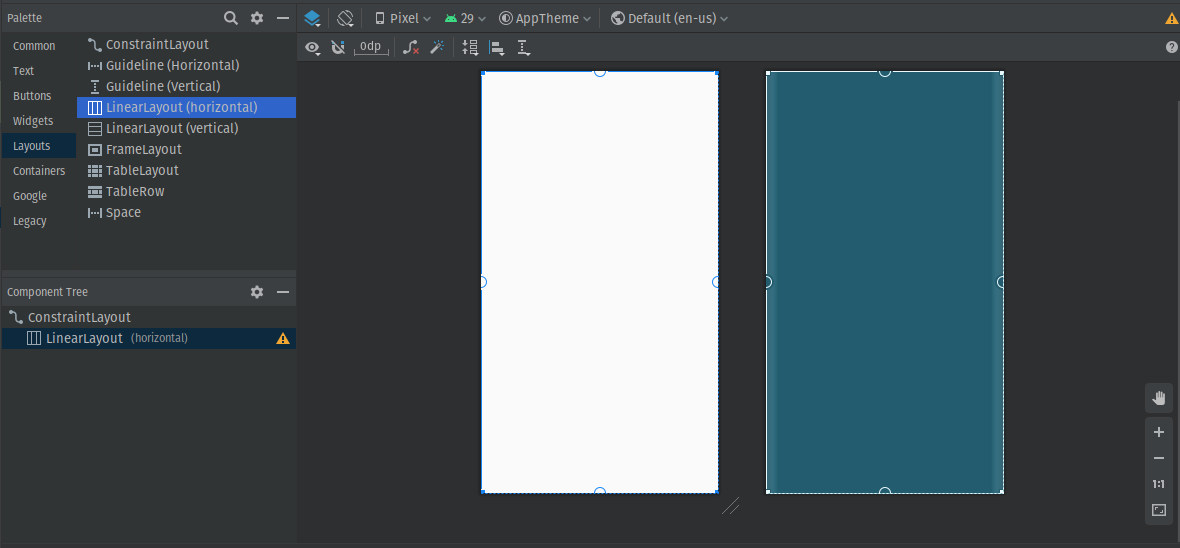
「Palette」->「Layouts」->「LinearLayout(horizontal)」をその下の「Component Tree」にドラッグ&ドロップします。
Paletteの虫眼鏡を押してListViewを検索します。
最近はRecyclerViewを使うらしいのですがめんどくさいのでListViewでお茶を濁します。
出てきた「ListView」を同じようにドラッグ&ドロップでComponent TreeのLinearLayoutの中に落とします。
Component Treeの中のRecyclerViewをクリックして右側のAttributes内のidを入力します。
idを設定します。ここではrobot-listとします。
追加できたら再ビルドします。
ListViewにデータを表示する
上で作ったListViewの中身にデータを入れます。
package com.rowma.rowmaexample

import android.os.Bundle
import android.widget.ArrayAdapter
import android.widget.ListView
import androidx.appcompat.app.AppCompatActivity
import com.rowma.rowma_kotlin.Rowma
import kotlinx.coroutines.Dispatchers
import kotlinx.coroutines.GlobalScope
import kotlinx.coroutines.async
import kotlinx.coroutines.launch
import org.json.JSONArray

class MainActivity : AppCompatActivity() {
    val rowma = Rowma("https://rowma.moriokalab.com")
    private var robots : JSONArray = JSONArray() // 追加
    private val robotUuids : ArrayList<String> = ArrayList() // 追加

    override fun onCreate(savedInstanceState: Bundle?) {
        super.onCreate(savedInstanceState)
        setContentView(R.layout.activity_main)
        getCurrentRobots()  // 追加
    }

    // 追加
    private fun getCurrentRobots() = GlobalScope.launch(Dispatchers.Main) {
        async(Dispatchers.Default) { rowma.currentConnectionList() }.await().let {
            robots = JSONArray(it.toString())
            for (i in 0 until robots.length()) {
                val item = robots.getJSONObject(i)
                robotUuids.add(item.getString("uuid"))
            }
            val robotListView : ListView = findViewById(R.id.robot_list)
            val arrayAdapter : ArrayAdapter<String> = ArrayAdapter(applicationContext, android.R.layout.simple_list_item_1, robotUuids)
            robotListView.adapter = arrayAdapter
        }
    }
}
再ビルドしてリストが表示されていれば成功です。
RobotActivityを追加
上でロボット一覧を取得・表示する画面を作りました。今度はロボット一覧からロボットを選択して操作を行う画面を追加します。
MainActivityを右クリックして「New」->「Activity」->「Empty Activity」をクリックします。
出てきた入力欄の「Activity Name」にRobotActivityと入力してFinishボタンを押します。
次にレイアウトを変更します。「res」->「layout」->「activity_robot.xml」を開きます。
開いたら既にあるコードを消して中身を以下に変更します。
<LinearLayout
    xmlns:android="http://schemas.android.com/apk/res/android"
    xmlns:tools="http://schemas.android.com/tools"
    xmlns:app="http://schemas.android.com/apk/res-auto"
    android:layout_width="match_parent"
    android:layout_height="match_parent"
    android:orientation="vertical"
    tools:context=".RobotActivity">

</LinearLayout>
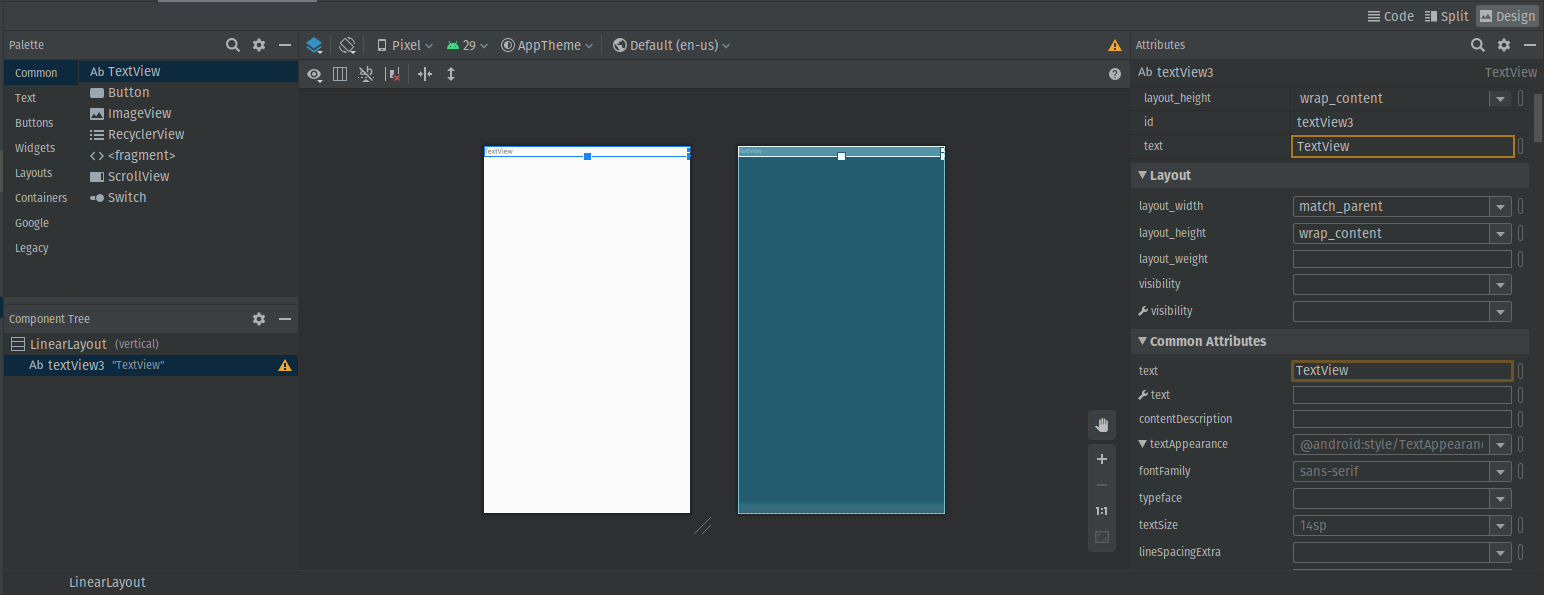
ひとまず分かりやすくテキストを置きます。PaletteペーンからTextViewを選択して適当な場所にドラッグ&ドロップします。
idにはrobot-uuidを指定します。
テキストはセンタリングしておきます。android:textAlignment="center"を<TextView>タグに追加します。
    <TextView
        android:id="@+id/robotUuid"
        android:layout_width="match_parent"
        android:layout_height="wrap_content"
        android:text="TextView"
        android:textAlignment="center" />
Warningが出ているので修正します。
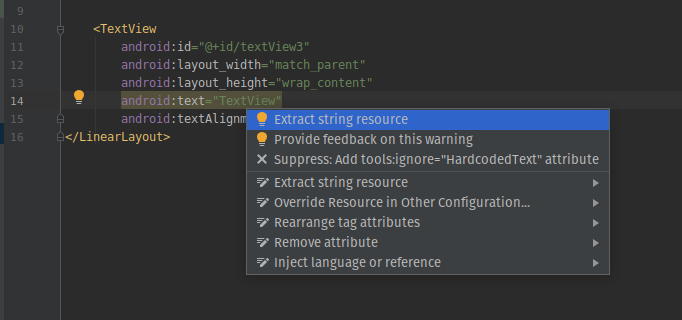
Codeに移動してandroid:text="TextView"をクリックしAlt + Enterを押します。
Extract string resourceをクリックします。出てきた入力欄にResource name: robotUuid、Resource value: Robot UUIDと入力してOKボタンを押します。
これでWarningが消えました。
MainActivityからRobotActivityに遷移する
以下のキャプチャのようにリストの要素を押すとMainActivityからRobotActivityに遷移するように実装します。
遷移にはIntentというものを使います。MainActivityのonCreate()にIntentの処理を書きます。
    override fun onCreate(savedInstanceState: Bundle?) {
        super.onCreate(savedInstanceState)
        setContentView(R.layout.activity_main)

        getCurrentRobots()

        // ここから追加
        val robotListView : ListView = findViewById(R.id.robot_list)
        robotListView.setOnItemClickListener { parent, view, position, id ->
            val intent : Intent = Intent(this, RobotActivity::class.java)
            this.startActivity(intent)
        }
    }
追加して再ビルドできたら完了です。
RobotActivityにUUIDを渡す
MainActivityのリストにあるUUIDをクリックするとそのUUIDをRobotActivityに渡したいです。
intent.putExtra()を使うとデータを遷移先のActivityに渡すことができます。
class MainActivity : AppCompatActivity() {
    val rowma = Rowma("https://rowma.moriokalab.com")
    private var robots : JSONArray = JSONArray()
    private val robotUuids : ArrayList<String> = ArrayList()

    override fun onCreate(savedInstanceState: Bundle?) {
        super.onCreate(savedInstanceState)
        setContentView(R.layout.activity_main)

        getCurrentRobots()

        val robotListView : ListView = findViewById(R.id.robot_list)
        robotListView.setOnItemClickListener { parent, view, position, id ->
            val intent = Intent(this, RobotActivity::class.java)
            intent.putExtra("ROBOT_UUID", robotUuids[position]) // 追加
            this.startActivity(intent)
        }
    }
    (中略)
}
RobotActivityでIntentのデータを受け取ってTextViewにappendします。
class RobotActivity : AppCompatActivity() {
    override fun onCreate(savedInstanceState: Bundle?) {
        super.onCreate(savedInstanceState)
        setContentView(R.layout.activity_robot)

        // ここから追加
        val robotUuid = intent.getStringExtra("ROBOT_UUID")
        val robotUuidTextView : TextView = findViewById(R.id.robotUuid)
        robotUuidTextView.append(robotUuid)
    }
}
ビルドしてロボットのUUIDが表示されれば成功です。
ロボットに接続する
ようやくロボットに対してアクションを起こします。
まずはMainActivityからRobotActivityに送信するデータをUUIDからrobot変数の中身をStringにしたJSONObjectへと置き換えます。
まずMainActivity.ktのonCreate()内を変更してタップされたロボットの情報を全部渡すようにします。
        val robotListView : ListView = findViewById(R.id.robot_list)
        robotListView.setOnItemClickListener { parent, view, position, id ->
            val intent = Intent(this, RobotActivity::class.java)
            intent.putExtra("ROBOT", robots[position].toString()) // ここ変更
            this.startActivity(intent)
        }
RobotActivityも変更します。
class RobotActivity : AppCompatActivity() {
    private var robot : JSONObject = JSONObject()  // ここ変更

    override fun onCreate(savedInstanceState: Bundle?) {
        super.onCreate(savedInstanceState)
        setContentView(R.layout.activity_robot)

        // ここ変更
        val robotString = intent.getStringExtra("ROBOT")
        robot = JSONObject(robotString)
        val robotUuidTextView : TextView = findViewById(R.id.robotUuid)
        robotUuidTextView.append(robot.getString("uuid"))
    }
}
そして最後にロボットに接続してトピックをpublishします。
class RobotActivity : AppCompatActivity() {
    private var robot : JSONObject = JSONObject()
    val rowma = Rowma("https://rowma.moriokalab.com") // 追加

    override fun onCreate(savedInstanceState: Bundle?) {
        super.onCreate(savedInstanceState)
        setContentView(R.layout.activity_robot)

        val robotString = intent.getStringExtra("ROBOT")
        robot = JSONObject(robotString)
        val robotUuidTextView : TextView = findViewById(R.id.robotUuid)
        robotUuidTextView.append(robot.getString("uuid"))

        rowma.connect() // 追加
        val msg = JSONObject() // 追加
        msg.put("data", "test message") // 追加
        rowma.publish(robot.getString("uuid"), "/chatter", msg) // 追加
    }
}
これでタップしたROSロボットに対して/chatterトピックが送信されます。RobotActivityが表示されるたびにROSにトピックが送信されています。
ひとまずこれで終わり。
その他
socket failed: EPERM (Operation not permitted)でアプリが落ちる
以下のエラーが出る場合は端末を操作してアプリを一度消してから再インストールしましょう。
E/AndroidRuntime: FATAL EXCEPTION: main
    Process: com.rowma.rowmaexample, PID: 15463
    java.net.SocketException: socket failed: EPERM (Operation not permitted)
