UnityのCinemachineのFreelookカメラは3Dゲームの三人称視点としてとても便利ですが、スクリプトで制御したい時の情報がまだまだ少ないかなと思っています。
そこで、今回はCinemachineのFreelookカメラで、そもそもの被写体オブジェクト(プレイヤーなど)に注視しつつ、他のオブジェクトにカメラを向ける方法をまとめてみました。
(これより良い方法があるよ!という方は是非コメントで教えてください... !
前置きがいらない人は本編からどうぞ〜
環境
Unity 2021.1.0f1
Cinemachine 2.7.3
すむ〜ずに敵の方に向けるようになりました。
— asiram@unityゲーム開発 (@asiramasiram) April 7, 2021
これだけなのにそれなりに時間を使ってしまった...!
cinemachineの入力値に、Mathf.SmoothDampを噛ませたものを流しております。 pic.twitter.com/inUoMSEDA1
CinemachineのFreelookカメラとは?
CinemachineはUnity公式から提供されているスクリプトなしでもいろんなカメラワークができちゃう、便利なアセットです。
基本的な動作や説明は素晴らしいこのサイト様が参考になります
https://light11.hatenadiary.com/entry/2019/10/24/220542
Freelookカメラは、そんなCinemachineのカメラの種類の一つです。
3Dゲームでよくある3人称視点を実現できるカメラです。
こちらの解説も、素晴らしいサイトにお任せしてしまいます。
https://light11.hatenadiary.com/entry/2019/08/11/160125
Cinemachine FreeLookカメラで任意の対象オブジェクトに向かせる
とりもあえずは最終的なコードを見てみましょう。
今回のスクリプトはCinemachineFreeLookがアタッチされているオブジェクトに、アタッチする想定で書かれています。
using UnityEngine;
using Cinemachine;

public class LookAtCamera : MonoBehaviour
{
    public Transform _target;

    CinemachineFreeLook _freeLookCamera;

    void Start()
    {
        _freeLookCamera = GetComponent<CinemachineFreeLook>();
    }

    void Update()
    {
        if (Input.anyKeyDown) LookAtTarget(_target.position);
    }

    void LookAtTarget(Vector3 target)
    {
        // それぞれの座標をカメラの高さに合わせる.
        float cameraHeight = _freeLookCamera.transform.position.y;
        Vector3 followPosition =
            new Vector3(_freeLookCamera.Follow.position.x, cameraHeight, _freeLookCamera.Follow.position.z);
        Vector3 targetPosition =
            new Vector3(target.x, cameraHeight, target.z);

        // それぞれのベクトルを計算.
        Vector3 followToTarget = targetPosition - followPosition;
        Vector3 followToTargetReverse = Vector3.Scale(followToTarget, new Vector3(-1, 1, -1));
        Vector3 followToCamera = _freeLookCamera.transform.position - followPosition;

        // カメラ回転の角度と方向を計算.
        Vector3 axis = Vector3.Cross(followToCamera, followToTargetReverse);
        float direction = axis.y < 0 ? -1 : 1;
        float angle = Vector3.Angle(followToCamera, followToTargetReverse);

        _freeLookCamera.m_XAxis.Value = angle * direction;
    }
}
うーん、意外にコード量が多くなってしまいました...
そして、これは冒頭のtwitterの動画のようにスムーズにカメラが動くわけではなく、一瞬で対象にカメラが向くようになっています。
スムーズに動くコードも最後のおまけで掲載されているので、そちらもご参考にどうぞ。
Freelookカメラを動かすための前提知識
Freelookカメラは、3つの円を上下しながら、円上をぐるぐる回ってカメラに写る対象を追いかけます。
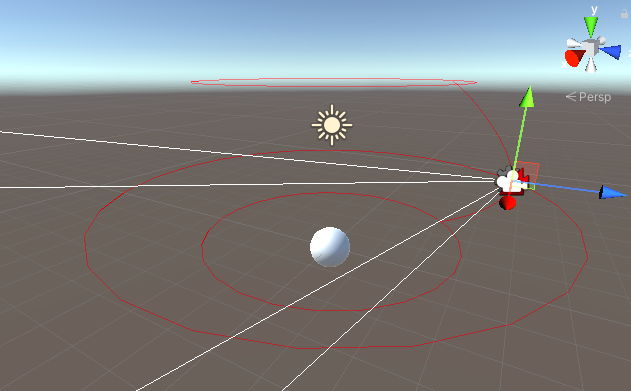
下記のように、m_XAxis.Valueに角度(0~360)を設定してあげれば、その分だけカメラが回転します。
注意が必要なのは、m_XAxis.Valueには都度回転してほしい角度を入力する必要があり、この変数には現在の回転状況は入っていません。
// カメラを60度回転させる.
_freeLookCamera.m_XAxis.Value = 60;
今回やりたいことを実現するためには、この円上をどれだけ回転させれば、カメラを対象に向かせることができるのかを計算する必要があります。
カメラの高さを合わせる
ではそれぞれのコード部分をみていきましょう。
以降、メインの処理であるLookAtTarget()メソッドの中身の処理を追います。
float cameraHeight = _freeLookCamera.transform.position.y;
Vector3 followPosition =
    new Vector3(_freeLookCamera.Follow.position.x, cameraHeight, _freeLookCamera.Follow.position.z);
Vector3 targetPosition =
    new Vector3(target.x, cameraHeight, target.z);
この部分は単純ですが、意外に重要です。
カメラは通常高い位置にいるので、それぞれ(カメラに向かせたい対象:targetPosition、現在の注視対象:followPosition)の座標のY成分をカメラの高さに合わせてあげています。
高さを合わせてあげないと、ベクトル同士の角度を出すときに欲しい値がうまく算出できません。
それぞれのベクトルを計算
(少なくとも自分には)お辛いベクトル計算の時間です。
Vector3 followToTarget = targetPosition - followPosition;
Vector3 followToTargetReverse = Vector3.Scale(followToTarget, new Vector3(-1, 1, -1));
Vector3 followToCamera = _freeLookCamera.transform.position - followPosition;
わかりやすくするために図を描いてみました。
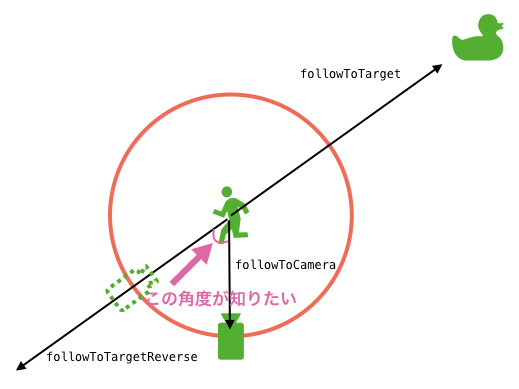
こんな感じで、必要な角度を算出するためにそれぞれのベクトルを作ります。
カメラの回転角と方向の計算、適用
最後に、カメラを回転させる角度とその方向を計算して、FreeLookカメラに反映させます。
Vector3 axis = Vector3.Cross(followToCamera, followToTargetReverse);
float direction = axis.y < 0 ? -1 : 1;
float angle = Vector3.Angle(followToCamera, followToTargetReverse);

_freeLookCamera.m_XAxis.Value = angle * direction;
Vector3.Cross()を使用して、どちらの方向にカメラを動かすかを計算しています。
また、Vector3.Angle()で二つのベクトルの角度を求めて、最後にFreeLookカメラのm_XAxis.Valueに角度と方向をかけたものを設定してあげれば、対象にカメラが向きます!
まとめ
CinemachineのFreeLookカメラで、注視対象を捉えつつ任意の対象の方向にカメラを向かせる処理ができました。
こういう計算にはやっぱりベクトルの計算が必要で、自分は毎回思い出しながら紙に書いたりして頑張って計算しています。
この記事が、どこかの悩めるCinemachineユーザーに届くことを祈っております〜
おまけ
最後に、詳細な解説は避けますが、自分が冒頭のtwitter動画で実装した、スムーズに動くカメラ移動のコードを付け加えたものを載せておきます!
ポイントは、Mathf.SmoothDamp()を使用して、線形ではない良い感じの補間を使用して入力を与えてあげるところです。
(あと、SmoothDamp()の使い方が奇抜すぎるかもしれません...。もっと良い方法があったら是非教えてください〜)
using UnityEngine;
using Cinemachine;

public class LookAtCamera : MonoBehaviour
{
    public Transform _target;

    CinemachineFreeLook _freeLookCamera;
    bool _isAutoLookAt;
    float _autoLookAtAngle;
    float _autoLookAtAngleProgress;
    float _autoLookAtCurrentVelocity;

    void Start()
    {
        _freeLookCamera = GetComponent<CinemachineFreeLook>();
    }

    void Update()
    {
        if (Input.anyKeyDown) LookAtTarget(_target.position);

        if (_isAutoLookAt)
        {
            float angle = Mathf.SmoothDamp(
                _autoLookAtAngleProgress, _autoLookAtAngle, ref _autoLookAtCurrentVelocity, 0.2f);

            // 前回との差分を設定.
            _freeLookCamera.m_XAxis.Value = angle - _autoLookAtAngleProgress;
            _autoLookAtAngleProgress = angle;

            // だいたい目標角度になったら終了.
            if (Mathf.Abs((int)_autoLookAtAngleProgress) >= Mathf.Abs((int)_autoLookAtAngle)) _isAutoLookAt = false;
        }
    }

    void LookAtTarget(Vector3 target)
    {
        // それぞれの座標をカメラの高さに合わせる.
        float cameraHeight = _freeLookCamera.transform.position.y;
        Vector3 followPosition =
            new Vector3(_freeLookCamera.Follow.position.x, cameraHeight, _freeLookCamera.Follow.position.z);
        Vector3 targetPosition =
            new Vector3(target.x, cameraHeight, target.z);

        // それぞれのベクトルを計算.
        Vector3 followToTarget = targetPosition - followPosition;
        Vector3 followToTargetReverse = Vector3.Scale(followToTarget, new Vector3(-1, 1, -1));
        Vector3 followToCamera = _freeLookCamera.transform.position - followPosition;

        // カメラ回転の角度と方向を計算.
        Vector3 axis = Vector3.Cross(followToCamera, followToTargetReverse);
        float direction = axis.y < 0 ? -1 : 1;
        float angle = Vector3.Angle(followToCamera, followToTargetReverse);

        _autoLookAtAngle = angle * direction;
        _isAutoLookAt = true;
        _autoLookAtCurrentVelocity = 0;
        _autoLookAtAngleProgress = 0;
    }
}