最近流行のDeepLearningを触ってみたいと思っていたところ、まずはkerasでmnistを動かしてみるのがよいとアドバイスいただいたので試してみました。
とりあえず動いたものの、pythonの知識もほとんどなく、機械学習も初心者なので、コードを見てもよく分からん。ということで、気になるところを調べてみました。同じような方の参考になれば幸いです。
Kerasとは
Kerasは,Pythonで書かれた,TensorFlowまたはCNTK,Theano上で実行可能な高水準のニューラルネットワークライブラリです. Kerasは,迅速な実験を可能にすることに重点を置いて開発されました. アイデアから結果に到達するまでのリードタイムをできるだけ小さくすることが,良い研究をするための鍵になります.
TensorFlowやTheanoの知識がなくても、手軽に深層学習を試すことが出来るライブラリっぽい。日本語のドキュメントもあって取っつきやすい。
mnistとは
28x28ピクセル、白黒画像の 手書き数字 のデータセット。各ピクセルは0(白)~255(黒)の値をとる。6万枚の学習用画像と1万枚のテスト画像が入っている。
こちらのkerasのドキュメントにも説明がある:https://keras.io/ja/datasets/#mnist
他にも「ボストンの住宅価格回帰データセット」とか色々あって気になる。
サンプルを動かす
githubにあるこちらのサンプルを落としてきて動かしました。
https://github.com/fchollet/keras/blob/master/examples/mnist_mlp.py
少しずつ解説していきます。
import keras
from keras.datasets import mnist
from keras.models import Sequential
from keras.layers import Dense, Dropout
from keras.optimizers import RMSprop

batch_size = 128
num_classes = 10
epochs = 20
↑ epochsは「訓練データを何回繰り返して学習させるか」の回数です。上の場合は20回。
こちらのページの解説がわかりやすかったです→ エポック(epoch)数とは
データの読込と整形
# the data, shuffled and split between train and test sets
(x_train, y_train), (x_test, y_test) = mnist.load_data()
↑この一行でmnistデータセットをどこかからダウンロードしてきてくれます。便利!
x_で始まるのが画像データ、y_で始まるのが0~9のラベルです。
次に読み込んだ画像データをネットワークに入力出来る形に変形していきます。訓練データ、テストデータそれぞれに同じ処理を施しています。
x_train = x_train.reshape(60000, 784) # 2次元配列を1次元に変換
x_test = x_test.reshape(10000, 784)
x_train = x_train.astype('float32')   # int型をfloat32型に変換
x_test = x_test.astype('float32')
x_train /= 255                        # [0-255]の値を[0.0-1.0]に変換
x_test /= 255
print(x_train.shape[0], 'train samples')
print(x_test.shape[0], 'test samples')
次にラベルデータも変換します。Kerasの to_categorical関数を使って、整数値を2値クラスの配列に変換しています。kerasのドキュメントはこちら。
例えば、5という値は[0, 0, 0, 0, 0, 1, 0, 0, 0, 0]という配列に変換されます。
# convert class vectors to binary class matrices
y_train = keras.utils.to_categorical(y_train, num_classes)
y_test = keras.utils.to_categorical(y_test, num_classes)
モデル構築
データの準備が出来たので、モデルを構築していきます。Sequentialという箱を用意して、その中にaddで各層を追加していきます。以下のサンプルではDenseを3つ、Dropoutを2つ追加しています。
model = Sequential()
model.add(Dense(512, activation='relu', input_shape=(784,)))
model.add(Dropout(0.2))
model.add(Dense(512, activation='relu'))
model.add(Dropout(0.2))
model.add(Dense(10, activation='softmax'))

model.summary()
model.compile(loss='categorical_crossentropy',
              optimizer=RMSprop(),
              metrics=['accuracy'])
DenseとDropoutについて詳しく見てみます。
-
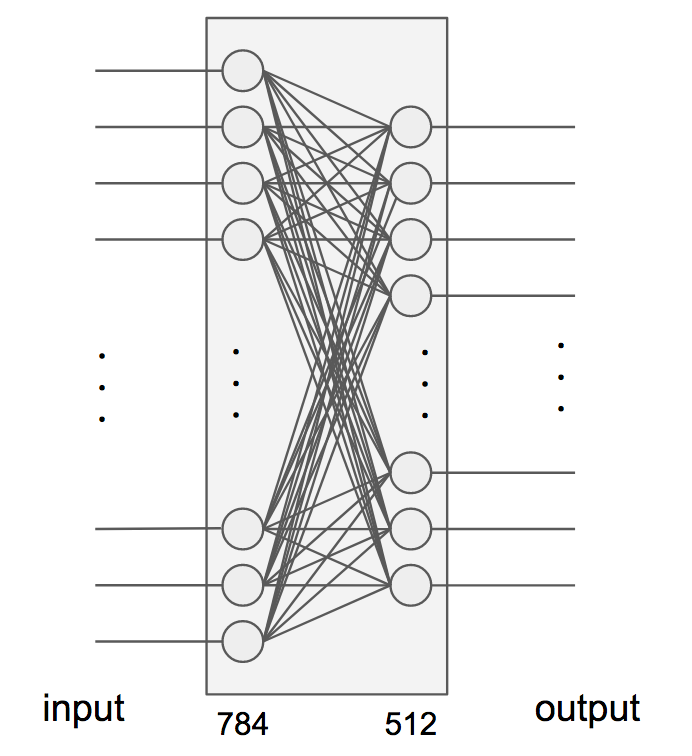
Dense は全結合のニューラルネットワークレイヤーです。kerasのドキュメントはこちら。第1引数で出力の次元数を指定します。入力の次元数はinput_shapeで指定します(指定しない場合は出力と同じ)。サンプルでは
Dense(512, activation='relu', input_shape=(784,))
となっているので、入力が784(=28x28)次元で、出力が512次元です。
-
Dropout は指定した割合で入力の値を0にするレイヤです。サンプルでは
Dropout(0.2)となっているので20%の入力が破棄されているのがわかります。過学習を防ぐのに有効らしいです。kerasのドキュメントはこちら。
Denseではactivation引数で活性化関数を指定します。サンプルコードではreluとsoftmaxが使われています。
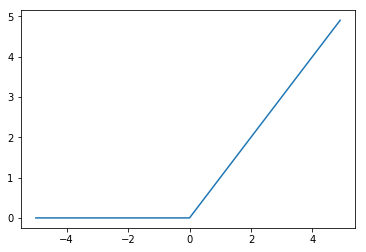
- ReLU: 入力が0以下の時は出力も0、入力が0より大きい場合はそのまま出力します. 式で書くと$f(x) = max(0, x)$ で、グラフにするとこんな感じです。
- Softmax: 各成分の値が0~1の範囲で、各成分の和が1になるような関数です。このサイトの説明が分かりやすいです。
以上でモデルの構築は完了です。
学習
次は、指定されたエポック数でモデルを訓練します。
history = model.fit(x_train, y_train,  # 画像とラベルデータ
                    batch_size=batch_size,
                    epochs=epochs,     # エポック数の指定
                    verbose=1,         # ログ出力の指定. 0だとログが出ない
                    validation_data=(x_test, y_test))
評価
学習したモデルの精度評価を行います。
score = model.evaluate(x_test, y_test, verbose=0)
print('Test loss:', score[0])
print('Test accuracy:', score[1])
実行結果
実行すると下記のようなログが出力されます。エポックが進む毎に少しずつ精度が上がっていくのが確認できます。
60000 train samples
10000 test samples
_________________________________________________________________
Layer (type)                 Output Shape              Param #
=================================================================
dense_1 (Dense)              (None, 512)               401920
_________________________________________________________________
dropout_1 (Dropout)          (None, 512)               0
_________________________________________________________________
dense_2 (Dense)              (None, 512)               262656
_________________________________________________________________
dropout_2 (Dropout)          (None, 512)               0
_________________________________________________________________
dense_3 (Dense)              (None, 10)                5130
=================================================================
Total params: 669,706.0
Trainable params: 669,706.0
Non-trainable params: 0.0
_________________________________________________________________
Train on 60000 samples, validate on 10000 samples
Epoch 1/20
60000/60000 [==============================] - 9s - loss: 0.2496 - acc: 0.9223 - val_loss: 0.1407 - val_acc: 0.9550
…(省略)…
Epoch 20/20
60000/60000 [==============================] - 8s - loss: 0.0201 - acc: 0.9950 - val_loss: 0.1227 - val_acc: 0.9829
Test loss: 0.122734002527
Test accuracy: 0.9829

