はじめに
iPhoneアプリ開発をしていて,音楽系の記事を調べると日本語の記事が少なかったり,わかりづらかったりしたため,メモ程度に.
今回は録音周りを書きます.
環境
- High Sierra 10.13
- XCode 9.2
- Swift 4
- iPhoneX(実機でしかテストできないため)
実装
1.StoryBoardで必要な部品を配置
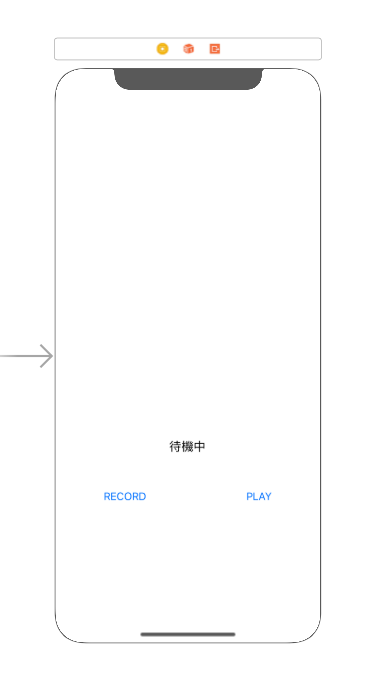
今回必要になる「録音ボタン」「再生ボタン」「ラベル」を配置する.(ラベルは現在の状態を確認するため)

次に録音時にマイクを使用するため,Info.plistにマイクの許可を書く
Key : Privacy - Microphone Usage Description
Value : マイク使用のため(任意の文字列)
2.コーディング
ViewController.swiftを開いてAVFoundationをインポートする.
import AVFoundation
必要となるプロトコルを記述する.
class ViewController: UIViewController, AVAudioRecorderDelegate, AVAudioPlayerDelegate {
先程StoryBoardに配置した部品を書き,関連付けをしておく.
    @IBOutlet var label: UILabel!
    @IBOutlet var recordButton: UIButton!
    @IBOutlet var playButton: UIButton!
次に録音と再生で使用するAVAudioRecorderとAVAudioPlayerを宣言する.
また,現在が録音状態か,再生状態かを判別するbool型の変数も宣言しておく.
    var audioRecorder: AVAudioRecorder!
    var audioPlayer: AVAudioPlayer!
    var isRecording = false
    var isPlaying = false
今回のメインの録音をするメソッドを書きます.
    @IBAction func record(){
        if !isRecording {

            let session = AVAudioSession.sharedInstance()
            try! session.setCategory(AVAudioSessionCategoryPlayAndRecord)
            try! session.setActive(true)

            let settings = [
                AVFormatIDKey: Int(kAudioFormatMPEG4AAC),
                AVSampleRateKey: 44100,
                AVNumberOfChannelsKey: 2,
                AVEncoderAudioQualityKey: AVAudioQuality.high.rawValue
            ]

            audioRecorder = try! AVAudioRecorder(url: getURL(), settings: settings)
            audioRecorder.delegate = self
            audioRecorder.record()

            isRecording = true

            label.text = "録音中"
            recordButton.setTitle("STOP", for: .normal)
            playButton.isEnabled = false

        }else{

            audioRecorder.stop()
            isRecording = false

            label.text = "待機中"
            recordButton.setTitle("RECORD", for: .normal)
            playButton.isEnabled = true

        }
    }
録音するためのsettingsを書いてあげて,URLの場所に録音しています.
次にURLを取得しているメソッドを書きます.
    func getURL() -> URL{
        let paths = FileManager.default.urls(for: .documentDirectory, in: .userDomainMask)
        let docsDirect = paths[0]
        let url = docsDirect.appendingPathComponent("recording.m4a")
        return url
    }
もし,いくつも録音したいという場合は「"recording.m4a"」という文字列のところを毎回変わる文字列(日付時間など)を生成してあげて,配列などに入れてUserDefaultsなどで保存しておくと良いと思います.
最後に録音した音声を再生するための再生ボタンを作成したら完成です.
    @IBAction func play(){
        if !isPlaying {

            audioPlayer = try! AVAudioPlayer(contentsOf: getURL())
            audioPlayer.delegate = self
            audioPlayer.play()

            isPlaying = true

            label.text = "再生中"
            playButton.setTitle("STOP", for: .normal)
            recordButton.isEnabled = false

        }else{

            audioPlayer.stop()
            isPlaying = false

            label.text = "待機中"
            playButton.setTitle("PLAY", for: .normal)
            recordButton.isEnabled = true

        }
    }
2つのボタンに関連付けすることも忘れずに.
参考にしたサイト
-
iOS Revisited How to Record and Play Audio in iPhone using swift 4
-
nackpan Blog [iOS][Swift]録音する
さいごに
音楽系のアプリを作っている時によく出てくるformatやsettingなどは余り理解せず書いているので,説明できる方などいましたらコメント等宜しくお願い致します.
また,今回のプロジェクトはGitHubにも上げておきます.
リポジトリ : RecorderSample