自社ECサイトに決済機能を実装しています。
前回のSquareの実装に引き続き、今度はAmazonPay決済を実装しましたが、
丸2日間、壁にぶち当たる事態に陥ったためこちらにまとめます。
参考にさせていただいたのは以下↓
PHPとAmazon Payを使ったクレジットカード決済サンプル
Amazon Payの実装でつまづきやすいこと一覧
参考になる記事をありがとうございました。
やりたいこと
・ 自社サイトに 「AmazonPayでお支払い」 ボタンを表示
・ AmazonPayポップアップが開き、カードなど選択して決済完了
ハマったところ
決済は正常に完了しているのに、配送先情報が取得できなかった。
オーダー情報の取得は GetOrderReferenceDetails APIでできるが、
正しくパラメータを渡してもレスポンス内に配送先(Destination)が無い状態
原因
アドレス帳ウィジェットを表示していなかった・・・・
Amazon公式のインテグレーションガイドを読みながら実装すれば良かったものを、
ガイド内のサンプルコードがPythonとRubyしか無いのでさらっと最初に目を通しただけで
その後上記Qiita記事+APIリファレンスを参照していたため初歩的なところでつまづくことに。。
解決したので実装をまとめていきます!!!###
全体の流れ##
- AmazonPayセラーセントラル(管理画面)上の設定と必要なキーの確認
- ボタンウィジェットを表示
- アドレス帳ウィジェットと支払いウィジェットを表示
- 決済処理
1. AmazonPayセラーセントラル(管理画面)上の設定と必要なキーの確認##
セラーセントラルにログインし、画面右上部で Amazonログインをセレクト。
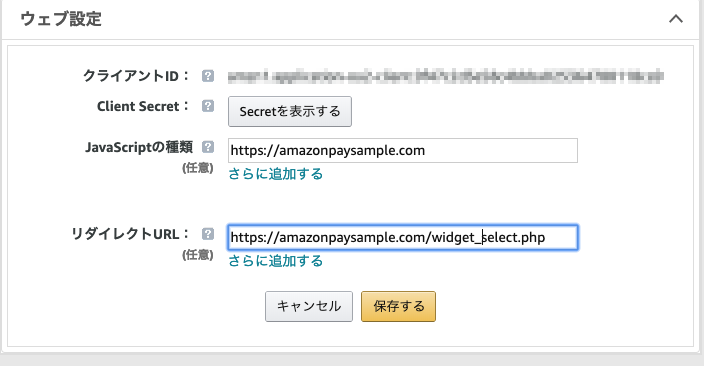
アプリケーションを登録し、ウェブ設定を行います。
・ Javascriptの種類・・・日本語訳めちゃくちゃですが開発環境のルートURLを設定すると良い
・ リダイレクトURL・・・AmazonPayボタンをクリックしログイン後にリダイレクトするページ

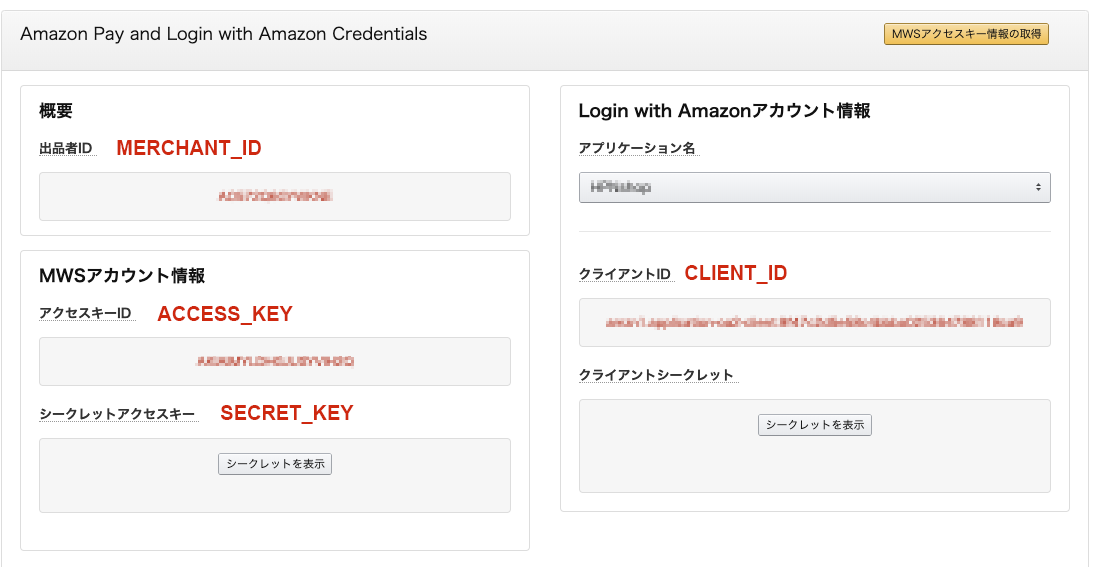
次に実装時必要となる各種キーを確認しておきます。
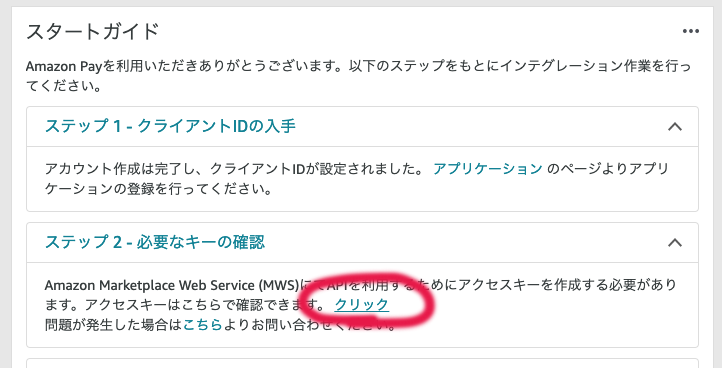
セラーセントラルの画面右上部でAmazonpay(テスト環境)をセレクト。
ステップ2 必要なキーの確認をクリック

必要となるキーは以下の4箇所です

また、Amazonpay(テスト環境)のインテグレーションからテストアカウントも作っておきましょう。
2. ボタンウィジェットを表示##
<!DOCTYPE html>
<html>
<head>
<meta charset="utf-8">
<title>AmazonPaySample</title>
</head>

<body>
<script async="async" src='https://origin-na.ssl-images-amazon.com/images/G/09/EP/offAmazonPayments/sandbox/prod/lpa/js/Widgets.js'></script>
<div id="AmazonPayButton"></div>
<script>
    window.onAmazonLoginReady = function () {
        amazon.Login.setClientId('--- CLIENT_ID ---');
    };
    window.onAmazonPaymentsReady = function() {
        showButton();
    };
</script>
<script>
function showButton() {
    var authRequest;
    OffAmazonPayments.Button("AmazonPayButton", "--- MERCHANT_ID ---", {
        type: "PwA",
        color: "Gold",
        size: "large",
        language: "jp",
        authorization: function () {
					loginOptions = {scope: 'profile postal_code payments:widget payments:shipping_address', popup: true};
            authRequest = amazon.Login.authorize(loginOptions, "https://amazonpaysample.com/widget_select.php");
        },
        onError: function(error) {
            // error handling
        }
    });
};
</script>
</body>
</html>
<div id="AmazonPayButton"></div> 箇所にボタンが表示されます。
CLIENT_IDとMERCHANT_IDの箇所は1で確認した値をセットしてください。
配送先の情報を取得したい場合はloginOptionsのscopeに ”payments:shipping_address” を指定しておきます。
3. アドレス帳ウィジェットと支払いウィジェットを表示
<?php
    session_start();
    //アクセストークンをセッションに保存しておく
    $_SESSION['access_token'] = $_GET['access_token'];
?>
<!DOCTYPE html>
<html>
<head>
<meta charset="utf-8">
<meta name="viewport"
content="width=device-width,initial-scale=1.0, maximum-scale=1.0"/>
<title>Amazonpayご住所、お支払い情報の選択</title>
</head>

<body>
<!-- アドレス帳ウィジェット -->
<div id="addressBookWidgetDiv" style="width:300px; height:240px;"></div>
<!-- 支払い選択ウィジェット -->
<div id="walletWidgetDiv" style="width:300px; height:240px;"></div>
<script>
    window.onAmazonLoginReady = function() {
        amazon.Login.setClientId('--- CLIENT_ID ---');
    };
</script>
<script src='https://origin-na.ssl-images-amazon.com/images/G/09/EP/offAmazonPayments/sandbox/prod/lpa/js/Widgets.js'></script>
<script type="text/javascript">

	window.onAmazonPaymentsReady = function() {
      showAddressBookWidget();
  };
	function showAddressBookWidget() {
        new OffAmazonPayments.Widgets.AddressBook({
          sellerId: '--- MERCHANT_ID ---',

          onReady: function (orderReference) {
              var orderReferenceId = orderReference.getAmazonOrderReferenceId();
              var el;
              if ((el = document.getElementById("orderReferenceId"))) {
                el.value = orderReferenceId;
              }
              //アドレス帳ウィジェット表示確認後にお支払いウィジェットを表示する
              showWalletWidget(orderReferenceId);
          },
          onAddressSelect: function (orderReference) {
          },
          design: {
              designMode: 'responsive'
          },
          onError: function (error) {
              // エラー処理
              // @see https://payments.amazon.com/documentation/lpwa/201954960
              console.log('OffAmazonPayments.Widgets.AddressBook', error.getErrorCode(), error.getErrorMessage());
          }
        }).bind("addressBookWidgetDiv");
    }

    function showWalletWidget(orderReferenceId) {
        new OffAmazonPayments.Widgets.Wallet({
          sellerId: '--- MERCHANT_ID ---',
          amazonOrderReferenceId: orderReferenceId,
          onReady: function(orderReference) {
              console.log(orderReference.getAmazonOrderReferenceId());
              //★ 決済ページ渡すorderReferenceIdを設定
              document.getElementById("orderReferenceId").value = orderReferenceId;
          },
          onPaymentSelect: function() {
              console.log(arguments);
          },
          design: {
              designMode: 'responsive'
          },
          onError: function(error) {
              // エラー処理
              // @see https://payments.amazon.com/documentation/lpwa/201954960
              console.log('OffAmazonPayments.Widgets.Wallet', error.getErrorCode(), error.getErrorMessage());
          }
        }).bind("walletWidgetDiv");
    }
</script>
<script>
    window.onAmazonLoginReady = function() {
        amazon.Login.setClientId('--- CLIENT_ID ---');
    };
</script>
<script
	async='async' type='text/javascript' src='https://static-fe.payments-amazon.com/OffAmazonPayments/jp/sandbox/lpa/js/Widgets.js'>
</script>
// 決済実行ページにorderReferenceIdをPOSTで渡す
<form action="azpayment.php" method="POST">
    <input type="hidden" id="orderReferenceId" name="orderReferenceId">
    <input type="submit" value="購入する">
</form>
</body>
</html>
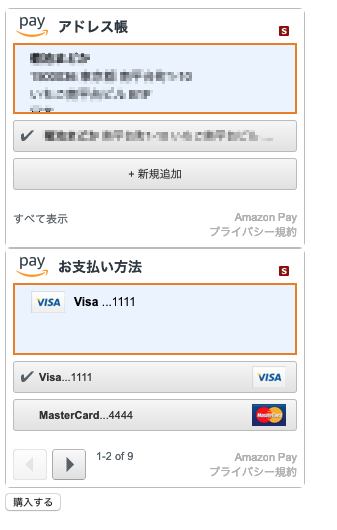
ポップアップウィンドウでログイン後、2つのウィジェットが表示されればOKです。
購入するボタンをクリックすると決済処理に進みます。

4. 決済処理##
<?php

//SDKの場所は環境により変更してください↓
require 'vendor/amzn/amazon-pay-sdk-php/AmazonPay/Client.php';

Use AmazonPay\Client;

class Payment
{
    const MERCHANT_ID = '---MERCHANT_ID---';
    const AMOUNT = 100; //決済額

    public function execute()
    {
        $referenceId = $_REQUEST['orderReferenceId'];

        // Clientインスタンスを作成
        $config = array(
            'merchant_id' => self::MERCHANT_ID,
            'access_key' => '---ACCESS_KEY---',
            'secret_key' => '---SECRET_KEY---',
            'client_id' => '---CLIENT_ID---',
            'currency_code' => 'jpy',
            'region' => 'jp',
            'sandbox' => true,
        );
        $client = new Client($config);

        // 注文情報をセット
        $setOrderParams = array(
            'merchant_id' => self::MERCHANT_ID,
            'amazon_order_reference_id' => $referenceId,
            'amount' => self::AMOUNT,
            'currency_code' => 'JPY',
            'seller_note' => 'ご購入ありがとうございます',
            'seller_order_id' => 'Order_' . time(),
            'store_name' => 'サンプルストア',
        );
        $client->SetOrderReferenceDetails($setOrderParams);

        if ($client->success === false) {
            header("Location:https://amazonpaysample.com/error");
            exit;
        }

        // 注文情報を確定
        $confirmOrderParams = array(
            'amazon_order_reference_id' => $referenceId
        );
        $client->confirmOrderReference($confirmOrderParams);

        if ($client->success === false) {
            header("Location:https://amazonpaysample.com/error");
            exit;
        }

        // オーソリをリクエスト
        $authorizeParams = array(
            'amazon_order_reference_id' => $referenceId,
            'authorization_amount' => self::AMOUNT,
            'authorization_reference_id' => 'Order_' . time(),
            'seller_authorization_note' => 'Authorizing payment',
            'transaction_timeout' => 0,
        );
        $response = $client->authorize($authorizeParams);
        $result = $response->toArray();

        $amazonAuthorizationId = $result['AuthorizeResult']['AuthorizationDetails']['AmazonAuthorizationId'];
        if (empty($amazonAuthorizationId)) {
            header("Location:https://amazonpaysample.com/error");
            exit;
        }
        if ($client->success === false) {
            header("Location:https://amazonpaysample.com/error");
            exit;
        }

        // 請求情報を確定
        $captureParams = array(
            'amazon_authorization_id' => $amazonAuthorizationId,
            'capture_amount' => self::AMOUNT,
            'currency_code' => 'JPY',
            'capture_reference_id' => 'Order_' . time(),
            'seller_capture_note' => '購入が完了しました',
        );
        $response = $client->capture($captureParams);
        $result = $response->toArray();

        // OrderReferenceを取得
        session_start();
        $token = $_SESSION['access_token'];
	$GetOrderReferenceDetailsParams = array(
            'amazon_order_reference_id' => $referenceId,
            'address_consent_token' =>  $token
        );
	$response = $client->GetOrderReferenceDetails($GetOrderReferenceDetailsParams);
        // 注文詳細、配送先情報等の取得
        // サンクスメールやDB登録等はこれを使用する
        $result = $response->toArray();

        // 注文の確定に失敗したらオーソリを取り消して、注文をクローズする
        if ($result['ResponseStatus'] !== '200') {
            $cancelParams = array(
                'merchant_id' => self::MERCHANT_ID,
                'amazon_order_reference_id' => $referenceId,
            );
            $client->cancelOrderReference($cancelParams);
            $closeParams = array(
                'merchant_id' => self::MERCHANT_ID,
                'amazon_authorization_id' => $amazonAuthorizationId,
            );
            $client->closeAuthorization($closeParams);

            header("Location:https://amazonpaysample.com/error");
            exit;
        }
        header("Location:https://amazonpaysample.com/thankyou");
        exit;
    }
}

$payment = new Payment();
$payment->execute();
?>
セラーセントラルの取引管理上の取引詳細に配送先情報が表示されていることを確認できました。

おわりに##
決済関連のサンプルや実装してみた記事ってなんか少ないように感じます。
さらっとドキュメント見てできて当たり前なのかもしれないのですが・・
「Amazonpayちょっと入れてみてよ」って言われて同じくハマってる方の力になれれば幸いです。
質問やご指摘などありましたらコメントください。