動機
先日、都内にある国立大学の博物館を見学しました。そこでは展示ごとにQRコードが付与されており、スマホカメラでスキャンすると解説Webページへ飛ぶ仕様になっていました。
その時、ふと「ここで、普段使っているGemini Liveが使えたら面白いのでは?」と思いつきました。
QRコードをスキャンするだけで、自動的に音声ガイドが始まり、さらに気になったことは音声で質問して即座に答えが返ってくる——そんな体験です。そこで、このアイデアを形にするため「博物館向けGemini Liveアプリ」を試作してみました。
開発手順
ベースコードの準備
Google AI Studio上にGemini Liveのウエブアプリ雛形が公開されておりましたので、これを参考にGemini Live APIを活用したアプリを制作します。
https://aistudio.google.com/apps/bundled/live_audio?showPreview=true&showAssistant=true
これはReactベースのアプリですが、普段、私はSvelteを使っています。そこで、Gemini CLIへReactベースのコードをSvelteベースへ変換してもらいました。
https://github.com/araobp/godot-museum/tree/main/misc/live-audio-sveltekit5
更に、このコードを理解するため、VS Code向けGemini Pluginへ、ベースコード上の各コードブロックへコメントを付与してもらいました。これにより、処理の流れを理解することが出来ました。最近、コードが先、仕様書が後みたいな事を言う方々もおりますが、私も、気がついてみたら、GeminiへREADMEとかコメントを書かせている感じです。
QRコードリーダ・画像キャプチャー機能の追加
Gemini Liveを博物館音声ガイドとして活用するには、次のコンテキストをリアルタイムでGemini Liveへ与える必要があります:
- 見学者の目の前にある展示物が何か
- その展示物の説明文
- 見学者は展示物のどこを見ているのか
そこで、ベースコードへ、QRコードリーダ、画像キャプチャー機能、及び、QRコードへ紐づいた説明文をGemini Liveへ送信する機能を追加しました。
まずは、QRコードリーダ機能の追加です。
JavaScript向けQRコードリーダのライブラリとしてはjsQRが有名です:
https://github.com/cozmo/jsQR
jsQRをベースとし、Svelte向けCameraコンポーネント(Camera.svelte)を新たに追加します。このコンポーネントは、QRコードの自動読み取り、及び、カメラ画像キャプチャー機能を提供します。

以下はCamera.svelteのコード:
<script>
import jsQR from "jsqr";
import { onMount } from "svelte";
/**
* Component properties for configuring the QR code reader.
* @prop {number} [z_index=10] - The z-index for the overlay canvas.
* @prop {boolean} [enabled=false] - Toggles the QR code reader's active state.
* @prop {string | null} [qr_code=null] - A bindable property that holds the decoded QR code data.
* @prop {(msg: string) => void | null} [updateStatus=null] - A callback function to update the status message in the parent component.
* @prop {() => string} [captureImage] - A bindable function that captures the current video frame and returns it as a base64 string.
*/
let {
z_index = 10,
enabled = false,
qr_code = $bindable(),
updateStatus = null,
captureImage = $bindable(),
} = $props();
/**
* State variables for DOM element bindings.
* - video: The <video> element that displays the live camera feed.
* - canvas: An off-screen canvas to capture video frames for analysis.
* - rectCanvas: An on-screen canvas to draw a rectangle around a detected QR code.
*/
let video = $state();
let canvas = $state();
let rectCanvas = $state();
/**
* Draws a rectangle on the canvas to highlight the detected QR code.
* This is done by creating a single path connecting the corner points and stroking it.
* @param {CanvasRenderingContext2D} ctx - The rendering context of the canvas to draw on.
* @param {object} location - The location object from the jsQR library, containing the corner points of the QR code.
*/
const drawRect = (ctx, location) => {
ctx.beginPath();
ctx.moveTo(location.topLeftCorner.x, location.topLeftCorner.y);
ctx.lineTo(location.topRightCorner.x, location.topRightCorner.y);
ctx.lineTo(location.bottomRightCorner.x, location.bottomRightCorner.y);
ctx.lineTo(location.bottomLeftCorner.x, location.bottomLeftCorner.y);
ctx.closePath();
ctx.lineWidth = 4;
ctx.strokeStyle = "blue";
ctx.stroke();
};
/**
* Manages the QR code reading process. When enabled, it requests access to the
* device's rear camera. Once the video stream is active, it continuously
* captures frames, scans them for a QR code using jsQR, and highlights any
* detected code on an overlay canvas. When disabled, it stops the camera stream
* to release resources. It also handles and reports errors, such as when
* camera access is denied.
*/
const startReadingQrCode = async () => {
/**
* Defines the media constraints for `getUserMedia`. It requests only video
* from the rear-facing camera ("environment") and disables audio.
*/
const constraints = {
audio: false,
video: {
facingMode: "environment", // Specifies the rear camera
},
};
if (enabled) {
try {
// Prompt for camera access and assign the resulting MediaStream to the video element.
video.srcObject =
await navigator.mediaDevices.getUserMedia(constraints);
//updateStatus("Camera access granted. Starting capture...");
/**
* This event handler is triggered once the video's metadata is loaded.
* It starts video playback, sets up the canvases for QR code scanning, and
* initiates a recurring loop (`scanFrame`) to continuously analyze video
* frames for QR codes.
*/
video.onloadeddata = () => {
video.play();
/**
* A recursive function that continuously scans for QR codes.
* It draws the current video frame to a canvas, gets the image data,
* and uses the jsQR library to detect a code. If a code is found, it is
* highlighted and its data is stored. The function then uses
* `requestAnimationFrame` to schedule the next scan, synchronizing it
* with the browser's rendering cycle for optimal performance.
*/
// Set the dimensions of both the off-screen capture canvas and the
// on-screen overlay canvas to match the video element's display size.
// This ensures that the captured image data and the drawn rectangle
// align correctly with the visible video feed.
const videoWidth = video.videoWidth;
const videoHeight = video.videoHeight;
const dWidth = video.clientWidth;
const dHeight = video.clientHeight;
// Set the dimensions of both the off-screen capture canvas and the
// on-screen overlay canvas to match the video element's display size.
// This ensures that the captured image data and the drawn rectangle
// align correctly with the visible video feed.
canvas.width = dWidth;
canvas.height = dHeight;
rectCanvas.width = dWidth;
rectCanvas.height = dHeight;
//https://developer.mozilla.org/en-US/docs/Web/API/CanvasRenderingContext2D/drawImage
// Calculate the source rectangle (sx, sy, sWidth, sHeight) from the video
// and the destination rectangle (dx, dy, dWidth, dHeight) on the canvas.
// This logic mimics the behavior of `object-fit: cover`. It ensures the video
// fills the canvas while maintaining the display's aspect ratio, cropping
// any excess video content (in this case, horizontally) to prevent distortion.
const sx =
(videoWidth - (videoHeight * dWidth) / dHeight) / 2;
const sy = 0;
const sWidth = videoWidth - sx * 2;
const sHeight = videoHeight;
const dx = 0;
const dy = 0;
//console.log(sx, " ", sy, " ", sWidth, " ", sHeight, " ", dx, " ", dy, " ", dWidth, " ", dHeight);
const scanFrame = () => {
/**
* Get the 2D rendering contexts for both canvases.
* - `ctx`: For the off-screen canvas to capture and analyze video frames.
* The `willReadFrequently: true` hint optimizes performance for frequent reads.
* - `rectCtx`: For the on-screen canvas to draw the highlight rectangle.
*/
const ctx = canvas.getContext("2d", {
willReadFrequently: true,
});
const rectCtx = rectCanvas.getContext("2d");
// Draw the current video frame onto the off-screen canvas and then
// extract its raw pixel data. This data is what the jsQR library
// will analyze to find a QR code.
ctx.drawImage(
video,
sx,
sy,
sWidth,
sHeight,
dx,
dy,
dWidth,
dHeight,
);
const imageData = ctx.getImageData(
0,
0,
dWidth,
dHeight,
);
// Use the jsQR library to scan the captured image data for a QR code.
// It returns a code object if found, otherwise null.
const code = jsQR(imageData.data, dWidth, dHeight);
rectCtx.clearRect(0, 0, dWidth, dHeight);
// If a QR code is detected, clear the previous rectangle, draw a new
// one around the code's location, update the parent component's status,
// log the result, and update the bindable `qr_code` property with the
// decoded data, ensuring the data is not empty.
if (code && code.data !== "") {
drawRect(rectCtx, code.location);
updateStatus(`QR code found: ${code.data}`);
console.log(`QR code found: ${code.data}`);
qr_code = code.data;
}
// If the reader is still enabled, schedule the next frame scan.
if (enabled) {
requestAnimationFrame(scanFrame);
}
};
// Start the scanning loop.
scanFrame();
};
} catch (e) {
console.error("Error accessing camera:", e);
updateStatus(`Camera Error: ${e.message}`);
}
} else {
// If the reader is disabled, stop all video tracks to release the camera
// and turn off the recording indicator. This is a crucial cleanup step
// to free up resources when the component is no longer active.
if (video.srcObject) {
const tracks = video.srcObject.getTracks();
tracks.forEach((track) => {
track.stop();
});
video.srcObject = null;
}
}
};
/**
* Captures the current video frame, converts it to a base64-encoded JPEG image,
* and returns the data. This can be used for features like taking a snapshot.
* @returns {string} The base64-encoded JPEG image data.
*/
captureImage = () => {
const ctx = canvas.getContext("2d");
ctx.drawImage(video, 0, 0, canvas.width, canvas.height);
const imageURL = canvas.toDataURL("image/jpeg").split(",")[1];
return imageURL;
};
/**
* A reactive effect that triggers whenever the `enabled` prop changes.
* It calls `startReadingQrCode()` to either initiate or terminate the
* camera stream and scanning process based on the new value.
*/
$effect(() => {
enabled;
startReadingQrCode();
});
onMount(() => {
// Request fullscreen and lock orientation to portrait on component mount.
// This provides a more consistent user experience for camera-based interactions.
document.documentElement.requestFullscreen();
try {
screen.orientation.lock("portrait-primary"); // Force portrait mode
} catch (e) {
console.log(e);
}
});
</script>
<!--
This container holds all the camera-related elements. It is shown or hidden
based on the `enabled` prop, controlling the visibility of the entire component.
-->
<div
style="width: 100vw; height: 100vh; background-color: #100C14; {enabled
? 'display: block'
: 'display: none'}"
>
<!--
This <video> element is the core of the camera functionality. It is not
directly visible to the user. Instead, its frames are captured and drawn
onto the canvases for processing and display.
- `autoplay`: Ensures the video stream starts as soon as it's available.
- `bind:this={video}`: Binds this DOM element to the `video` variable for script access.
- `object-fit: cover`: Makes the video fill its container while maintaining aspect ratio,
which is important for the `drawImage` calculations that mimic this behavior on the canvas.
-->
<!-- svelte-ignore a11y_media_has_caption -->
<video
style="width: 100vw; height: 100vh; object-fit: cover;"
autoplay
bind:this={video}
> <!-- svelte-ignore a11y_media_has_caption --></video>
<!--
An off-screen canvas used for capturing frames from the video element.
It's hidden from view but is essential for getting the image data that
is fed into the jsQR library for analysis.
-->
<canvas style="position: absolute; top:0; left:0; visibility: hidden;" bind:this={canvas}
></canvas>
<canvas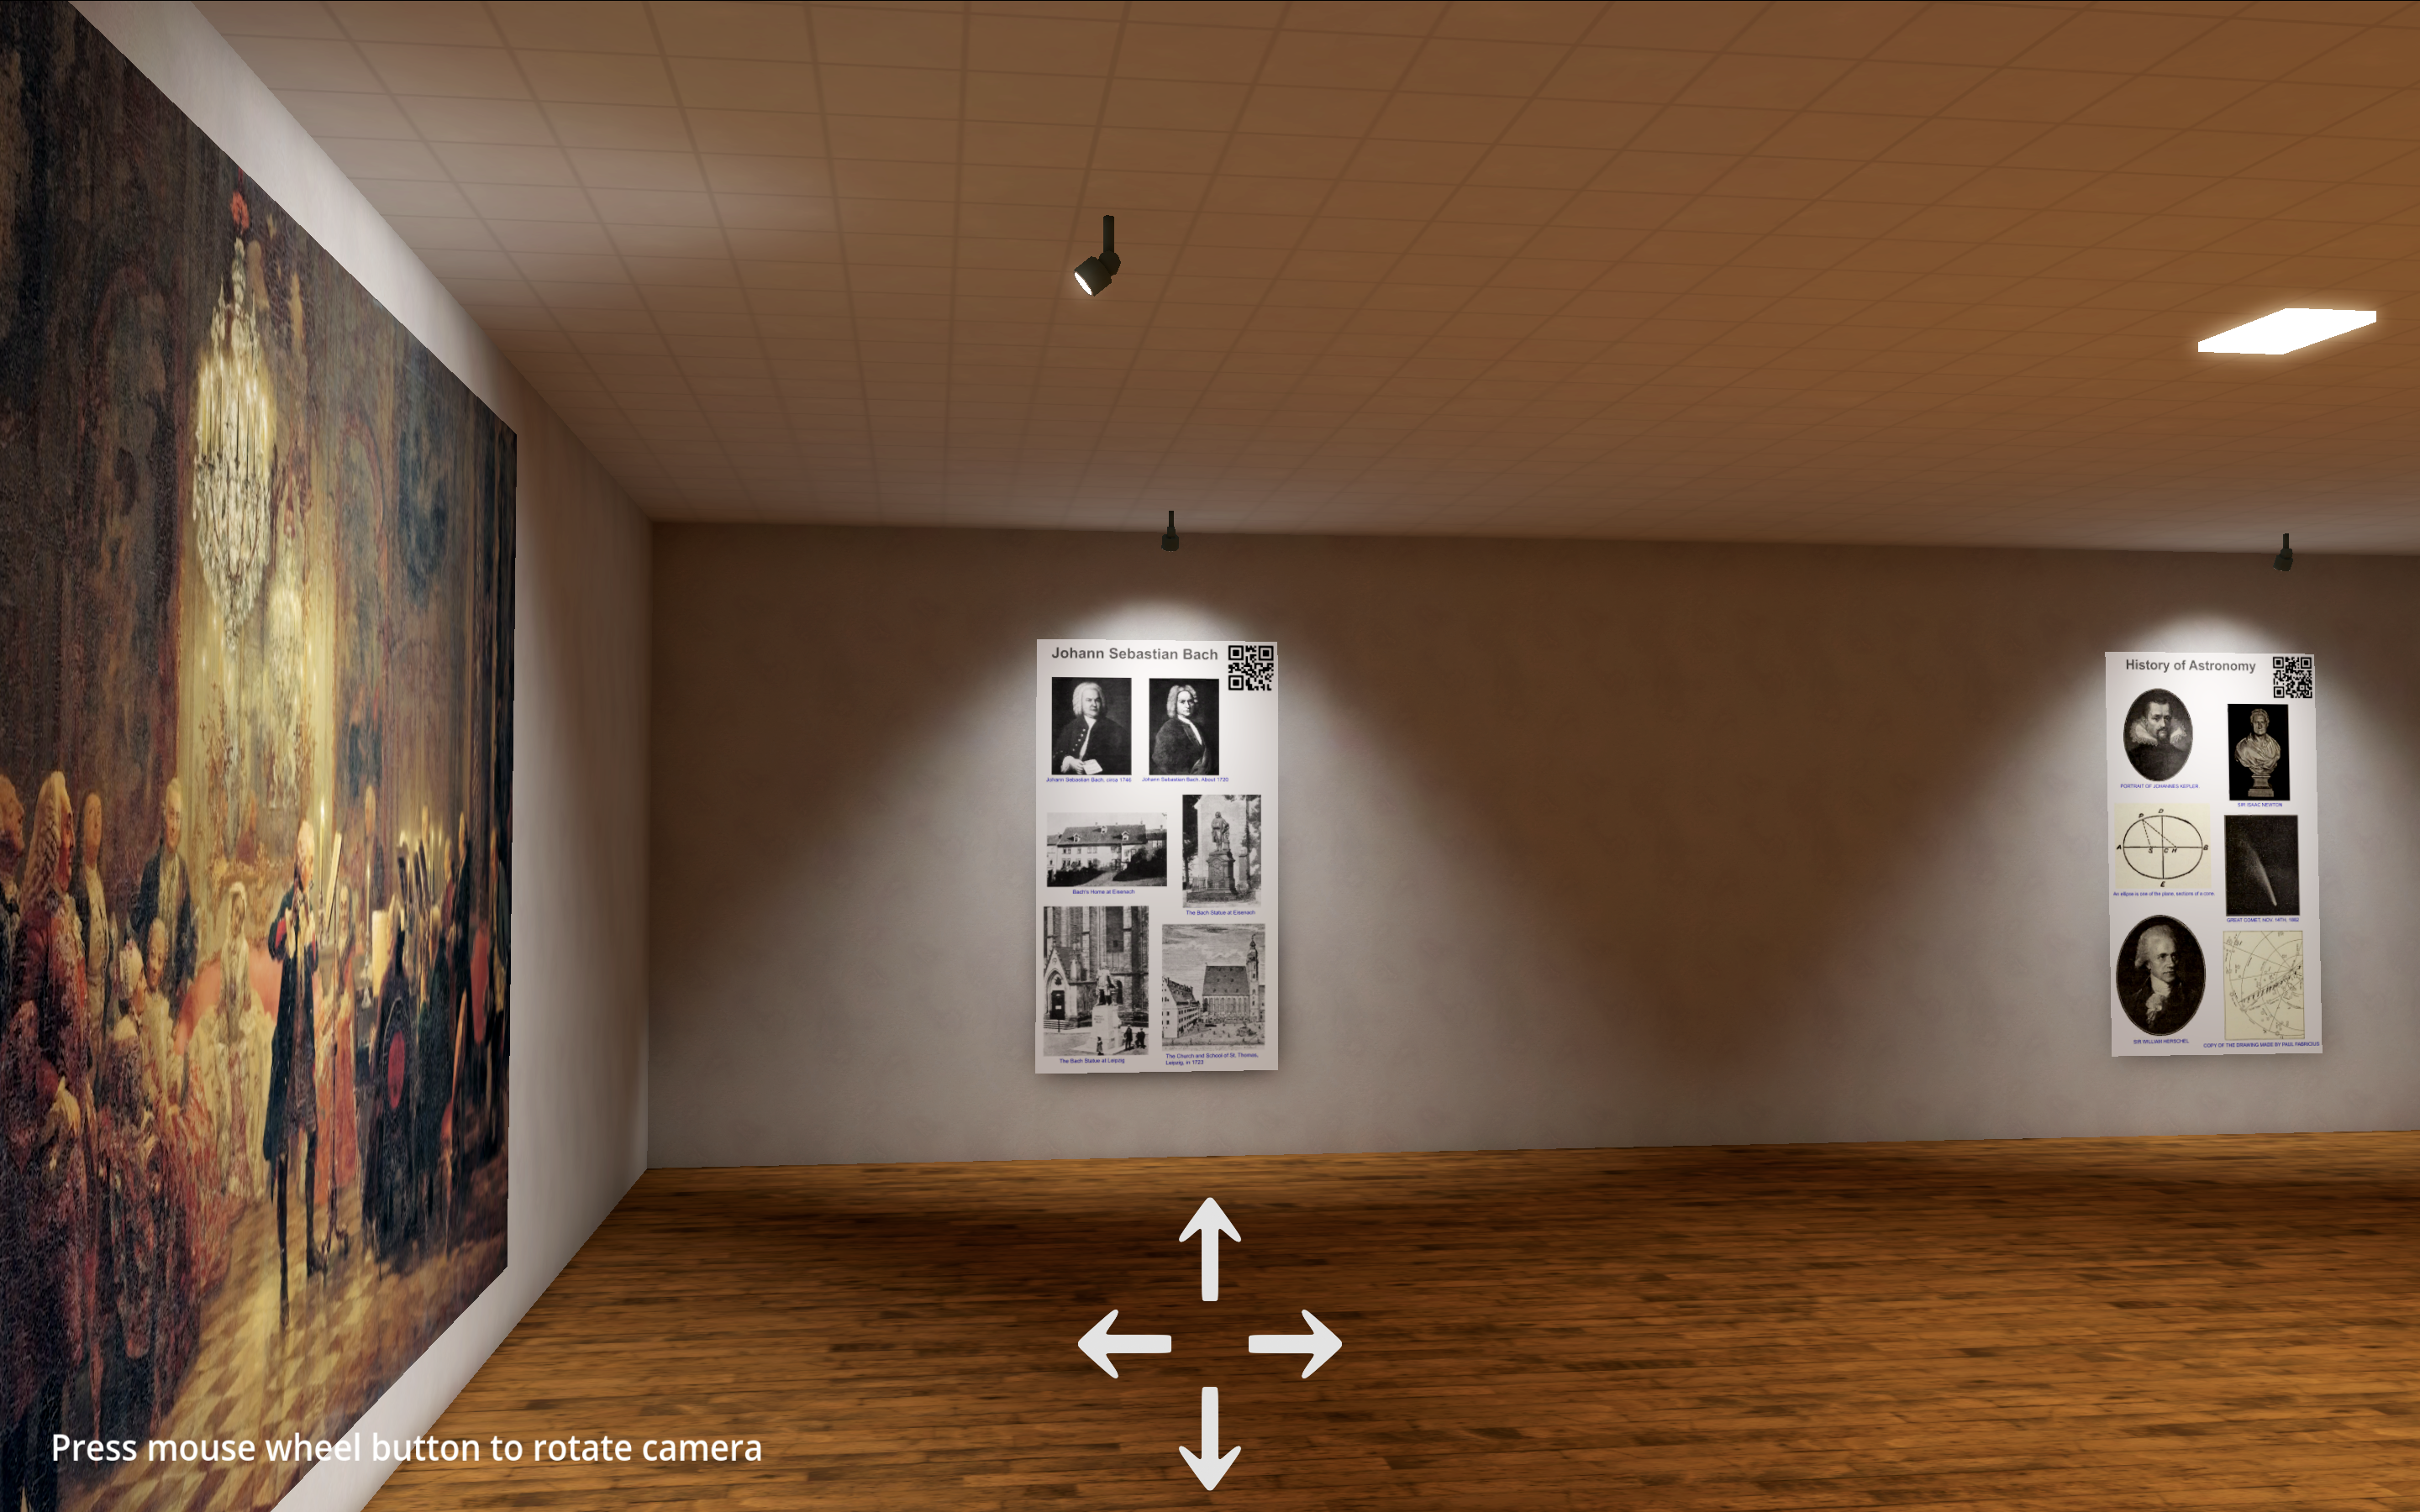
style="position: absolute; top:0; left:0; z-index: {z_index};"
bind:this={rectCanvas}
></canvas>
</div>
このCameraコンポーネントが自動認識したQRコードは、対象となる展示物の説明文(テキスト文のスクリプト)と紐づけられており、認識と同時にGemini LiveへAPI経由で送信されます。Gemini Liveは、この説明文を自動でキャッシュします。
制作したWebアプリのコード全文は以下です:
https://github.com/araobp/godot-museum/tree/main/app
このWebアプリをGitHub Pagesへスタティックサイトとして公開します。
https://araobp.github.io/godot-museum/live/
バーチャル博物館の制作
作成したSvelteベースのWebアプリを実際に使える場が欲しいです。そこで、BlenderとGodotでバーチャル博物館を制作しました。博物館内への展示物においては、GeminiやFlowでコンテンツを制作したり、Project GutenbergやWikipedia上のCC0コンテンツを流用しました。昔、ドイツに住んだ経験あり、ドイツを題材にしたコンテンツとしました。また、各展示物へ、その展示名を表すQRコードを付与しました。
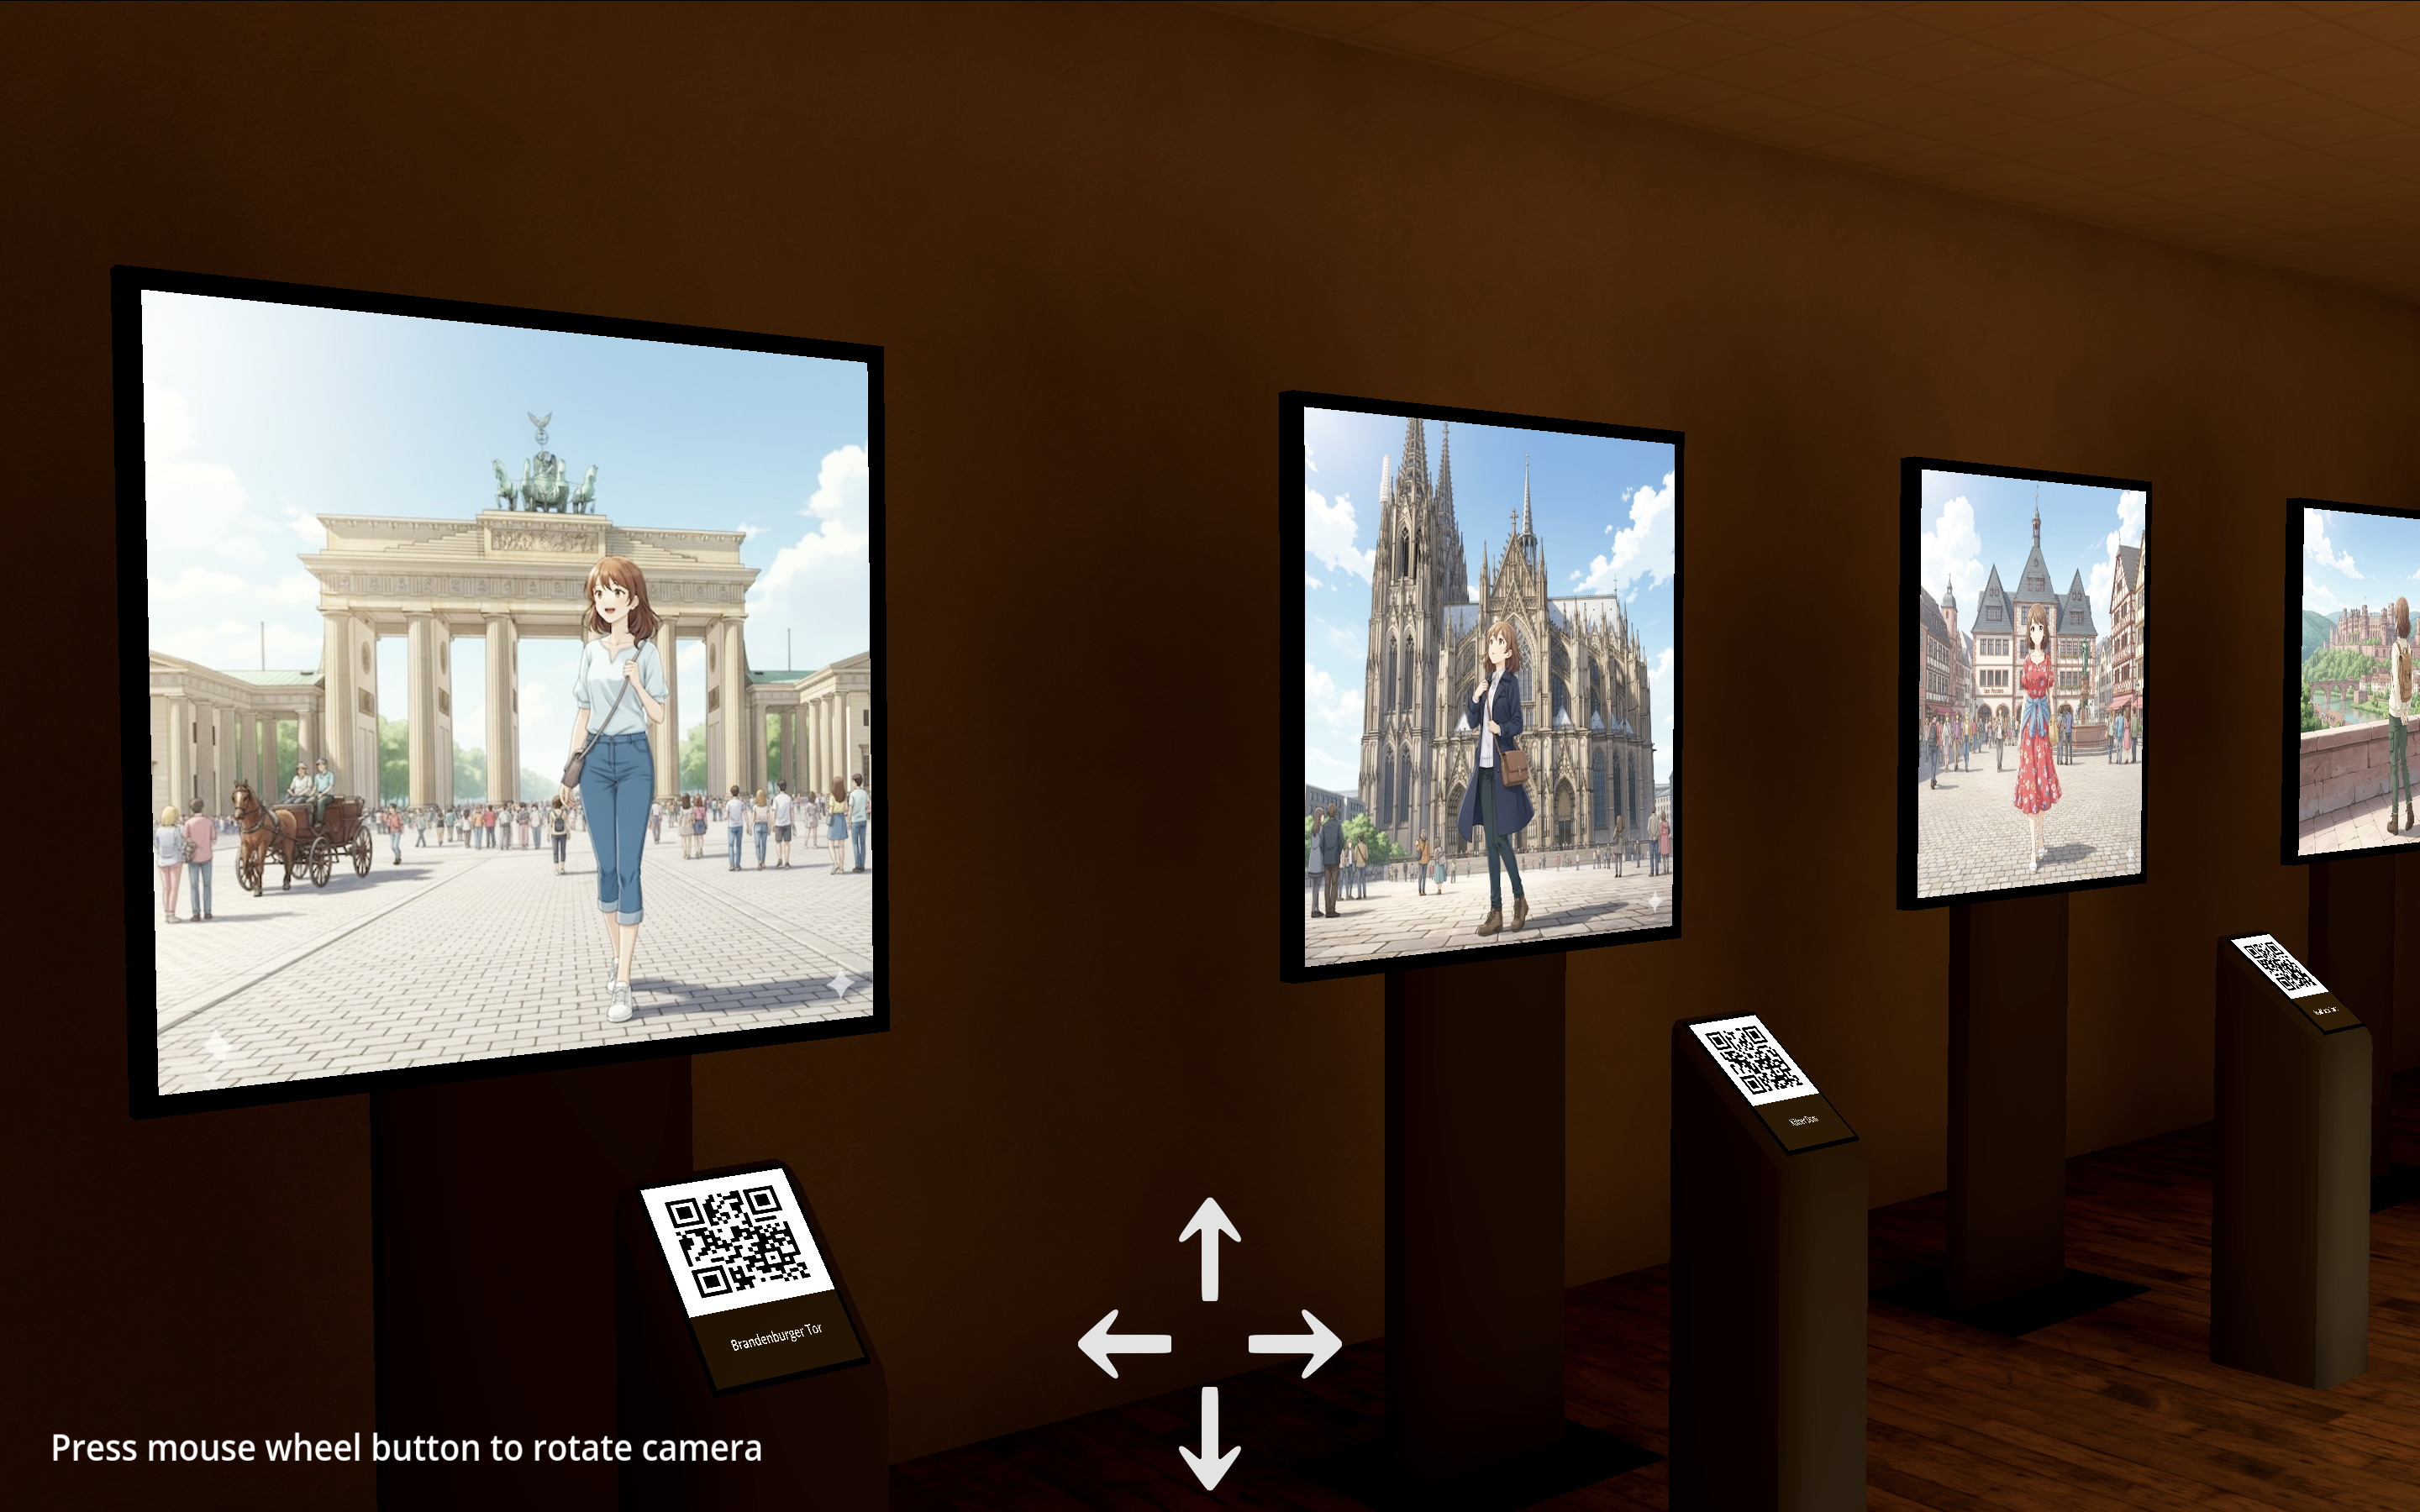
また、博物館の入り口には、制作したWebアプリに紐づくQRコードを設置しました。スマホカメラをこれにかざすと、GitHub Pages上のWebアプリURLが表示されるので、これをクリックし、Webアプリを起動します。

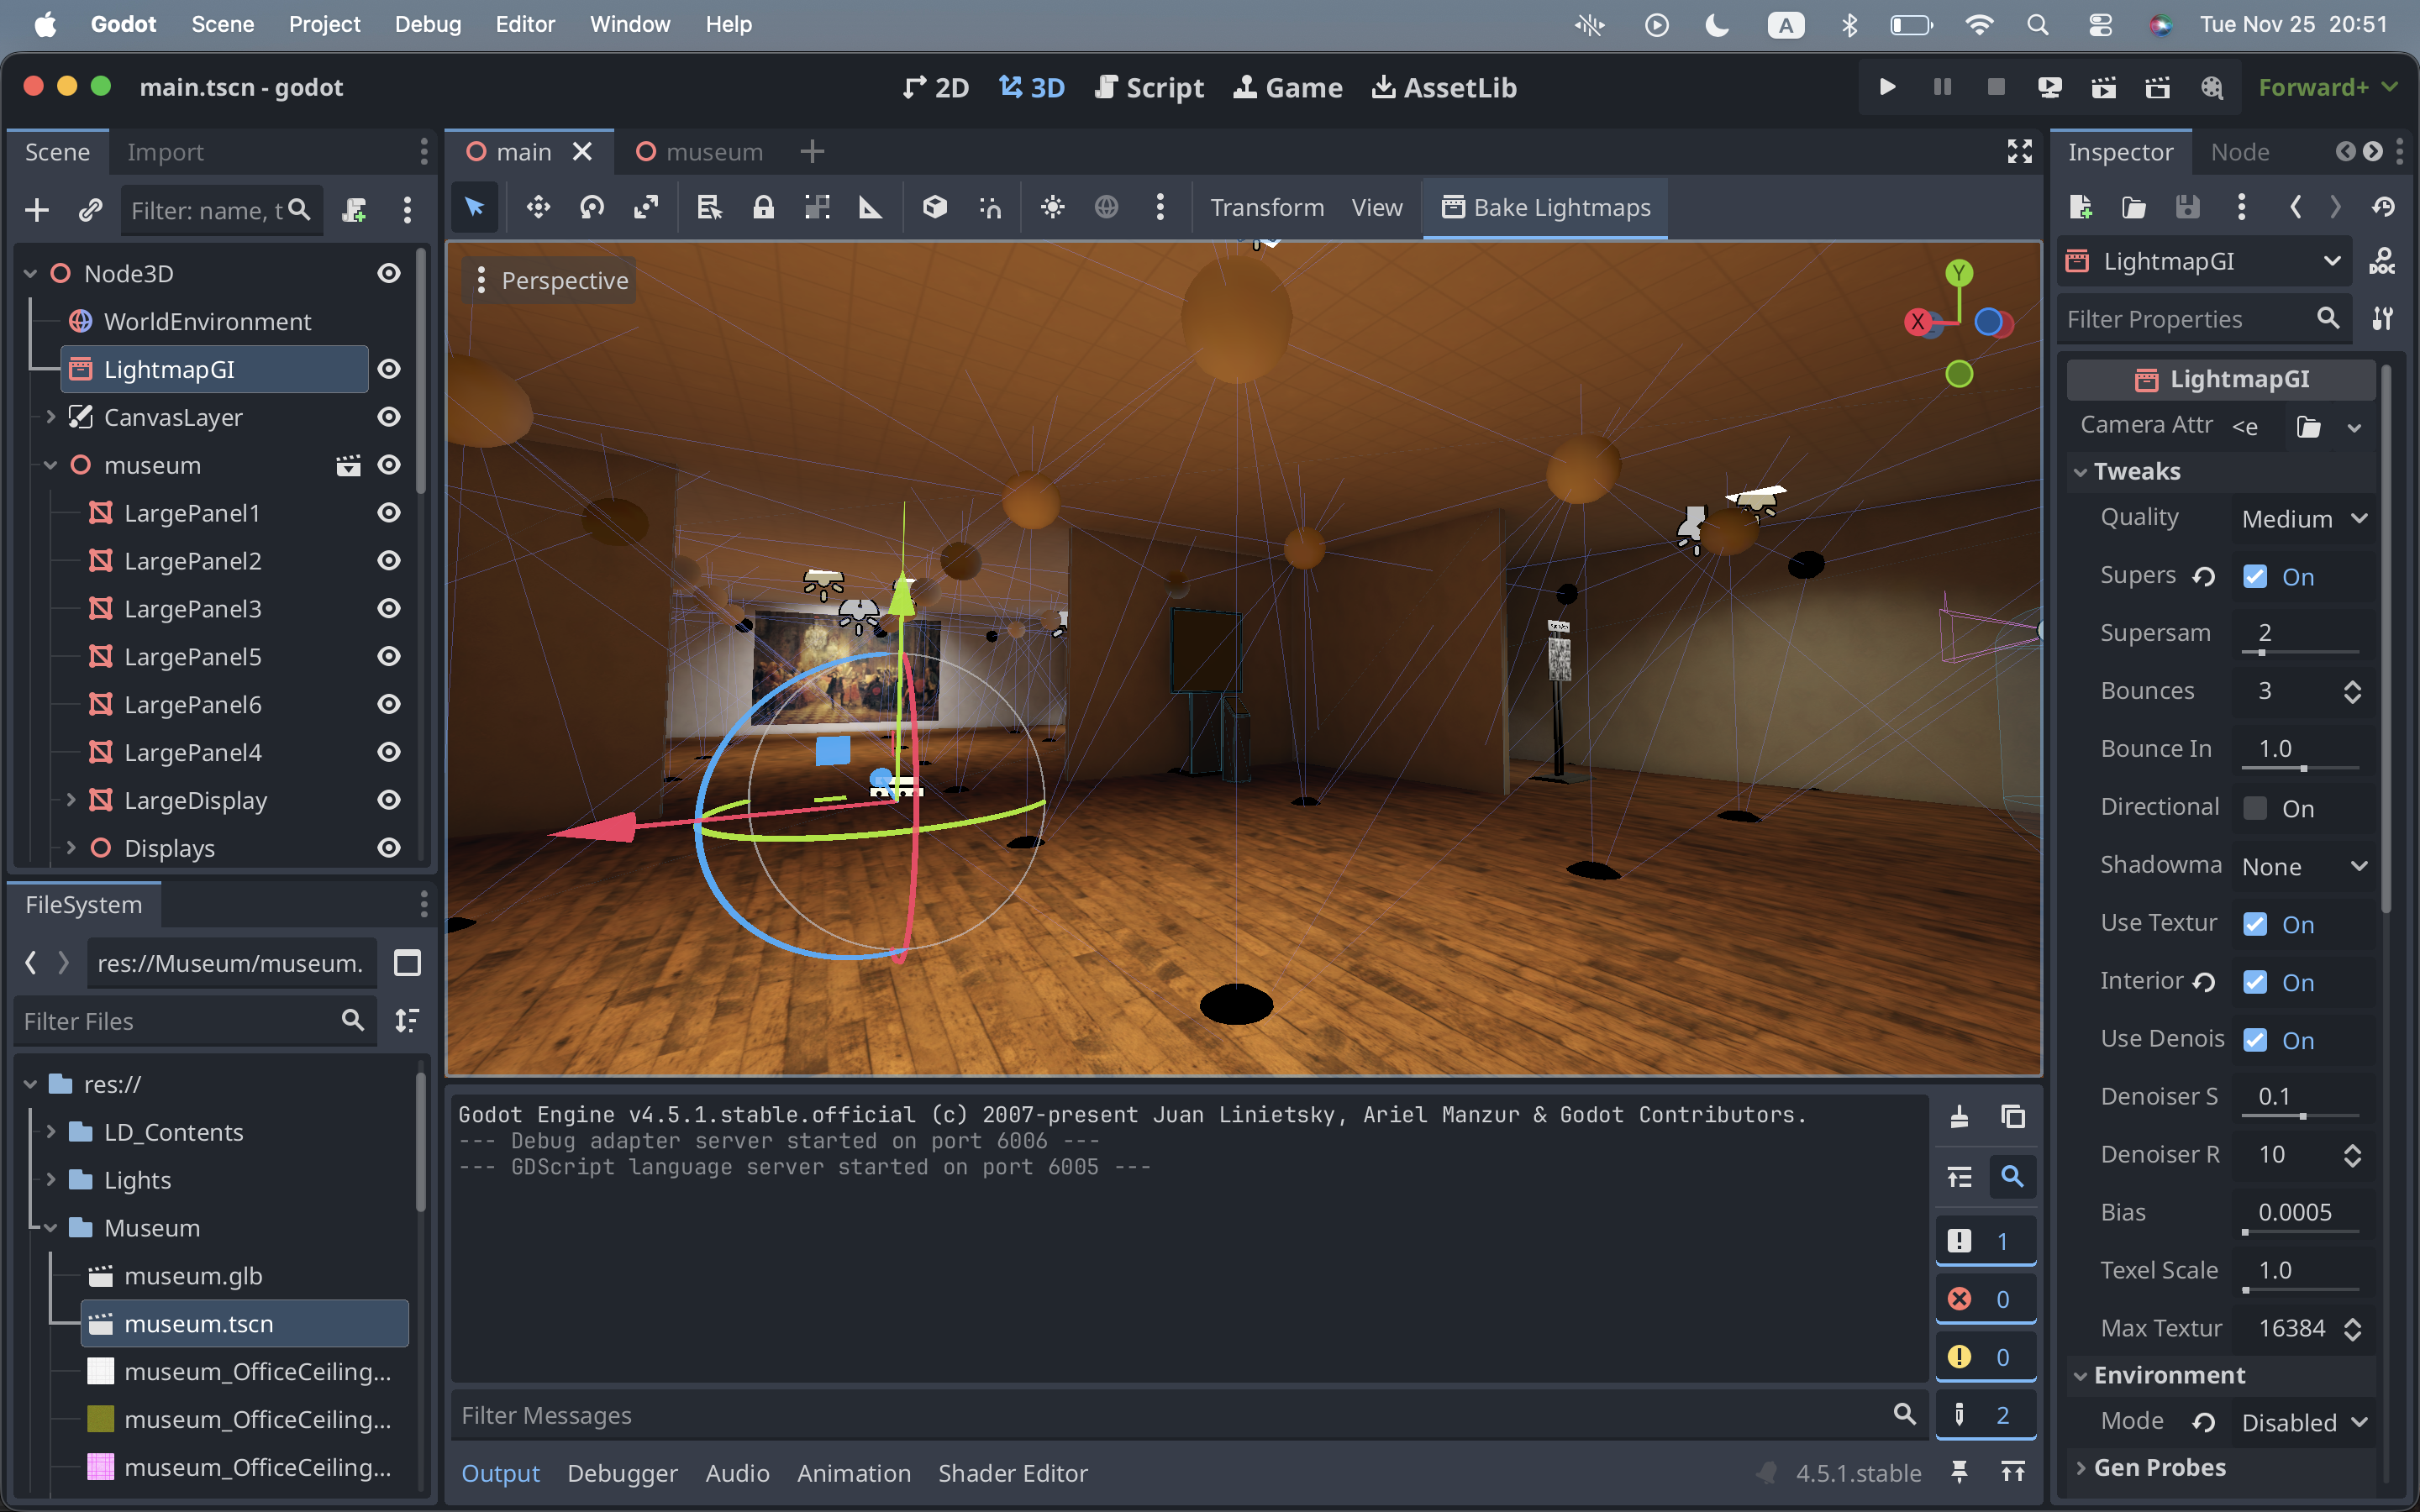
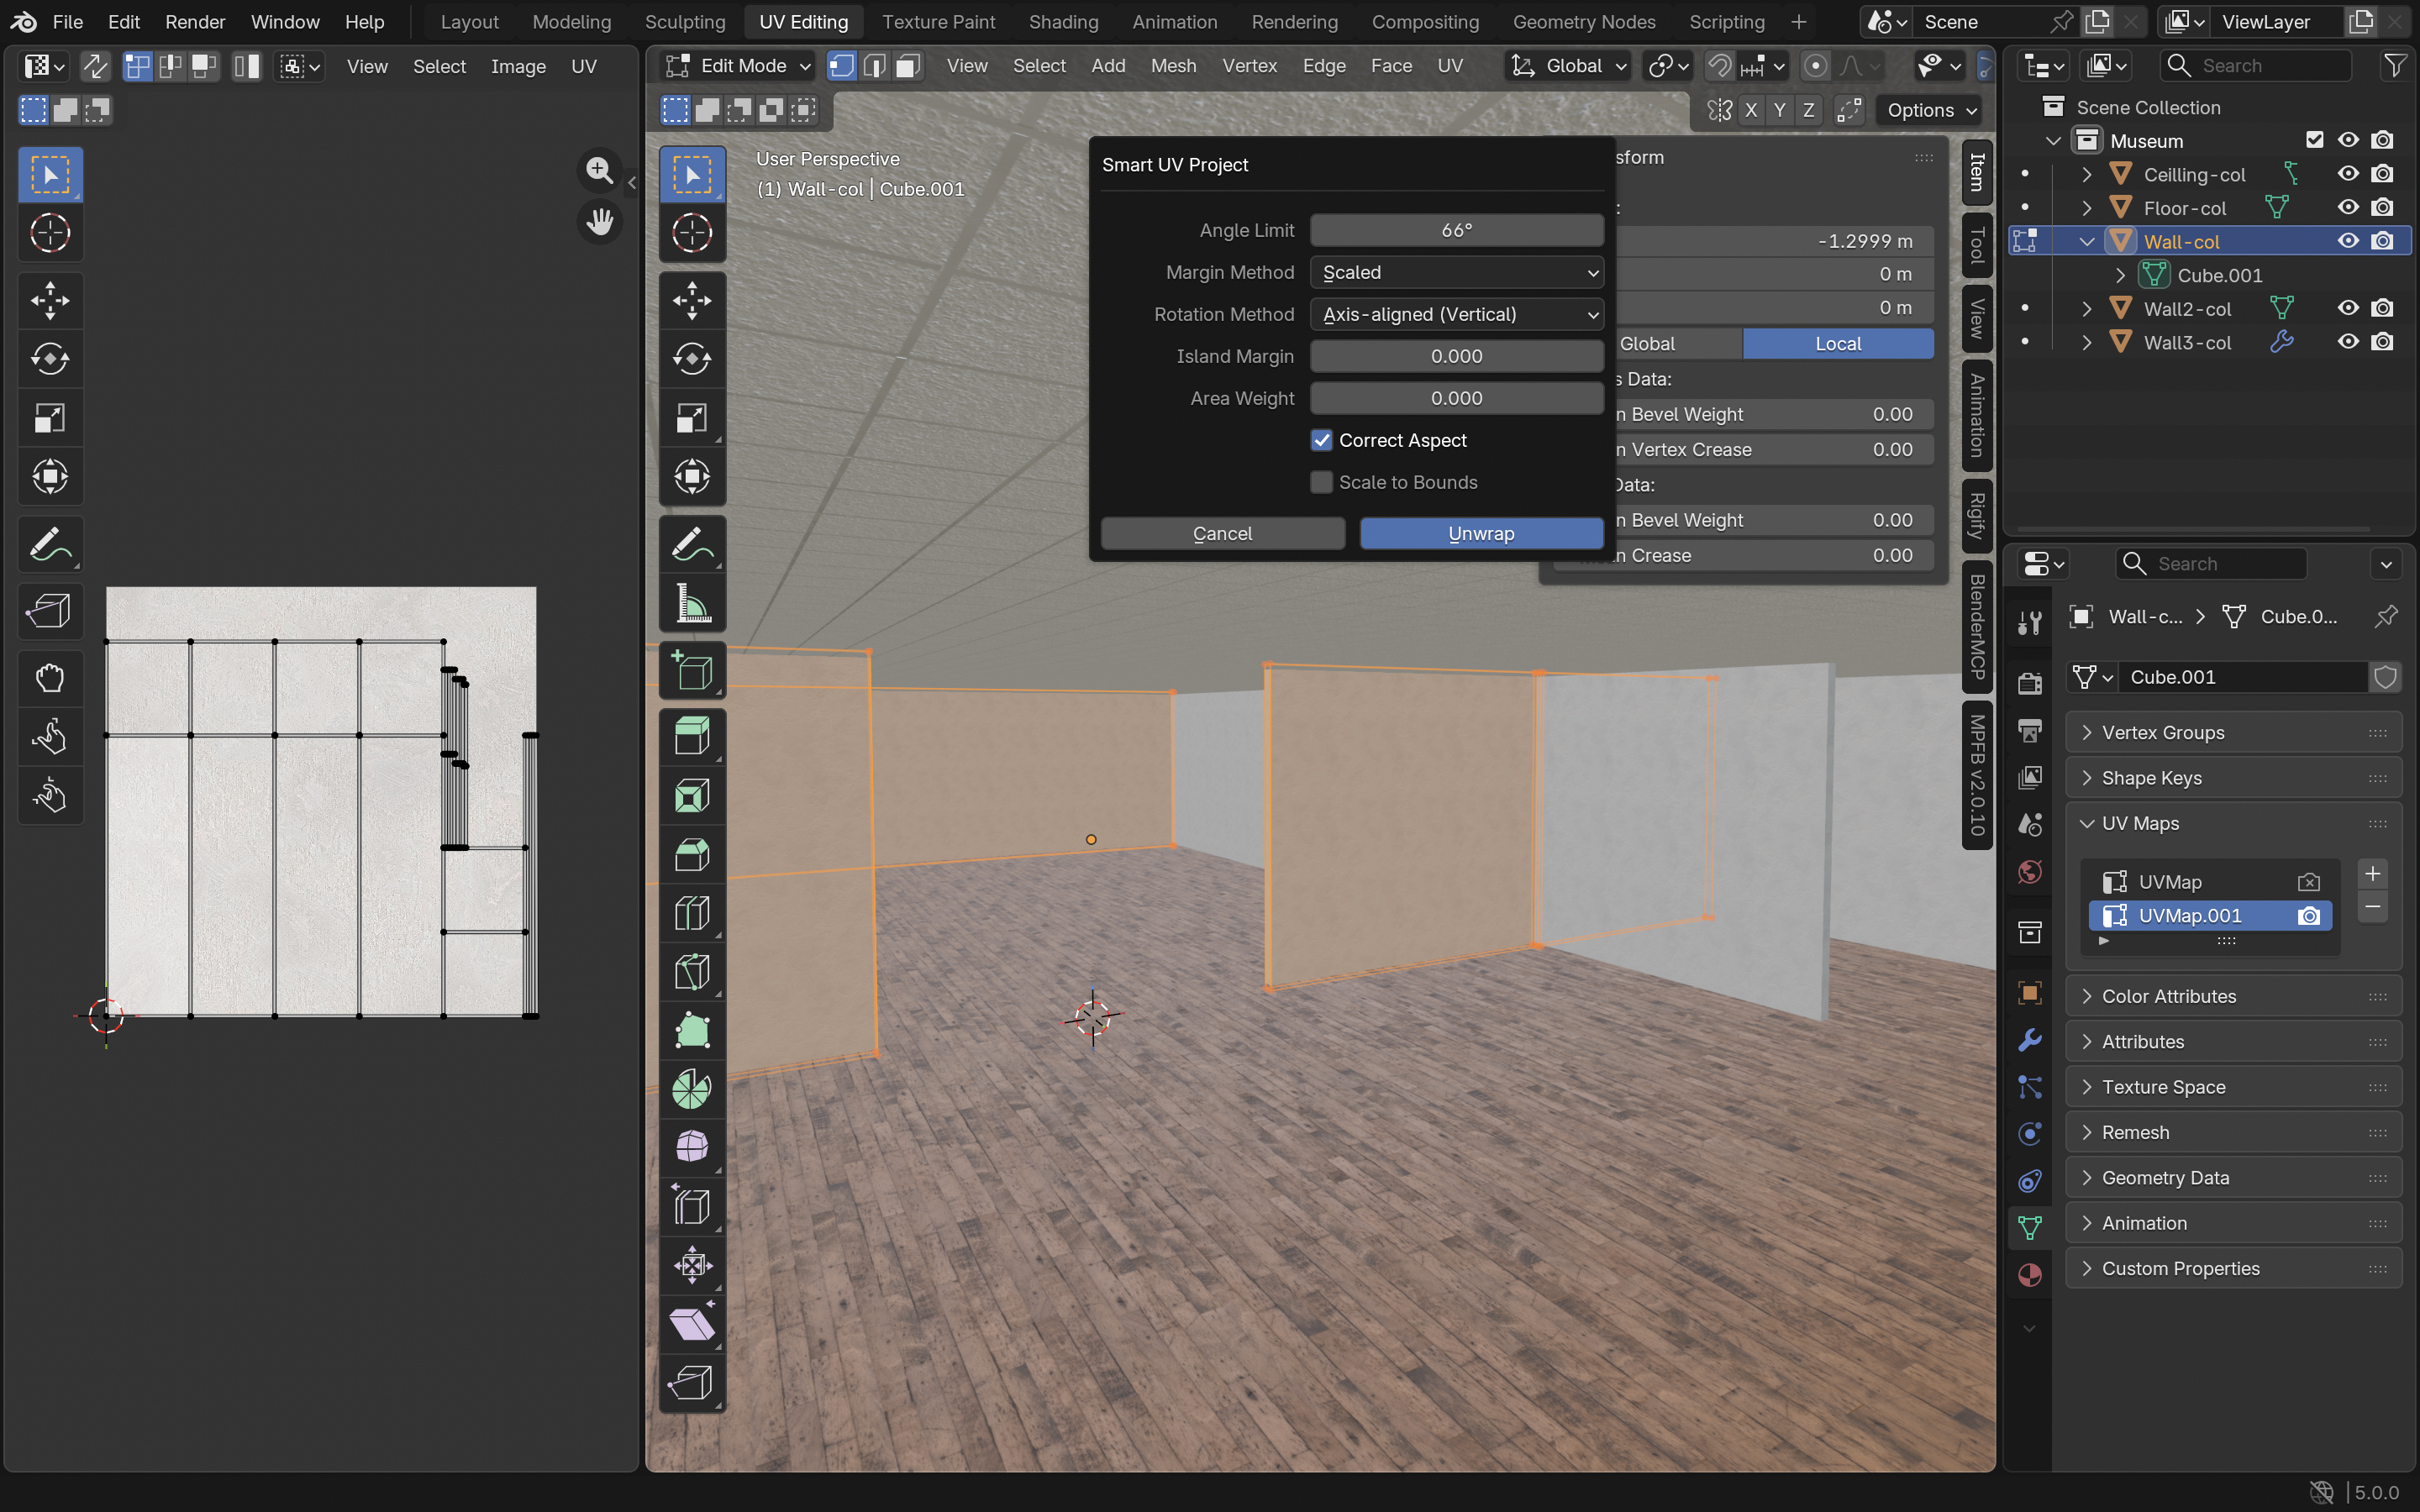
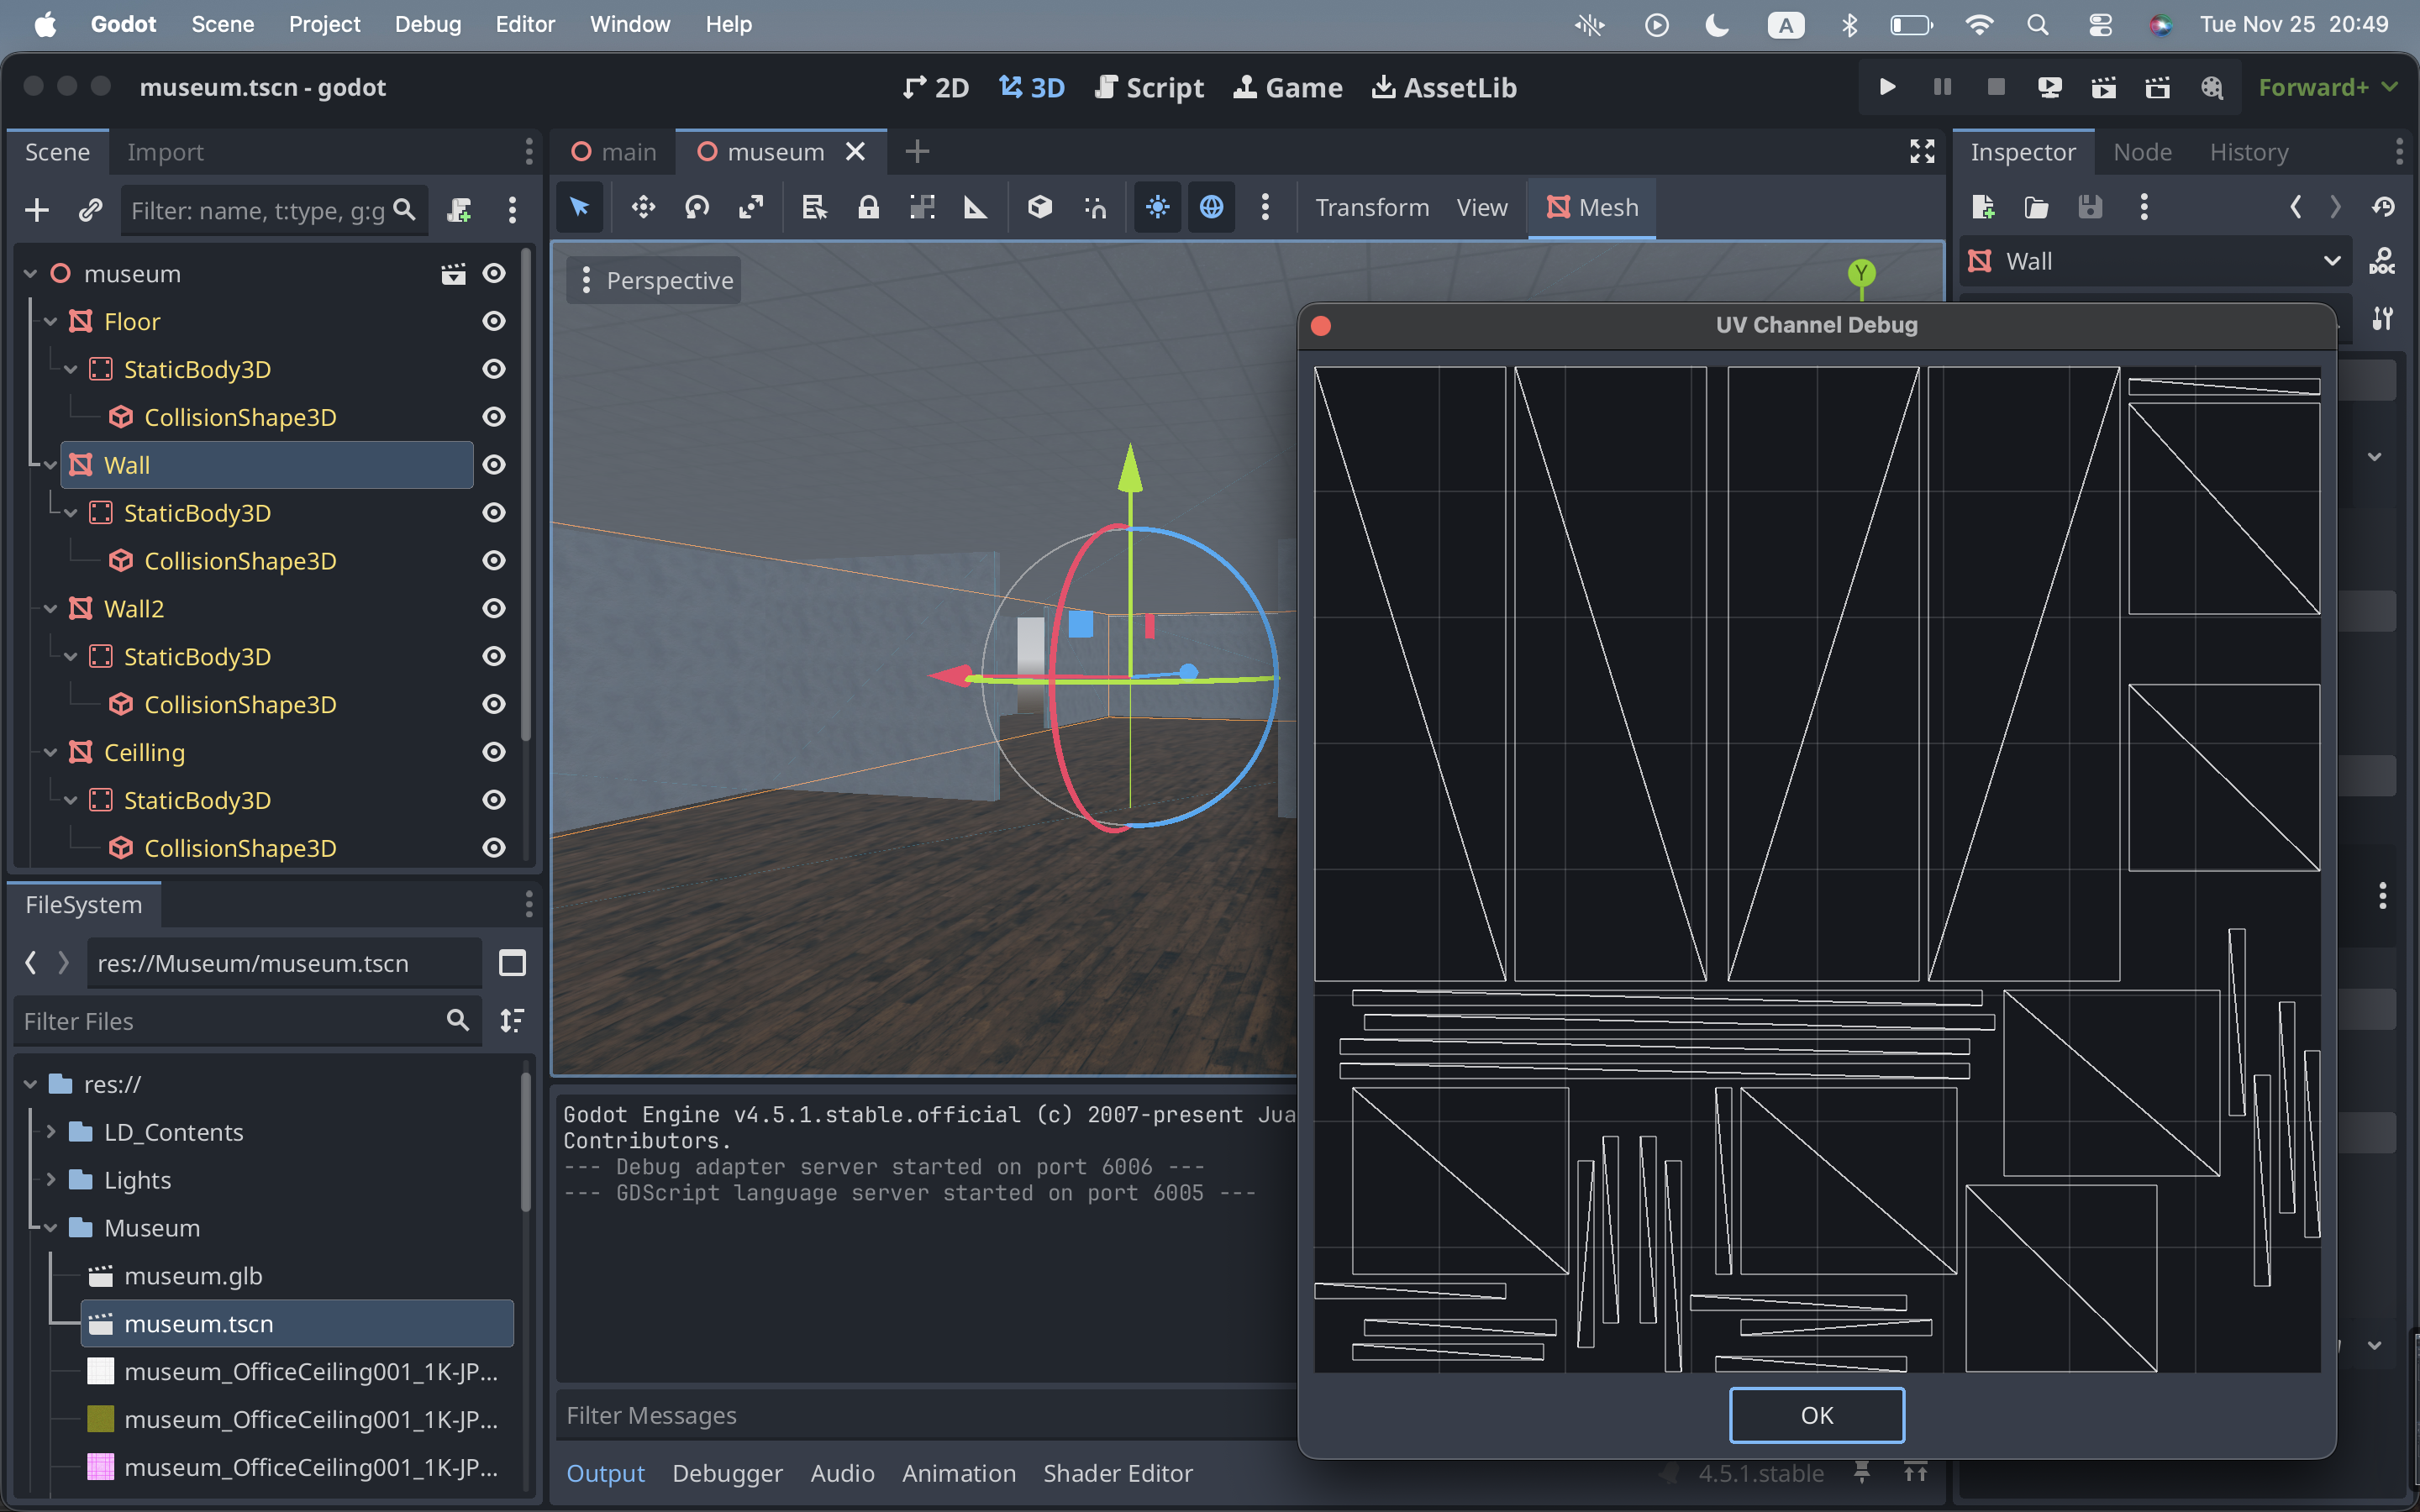
また、Godot上のバーチャル博物館をGitHub Pages上で公開したく、これをHTML5へビルドします。ブラウザ上でのライティング処理負荷を下げるため、可能な限り、LightmapGIノードでライティングをベイクしました。
ベイク先の3DモデルにはUV2が必要ですが、Blenderで容易にUV2を追加することが出来ました。
UV2をGodot上でも確認出来ます。
Gemini Liveを音声ガイドとして活用するには、各展示物の説明文が必要です。Geminiへ説明文を書かせたり、Project Gutenbergの電子書籍を流用しました。例えば、次の電子書籍を展示物の説明文として流用しました:https://www.gutenberg.org/ebooks/35041
以前は3D制作においてUnityを利用しておりましたが、この程度の3D制作であれば、Godotを使った方が楽だと感じました。また、Godotはライセンスフリーで、そのまま、職場で制作物をデモする事も出来ます。
制作したバーチャル博物館を以下のGitHub Pageへ公開しました:
https://araobp.github.io/godot-museum/demo/
最後に
私は、仕事では、マーケティング部門に所属しております。
この種のアプリを見れば、展示会や企業ショールームにおける展示説明員を生成AIに置き換へることで間接費削減出来ると考える人たちが多いです。確かに、台本通りの展示説明やQ&A対応しか出来ないなら、そうかもしれません。生成AIで置き換え出来てしまいます。
しかし、私自身は、展示会で人間と対話するのが大好きです。展示説明員と専門性高いお話が出来る貴重な機会、専門用語で会話できる楽しさ。特に、展示に関わる技術を開発をした本人と直接会話出来た時、満足度が高いです。台本通りにしか説明出来ない説明員と比べ、熱量が違います。
マーケティング部門においては、展示会やショールームなどはリアルタッチポイントと称されます。リアルな展示とリアルな人間が触れ合う場です。生成AI時代、リアルタッチポイントには、知性や知恵を持った説明員が必要になると思います。生成AIには豊富な知識がありますが、知性や知能のところは人間の能力を越えていません。知性や知能、それは、チャレンジを繰り返しては現場で失敗を繰り返し、それでも、少しは、成功に辿り着けた人たち。だから、見学者や訪問者と創造性高いお話が出来て、会話がはずむし熱量も高い。
この種のアプリが、リアルタッチポイントにおける人材のあり方を考えるきっかけになれれば幸いです。