1/16 に GA (General Availability: 一般提供) になった Azure OpenAI Service は、Azure 上で OpenAI が稼働するサービスです。Cognitive Services の一員として & Web API として利用できる、Studio と呼ばれる GUI が用意されており、テストや調整などが可能です。
今回は、Azure OpenAI Studio から操作できない Embedding 機能 (ご自身のデータを投入して、自然言語で検索が可能な機能) を ③Embedding & 自然言語検索を Jupyter Notebook からお試し に引き続き、今度は Rest API から操作できるように、Azure Functions で実装します。
3/10 現在、GA したとはいえ、Azure OpenAI Service を利用するには Web から利用申請が必要です。
Azure OpenAI Service の申し込み方法は 祝 Azure OpenAI Service GA! ① の記事をご覧ください。
Azure OpenAI Service 自体は GA ですが、3/10~ 利用可能になった ChatGPT, 3/22~ 利用可能になった GTP-4 は現在プレビュー中です。
準備
-
Azure OpenAI Service
- 前回記事 ③Embedding & 自然言語検索を Jupyter Notebook からお試し - 準備 を参考に準備し、API Key とエンドポイントをローカルに保存しておきます。
- 同じく 前回記事 - Text Search Curie モデルのデプロイ を参考に Azure OpenAI Service に Text Search Curie モデルをデプロイしておきます。
-
Embededding して検索したいデータ
- 同じく 前回記事 - 準備 を参考に CSV ファイルとして準備します。
-
Azure Storage の作成
-
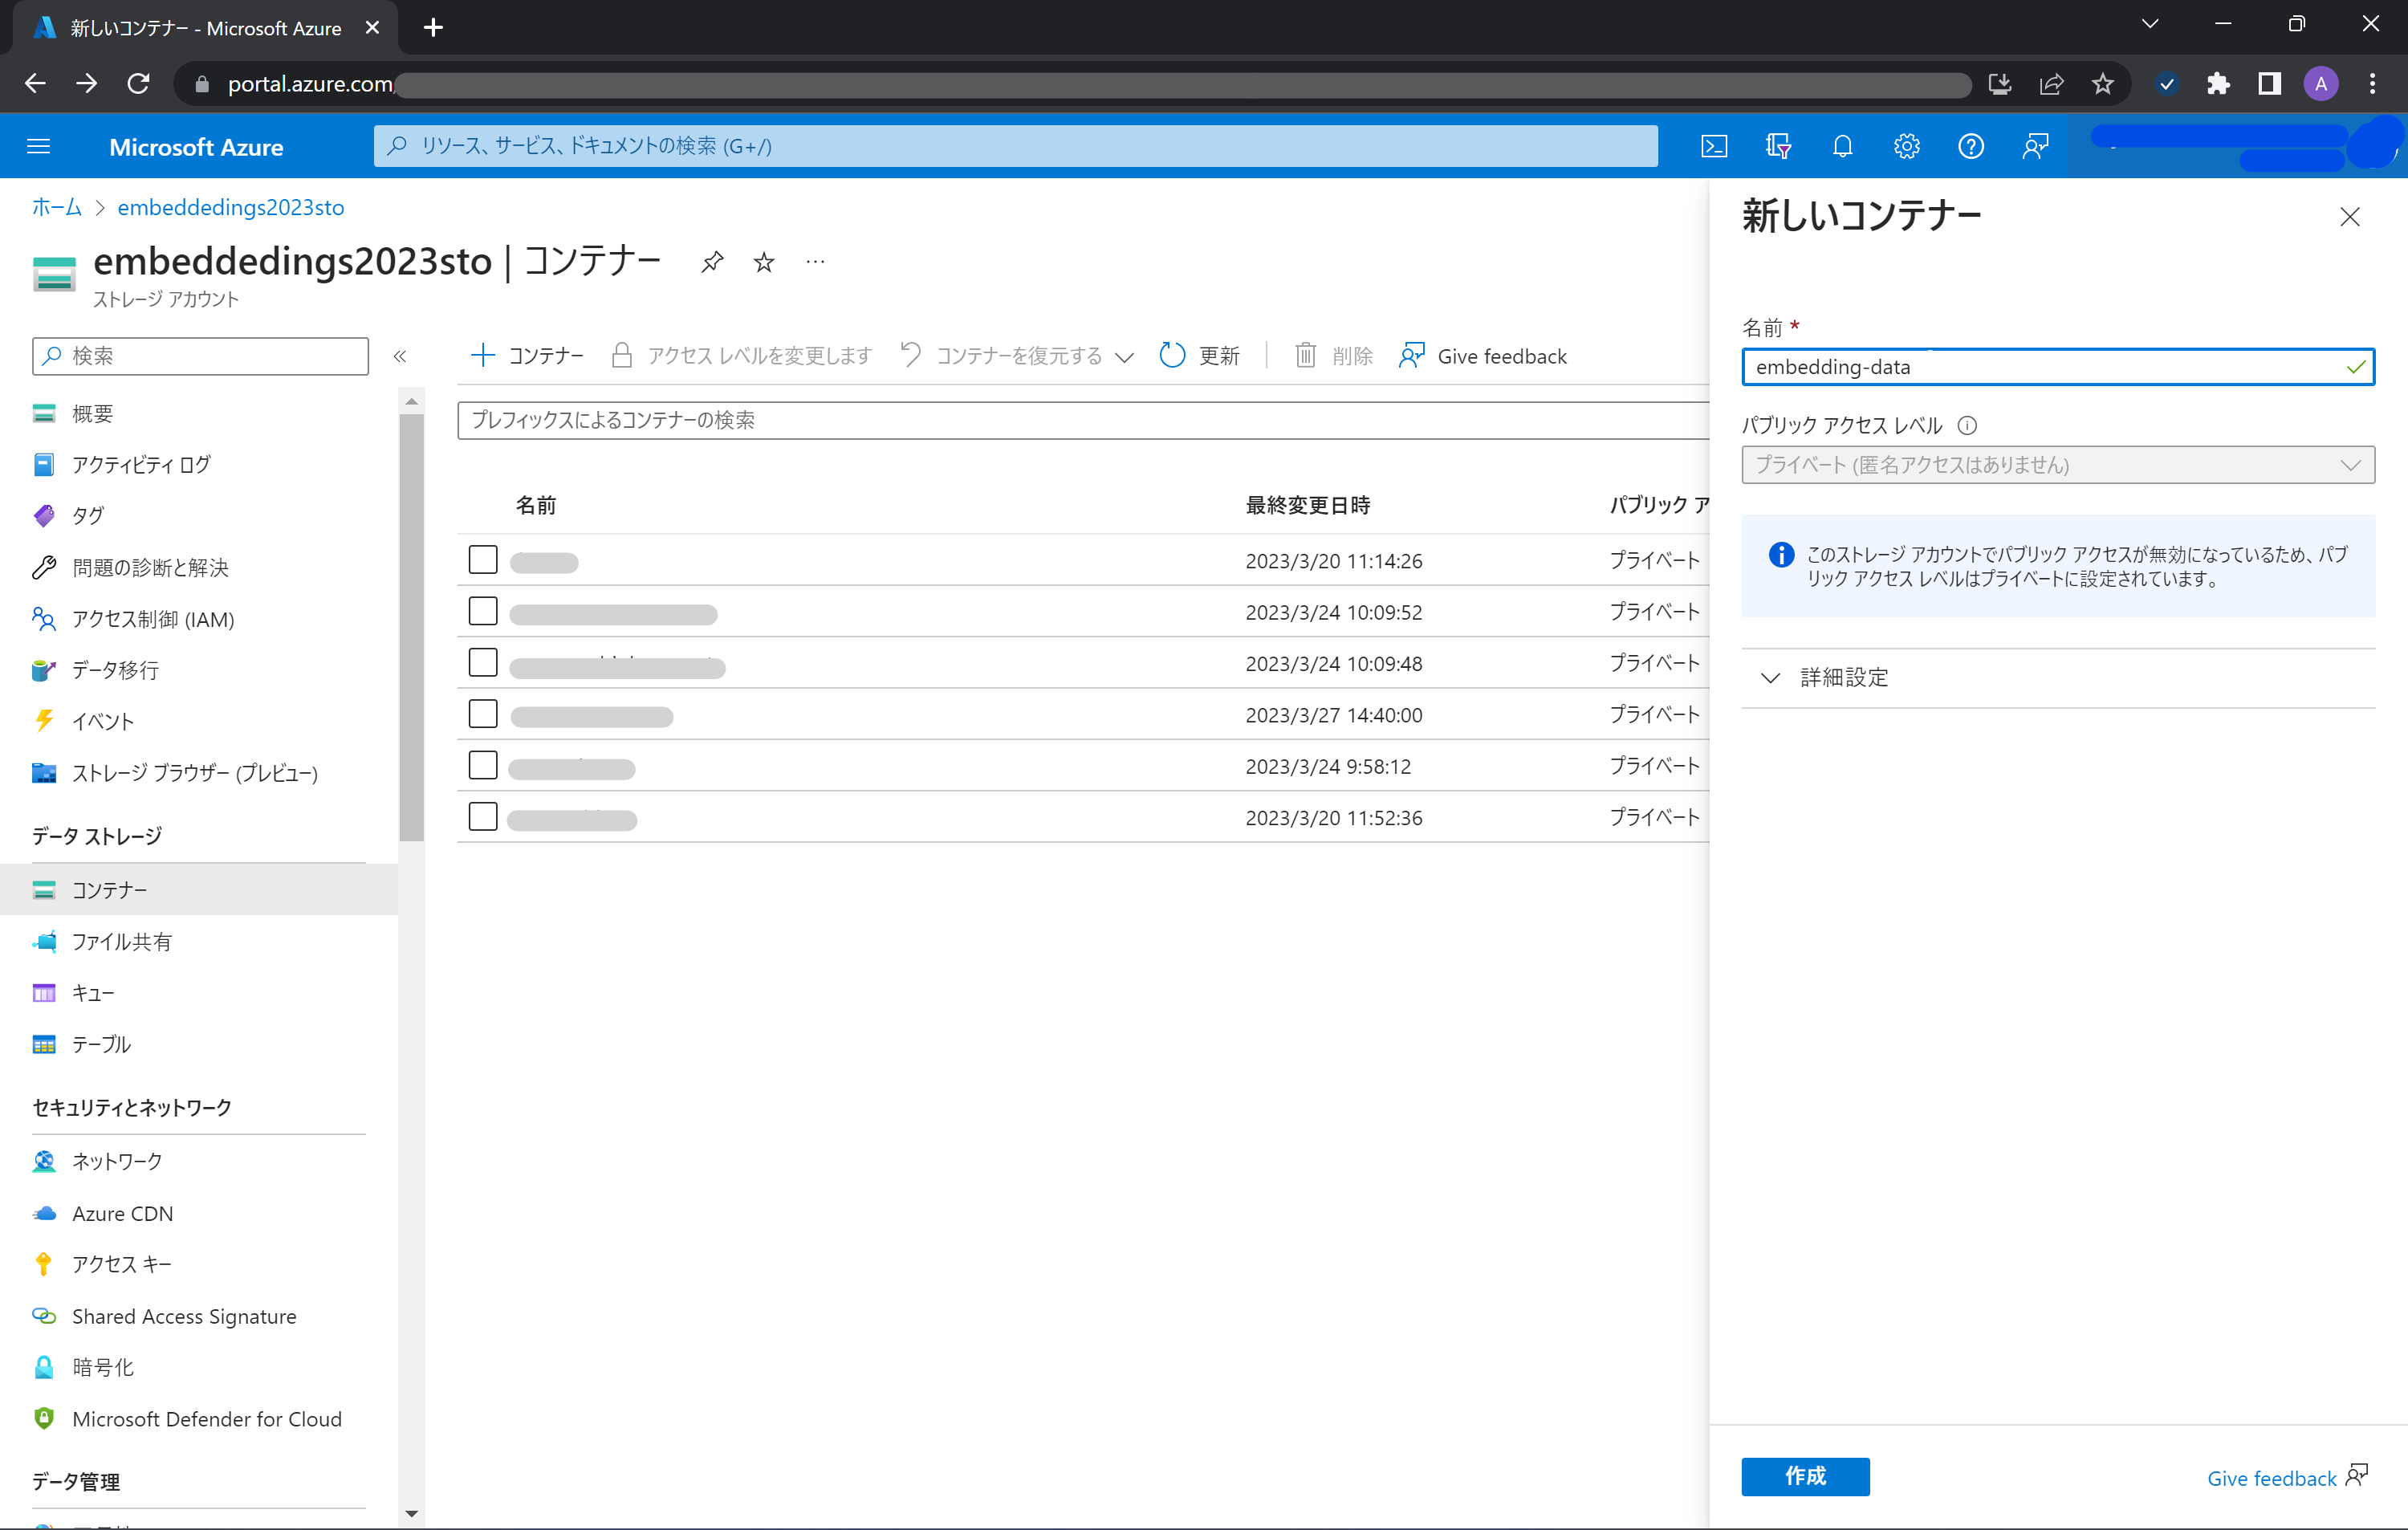
Azure Storage を作成 (または作成済みのものでも可能) し、Blob コンテナーを作成します。アクセス権はデフォルトのまま (private) でOKです。
-
-
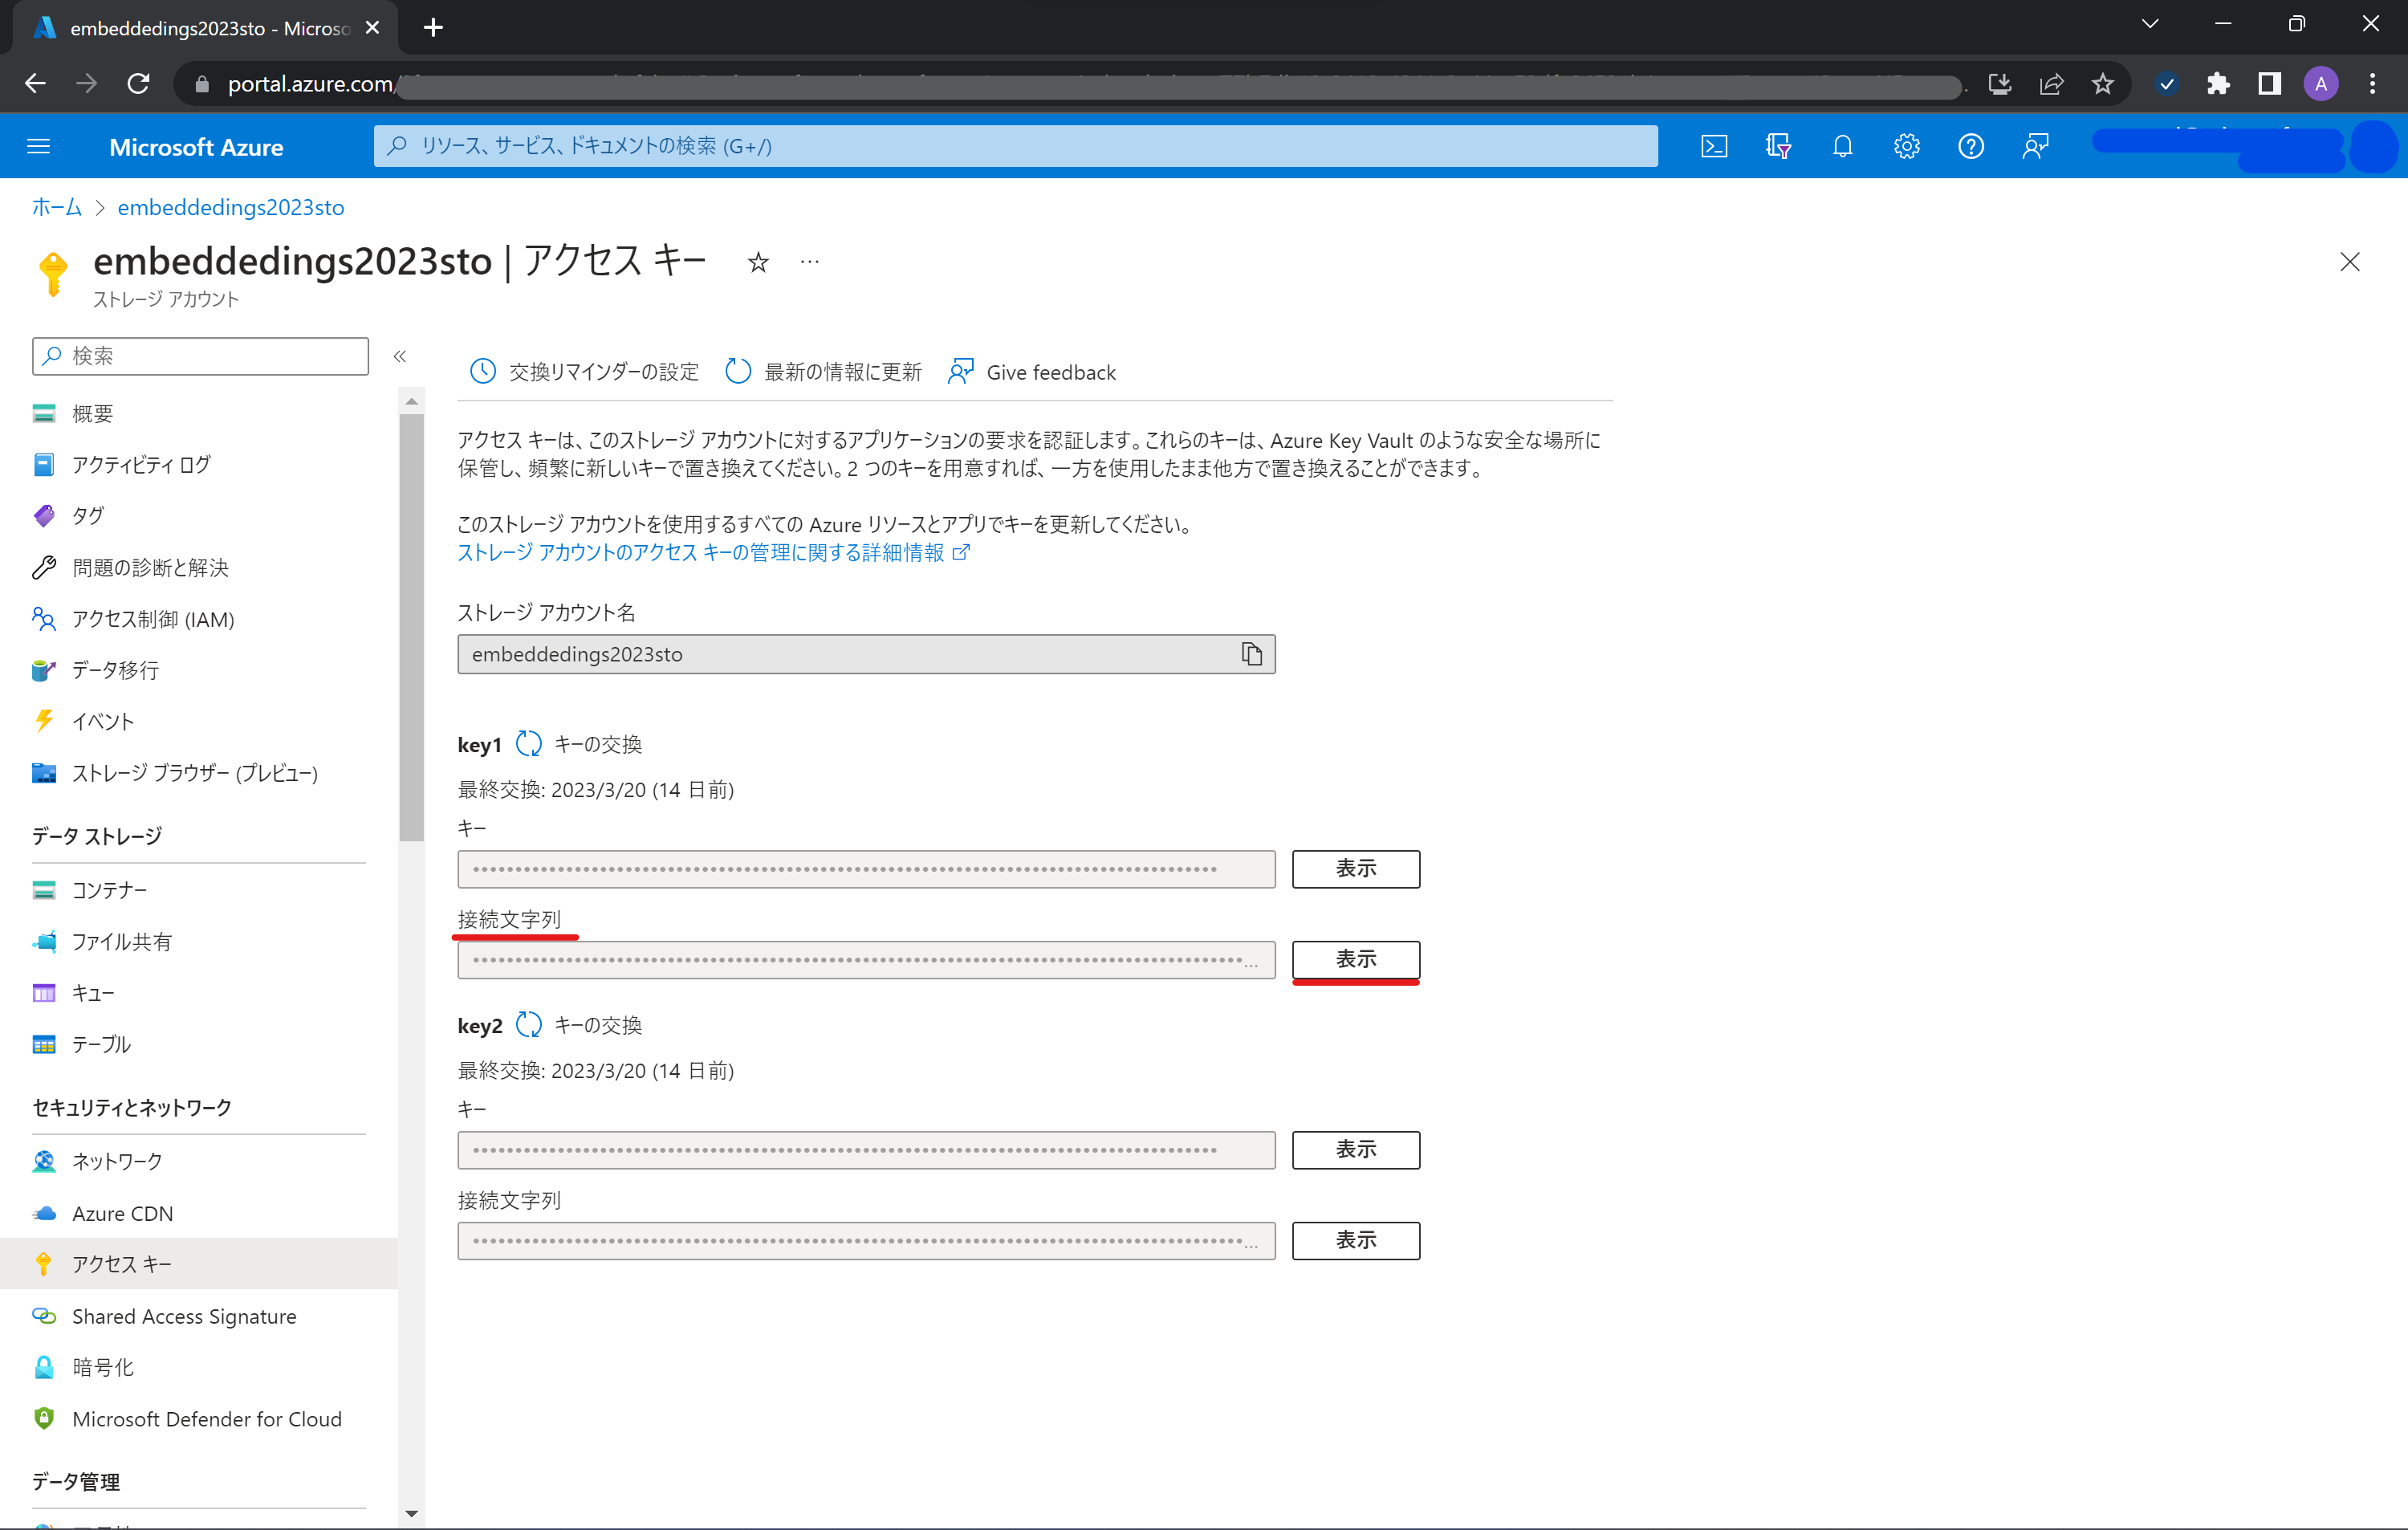
作成した Azure Storage の接続文字列 (Connection String) をローカルに保存しておきます。
-
-
開発環境
今回は Visual Studio Code + Azure Function Tools を利用して開発しています。
Microsoft Learn > クイックスタート: Visual Studio Code と Python を使用して Azure に関数を作成する を参考に環境を準備し、ローカル環境で HTTP Function を作成しておきます。
手順
前回記事 ③Embedding & 自然言語検索を Jupyter Notebook からお試し とほぼほぼ手順は同じです。
requirements.txt に必要なライブラリーを追加
azure-functions の下に OpenAI およびデータ操作系のライブラリーを追加して、Azure Functions で利用できるようにします。
# DO NOT include azure-functions-worker in this file
# The Python Worker is managed by Azure Functions platform
# Manually managing azure-functions-worker may cause unexpected issues

azure-functions
certifi==2022.9.24
charset-normalizer==2.1.1
colorama==0.4.6
contourpy==1.0.6
cycler==0.11.0
docopt==0.6.2
et-xmlfile==1.1.0
filelock==3.8.2
fonttools==4.38.0
huggingface-hub==0.11.1
idna==3.4
joblib==1.2.0
kiwisolver==1.4.4
matplotlib==3.6.2
num2words==0.5.12
numpy==1.23.5
openai==0.25.0
openpyxl==3.0.10
packaging==21.3
pandas==1.5.2
pandas-stubs==1.5.2.221124
Pillow==9.3.0
plotly==5.11.0
pyparsing==3.0.9
python-dateutil==2.8.2
pytz==2022.6
PyYAML==6.0
regex==2022.10.31
requests==2.28.1
scikit-learn==1.1.3
scipy==1.9.3
six==1.16.0
tenacity==8.1.0
threadpoolctl==3.1.0
tokenizers==0.13.2
tqdm==4.64.1
transformers==4.25.1
types-pytz==2022.6.0.1
typing_extensions==4.4.0
urllib3==1.26.13
Azure OpenAI Service & Azure Storage Blob の情報セット
Azure Functions の実装は (Function名) /__init__.py にあります。
こちらの冒頭で、OpenAI およびデータ操作系、Azure Storage Blob のライブラリーをインポートします。
import logging

import azure.functions as func
import openai
import re
from num2words import num2words
import pandas as pd
from openai.embeddings_utils import get_embedding, cosine_similarity
from transformers import GPT2TokenizerFast
import json

from azure.storage.blob import BlobServiceClient
Azure OpenAI Service & Azure Storage Blob の情報セット
Azure Functions の実際の挙動は main 関数に設定されています。
main の冒頭で、(本来なら環境変数として設定すべきですが、お試しなので直接) ローカルに保存しておいた Azure OpenAI Service のキー と エンドポイントをコード内で設定します。
def main(req: func.HttpRequest) -> func.HttpResponse:
    logging.info('EmbeddingDataFunc HTTP trigger function processed a request.')

    # Set Azure OpenAI Service & Blob Storage Info
    API_KEY = "YOUR_API_KEY"
    RESOURCE_ENDPOINT = "https://YOUR_SERVICE_NAME.openai.azure.com/"
    BLOB_CONNECTION_STRING = "YOUR_CONNECTION_STRING"

    openai.api_type = "azure"
    openai.api_key = API_KEY
    openai.api_base = RESOURCE_ENDPOINT
    openai.api_version = "2022-12-01"
    url = openai.api_base + "/openai/deployments?api-version=2022-12-01"

: (以下略)
本来なら...(以下略))、Azure Storage の接続文字列を設定します。
指定した Blob ('embedding-data') に格納されたファイルを全て CSV データとして読み込みます。
def main(req: func.HttpRequest) -> func.HttpResponse:
: (中略)

    # Set Azure Storage Info
    blob_service_client = BlobServiceClient.from_connection_string(BLOB_CONNECTION_STRING)

    # Get and Read Embedding Data from Azure Blob Storage
    containerClient = blob_service_client.get_container_client(container="embedding-data")
    blobList = containerClient.list_blobs()
    for blob in blobList:
        file = containerClient.download_blob(blob.name)
        df = pd.read_csv(file)
: (以下略)
データ前処理、Tokenizer、text-curie-search-doc を使った埋め込み (Embedding)
前回記事 ③Embedding & 自然言語検索を Jupyter Notebook からお試し と同様の手順で、データ前処理、Tokenizer、text-curie-search-doc を使った埋め込み (Embedding) を行います。
def main(req: func.HttpRequest) -> func.HttpResponse:
: (中略)

    # Clean Up Data
    def normalize_text(s, sep_token = " \n "):
        s = re.sub(r'\s+',  ' ', s).strip()
        s = re.sub(r". ,","",s)
        # remove all instances of multiple spaces
        s = s.replace("..",".")
        s = s.replace(". .",".")
        s = s.replace("\n", "")
        s = s.strip()
        return s

    df['text'] = df["text"].apply(lambda x : normalize_text(x))

    # Tokenize Data
    tokenizer = GPT2TokenizerFast.from_pretrained("gpt2")
    df['n_tokens'] = df["text"].apply(lambda x: len(tokenizer.encode(x)))
    df = df[df.n_tokens<2000]

    # Enbedding Data
    df['curie_search'] = df["text"].apply(lambda x : get_embedding(x, engine = 'text-search-curie-doc-001'))

: (以下略)
text-curie-search-query を使った検索の関数化と、Rest API としての挙動の設定
Azure Functions の HTTP Function では、HTTP Request された内容が req に格納されています。 GET または POST で HTTP Request 可能とし、GET の場合はパラメーター ("q=質問したい内容") で、POST の場合は JSON 内に "q" という項目に質問したい内容を入れるようにします。
def main(req: func.HttpRequest) -> func.HttpResponse:
: (中略)

    # Get User Input for Search Data
    q = req.params.get('q')
    if not q:
        try:
            req_body = req.get_json()
        except ValueError:
            pass
        else:
            q = req_body.get('q')
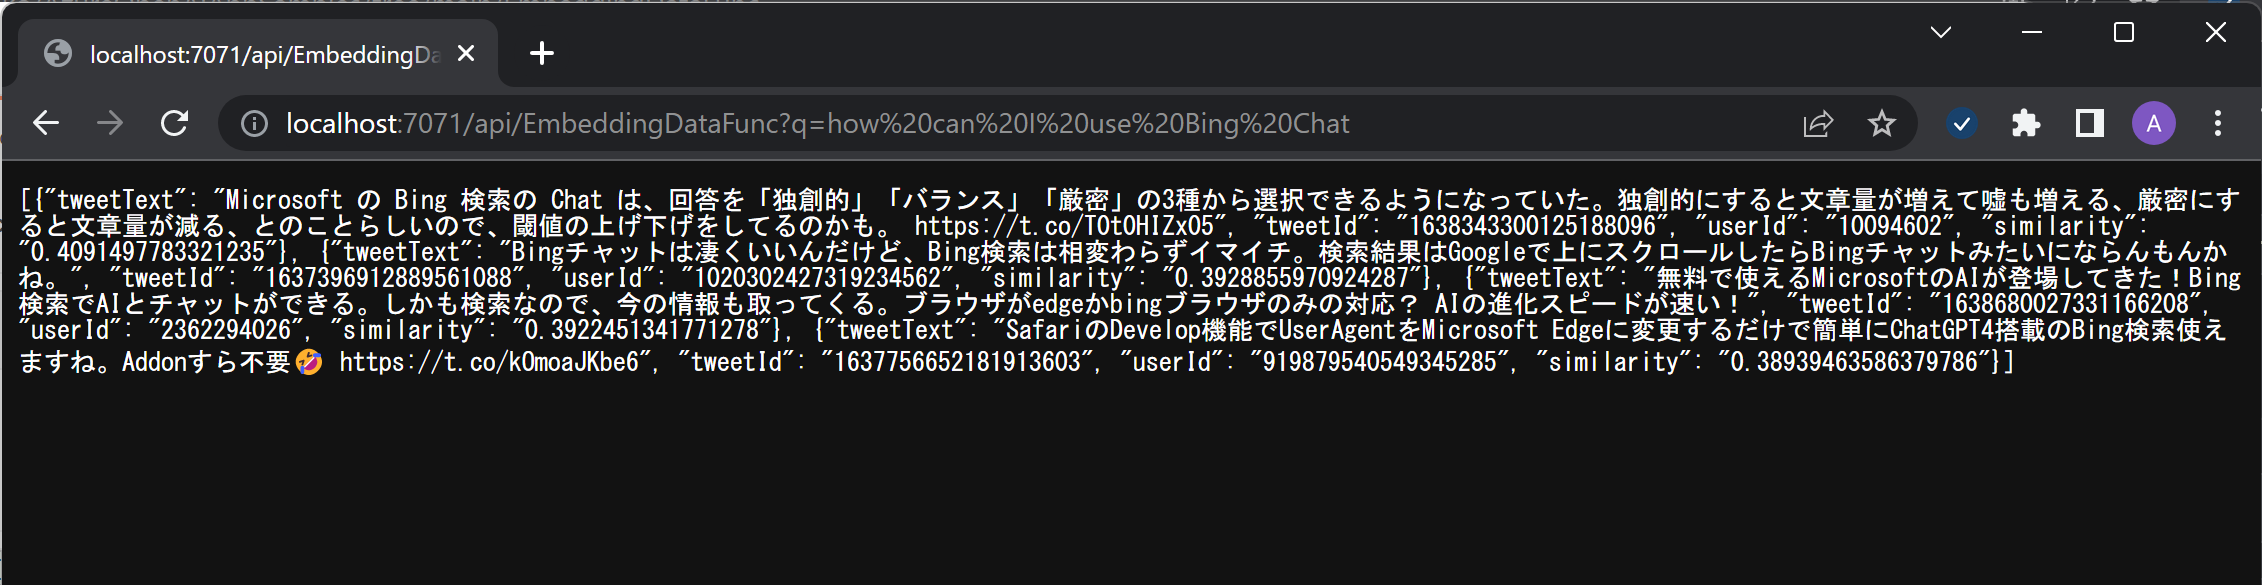
先ほど作成した search_docs を使って、質問に対して関連性の高い答えの上位 4 件を取得し、json で Response を返します。その際、tweetText, tweetId, userId, similarity (関連度) を出力しています。
Request で 'q' というパラメーターの値が取得できない場合は、(エラーではなく) Response 200、メッセージを戻すようにします。
    if q:
        # Search Data
        res = search_docs(df, q, top_n=4)
        jsondata = []
        for i in range(4):
            data = { "tweetText": res.iloc[i]['text'],
                    "tweetId": str(res.iloc[i]['tweetId']),
                    "userId": str(res.iloc[i]['userId']),
                    "similarity": str(res.iloc[i]['similarities']) }
            jsondata.append(data)

        answer = json.dumps(jsondata, ensure_ascii=False)
        return func.HttpResponse(answer)

    else:
        return func.HttpResponse(
             "This HTTP triggered function executed successfully. Add q in the query string or in the request body for searched response.",
             status_code=200
        )
結果
GET で取得
POST で取得
