この記事の基本的な方針
この記事は、過去記事で作ったアプリをEC2でデプロイします。
手を動かしながら読みたいようでしたら、以下でこのアプリを手に入れてください。
$ git clone https://github.com/annaPanda8170/cheaptweet.git
$ bundle install
$ bundle exec rake db:create
$ bundle exec rake db:migrate
これ自体の作り方は、こちら。
Rails5.2.4.2_でのみ動作確認しています。
基本解説はしません。手順のみ示します。
想定する読み手
既に一度Railsアプリをチュートリアルやスクール等で作りデプロイしたこのある方を想定しています。
Mac使用で、パソコンの環境構築は完了し、AWSのアカウントを持っていて、GitHubで既にこのアプリの監視をしていることが前提です。
具体的な手順
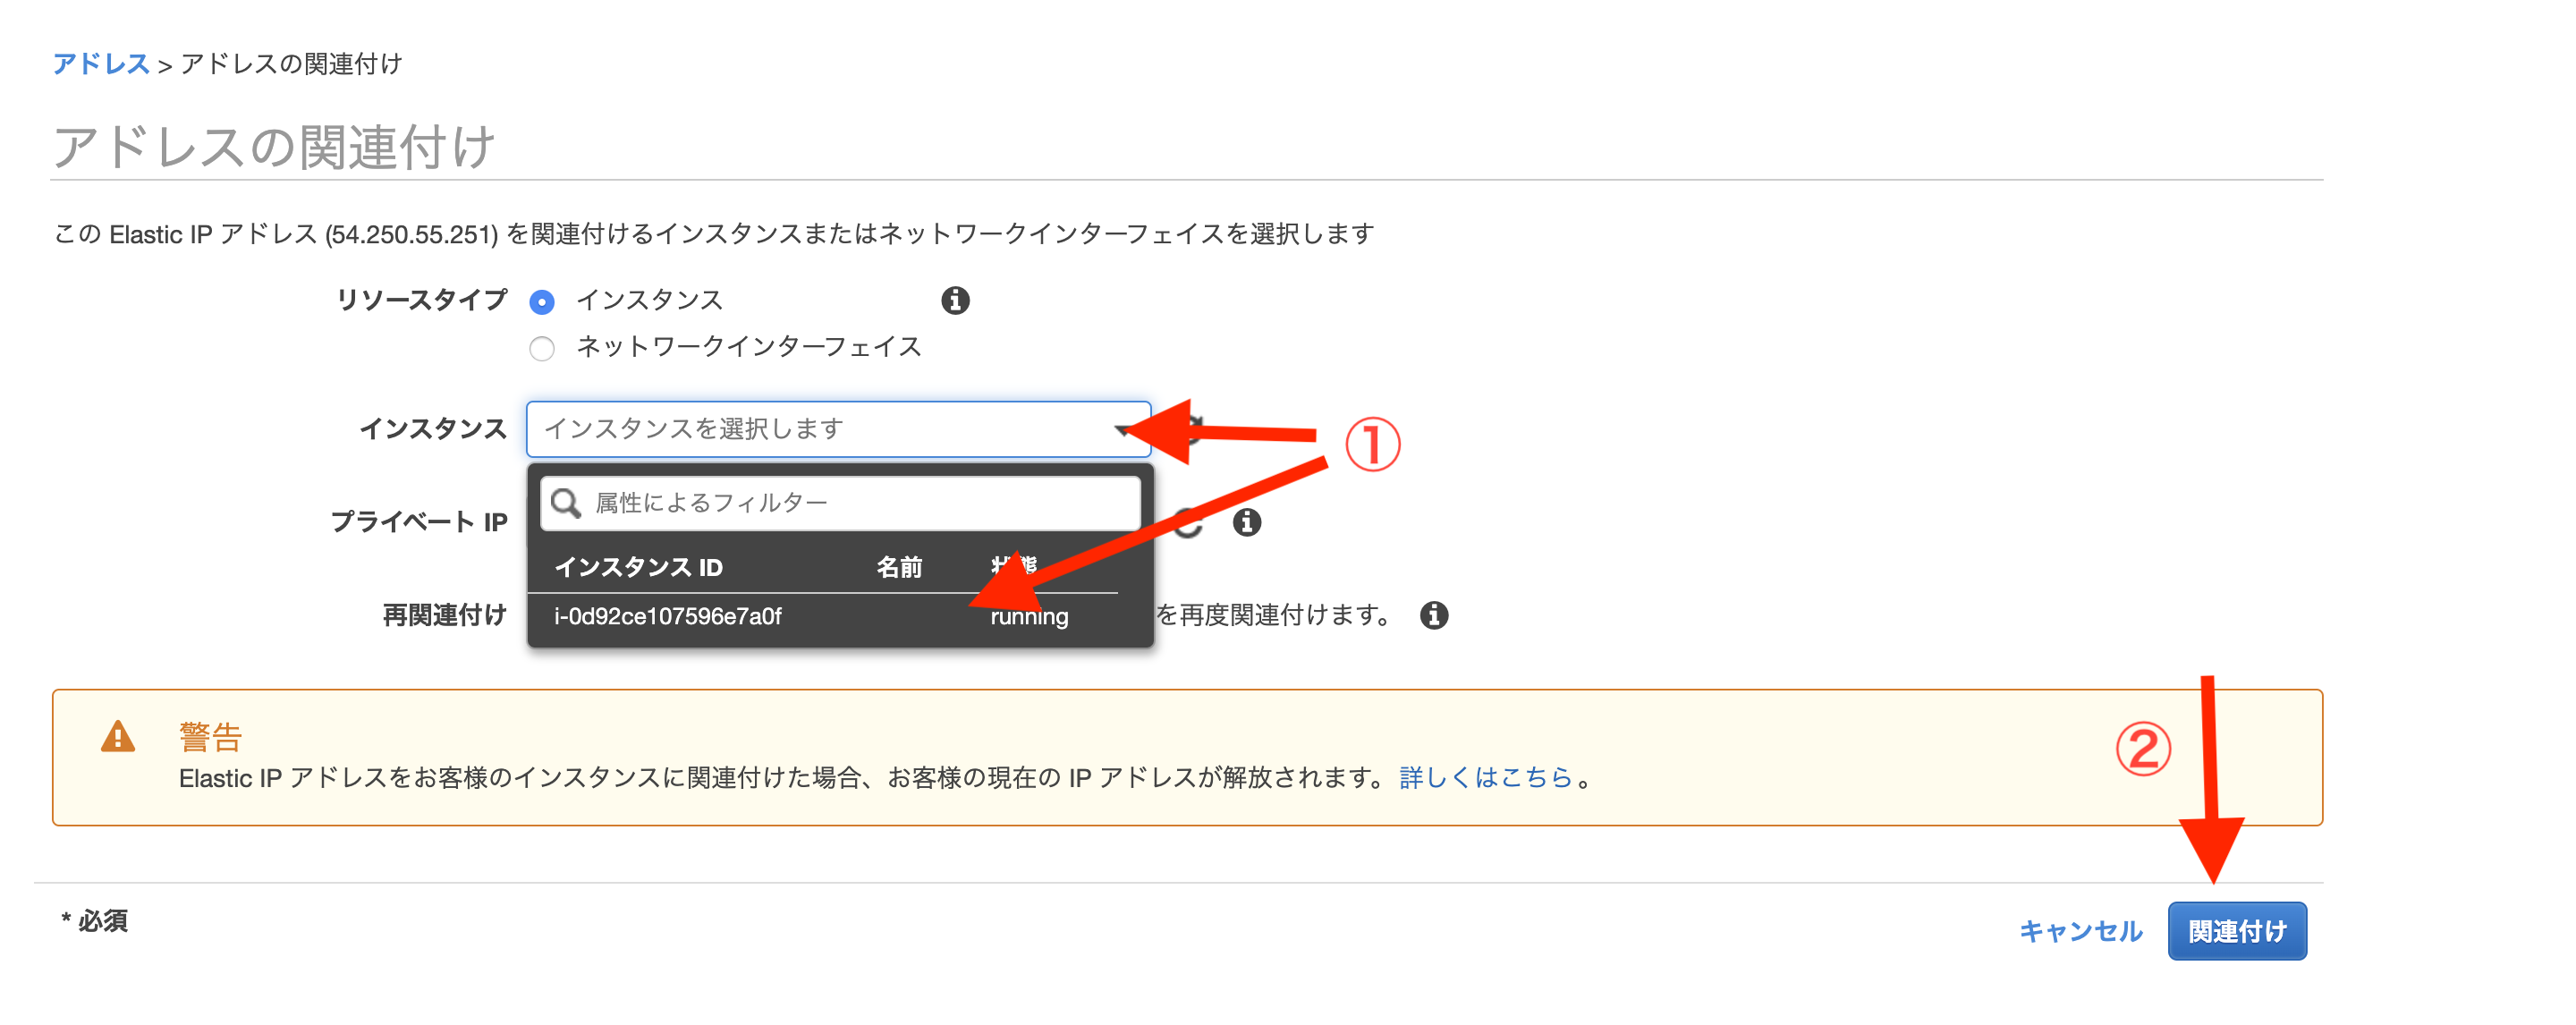
①インスタンスを作り、ssh接続でログインする
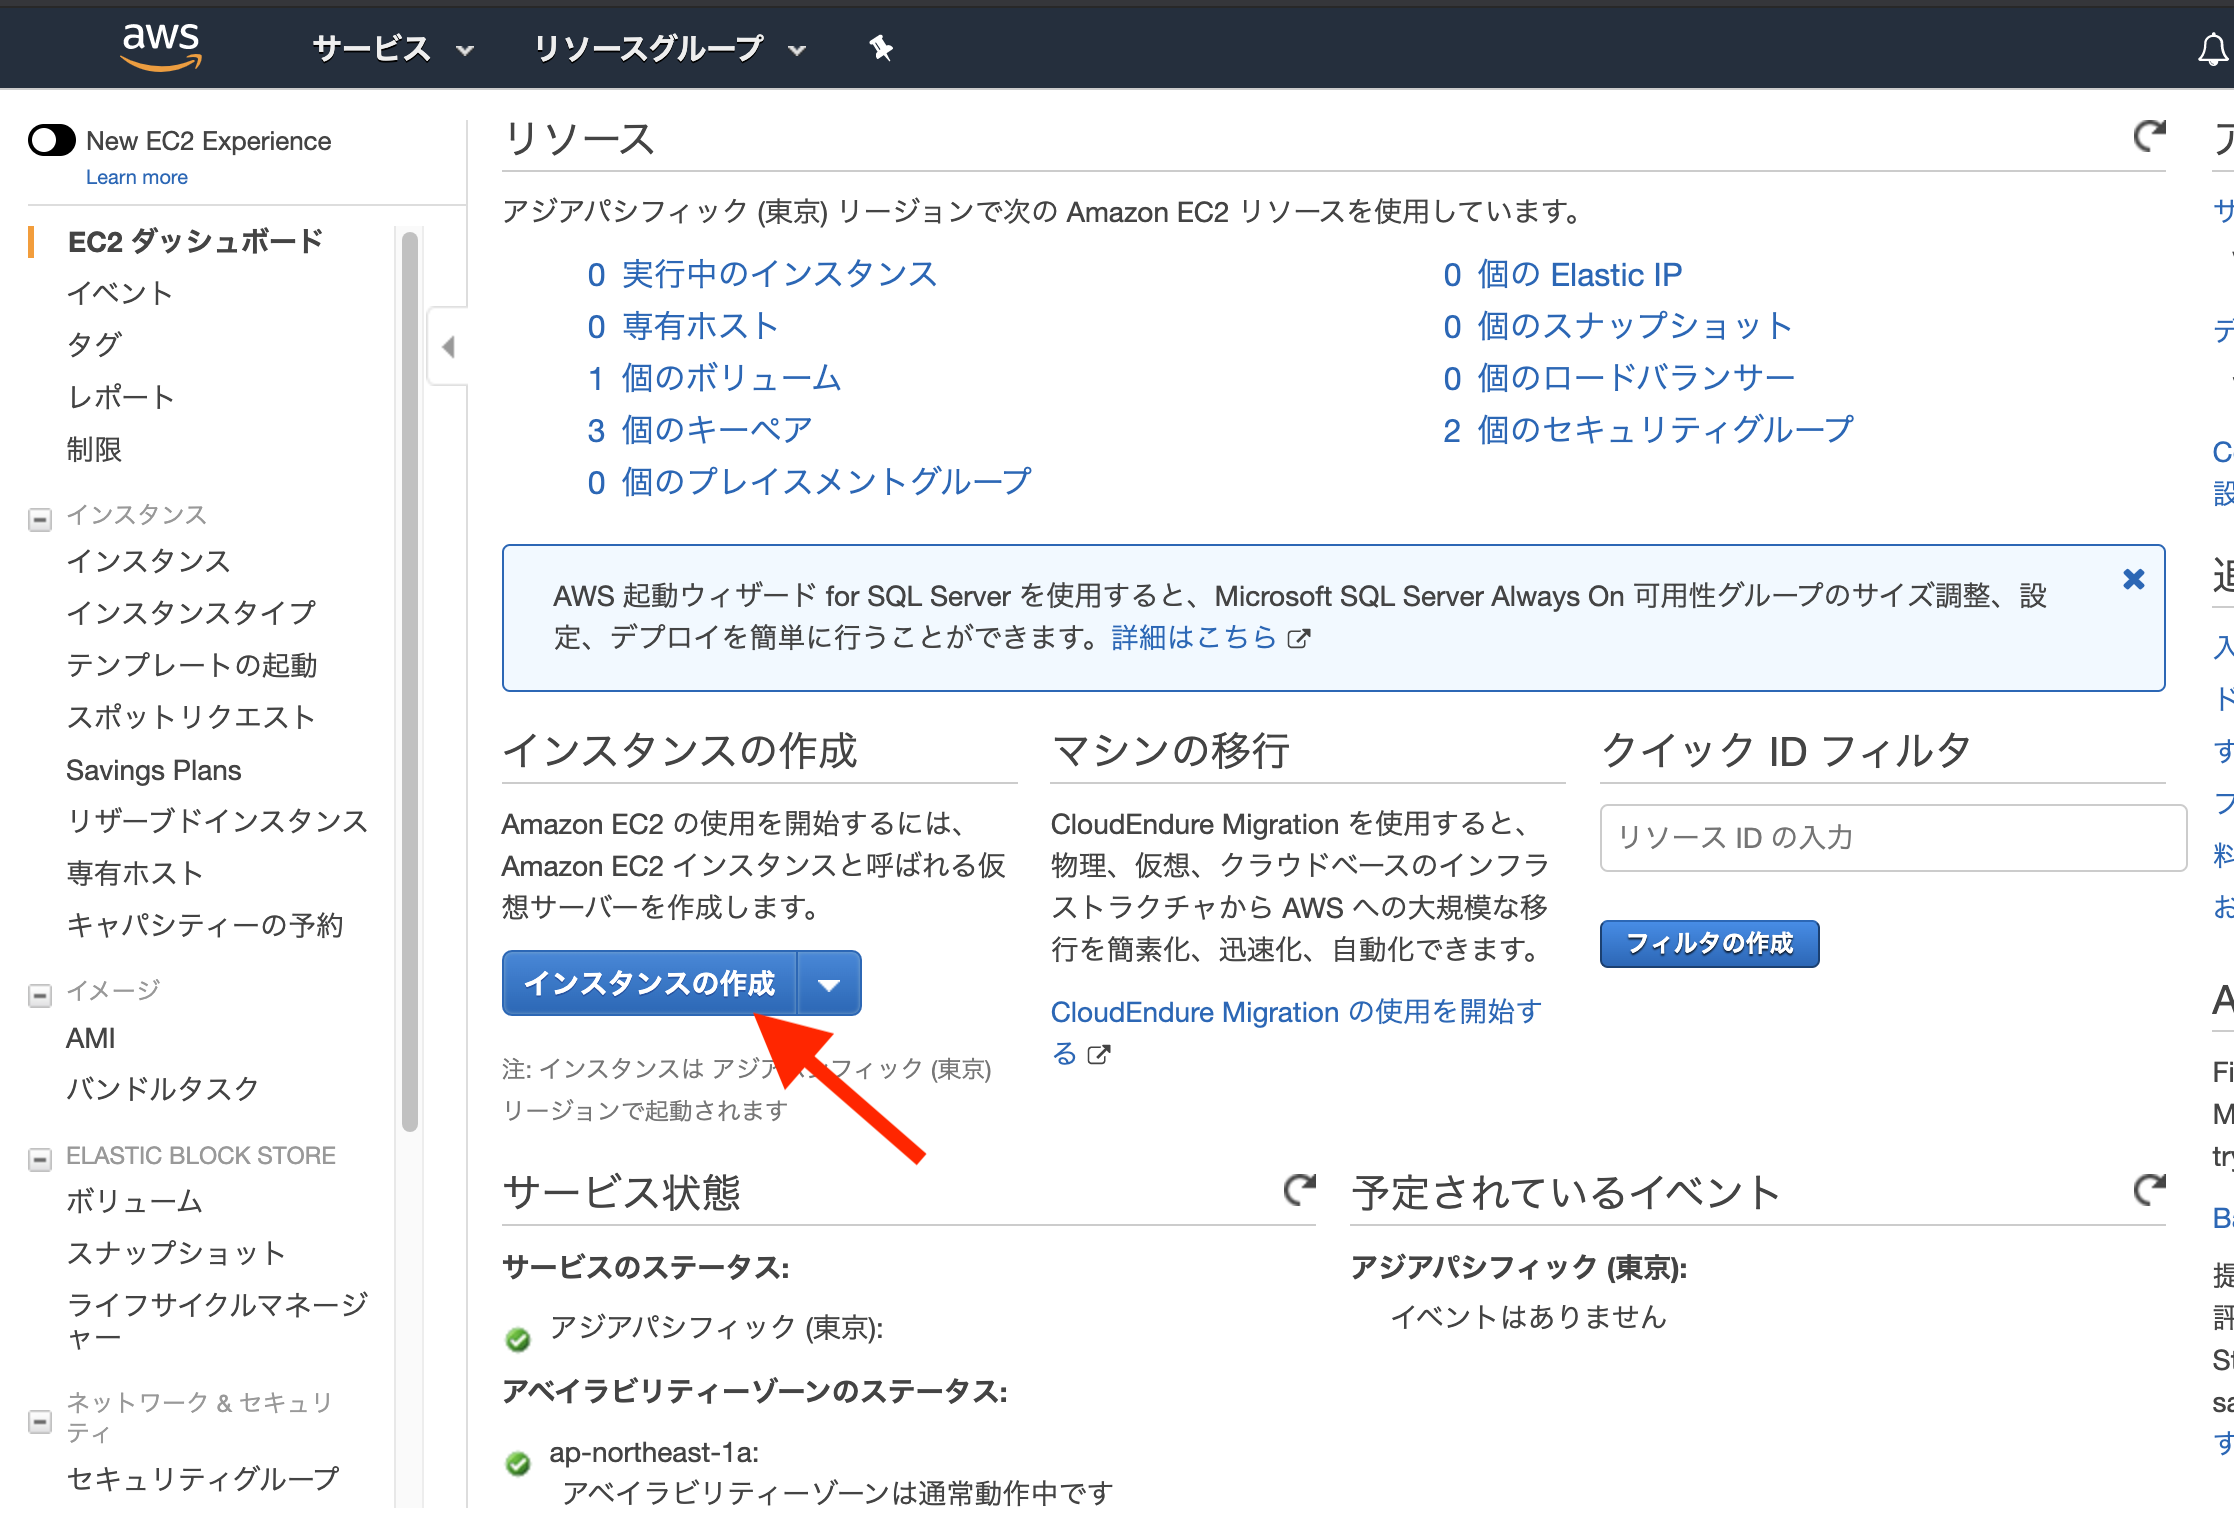
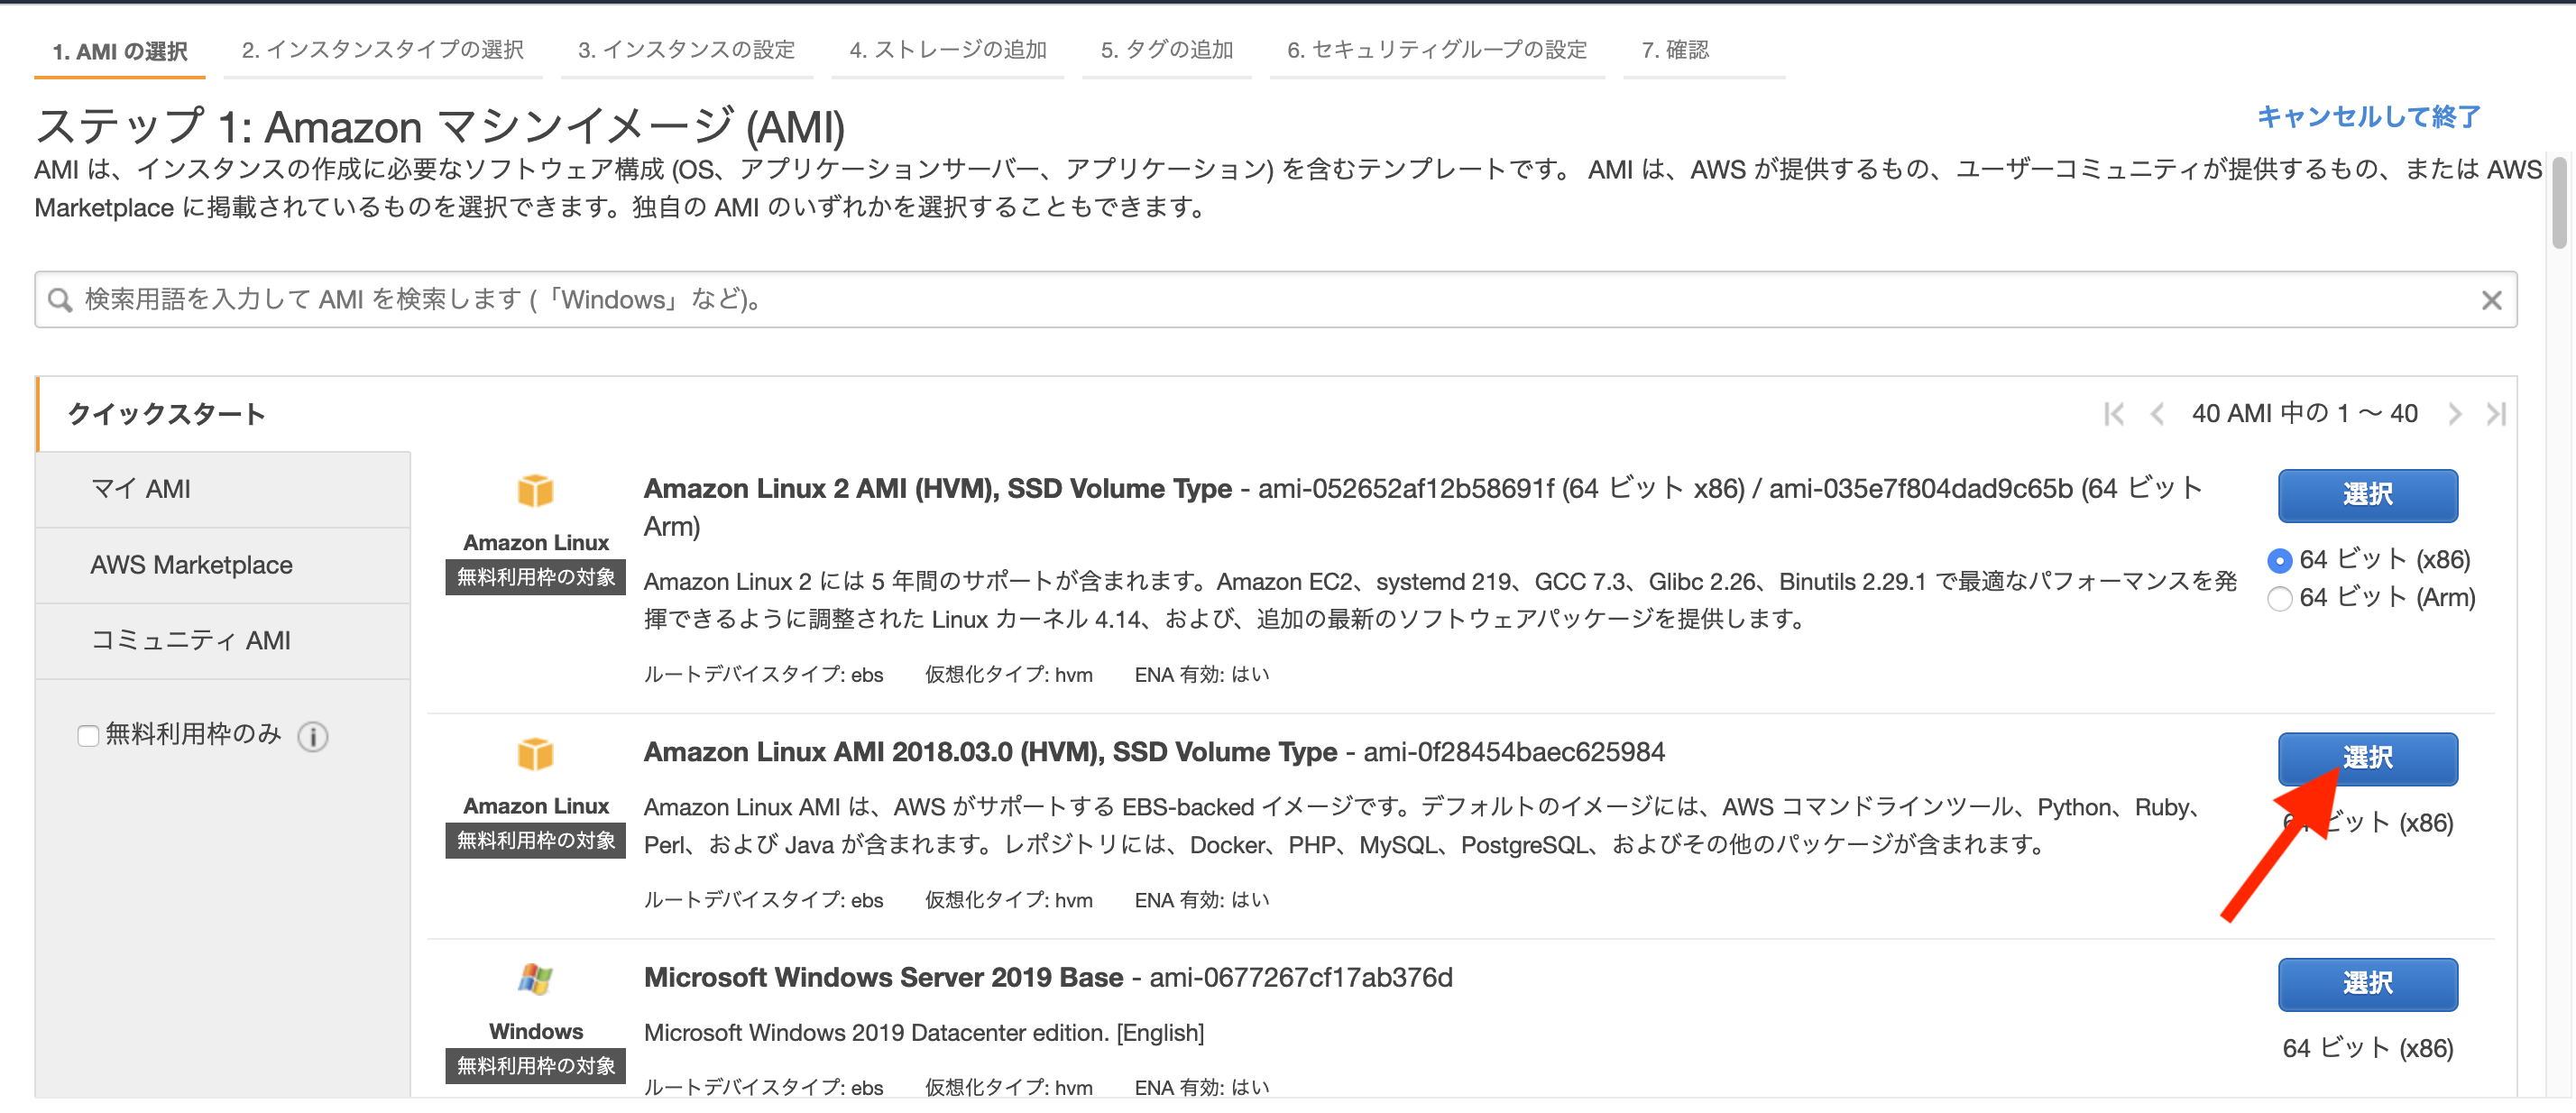
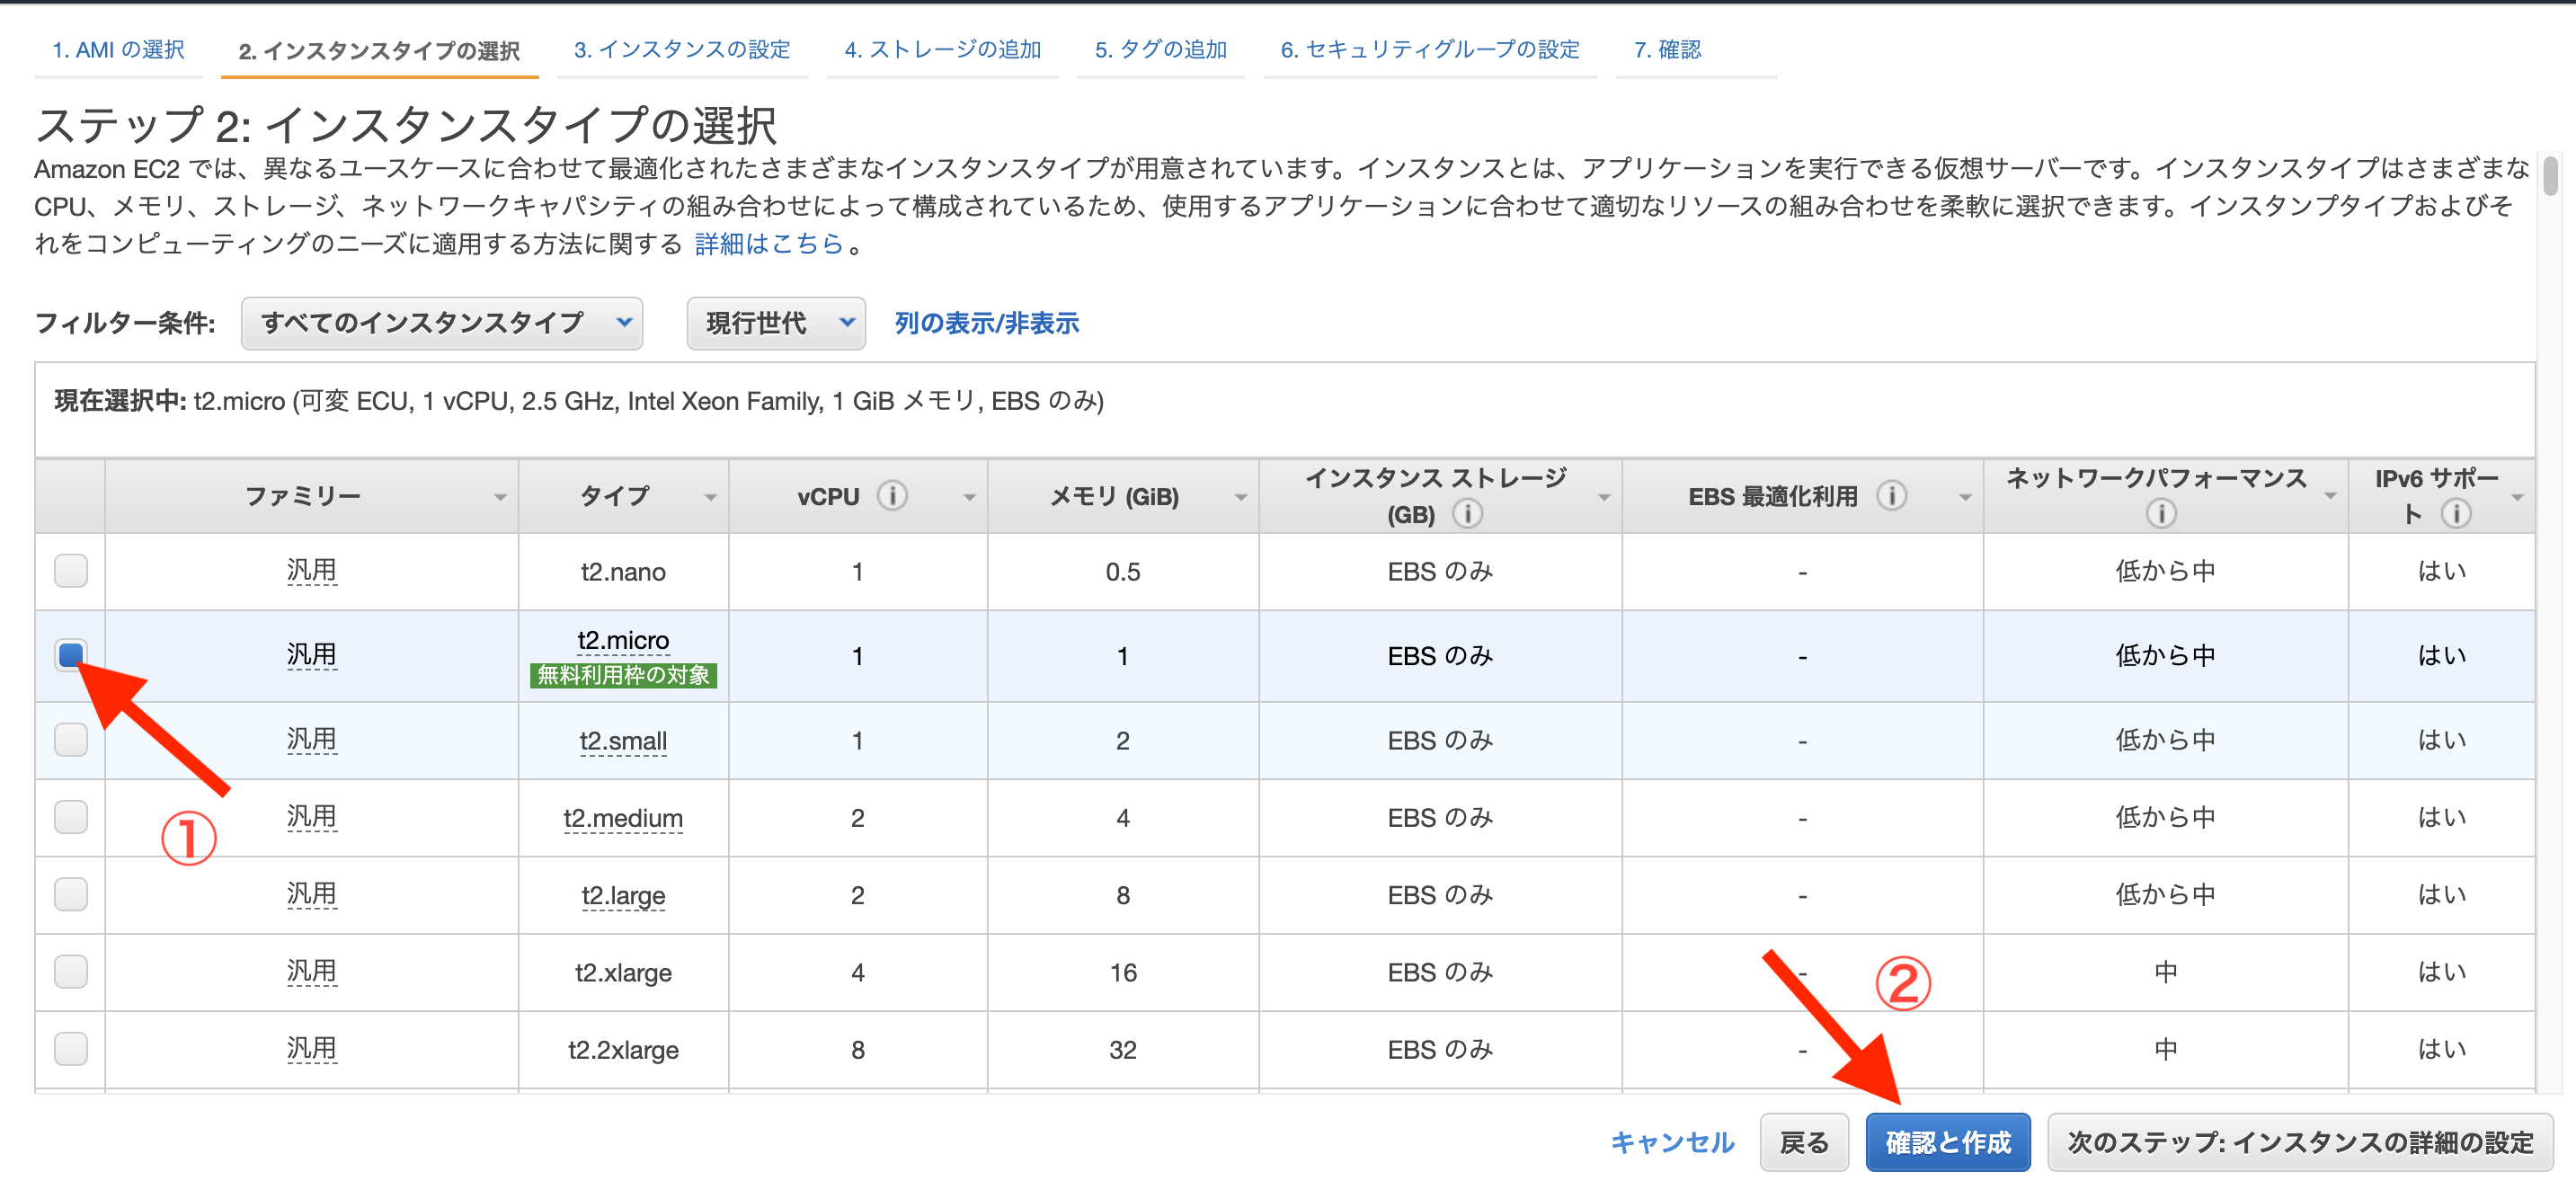
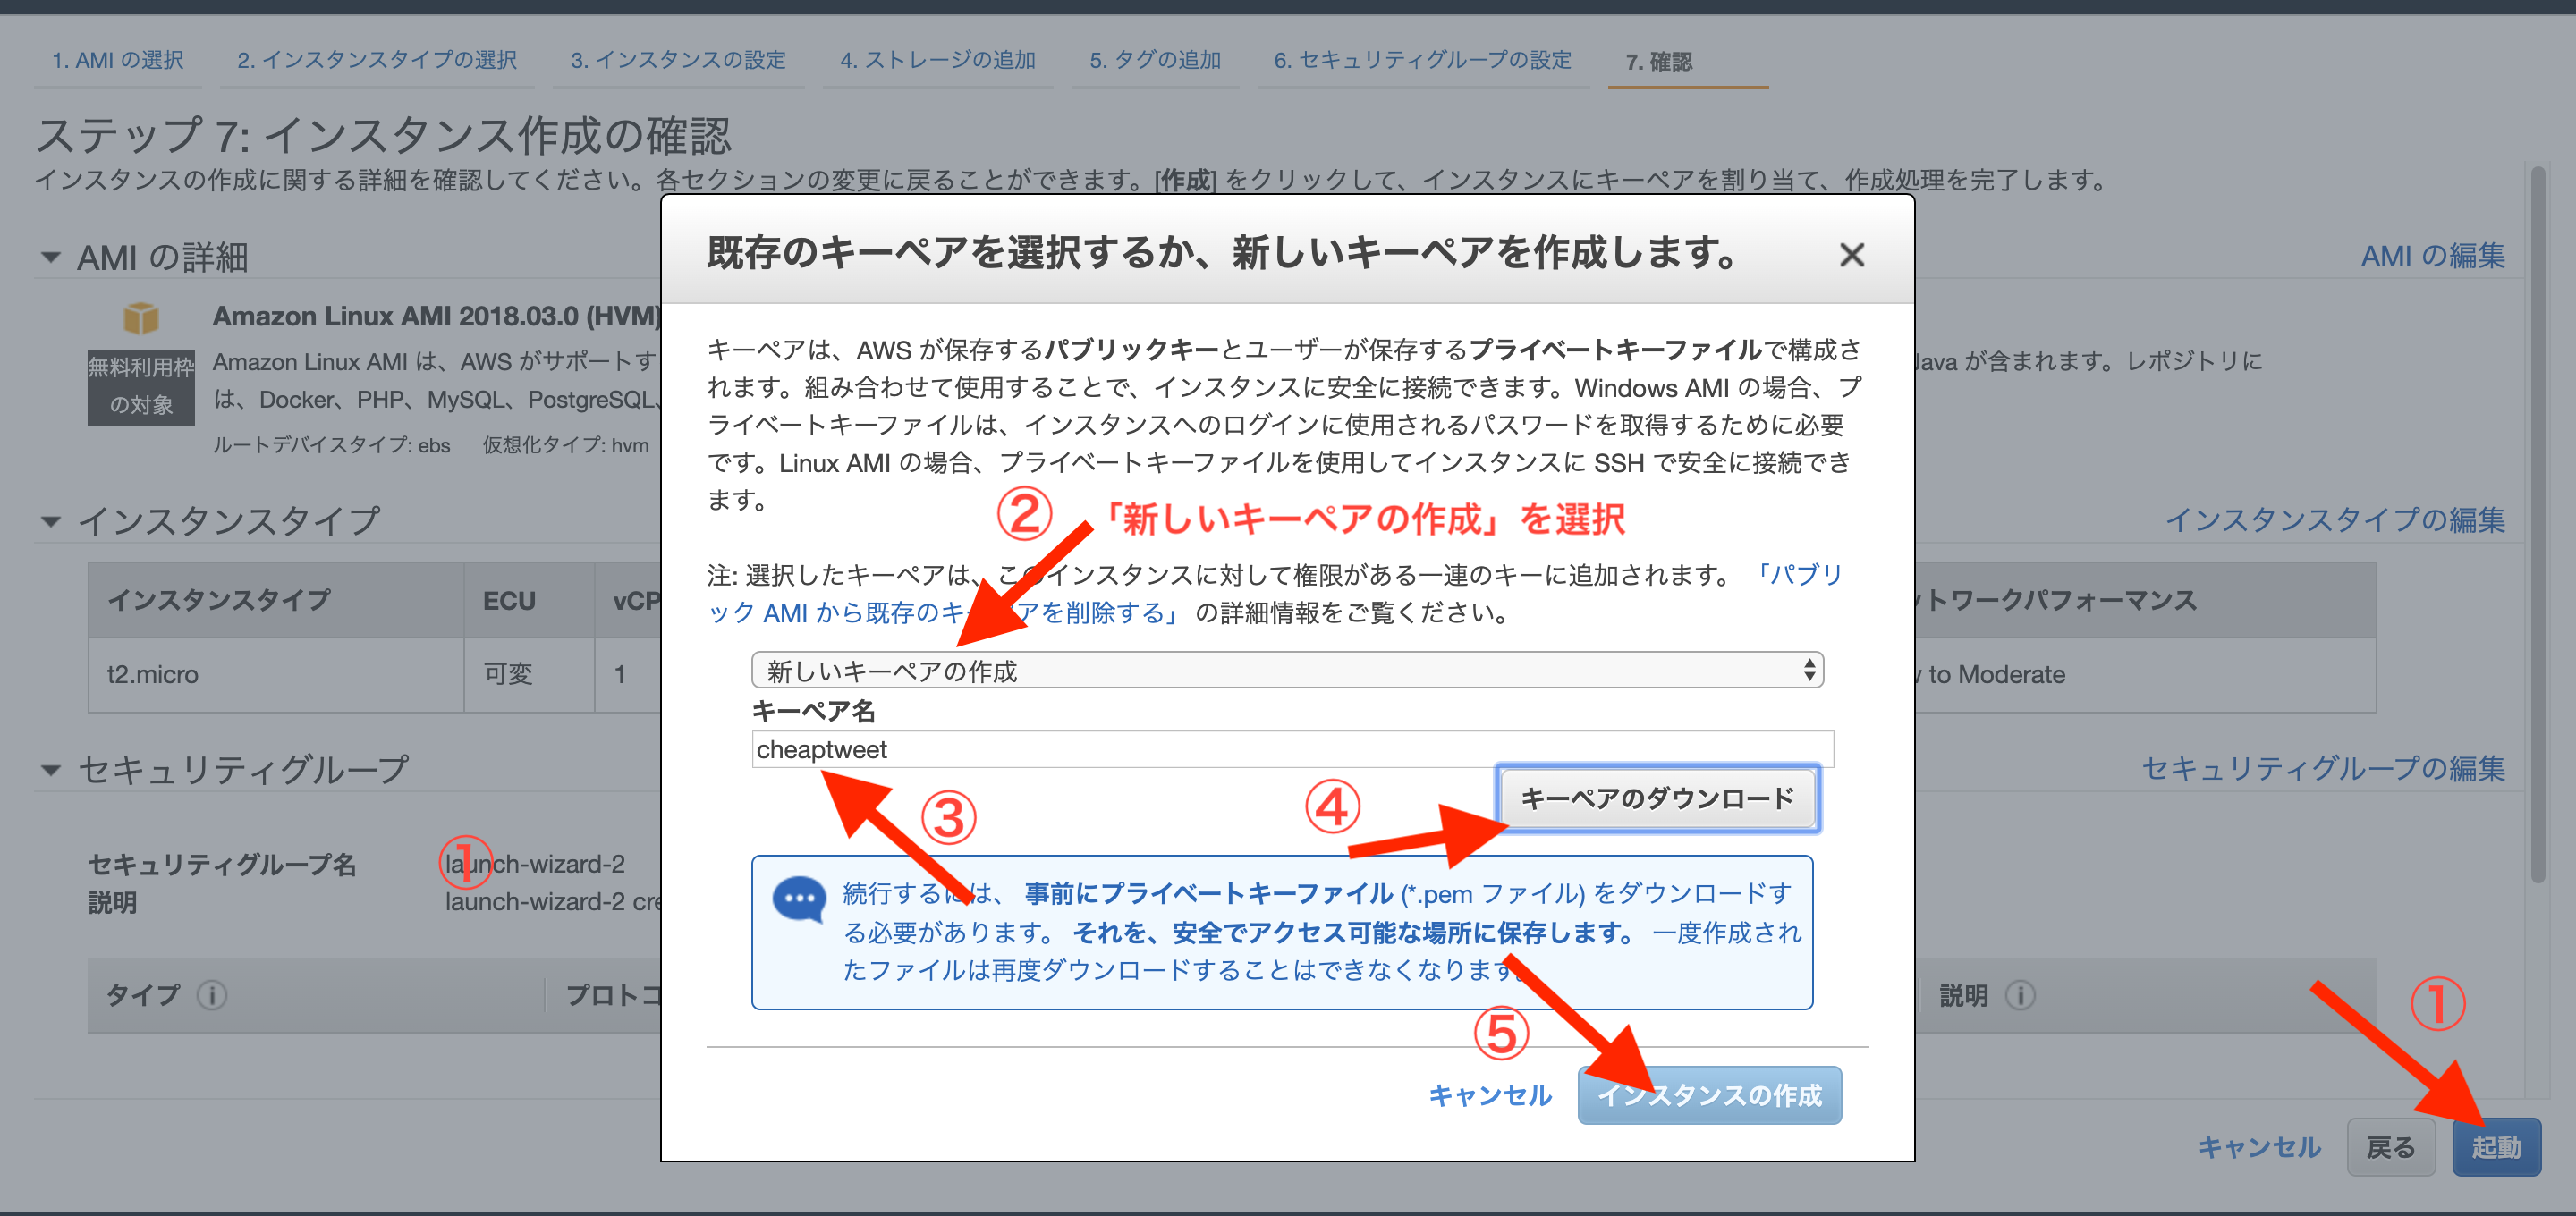




# ホームディレクトリ直下に.ssh/隠しディレクトリを事前に作ってます

$ cd
# 別に移動しなくても問題ないが、隠しディレクトリに入れといた方が無難
$ mv Downloads/****鍵の名前****.pem .ssh/

$ cd .ssh/

# ****鍵の名前****.pemのファイルに関して所有者のみ読み出し・書き込みの権限を与える意
# (所有者も実行権限がなく、所有者グループとその他はなんの権限もない)
$ chmod 600 ****鍵の名前****.pem

# ログイン
$ ssh -i ****鍵の名前****.pem ec2-user@****ここはElasticIP****
Are you sure you want to continue connecting (yes/no)?
yes
Warning: Permanently added '54.250.55.251' (ECDSA) to the list of known hosts.

       __|  __|_  )
       _|  (     /   Amazon Linux AMI
      ___|\___|___|

https://aws.amazon.com/amazon-linux-ami/2018.03-release-notes/
②諸々インストールと、GitHub連携
# もしアップデートしろと言われたら以下を実行
# アップデートしろと言われてなくてやっても問題ないので一応やってもいいかも
$ sudo yum -y update

# 諸々基本インストール

$ sudo yum -y install git make gcc-c++ patch libyaml-devel libffi-devel libicu-devel zlib-devel readline-devel libxml2-devel libxslt-devel ImageMagick ImageMagick-devel openssl-devel libcurl libcurl-devel curl
$ sudo curl -sL https://rpm.nodesource.com/setup_6.x | sudo bash -
$ sudo yum -y install nodejs  # 今回はJSは使ってないが一応

# 諸々Ruby・Rails関係インストール

$ git clone https://github.com/sstephenson/rbenv.git ~/.rbenv
$ echo 'export PATH="$HOME/.rbenv/bin:$PATH"' >> ~/.bash_profile
$ echo 'eval "$(rbenv init -)"' >> ~/.bash_profile
$ source .bash_profile
$ git clone https://github.com/sstephenson/ruby-build.git ~/.rbenv/plugins/ruby-build
$ rbenv rehash
# 自身のRubyのバージョンを確認して以下。結構時間かかります
$ rbenv install 2.5.1
$ rbenv global 2.5.1
$ rbenv rehash
# 確認は
# ruby -v

# MySQLインストール
$ sudo yum -y install mysql56-server mysql56-devel mysql56

# MySQL起動
$ sudo service mysqld start
# 確認は
# sudo service mysqld status

# MySQLパスワード設定
$ sudo /usr/libexec/mysql56/mysqladmin -u root password
# 確認は
# mysql -u root -p

# SSH鍵ペア関連

# 鍵ペア作成
$ ssh-keygen -t rsa -b 4096
# この後何も入力せずにEnter三回
# 鍵ペア表示
$ cat ~/.ssh/id_rsa.pub
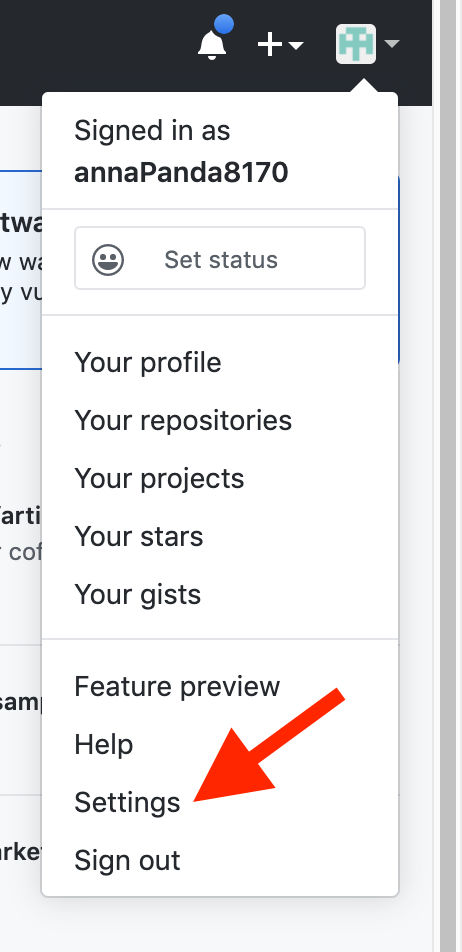
# 表示された値を ssh-rsa から最後までまるまるコピー
https://github.com/


$ ssh -T git@github.com
Are you sure you want to continue connecting (yes/no)?
yes
③unicorn導入
# 省略
group :production do
  gem 'unicorn', '5.4.1'
end
# 省略
$ bundle install
config/unicorn.rbを作成
app_path = File.expand_path('../../', __FILE__)
worker_processes 1
working_directory app_path
pid "#{app_path}/tmp/pids/unicorn.pid"
listen 3000
stderr_path "#{app_path}/log/unicorn.stderr.log"
stdout_path "#{app_path}/log/unicorn.stdout.log"
timeout 60
preload_app true
GC.respond_to?(:copy_on_write_friendly=) && GC.copy_on_write_friendly = true
check_client_connection false
run_once = true
before_fork do |server, worker|
  defined?(ActiveRecord::Base) && ActiveRecord::Base.connection.disconnect!
  if run_once
    run_once = false
  end
  old_pid = "#{server.config[:pid]}.oldbin"
  if File.exist?(old_pid) && server.pid != old_pid
    begin
      sig = (worker.nr + 1) >= server.worker_processes ? :QUIT : :TTOU
      Process.kill(sig, File.read(old_pid).to_i)
    rescue Errno::ENOENT, Errno::ESRCH => e
      logger.error e
    end
  end
end
after_fork do |_server, _worker|
  defined?(ActiveRecord::Base) && ActiveRecord::Base.establish_connection
end
# 以下をコメントアウトする
# config.assets.js_compressor = :uglifier
# production:
#  <<: *default
#  database: ***名前***_production
#  username: ***名前***
#  password: <%= ENV['***名前***_DATABASE_PASSWORD'] %>

#    |
#    V

production:
  <<: *default
  database: '***名前***'_production
  username: root
  password: <%= ENV['DATABASE_PASSWORD'] %>
  socket: /var/lib/mysql/mysql.sock
プッシュしてmasterにマージする
$ cd
$ sudo mkdir /var/www/
$ sudo chown ec2-user /var/www/
$ cd /var/www/
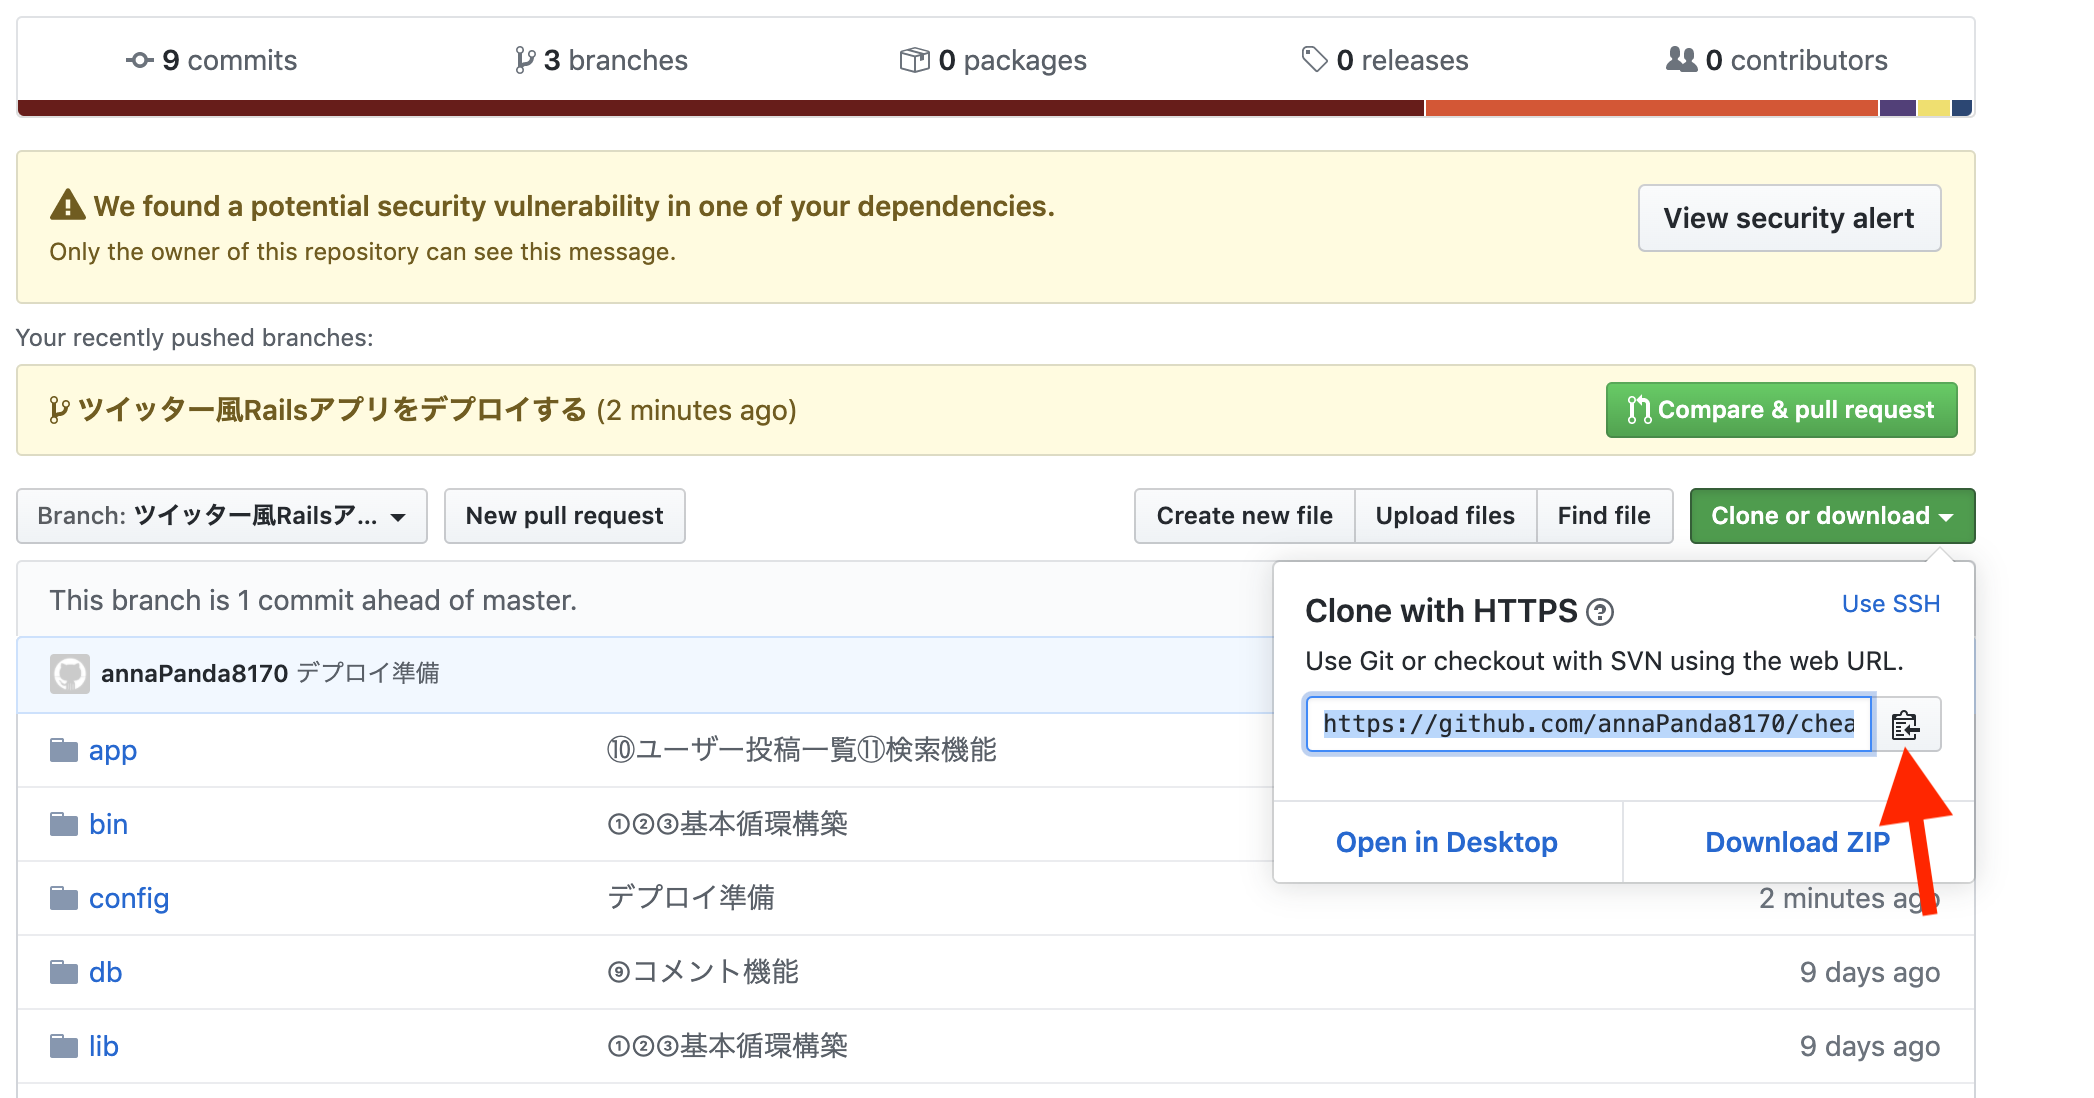
$ git clone ***上でコピーしたGitHubのURL***
④Swap領域の追加
$ cd
$ sudo dd if=/dev/zero of=/swapfile1 bs=1M count=512
$ sudo chmod 600 /swapfile1
$ sudo mkswap /swapfile1
$ sudo swapon /swapfile1
$ sudo sh -c 'echo "/swapfile1  none        swap    sw              0   0" >> /etc/fstab'
$ cd  /var/www/***アプリ名***
# ローカルでバンドラーのバージョンを確認
$ gem install bundler -v ***確認したバージョン***
$ bundle install

$ rake secret
# 出てきたキーをコピー
$ sudo vim /etc/environment
DATABASE_PASSWORD='***MySQLのパスワード***'
SECRET_KEY_BASE='***先程コピーしたキー***'
# 再ログイン
$ exit
$ ssh -i ****鍵の名前****.pem ec2-user@***ここはElasticIP***

# 上の環境変数の確認は
# env | grep SECRET_KEY_BASE
# env | grep DATABASE_PASSWORD
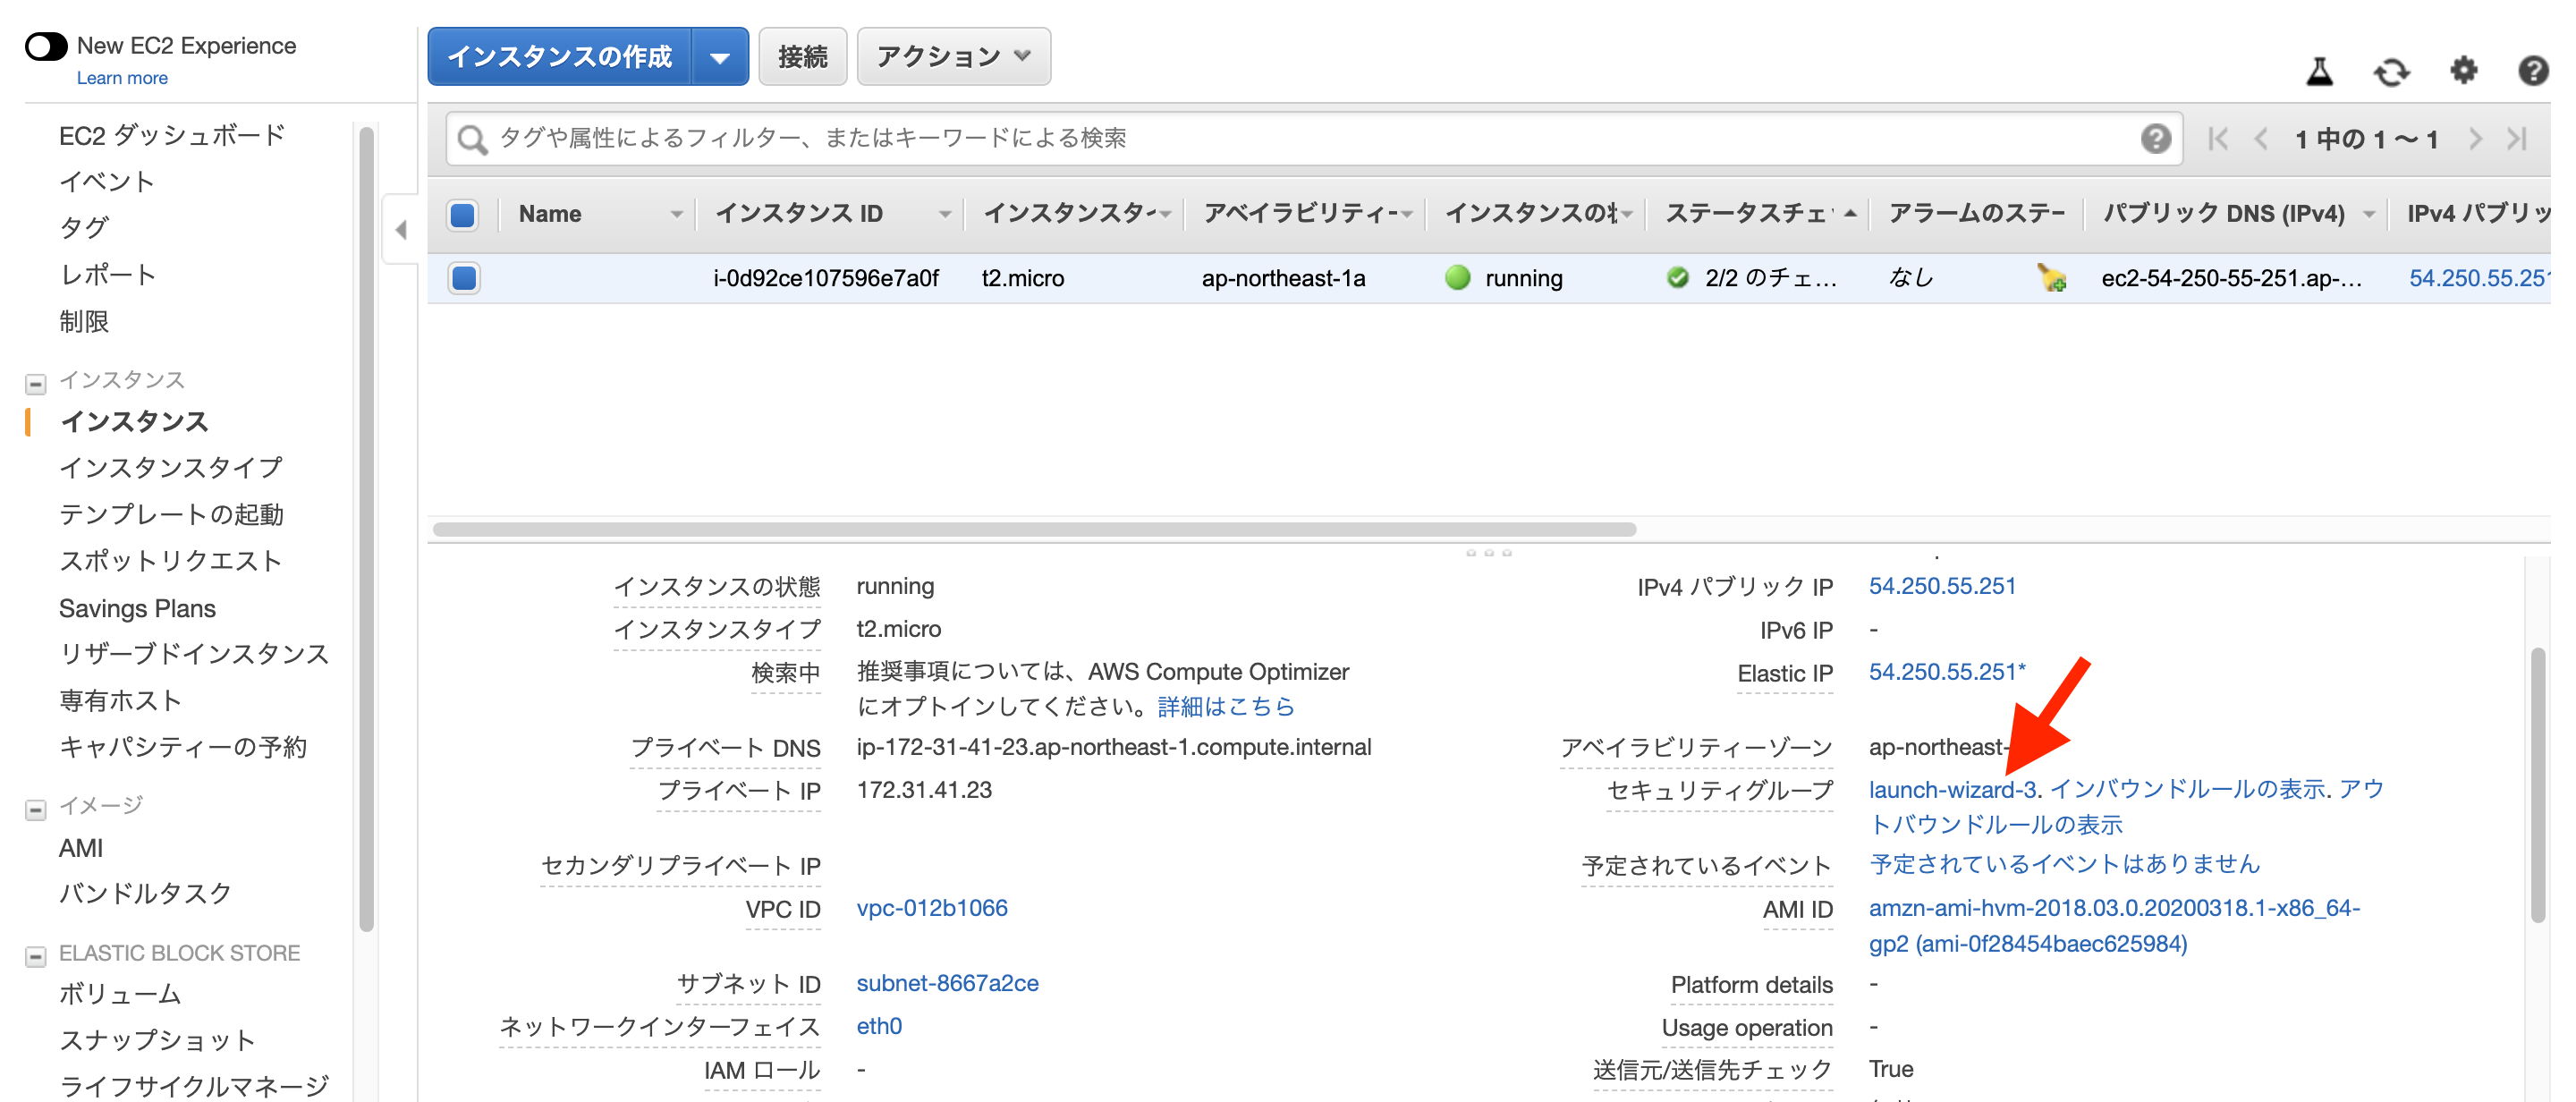

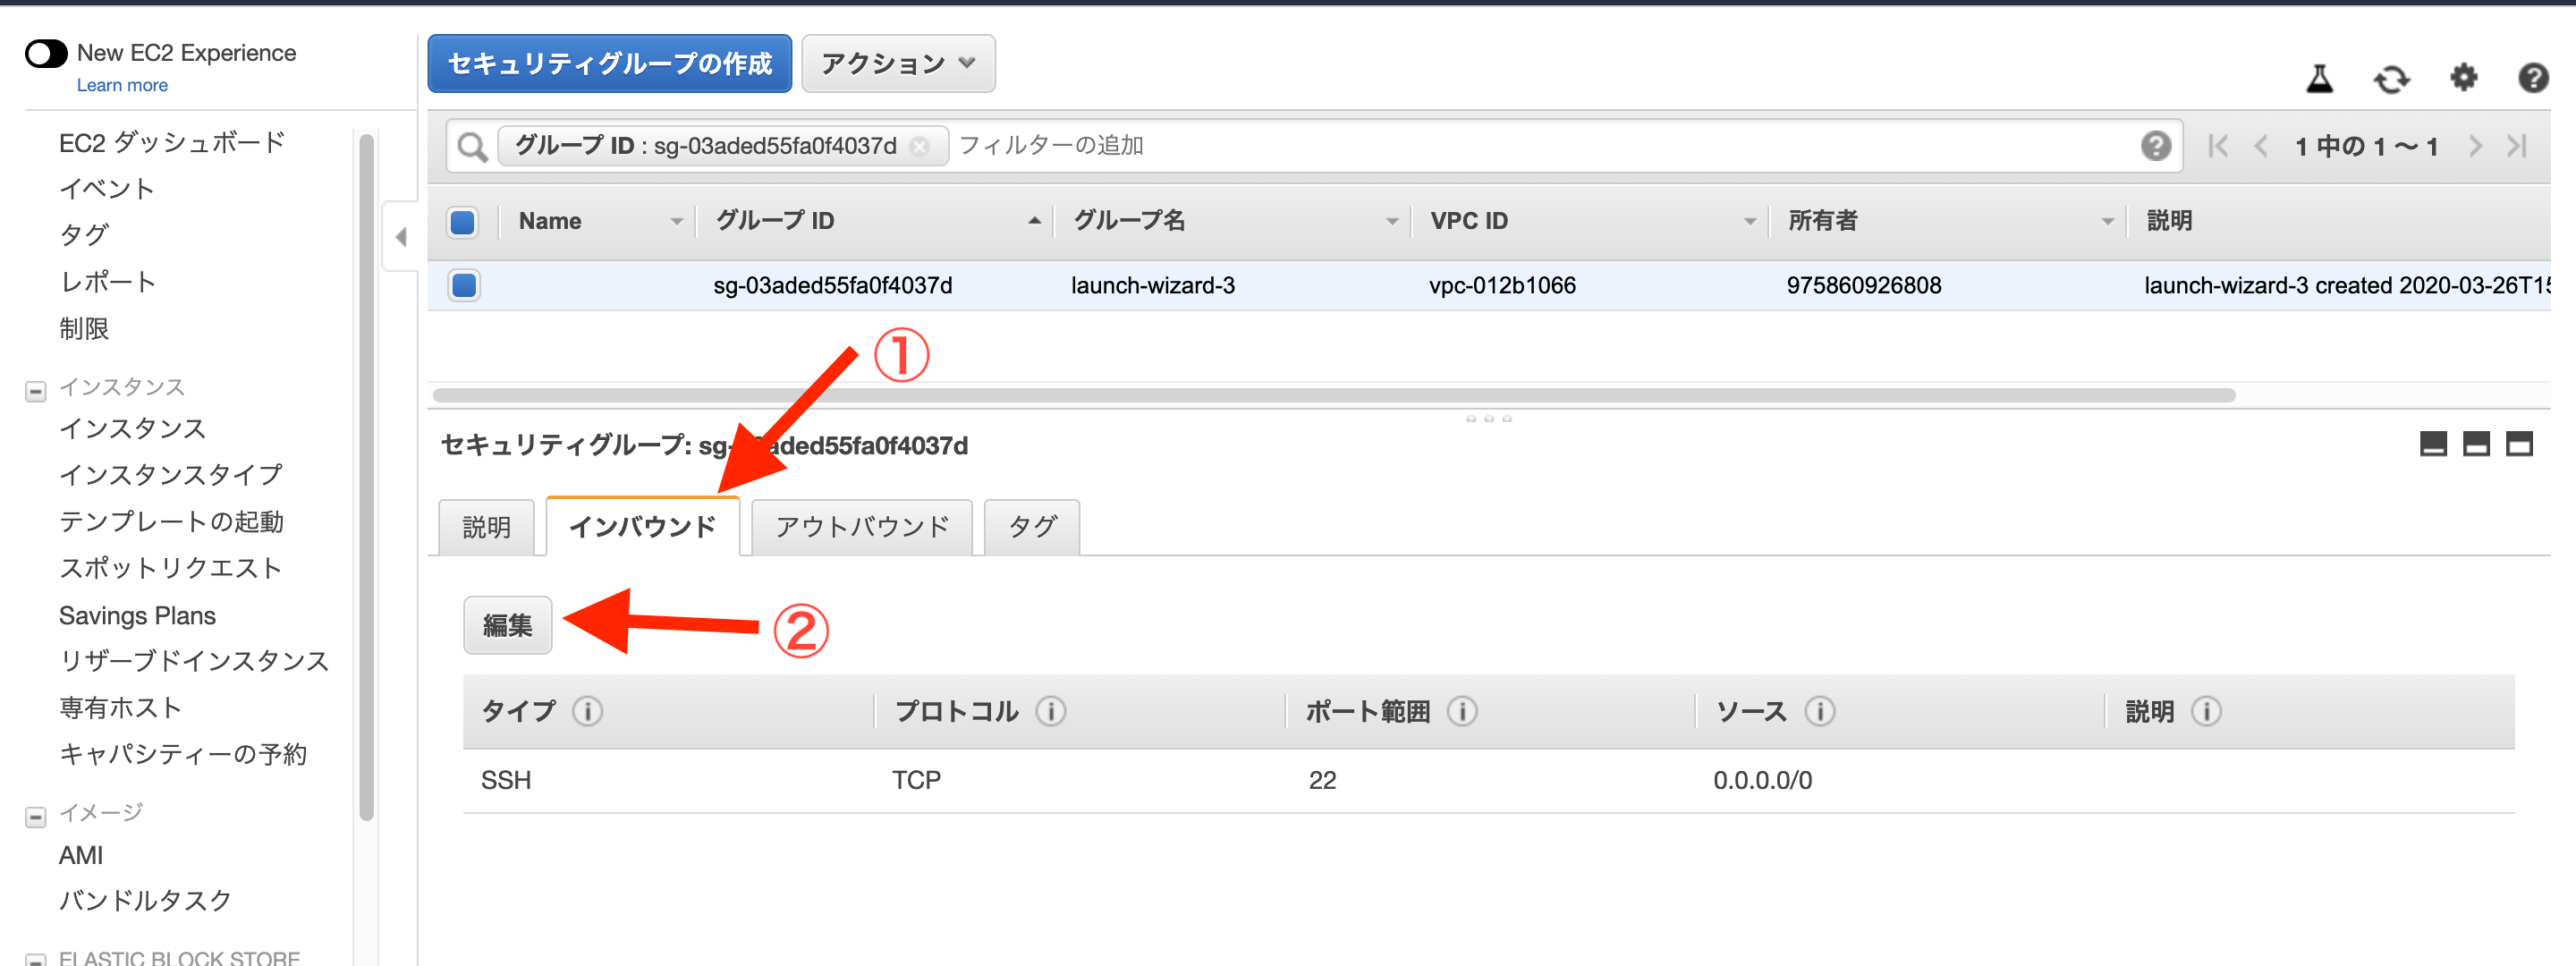
ポート範囲が3000、ソースが0.0.0.0/0で

$ cd /var/www/***アプリ名***
$ rails db:create RAILS_ENV=production
$ rails db:migrate RAILS_ENV=production
$ bundle exec unicorn_rails -c config/unicorn.rb -E production -D
$ rails assets:precompile RAILS_ENV=production

# 起動
$ RAILS_SERVE_STATIC_FILES=1 unicorn_rails -c config/unicorn.rb -E production -D
http://***ここはElasticIP***:3000
以上でとりあえず、繋がるはずです。
ただ、非常に遅いですね。
パワーアップして通常のアプリとして動作させるにはNginxが必要です。
マージをコマンド一つで本番環境まで反映させるにはCapistranoが必要です。
これらの導入は後編で。
もし困ったら
①ログ確認
/var/www/***アプリ名***/log/unicorn.stderr.logをtailかcatかlessかvimあたりのコマンドで確認する。
②unicornの再起動
$ ps aux | grep unicorn
$ kill ***ユニコーンのPID***
$ RAILS_SERVE_STATIC_FILES=1 unicorn_rails -c config/unicorn.rb -E production -D