はじめに
KingFisherはWebから画像をダウンロードしてキャッシュするための、軽量で純粋なSwiftライブラリです。
ソースはこちら https://github.com/onevcat/Kingfisher
最も簡単な使用方法は、UIImageView拡張を利用した方法です。
let url = URL(string: "https://autolap.jp/img/Top1.jpg")
imageView.kf.setImage(with: url)
これで、ネットワーク経由で画像をダウロードして、キャッシュしてUIImageViewに表示してくれます。キャッシュがあれば再取得を行わずにそれが利用されます。
Xcodeプロジェクトへライブラリのインストール
それではさっそくライブラリをプロジェクトに追加します。
今回はCarthageを利用します。
利用したいXcodeのプロジェクトディレクト移動します。
Cartfileの作成
下記の内容でCartfileという名前でファイルを作成します。
github "onevcat/Kingfisher" ~> 4.8
執筆時点での最新バージョンを指定しておきます(指定しないとその時の最新になります)
ライブラリのダウンロード&ビルド
今回はiOS以外は利用しないので「--platform ios」を指定
$ carthage update --platform ios
ビルドされたバージョンはCartfile.resolvedに記述されます。
github "onevcat/Kingfisher" "4.8.0"
Xcodeのプロジェクトにビルドしたライブラリの導入
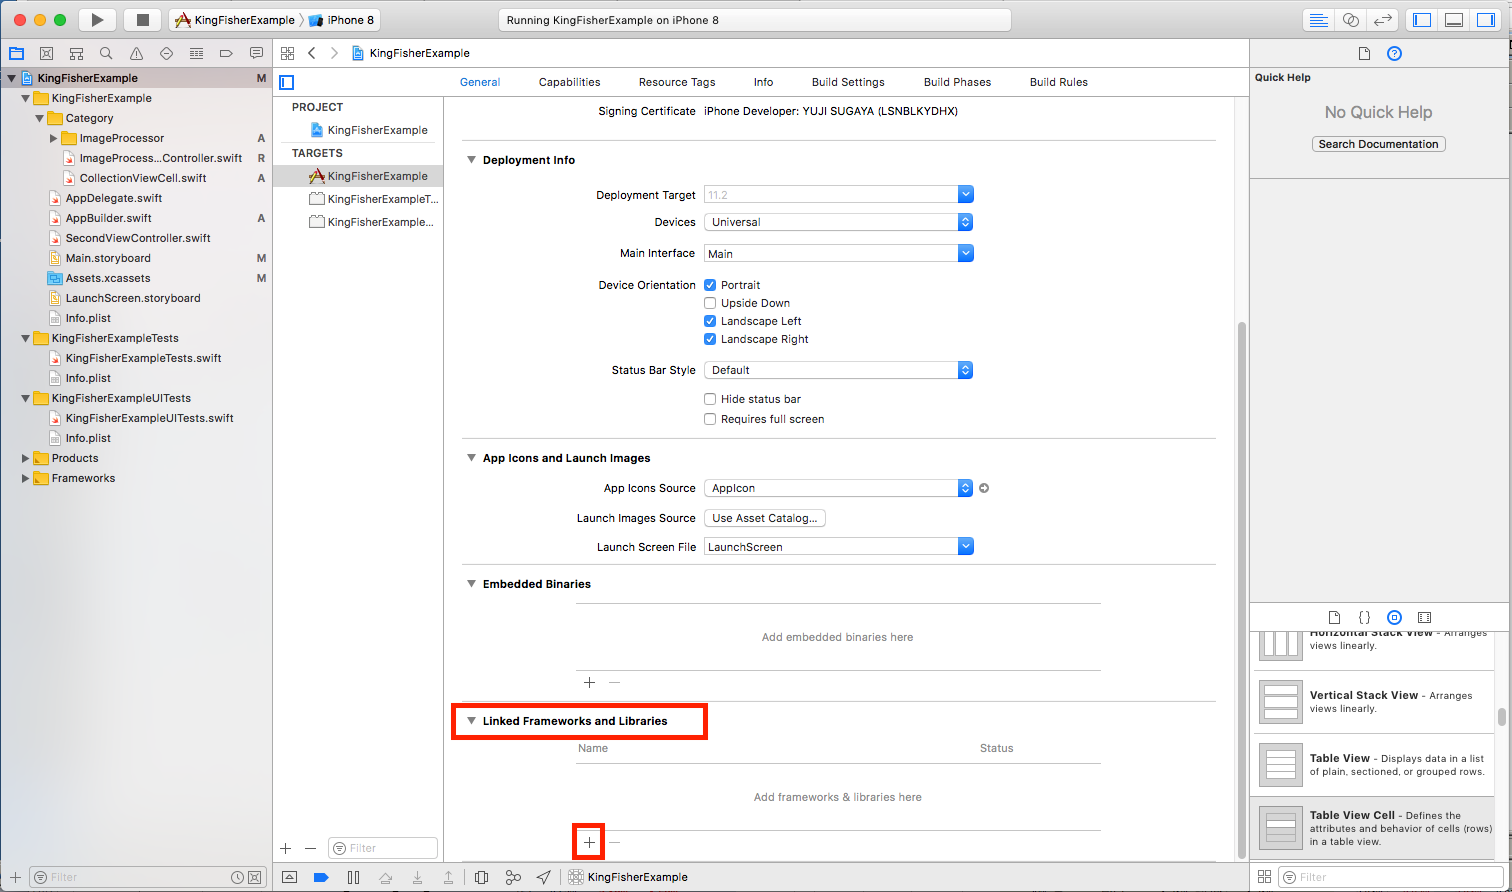
ターゲットプロジェクトのGeneral > Linked Frameworks and Librariesの+ボタンから追加します。
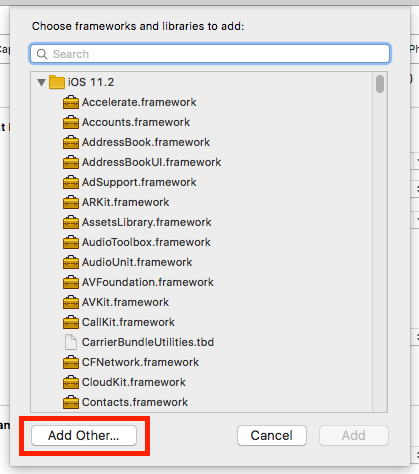
フレームワークの選択ダイアログが表示されたら、Add Other...をクリックします。
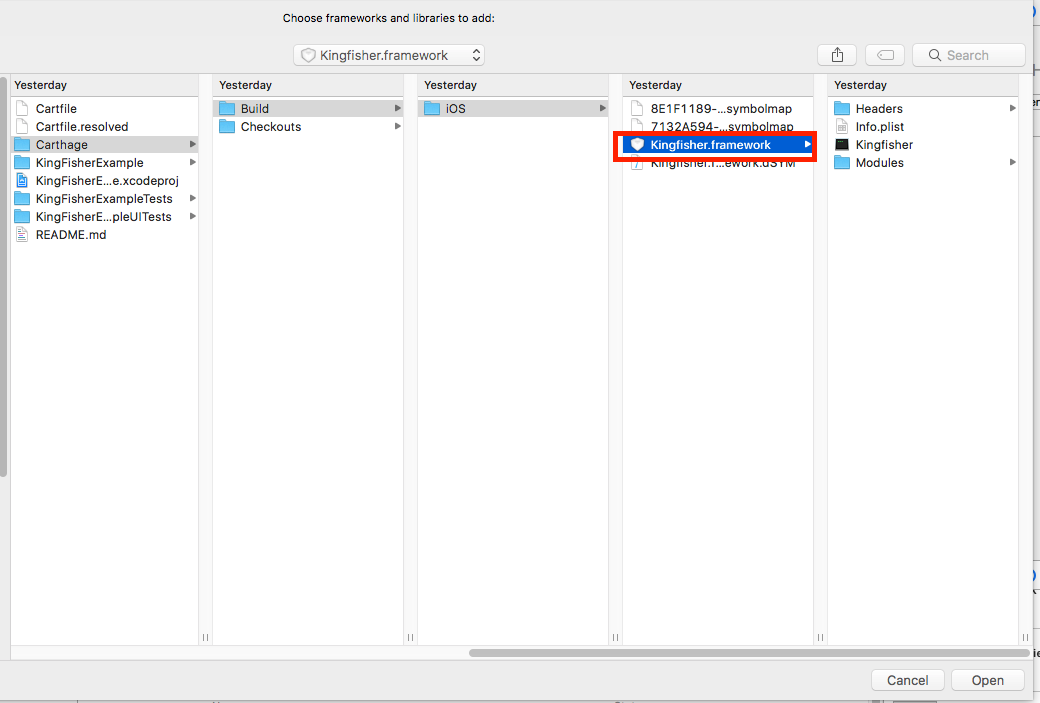
ビルドしたフレームワークを選択します。
プロジェクトフォルダ > Carthage > Build > iOS > Kingfisher.framework
を選択してOpenをクリックします。
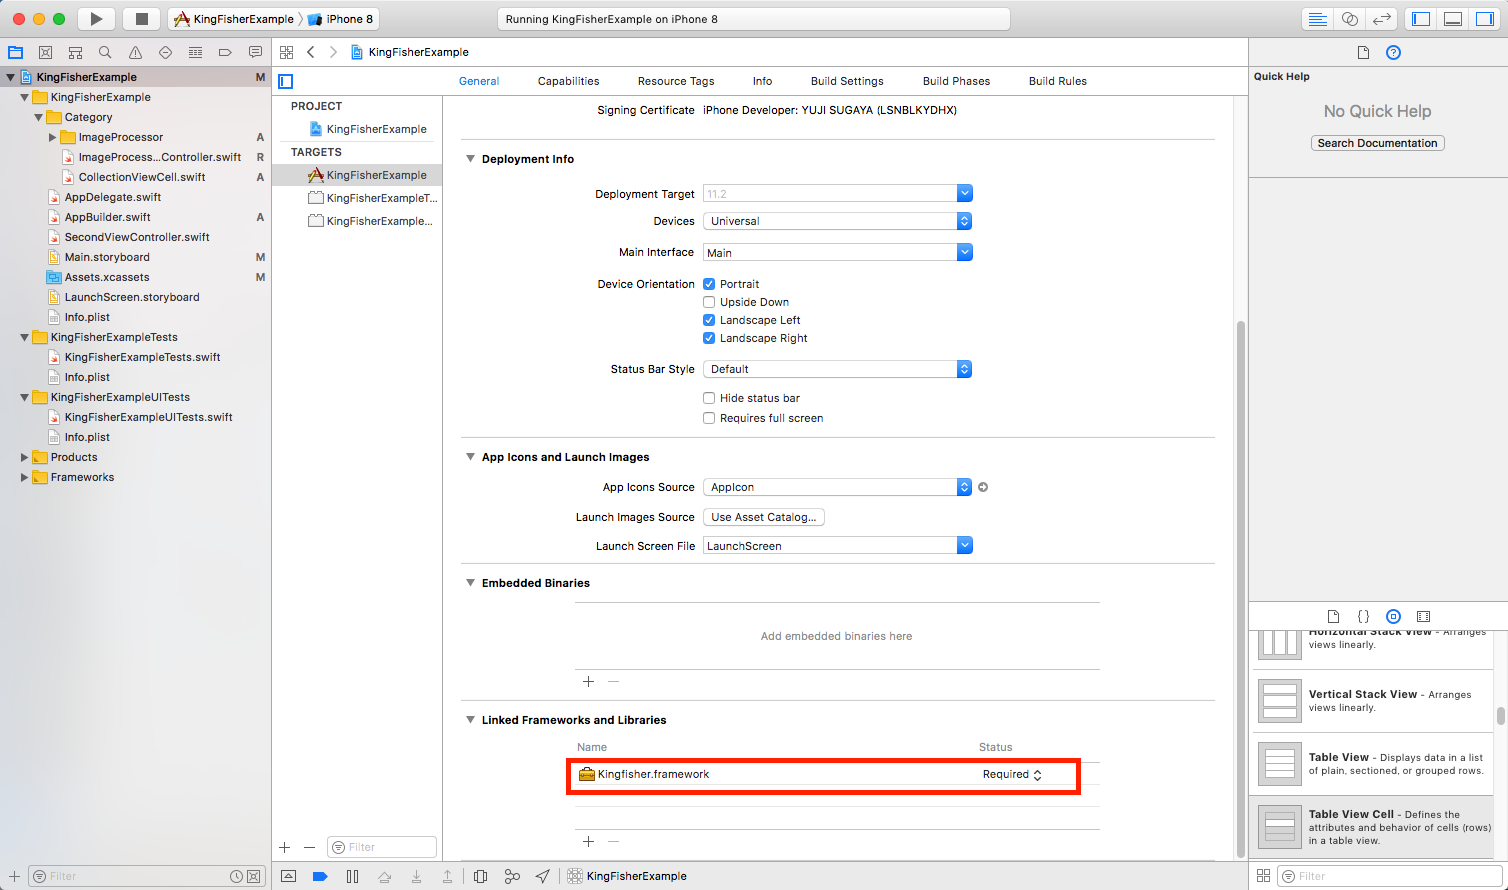
Linked Frameworks and LibrariesにKingfihser.frameworkが追加されます。
Runスクリプトの設定
ターケットプロジェクトのBuild Phases > +ボタン > New Run Script Phaseをクリックします。
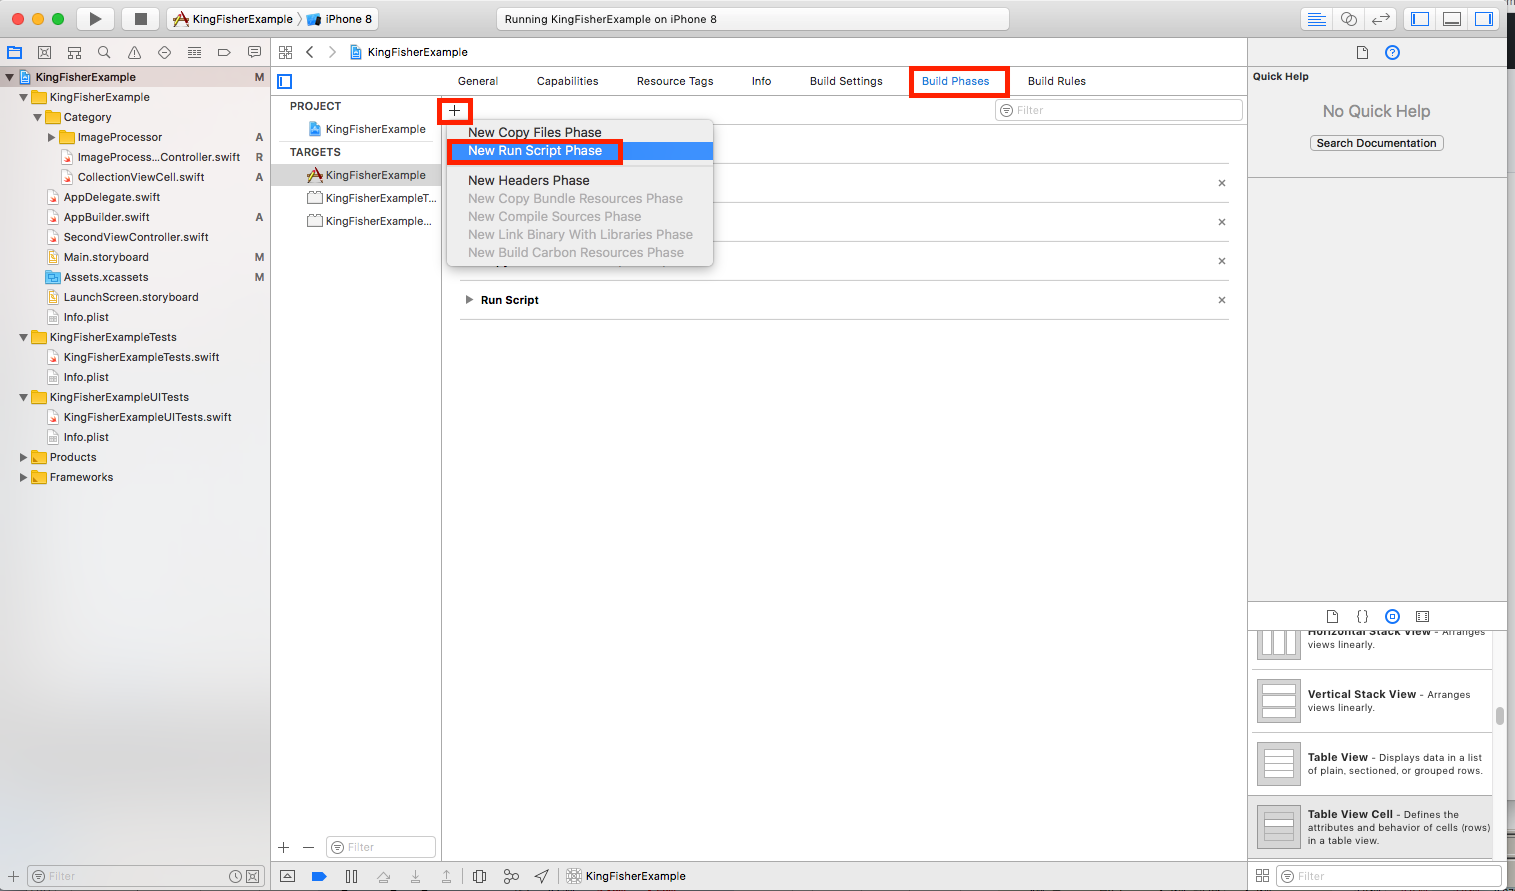
Shellのところに/usr/local/bin/carthage copy-frameworksと記述します。
carthageがインストールされているパスが違う場合は適宜変更してください。
Input Filesには$(SRCROOT)/Carthage/Build/iOS/Kingfisher.frameworkと記述します。
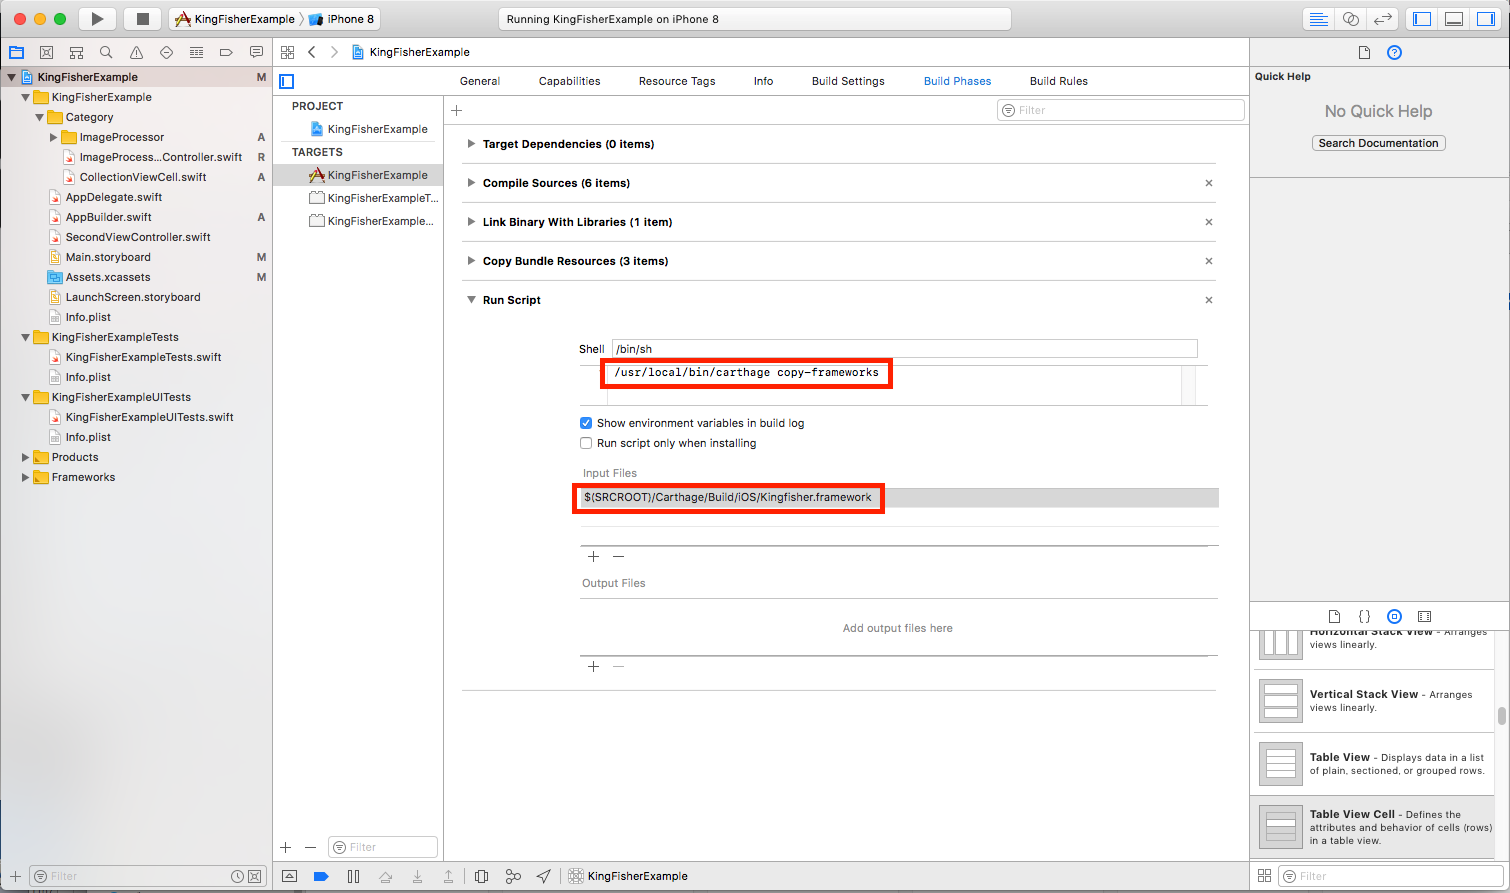
以上でプロジェクトにKingFisherのライブラリの導入は完了です。
使ってみる
Kingfisherにはたくさんの処理オプションが用意されていますが、今回は下記4点を使ったケースについて説明します。
1. Placeholder画像の設定
Placeholder画像はダウンロードされるまで代わりに表示させておきたい画像になります。
placeholderに画像が表示されるまで、表示しておきたいUIImageを設定
2. 画像表示時のTransitionの設定
optionsに.transition(ImageTransition)を指定
今回はFadeの効果を5秒で設定
.transition(.fade(5.0))
3. 画像のぼかし効果
optionsに.processor(ImageProcessor)を指定
今回はBlurImageProcessorでblurRadiusを10に設定
4. エラー時の画像表示
エラーが発生した場合にImageViewにエラー時用イメージを設定
コード全体
ImageViewへの処理全体
let blurRadius = CGFloat(10.0)
let url = URL(string: "https://autolap.jp/img/Top1.jpg")
let processor = BlurImageProcessor(blurRadius: blurRadius) // Blur with a radius
cell.imageView.kf.setImage(with: url, placeholder: placeholderImage, options: [.transition(.fade(5.0)), .processor(processor)], progressBlock: nil, completionHandler: { (image, error, cachType, url) in
	cell.setErrorImageIfNeeded(error: error)
})
エラー処理はCell側で実施していますが、コードは下記のとおりです。
class CollectionViewCell: UICollectionViewCell {
    - 省略 -
    private let noImage = UIImage(named: "NoImage")
    func setErrorImageIfNeeded(error: NSError?) {
        if error != nil { imageView.image = noImage }
    }
}
実際のプロジェクトで導入する際には、画像の取得は認証が必要であったり、キャッシュのライフサイクルなどを管理しなければいけないケースも出てくるかと思います。
リクエスト処理、キャッシュ処理、画像処理などを独自に実装して適用することも可能ですので、是非色々とチャレンジしてみてください。
全てのコードは下記にありますのでご自由にお試しください。
https://github.com/alyousecond/KingfisherExample
動作はこんな感じになります。


左下の「No Image」はエラー時のハンドリングで設定した画像が表示されています。
右下の「Now loading...」はエラー時のハンドリングを行なっていないため、Placeholderの画像がそのまま表示され続けます。
