はじめに
みなさん、AIエージェント作っていますか?
様々なツールが登場し、AIエージェントを作成するハードルが下がってきましたね!
この記事では、Amazon Bedrock AgentCoreをフル活用して、Confluenceから情報を検索して回答するAIエージェントを爆速で作成する方法を紹介します!
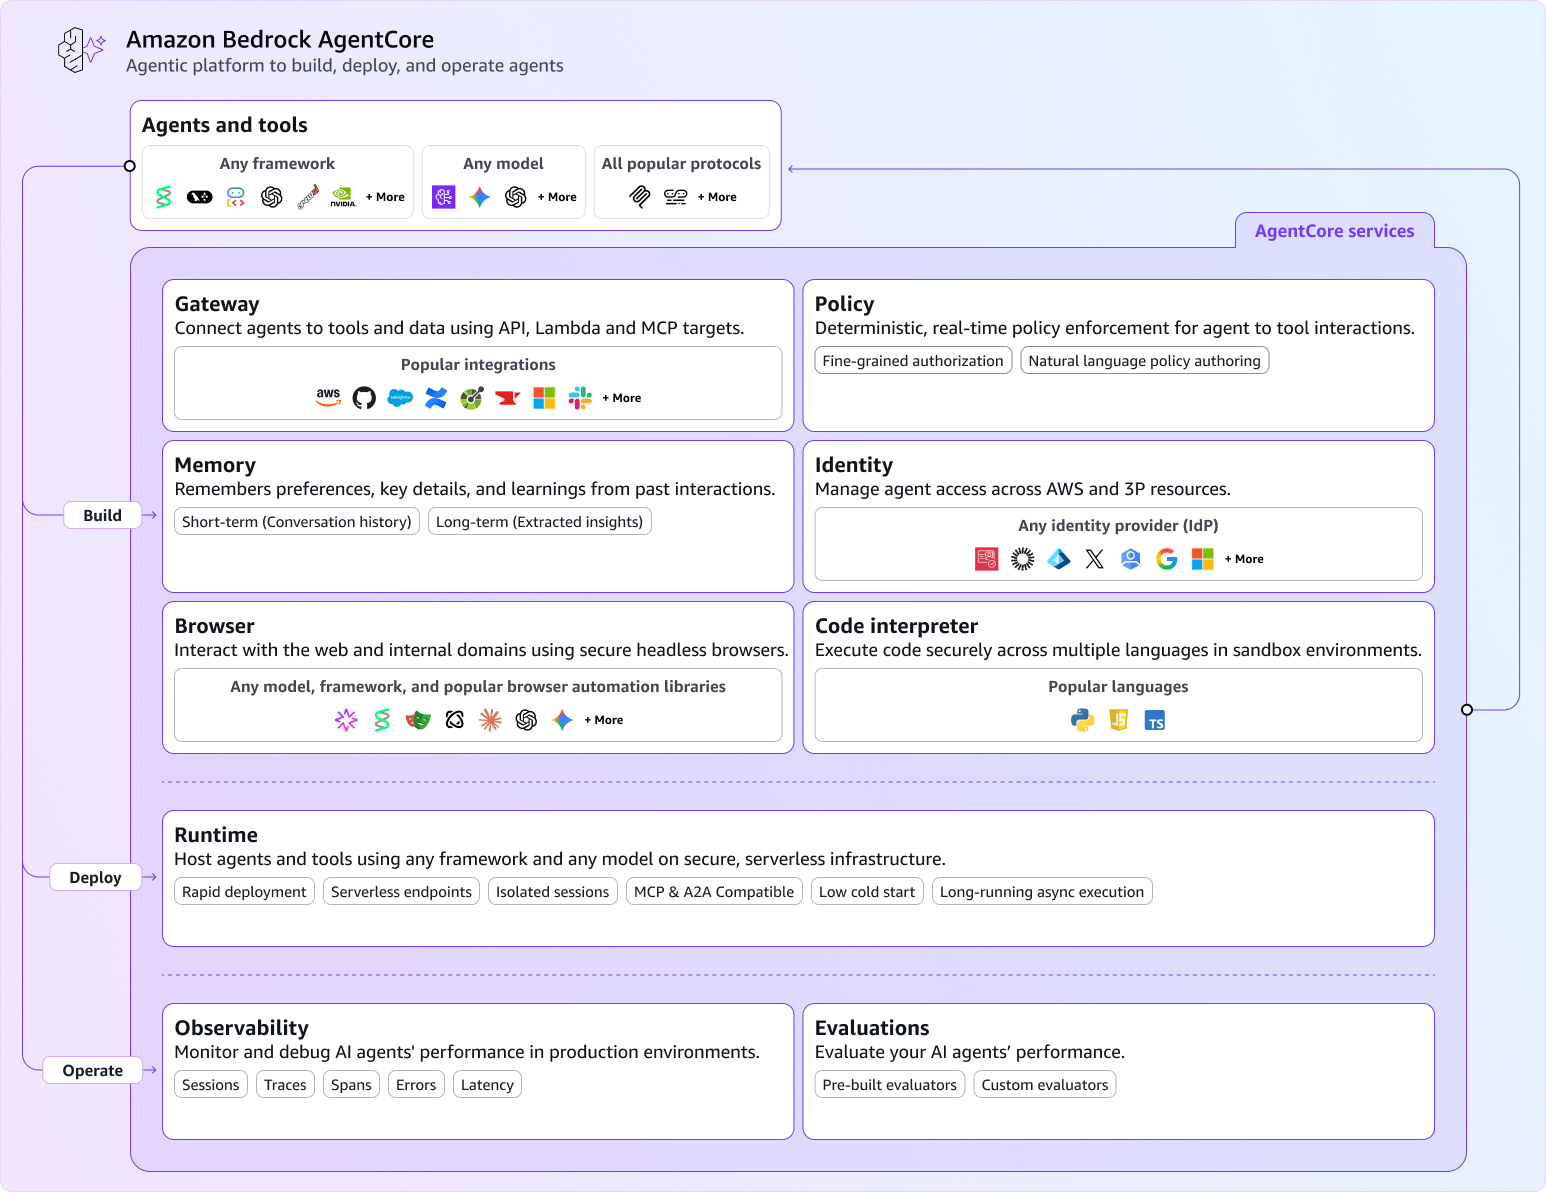
Amazon Bedrock AgentCoreとは、AWS上でAIエージェントを簡単に構築、デプロイ、管理できるサービスです。AIエージェントを実行するためのRuntime、様々なMCPやAPIと連携できるGateway、記憶を保持するためのMemoryなど様々な機能が提供されています。
これらの機能を組み合わせることで、高度なAIエージェントを簡単に構築・デプロイすることができます!
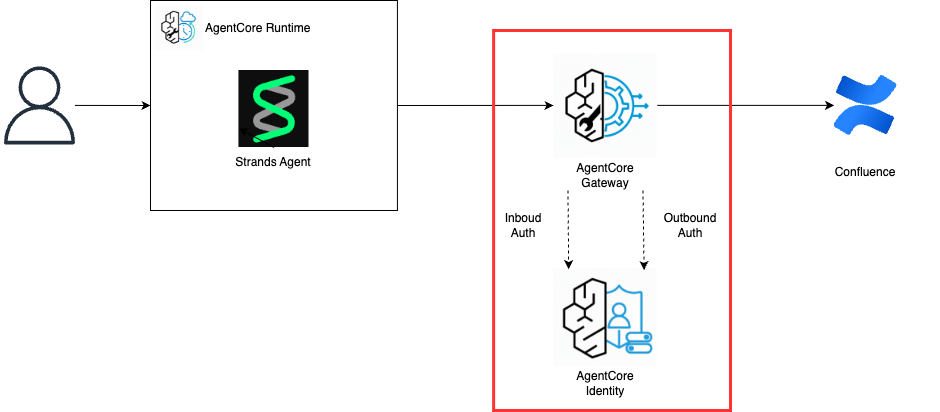
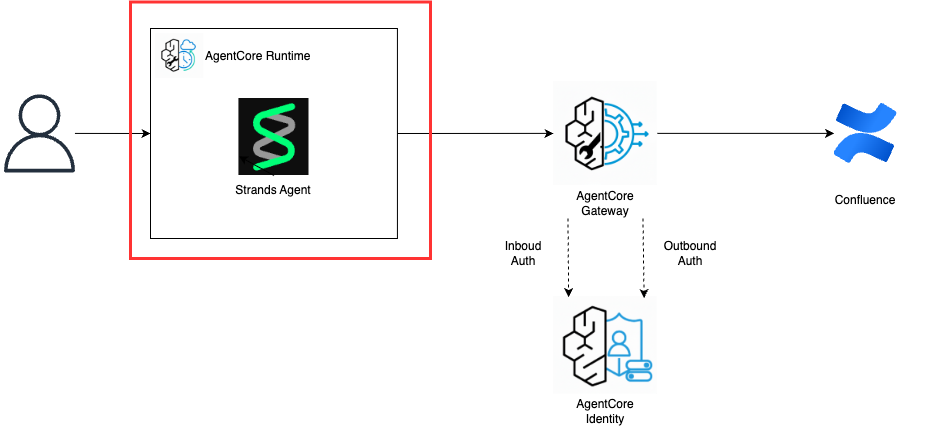
この記事では、以下のような構成でConfluenceから情報を検索して回答するAIエージェントを爆速で作成する方法を紹介します!
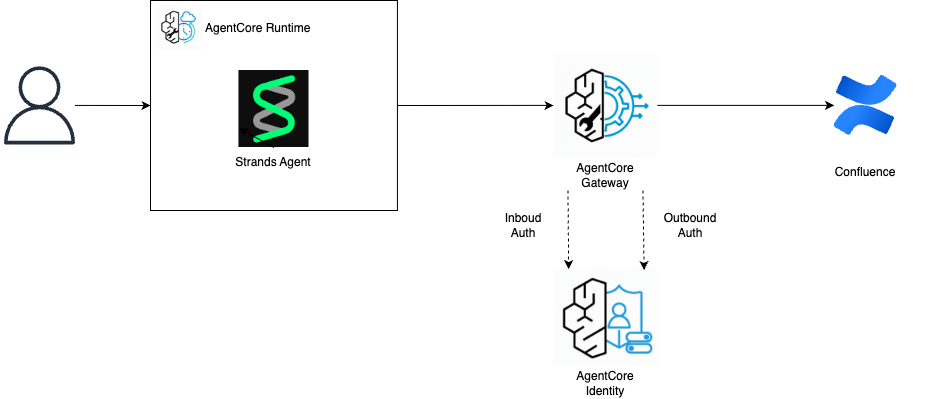
AIエージェントの実装にはAWSが開発しているStrands Agentを使用します。
この記事の内容を実施するために必要な環境は以下の通りです。
- AWSアカウント
- Python
- Python uv
申し訳ないですが、準備方法はここでは紹介しないので、各自で実施をお願いします。
1. AgentCore Gatewayの作成
最初に、Confluenceと接続するためにAgentCore Gatewayを作成します。
AgentCore Gatewayは、AIエージェントが外部のサービスと通信するためのゲートウェイです。
AIエージェントがMCPやツールを呼び出すために仲介をしてくれるようなサービスです。
AgentCore Gatewayの認証にはAgentCore Identityを使用し、Inbound AuthとOutbound Authの2種類があります。
それぞれの詳細と今回使用する認証方式は以下の通りです。
| 認証タイプ | 説明 | 今回の実装 |
|---|---|---|
| Inbound Auth | AIエージェントがGatewayにアクセスするための認証方式 | Cognito User Pool |
| Outbound Auth | Gatewayが外部サービスにアクセスするための認証方式 | Confluence API Token |
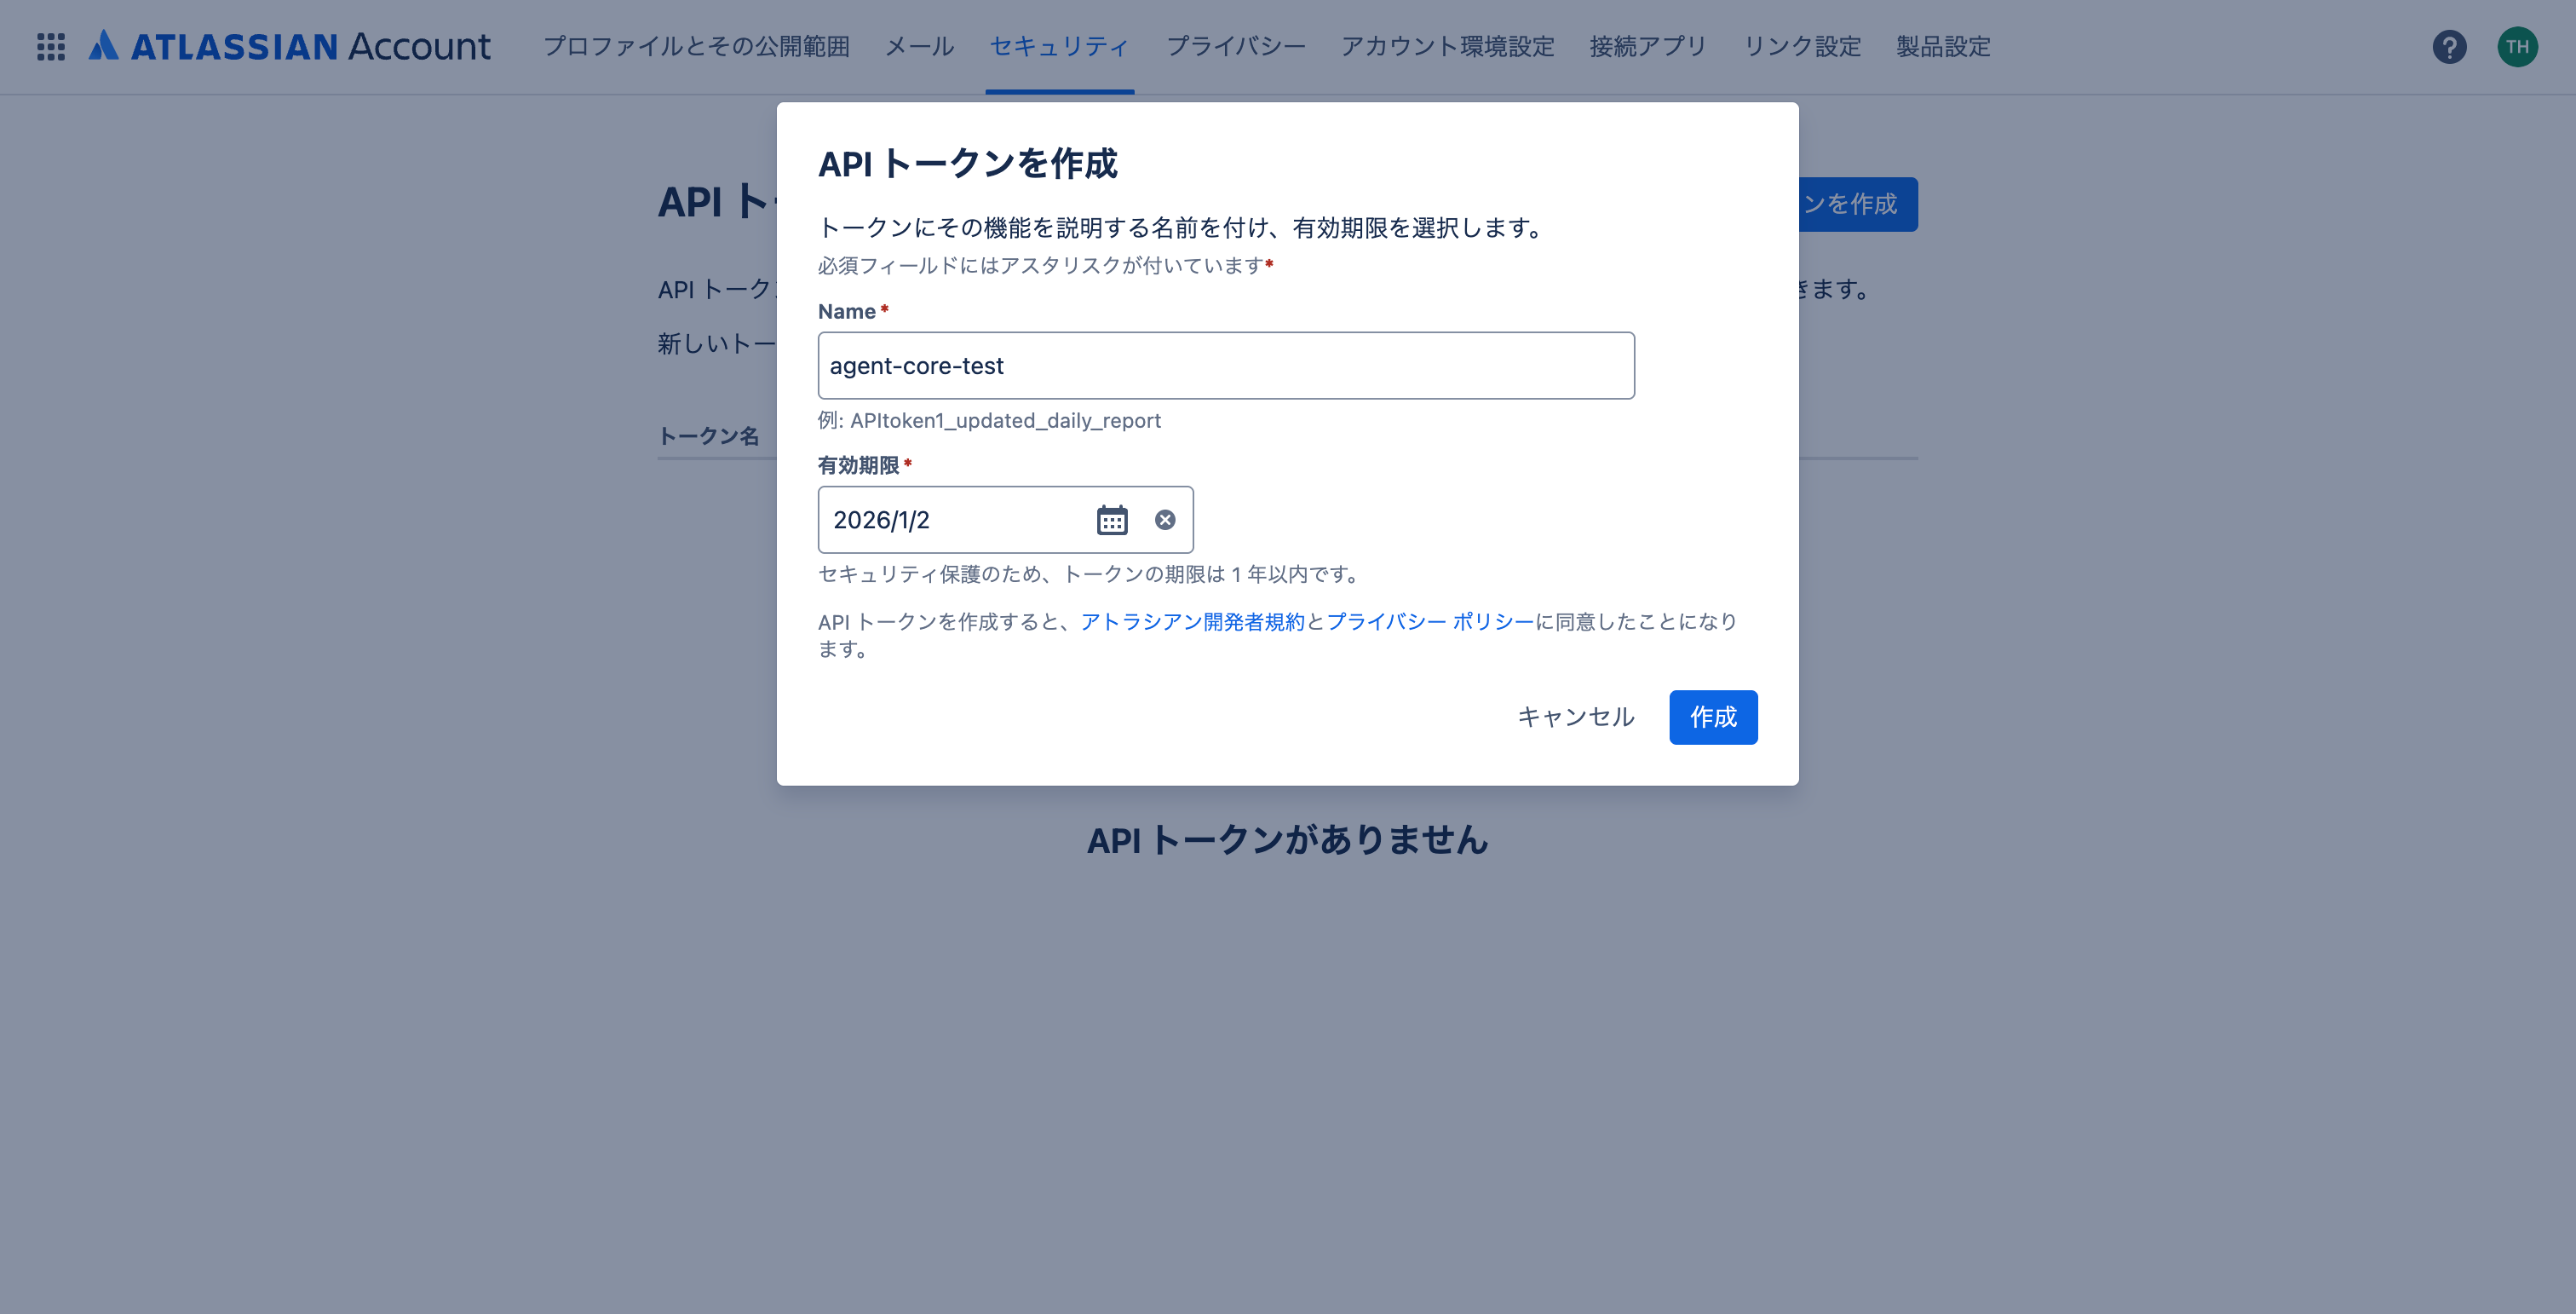
1-1. ConfluenceのAPI Tokenを作成する
以下のURLからConfluenceのAPI Tokenを作成します。
セキュリティの中にAPIトークンという項目があるので、ここから作成します。
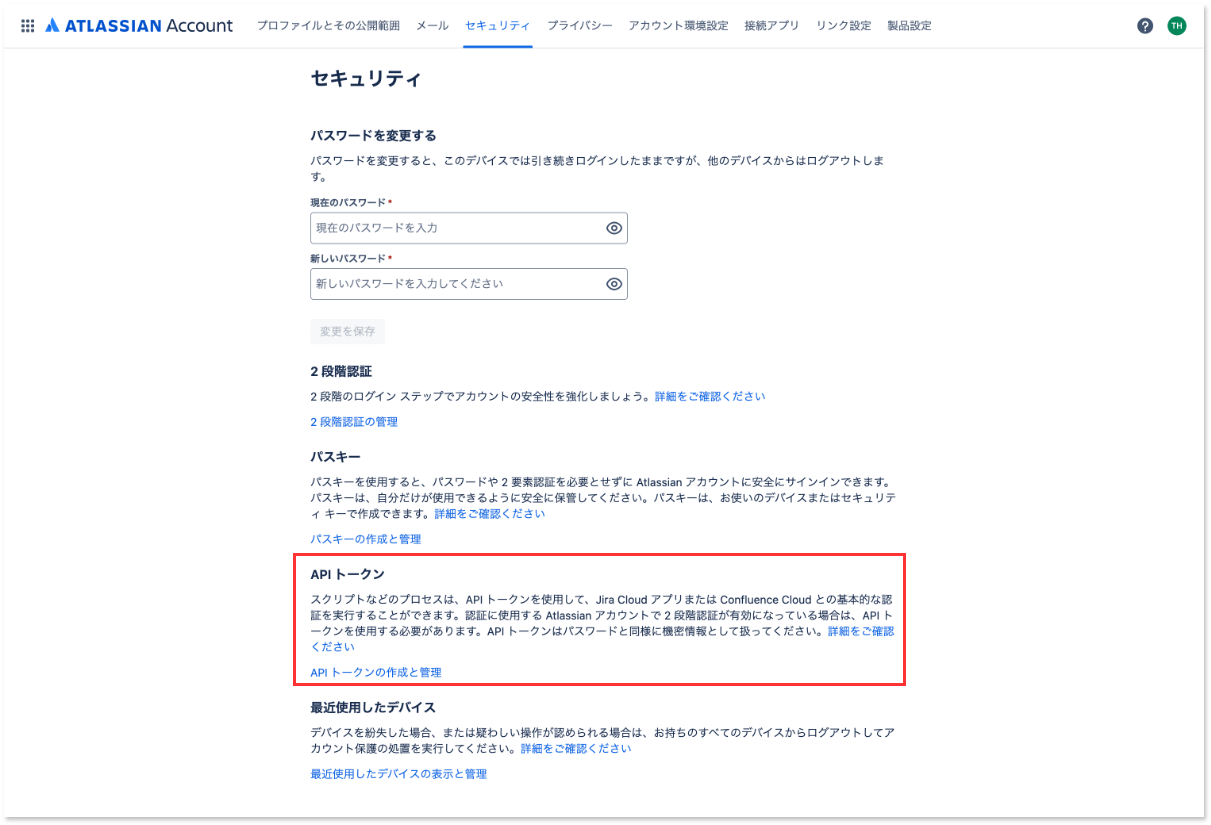
今回は検証用なので「APIトークンを作成」からスコープなしのトークンを作成しました。
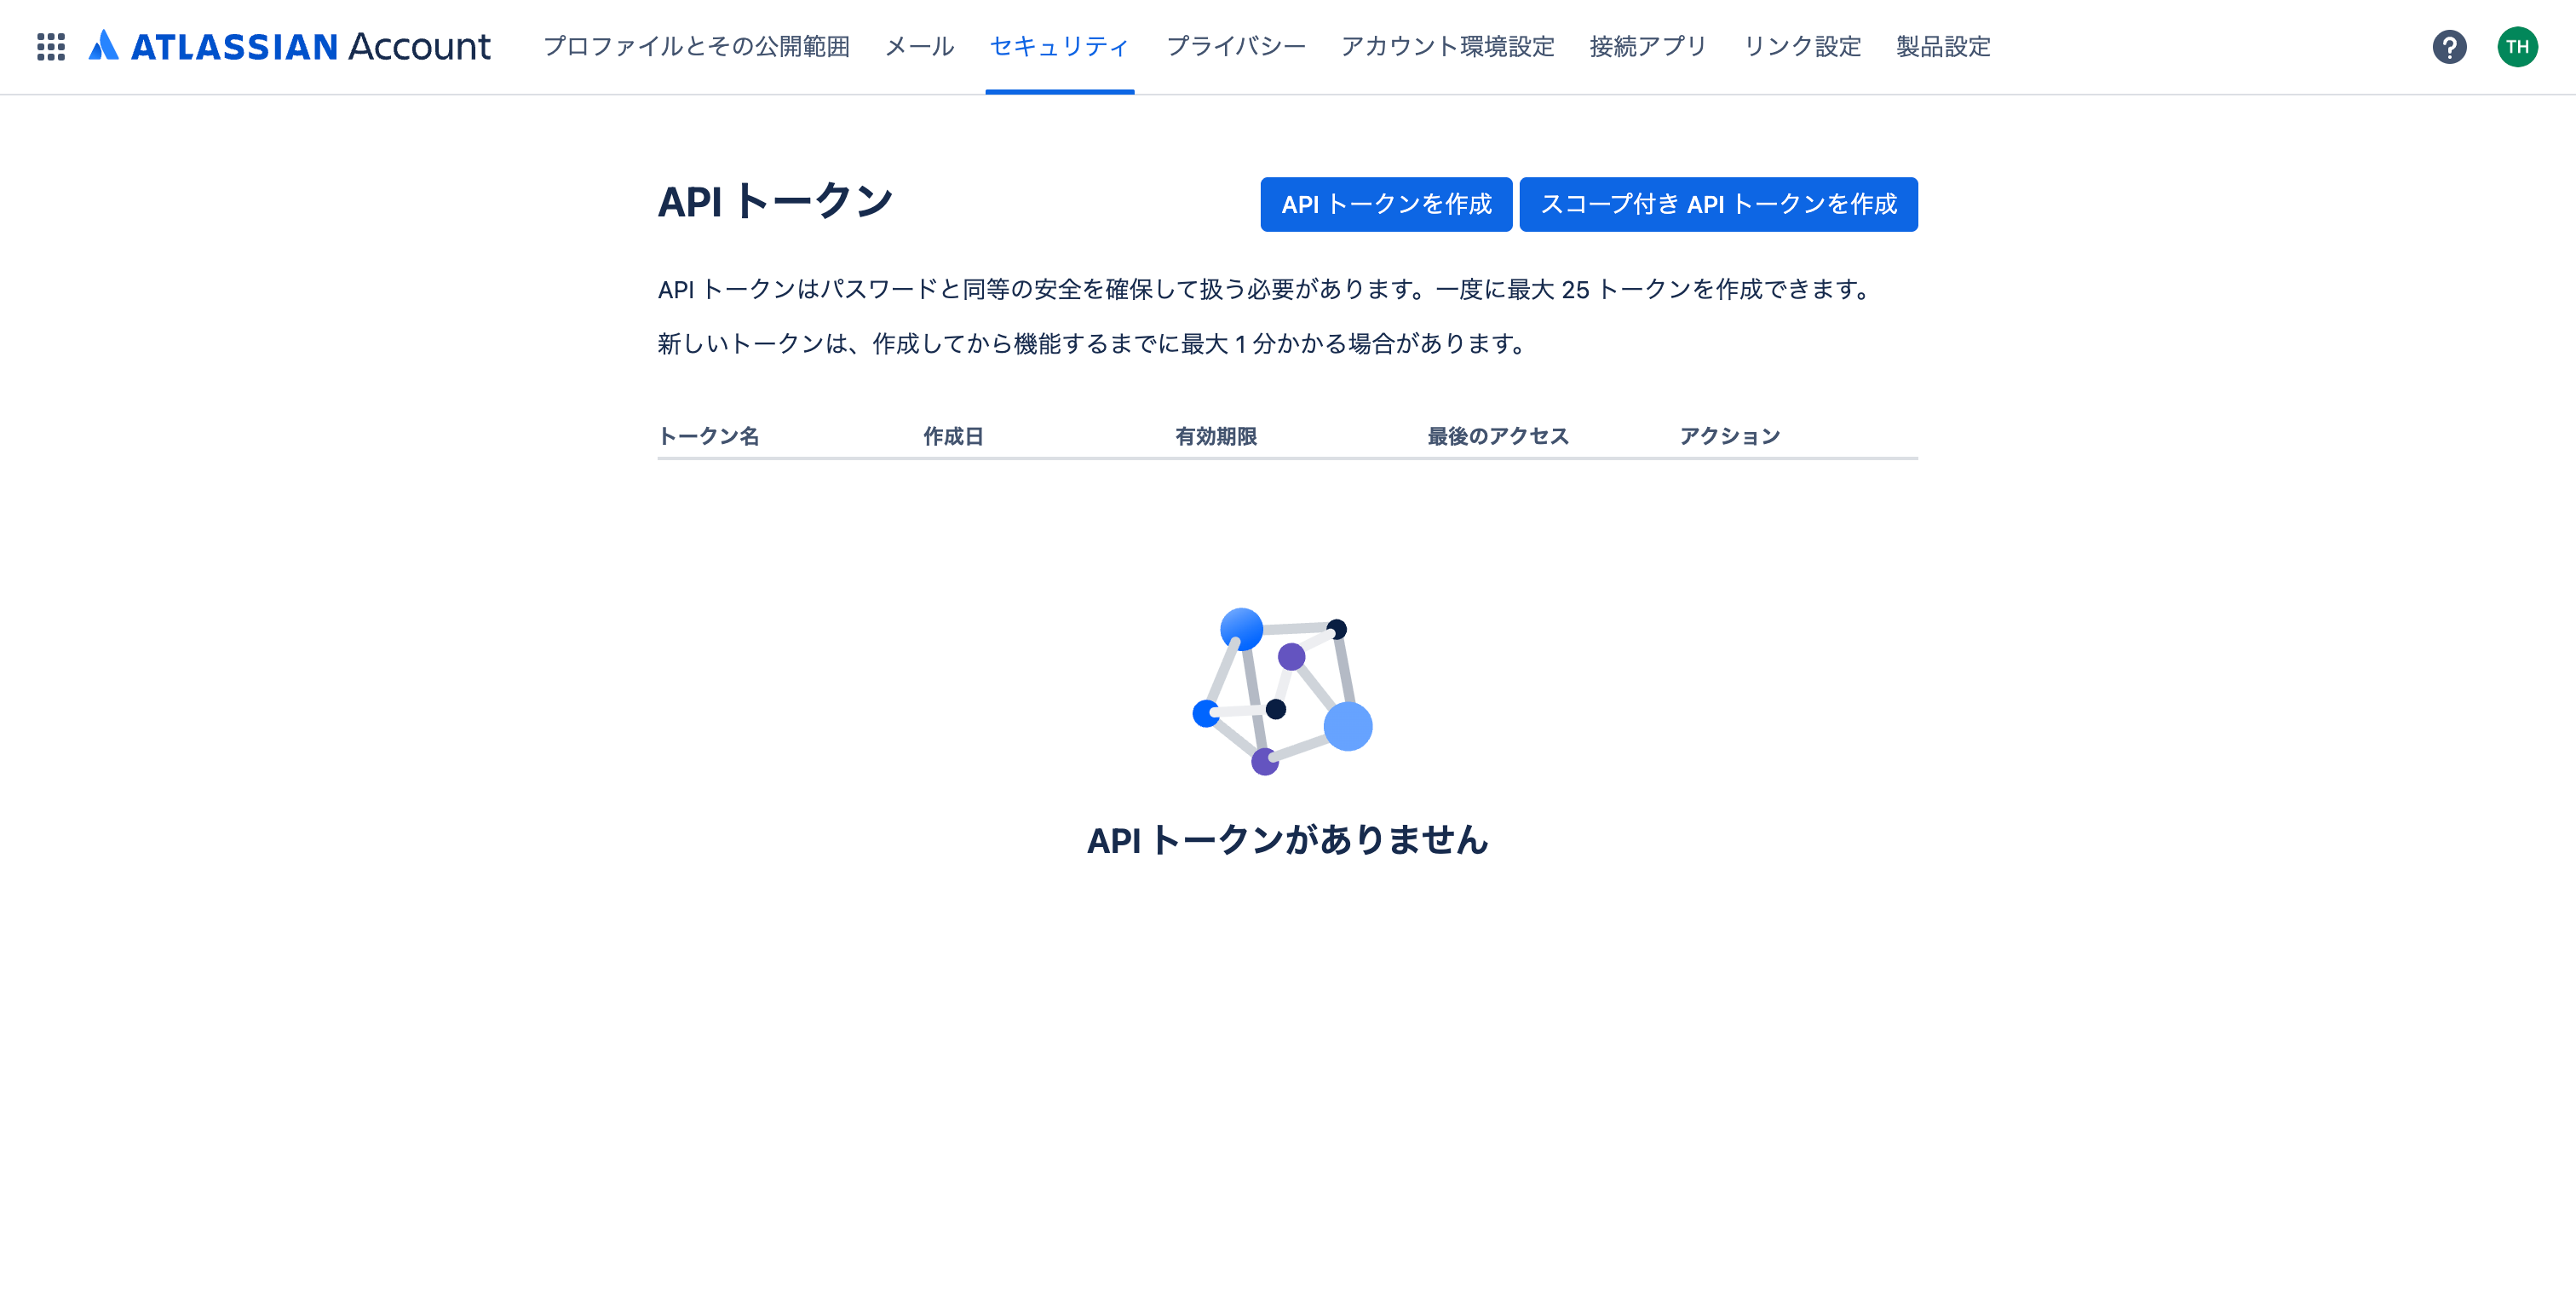
作成したトークンは再表示できないので、必ずコピーして保存しておきましょう。
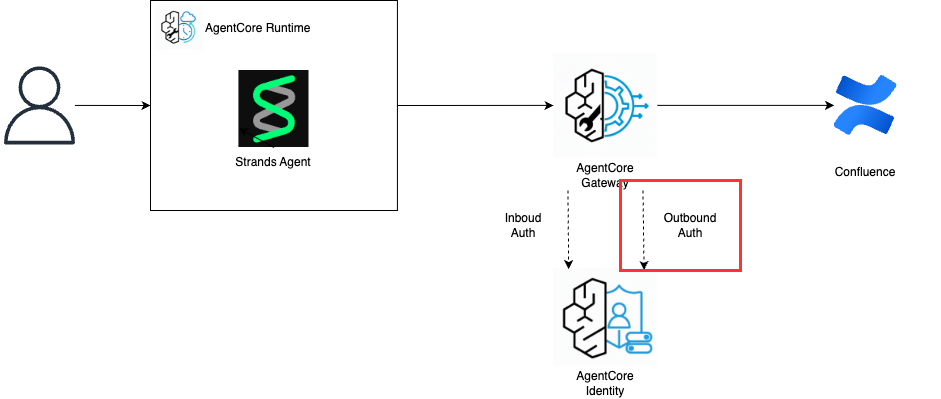
1-2. Outbound Authの設定
Amazon Bedrock AgentCore IdentityでOutbound Authの設定を行います。
以下の構成図の赤枠部分を作成します。
事前準備として、先ほど取得したConfluenceのAPIトークンに一手間加える必要があります。
以下のコマンドを実行して、メールアドレス:APIトークンの形式でbase64エンコードを実施してください。
echo -n "user@example.com:api_token_string" | base64
詳細はAtlassianの公式ドキュメントを確認してください。
発行したAPIトークンをそのまま使うと認証エラーになるので、必ず上記のbase64エンコードを実行してください。
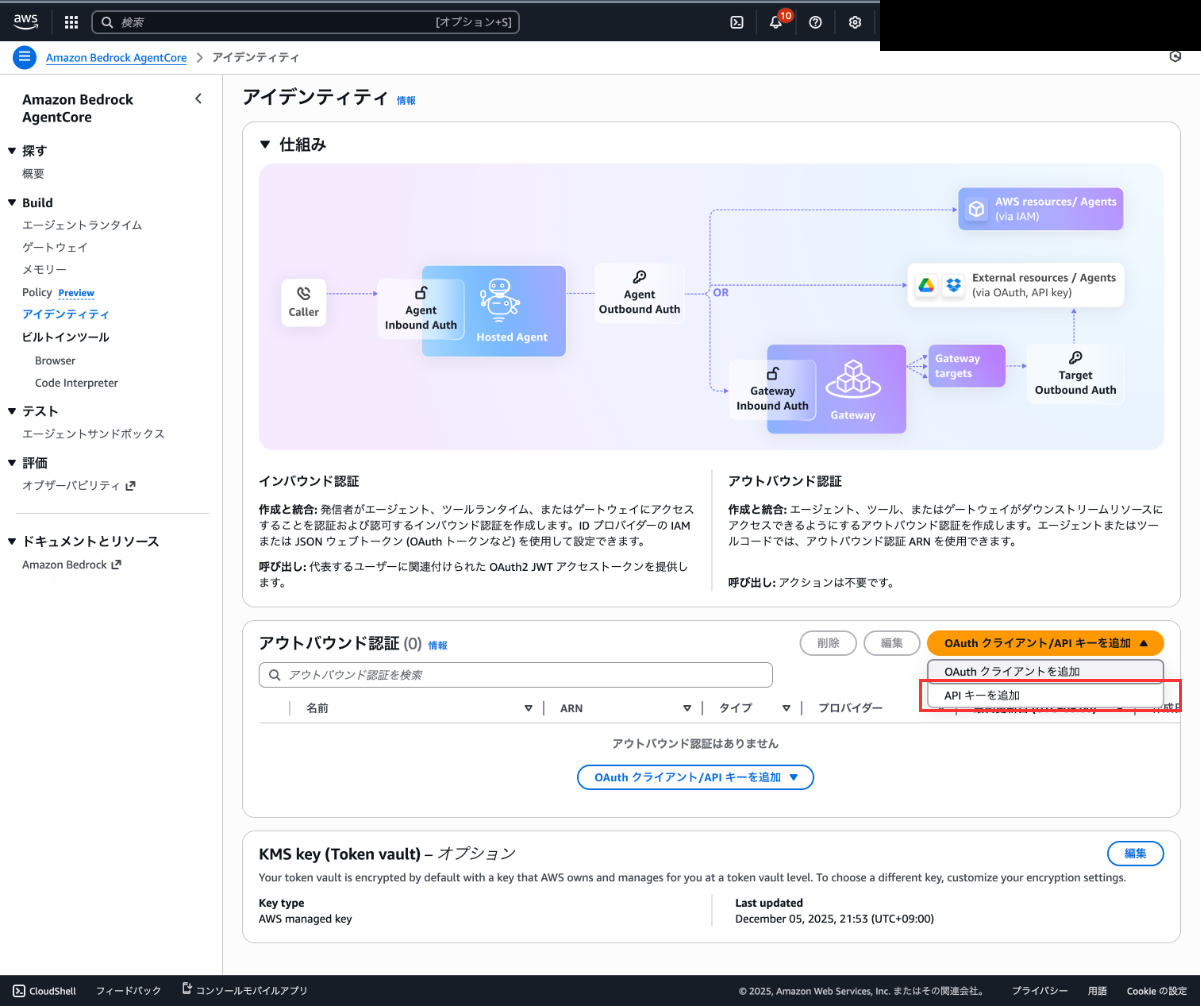
事前準備が完了したので、Outbound Authを作成します。Amazon Bedrock AgentCoreの画面から「アイデンティティ」を開いてください。
「APIキーを追加」を選択し、任意の名前を設定してAPIキーを入力してください。(ここには必ずBase64エンコードした文字列を入力してください。)
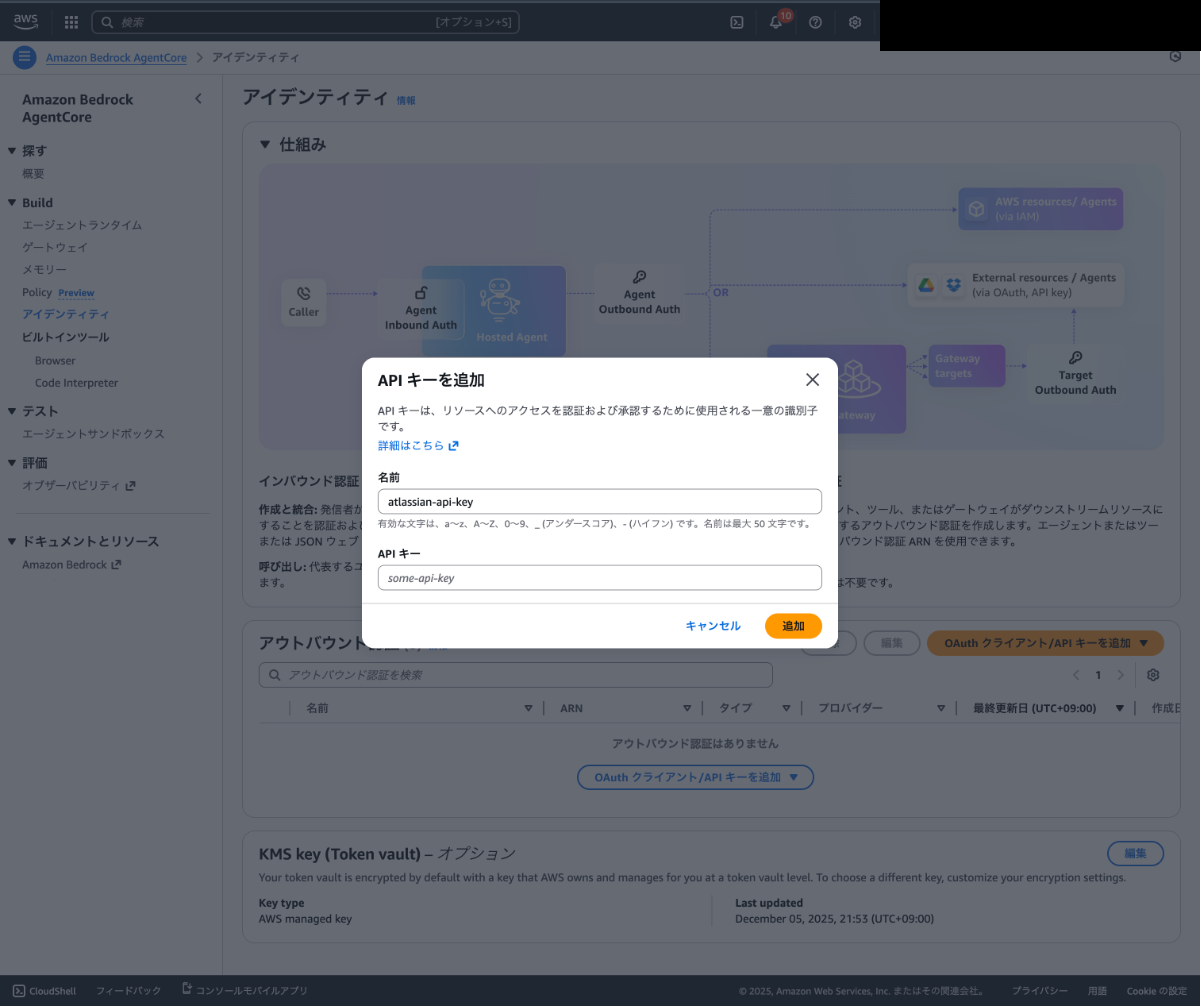
Confluenceへの接続で使用する認証情報の作成が完了しました!
1-3. Gatewayの作成とInbound Authの設定
AgentCore Gatewayを作成します。
以下の構成図の赤枠部分が完成します。
Inbound AuthはGatewayを作成する際に自動で作成されます。
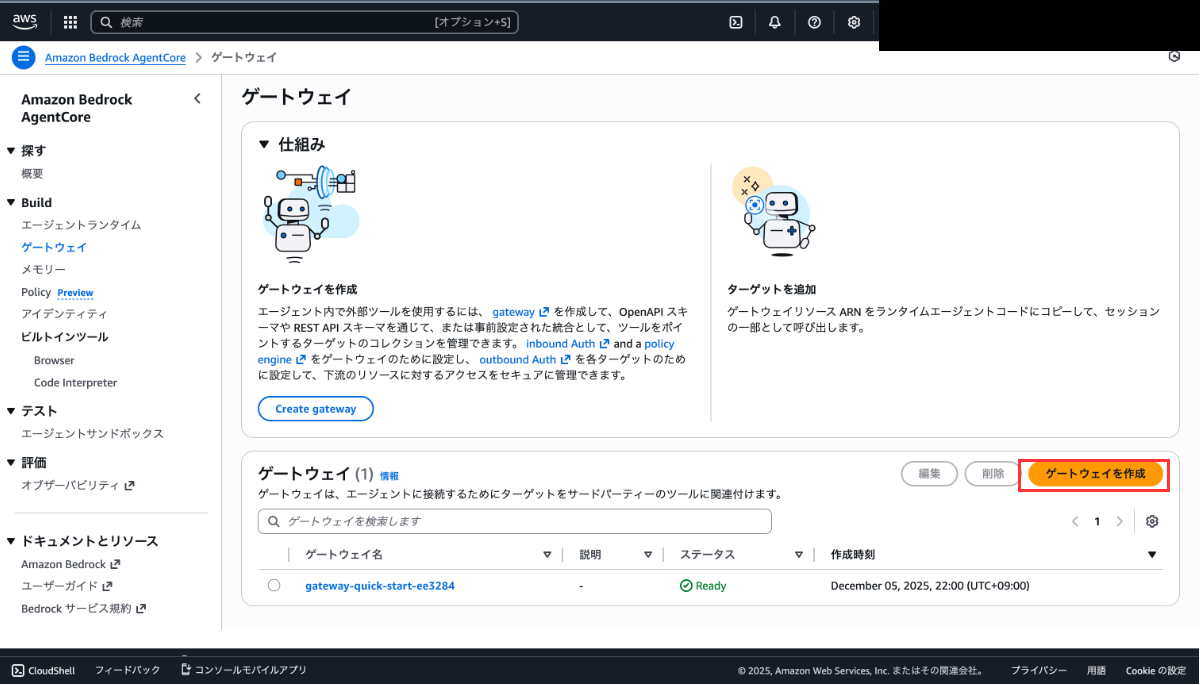
Amazon Bedrock AgentCoreの画面から「ゲートウェイ」を開き、「ゲートウェイを作成」を選択してください。
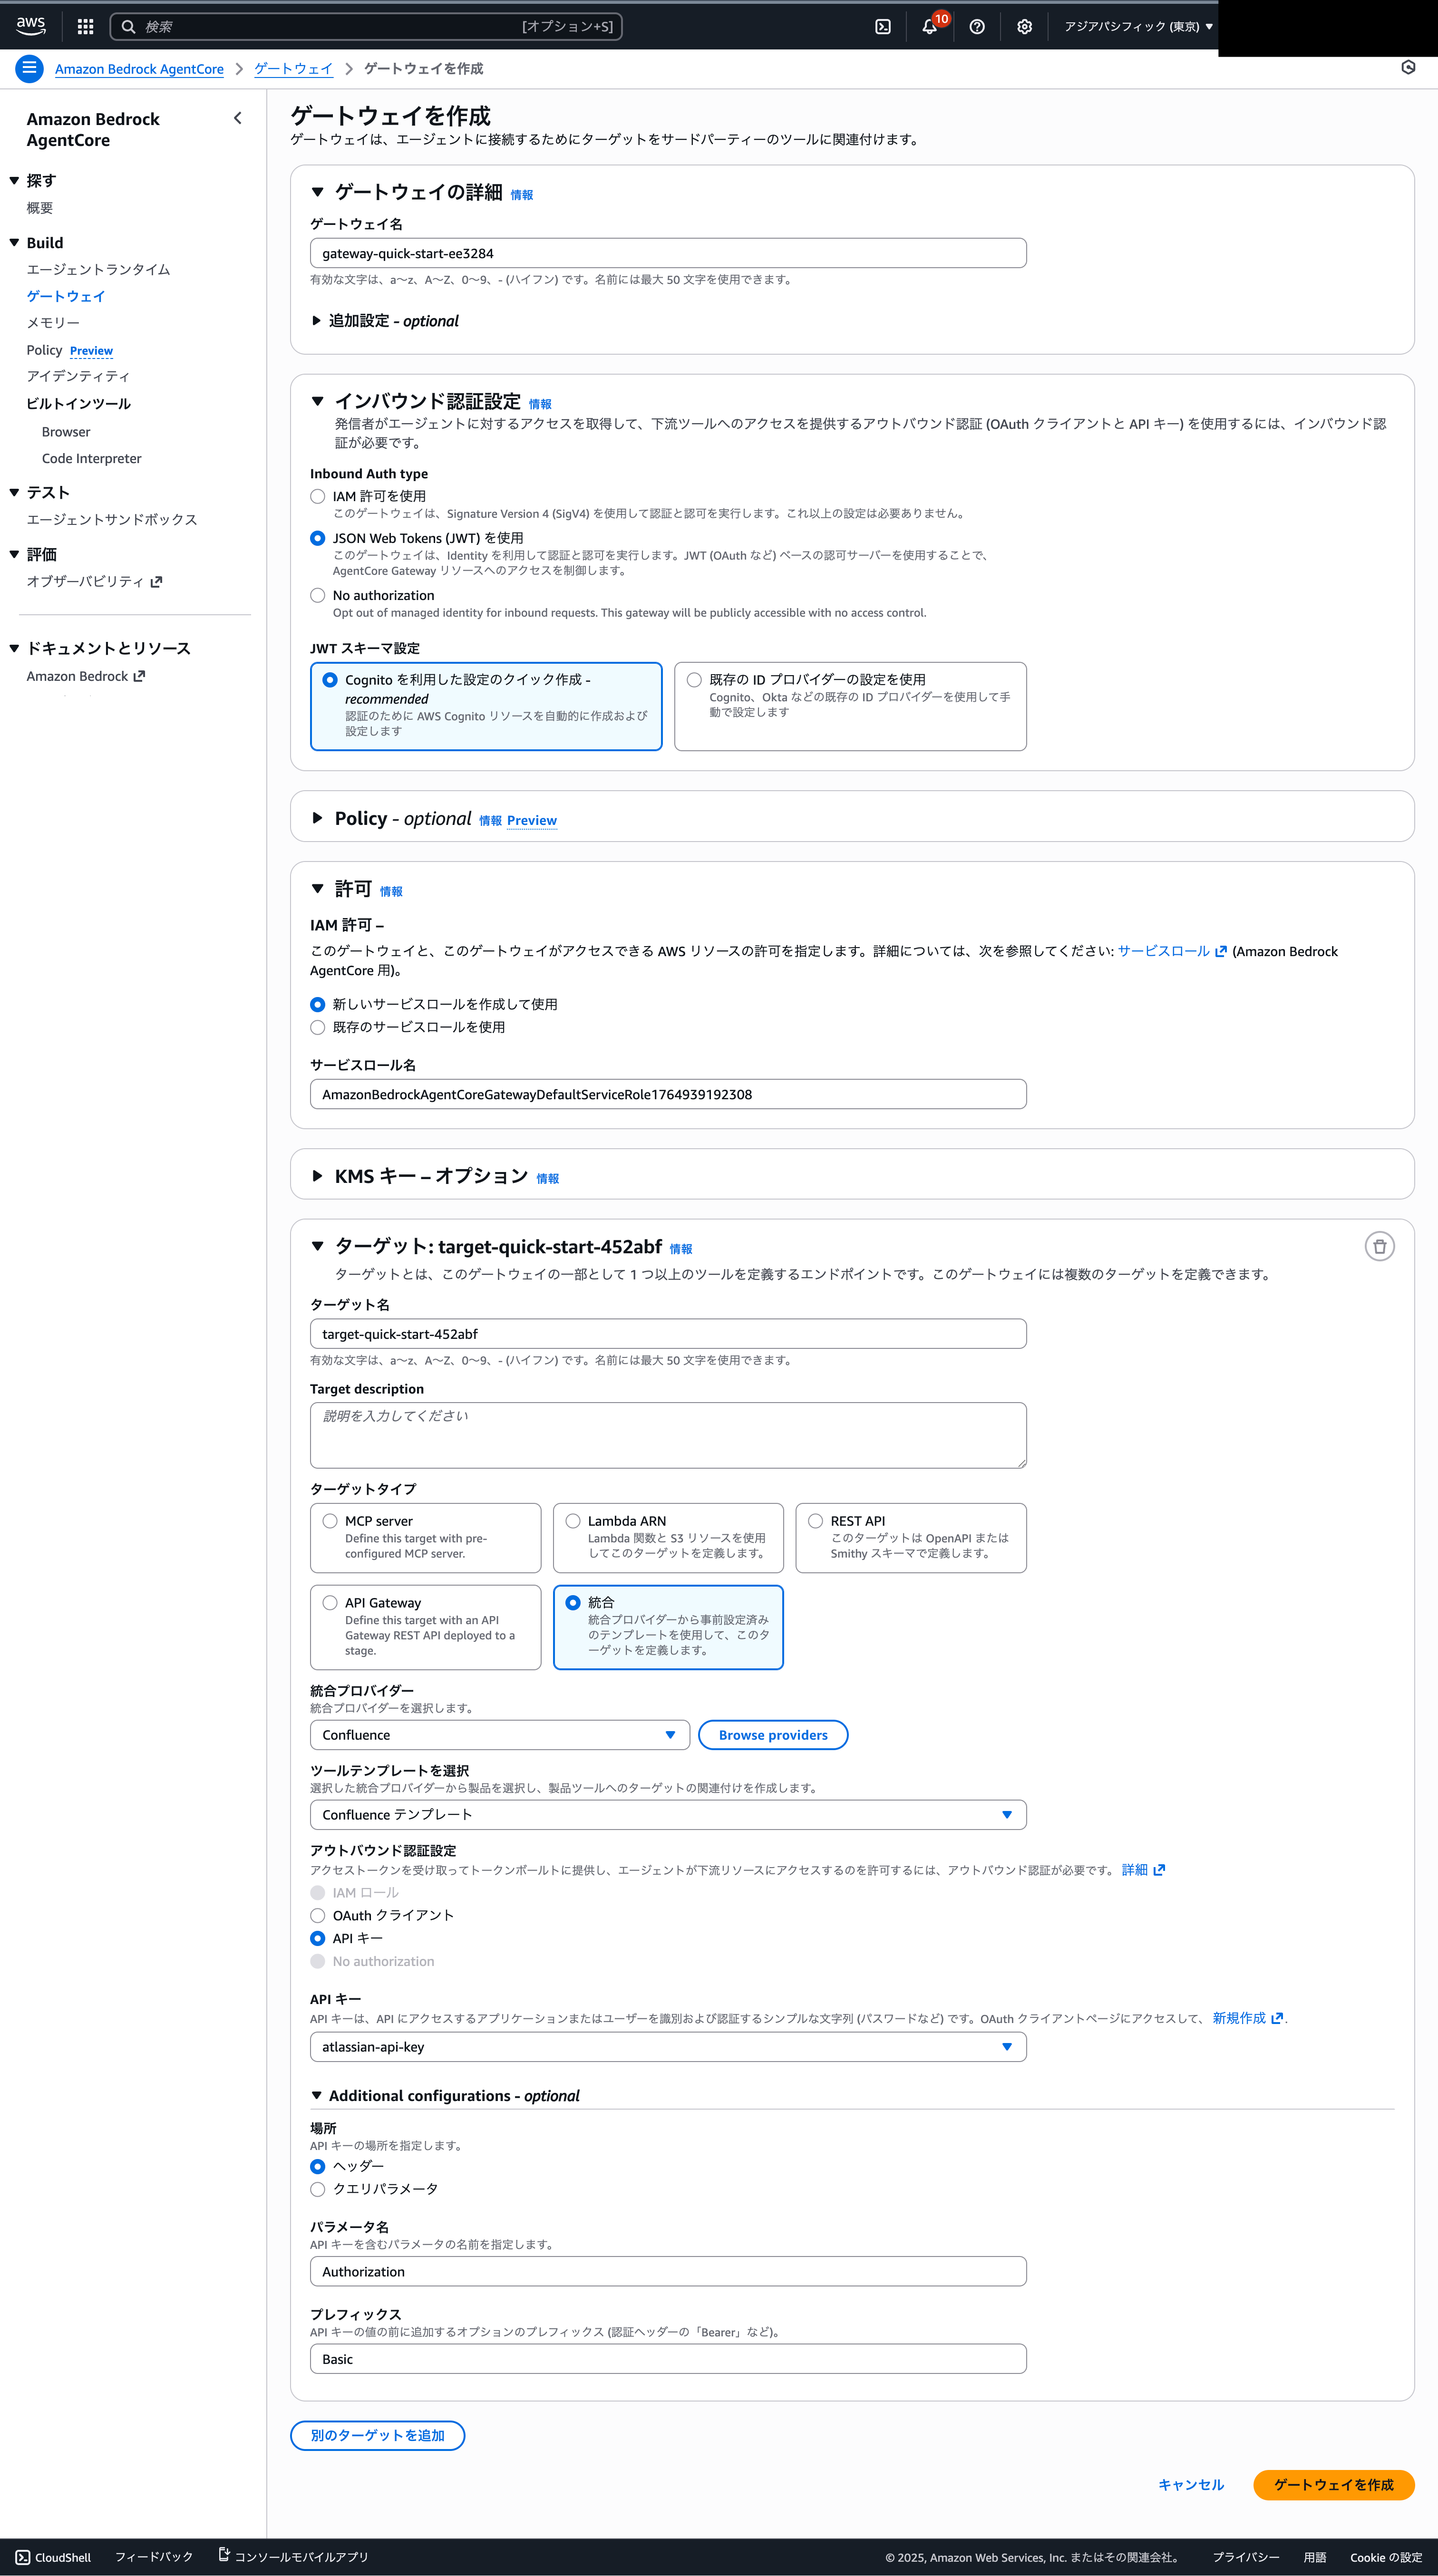
Gatewayの作成画面では、以下のように入力してください。「ゲートウェイ名」やターゲット名は任意で構いません。
ターゲットのアウトバウンド認証には先ほど作成したConfluenceのAPIキーを設定したIdentityを選択してください。
Additional configurationsで、場所はヘッダー、パラメータ名に「Authorization」、プレフィックスに「Basic」を入力することを忘れないでください。
Additional configurationsの設定により、ConfluenceのAPIを実行する際のリクエストヘッダーに「Authorization: Basic [Base64エンコードした文字列]」が設定され、認証が通るようになります。
1-4. 動作確認
Strands Agentの実行確認
作成したGatewayが実行できるかどうか動作確認を実施しましょう。
任意のフォルダで以下のコードを実行してPythonの実行環境を構築して、AIエージェントの作成に使用するstrands-agentsもインストールしましょう。
uv init
uv add strands-agents
まずは基本的なエージェントの実行ができるか確認しましょう。
main.pyを以下のように書き換えてください。
from strands import Agent

# Create an agent with default settings
agent = Agent()

# Ask the agent a question
agent("Tell me about agentic AI")
以下のコマンドで実行してください。
なお、実行するためにはAWSの認証情報が必要です。
uv run main.py
以下のように何かしらが出力されたら成功です。
Agentic AI refers to artificial intelligence systems designed to act autonomously as agents—making decisions, taking actions, and pursuing goals with minimal human intervention. Here are the key aspects: ...
ゲートウェイの動作確認
基本的な動作は確認できたので、ゲートウェイとの接続を確認しましょう。
必要なパラメータの入手
動作確認の前に必要なパラメータを取得します。
① GatewayのURL
作成したゲートウェイの詳細画面に表示されている「ゲートウェイリソースURL」を取得しておきましょう。
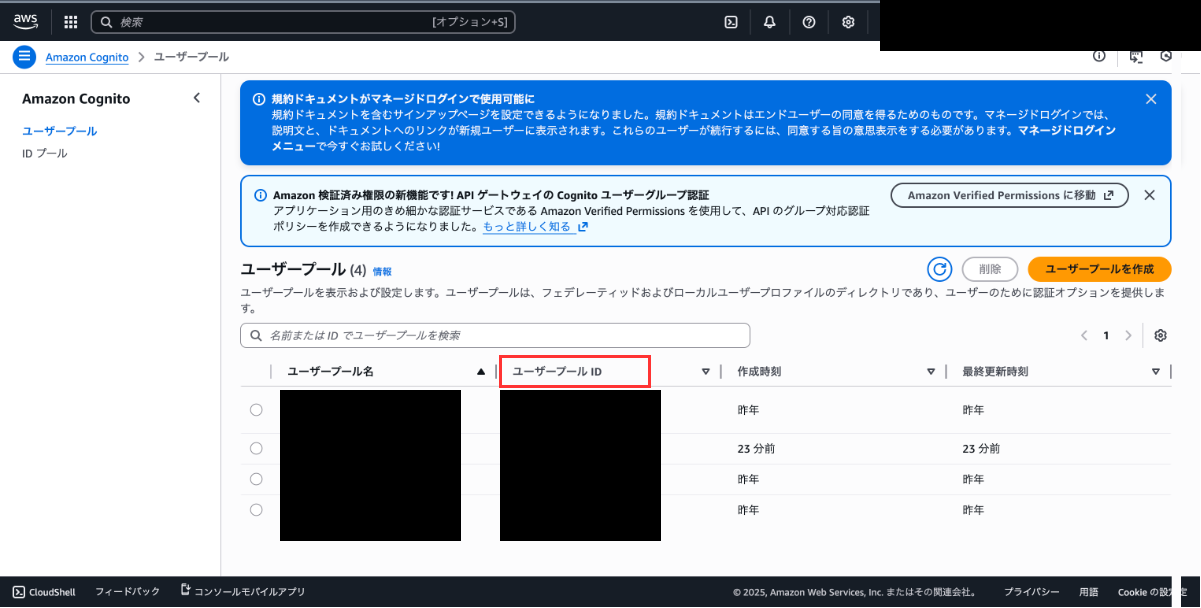
また、「ユーザープールID」と「クライアントID」はInbound Authの情報を取得するために使用するのでメモしておきましょう。

② Inbound Authの情報
Inbound Authを実行するために以下の3個の情報が必要です。
クライアントIDについては、GatewayのURLとともに取得できています。
- トークン取得URL
- クライアントID
- クライアントシークレット
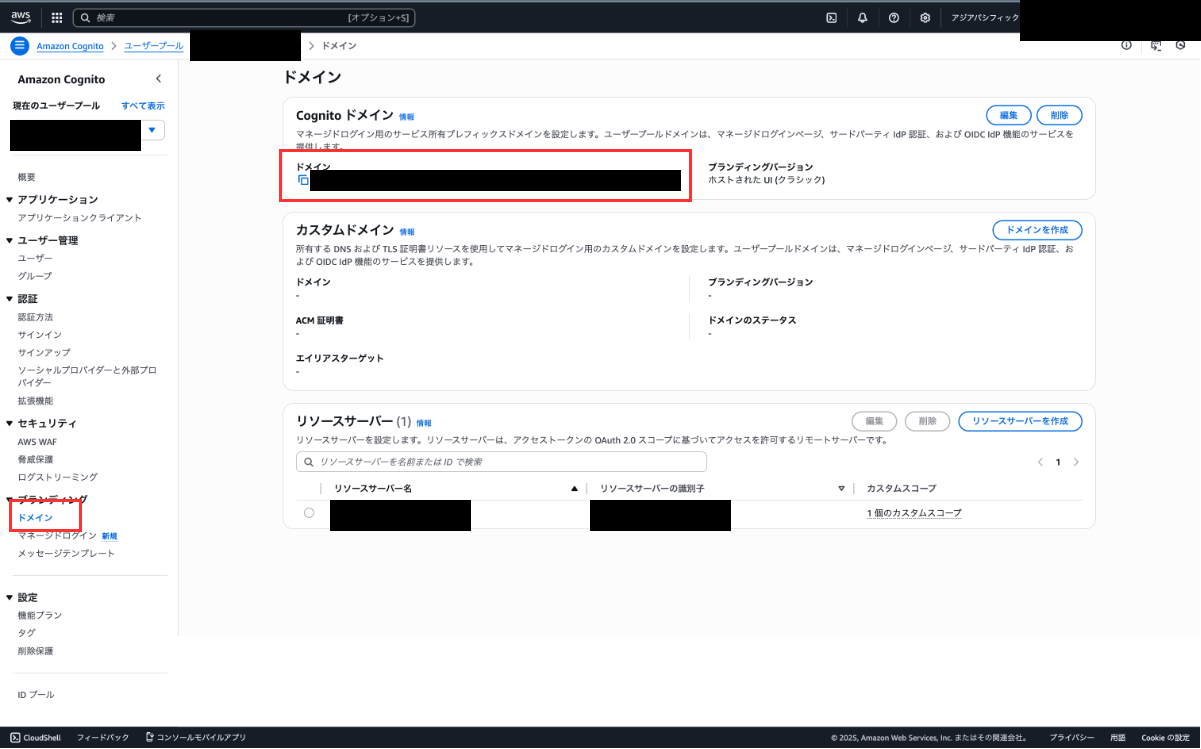
まずは、1個目のトークン取得URLを取得しましょう。
Cognitoのコンソールを開き、GatewayのURLを取得する際にメモしておいた「ユーザープールID」と一致するユーザープールを選択しましょう。
サイドバーの「ドメイン」から詳細画面を開くとトークン取得URLのドメインが取得できます。
実際に使用する際には「/oauth2/token」を末尾に追加して使用します。
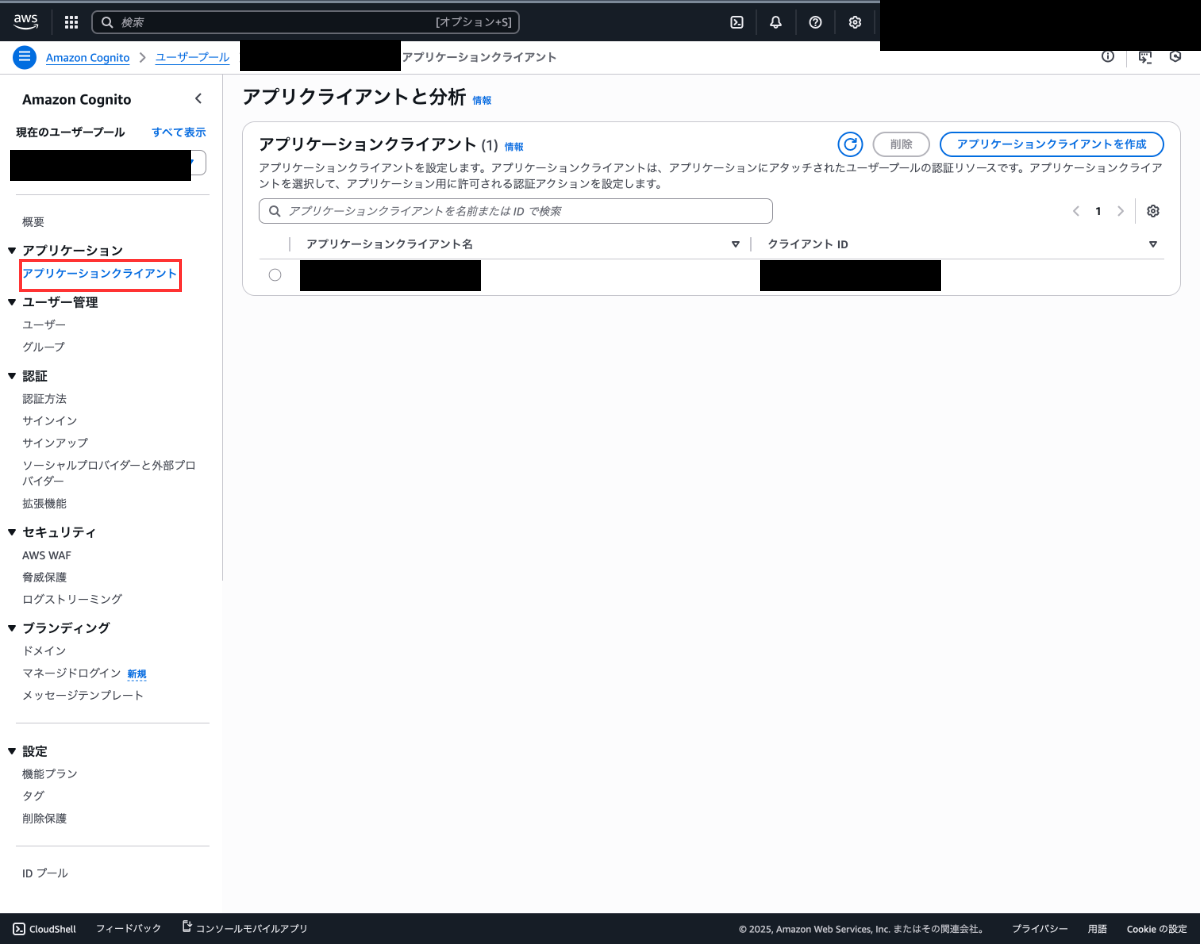
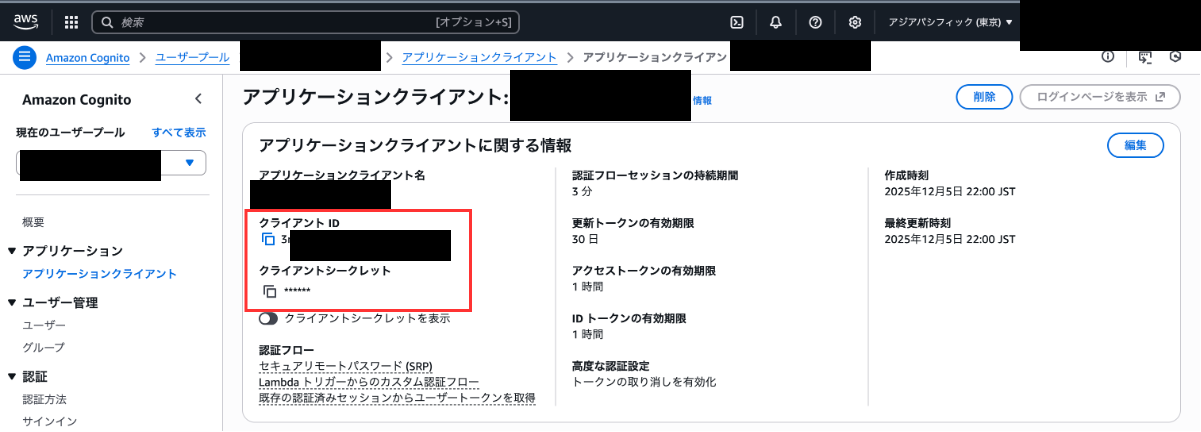
次に、サイドバーのアプリケーションクライアントから、GatewayのURLを取得する際にメモしておいた「クライアントID」と一致するクライアントを選択しましょう。
クライアントの詳細画面から「クライアントシークレット」を取得することができます。
コードの実行
必要なパラメータが揃ったので、以下のゲートウェイを実行するコードを実行しましょう。
変更が必要な箇所は「→変更が必要」で記載しています。
プロンプトで指定しているConfluenceのドメインと検索する内容も変更してください。
updatePageのツールが含まれているとエラーになるので、除外処理を入れています。
from strands import Agent
import requests
from mcp.client.streamable_http import streamablehttp_client
from strands.tools.mcp.mcp_client import MCPClient
from strands.tools.mcp.mcp_agent_tool import MCPAgentTool
from strands.models import BedrockModel

# 東京リージョンを使用
bedrock_model = BedrockModel(
    region_name="ap-northeast-1"
)
# 認証情報とMCPゲートウェイのURL
→変更が必要 inbound_auth_token_url = "https://xxx.auth.ap-northeast-1.amazoncognito.com/oauth2/token"
→変更が必要 inbound_auth_client_id = "xxx"
→変更が必要 inbound_auth_client_secret = "xxx"
gateway_url = "https://xxx.gateway.bedrock-agentcore.ap-northeast-1.amazonaws.com/mcp"

def get_access_token(token_endpoint: str, client_id: str, client_secret: str) -> str:
    """
    Inbound Authのアクセストークンを取得する
    """
    headers = {"Content-Type": "application/x-www-form-urlencoded"}

    payload = {
        "grant_type": "client_credentials",
        "client_id": client_id,
        "client_secret": client_secret,
    }

    response = requests.post(token_endpoint, headers=headers, data=payload)
    return response.json().get("access_token")

def create_streamable_http_transport(mcp_url: str, access_token: str):
    """
    認証ヘッダー付きのHTTPトランスポート作成
    """
    return streamablehttp_client(
        mcp_url, headers={"Authorization": f"Bearer {access_token}"}
    )

def get_full_tools_list(client: MCPClient) -> list[MCPAgentTool]:
    """
    使用可能なツールをすべて取得する
    """
    more_tools = True
    tools: list[MCPAgentTool] = []
    pagination_token = None
    while more_tools:
        tmp_tools = client.list_tools_sync(pagination_token=pagination_token)
        tools.extend(tmp_tools)
        if tmp_tools.pagination_token is None:
            more_tools = False
        else:
            more_tools = True
            pagination_token = tmp_tools.pagination_token
    return tools

access_token = get_access_token(
    inbound_auth_token_url, inbound_auth_client_id, inbound_auth_client_secret
)
mcp_client = MCPClient(
    lambda: create_streamable_http_transport(gateway_url, access_token)
)
with mcp_client:
    # Create an agent with default settings
    tools = get_full_tools_list(mcp_client)
    # updatePageが含まれているとエラーになるので除外
    filtered_tools = [tool for tool in tools if "updatePage" not in tool.tool_name]
    agent = Agent(
        model=bedrock_model,
        tools=filtered_tools,
→変更が必要        system_prompt="あなたはドメインがxxx.atlassian.netのConfluenceから情報を取得するAIエージェントです。"
    )
    # Ask the agent a question
→変更が必要    agent("ConfluenceからKDDIアジャイル開発センターについての情報を取得してください。")
変更箇所が修正できたら以下のコマンドで実行しましょう。
uv run main.py
以下のようにConfluenceの内容が取得できれば成功です。
Confluenceにあらかじめ入れておいたKDDIアジャイル開発センターの情報を正しく取得して出力できています。
KDDIアジャイル開発センターについての情報をConfluenceから検索します。CQLクエリを使用して関連する情報を取得します。
Tool #1: target-quick-start-452abf___searchByCQL
見つかった情報をより詳しく取得するため、該当ページの詳細を取得します。
Tool #2: target-quick-start-452abf___getPageById
KDDIアジャイル開発センターについての詳細情報をConfluenceから取得しました。以下にまとめます:

## KDDIアジャイル開発センターについて

### 1. 企業概要(2025年最新データ)
KDDIのデジタル変革を加速させるために設立された戦略的子会社で、意思決定の速さとエンジニア主導の文化を維持するため、KDDI本体とは異なる組織構造を持っています。
...
2. AgentCore Runtimeの作成
ローカルでの動作確認はできたので、AWS上にデプロイしましょう!
AIエージェントの実行環境であるAgentCore Runtimeにデプロイします。
この章で作成するのは、以下の構成図の赤枠部分です。
2-1. Runtimeで実行するエージェントの実装
必要なパッケージをインストールします。
uv add bedrock-agentcore
main.pyを以下のように変更してください。
inbound_auth_token_urlやinbound_auth_client_idなどの設定は先ほど使った値に各自変更してください。
from strands import Agent
import requests
from mcp.client.streamable_http import streamablehttp_client
from strands.tools.mcp.mcp_client import MCPClient
from strands.tools.mcp.mcp_agent_tool import MCPAgentTool
from strands.models import BedrockModel
from bedrock_agentcore import BedrockAgentCoreApp

app = BedrockAgentCoreApp()

# リージョンを明示的に指定
bedrock_model = BedrockModel(
    region_name="ap-northeast-1"
)

inbound_auth_token_url = "https://xxx.auth.ap-northeast-1.amazoncognito.com/oauth2/token"
inbound_auth_client_id = "xxx"
inbound_auth_client_secret = "xxx"
gateway_url = "https://xxx.gateway.bedrock-agentcore.ap-northeast-1.amazonaws.com/mcp"

def get_access_token(token_endpoint: str, client_id: str, client_secret: str) -> str:
    headers = {"Content-Type": "application/x-www-form-urlencoded"}

    payload = {
        "grant_type": "client_credentials",
        "client_id": client_id,
        "client_secret": client_secret,
    }

    response = requests.post(token_endpoint, headers=headers, data=payload)
    return response.json().get("access_token")


def create_streamable_http_transport(mcp_url: str, access_token: str):
    """
    認証ヘッダー付きのHTTPトランスポート作成
    """
    return streamablehttp_client(
        mcp_url, headers={"Authorization": f"Bearer {access_token}"}
    )

def get_full_tools_list(client: MCPClient) -> list[MCPAgentTool]:
    """Get all tools with pagination support"""
    more_tools = True
    tools: list[MCPAgentTool] = []
    pagination_token = None
    while more_tools:
        tmp_tools = client.list_tools_sync(pagination_token=pagination_token)
        tools.extend(tmp_tools)
        if tmp_tools.pagination_token is None:
            more_tools = False
        else:
            more_tools = True
            pagination_token = tmp_tools.pagination_token
    return tools

@app.entrypoint
def invoke(payload):
    """Your AI agent function"""
    user_message = payload.get("prompt", "Hello! How can I help you today?")
    access_token = get_access_token(
        inbound_auth_token_url, inbound_auth_client_id, inbound_auth_client_secret
    )
    mcp_client = MCPClient(
        lambda: create_streamable_http_transport(gateway_url, access_token)
    )
    with mcp_client:
        # Create an agent with default settings
        tools = get_full_tools_list(mcp_client)
        filtered_tools = [tool for tool in tools if "updatePage" not in tool.tool_name]
        agent = Agent(
            model=bedrock_model,
            tools=filtered_tools,
            system_prompt="あなたはドメインがxxx.atlassian.netのConfluenceから情報を取得するAIエージェントです。"
        )
        # Ask the agent a question
        result = agent(user_message)
        return {"result": result.message}

if __name__ == "__main__":
    app.run()
2-3. Runtimeのデプロイ
RuntimeのデプロイにはBedrock AgentCore Starter Toolkitを使用します。
コマンド一発でデプロイできる便利なツールです。
以下のコマンドで必要なパッケージをインストールして、初回設定を実施します。
uv add bedrock-agentcore-starter-toolkit --dev
uv run agentcore configure -e main.py -r ap-northeast-1
設定は以下のように実施してください。
venv ❯ agentcore configure -e main.py -r ap-northeast-1
Configuring Bedrock AgentCore...
✓ Using file: main.py

🏷️  Inferred agent name: main
Press Enter to use this name, or type a different one (alphanumeric without '-')
Agent name [main]: confluence_agent
✓ Using agent name: confluence_agent

🔍 Detected dependency file: pyproject.toml
Press Enter to use this file, or type a different path (use Tab for autocomplete):
Path or Press Enter to use detected dependency file: pyproject.toml
✓ Using requirements file: pyproject.toml

🚀 Deployment Configuration
Select deployment type:
  1. Direct Code Deploy (recommended) - Python only, no Docker required
  2. Container - For custom runtimes or complex dependencies
Choice [1]: 1

Select Python runtime version:
  1. PYTHON_3_10
  2. PYTHON_3_11
  3. PYTHON_3_12
  4. PYTHON_3_13
Choice [3]: 3
✓ Deployment type: Direct Code Deploy (python.3.12)

🔐 Execution Role
Press Enter to auto-create execution role, or provide execution role ARN/name to use existing
Execution role ARN/name (or press Enter to auto-create):
✓ Will auto-create execution role

🏗️  S3 Bucket
Press Enter to auto-create S3 bucket, or provide S3 URI/path to use existing
S3 URI/path (or press Enter to auto-create):
✓ Will auto-create S3 bucket

🔐 Authorization Configuration
By default, Bedrock AgentCore uses IAM authorization.
Configure OAuth authorizer instead? (yes/no) [no]:
✓ Using default IAM authorization

🔒 Request Header Allowlist
Configure which request headers are allowed to pass through to your agent.
Common headers: Authorization, X-Amzn-Bedrock-AgentCore-Runtime-Custom-*
Configure request header allowlist? (yes/no) [no]:
✓ Using default request header configuration
Configuring BedrockAgentCore agent: confluence_agent

Memory Configuration
Tip: Use --disable-memory flag to skip memory entirely

✅ MemoryManager initialized for region: ap-northeast-1
No existing memory resources found in your account

Options:
  • Press Enter to create new memory
  • Type 's' to skip memory setup

Your choice: s
✓ Skipping memory configuration
Memory disabled by user choice
Network mode: PUBLIC
Keeping 'confluence_agent' as default agent
これだけで設定は完了したので以下のコマンドでデプロイしましょう!
agentcore launch
実行が成功したらデプロイ成功です!簡単ですね!
2-4. Runtimeの動作確認
動作確認にもBedrock AgentCore Starter Toolkitを使用できます。
以下のコマンドで実行し、結果が返ってくることを確認してください。
uv run agentcore invoke '{"prompt": "KDDIアジャイル開発センターについて調べて"}'
以下のようにRuntime上でも実行できることが確認できました!
{"result": {"role": "assistant", "content": [{"text":
"KDDIアジャイル開発センターについて詳細な情報を取得しました。以下にまとめます:\n\n## KDDIアジャイル開発センター(KAG)の概要\n\n###
1. 企業概要(2025年最新データ)\n- **正式名称**: KDDIアジャイル開発センター株式会社 (KDDI Agile Development Center Corporation)\n-
...
3. まとめ
Amazon Bedrock AgentCoreを使って、Confluenceを検索するAIエージェントを作成しました。
ツールの連携やデプロイなどをAgentCoreが面倒を見てくれるので、AIエージェントの実装に集中することができます。
Confluence以外のツールに接続する際にも同様の手順で実施できるので、参考になれば幸いです。
今回はAPIトークンを使った認証でConfluenceを実行しましたが、いつの間にかAuthorization code grant (3LO)にも対応しているようなので、どこかで試したいと思います(これまではClient credentials grant (2LO)だけでした)。
ご覧いただきありがとうございました!