はじめに
この記事はnana music Advent Calendar 2018の18日目の記事です。
nanaでAndroidエンジニアをしているYoung (@akihito-okada) です。
今回はMotionLayoutを使ってアニメーションを書きつつ、クリスマスなアプリを作ってみました。
今回つくるもの
こんな感じのアプリです。
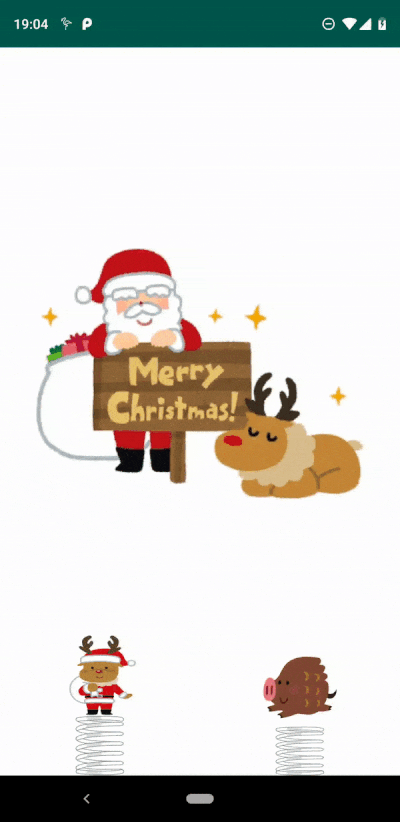
仕様は以下の通りです。
- バネの上にキャラクターを乗せる
- キャラクターは上方向にDragできる
- バネを伸ばして離すと初めの位置にもどりつつ、bounceさせる
- キャラクター以外の場所でのDragは抑止する
- キャラクターのクリックイベントをハンドルする
- 背景をクロスフェードで切り替える
Githubにソースコードをおいています。
https://github.com/akihito-okada/ChristmasToy
実装
事前準備
ConstraintLayout 2.0を読み込みます。
dependencies {
    implementation 'androidx.constraintlayout:constraintlayout:2.0.0-alpha2'
}
バネの上にキャラクターを乗せる
ConstraintLayoutの属性を使ってバネの上にキャラクターを載せます。
<androidx.constraintlayout.motion.widget.MotionLayout
    xmlns:tools="http://schemas.android.com/tools"
    xmlns:android="http://schemas.android.com/apk/res/android"
    xmlns:app="http://schemas.android.com/apk/res-auto"
    android:id="@+id/motion_layout"
    android:layout_width="match_parent"
    android:layout_height="match_parent">

    <ImageView
        android:id="@+id/character"
        android:layout_width="80dp"
        android:layout_height="80dp"
        android:layout_marginBottom="50dp"
        android:src="@drawable/image_tonakai"
        app:layout_constraintStart_toStartOf="parent"
        app:layout_constraintEnd_toEndOf="parent"
        app:layout_constraintBottom_toBottomOf="parent" />

    <ImageView
        android:id="@+id/spring"
        android:layout_width="50dp"
        android:layout_height="0dp"
        android:src="@drawable/image_spring"
        app:layout_constraintStart_toStartOf="parent"
        app:layout_constraintEnd_toEndOf="parent"
        app:layout_constraintTop_toBottomOf="@+id/character"
        app:layout_constraintBottom_toBottomOf="parent" />

</androidx.constraintlayout.motion.widget.MotionLayout>
バネが伸び切ったときの状態も定義します。
<androidx.constraintlayout.motion.widget.MotionLayout
    xmlns:android="http://schemas.android.com/apk/res/android"
    xmlns:app="http://schemas.android.com/apk/res-auto"
    xmlns:tools="http://schemas.android.com/tools"
    app:layoutDescription="@xml/scene_spring_toy"
    android:id="@+id/motionLayout"
    android:layout_width="match_parent"
    android:layout_height="match_parent">

    <ImageView
        android:id="@+id/character"
        android:layout_width="150dp"
        android:layout_height="150dp"
        android:layout_marginBottom="250dp"
        android:src="@drawable/image_tonakai"
        android:scaleType="fitXY"
        app:layout_constraintTop_toTopOf="parent"
        app:layout_constraintStart_toStartOf="parent"
        app:layout_constraintEnd_toEndOf="parent"
        app:layout_constraintBottom_toBottomOf="parent" />

    <ImageView
        android:id="@+id/spring"
        android:layout_width="50dp"
        android:layout_height="0dp"
        android:src="@drawable/image_spring"
        android:scaleType="fitXY"
        app:layout_constraintStart_toStartOf="parent"
        app:layout_constraintEnd_toEndOf="parent"
        app:layout_constraintTop_toBottomOf="@+id/character"
        app:layout_constraintBottom_toBottomOf="parent" />

</androidx.constraintlayout.motion.widget.MotionLayout>
Dragの設定
MotionSceneの中にTransition、OnSwipeを定義します。
OnSwipeを定義することで、期待する方向にDragができるようになります。
<Transition
    motion:constraintSetStart="@layout/motion_start"
    motion:constraintSetEnd="@layout/motion_end"
    motion:interpolator="bounce"
    motion:duration="300">

    <OnSwipe
        motion:touchAnchorId="@id/character"
        motion:touchAnchorSide="top"
        motion:dragDirection="dragUp" />

</Transition>
また、interpolatorにbounceと、アニメーションのdurationを設定しています。
interporatorを設定するとTransitionのStartからEndに向かって効果がかかります。
このため、Startをバネが縮んだ状態、Endを伸びた状態として設定しています。
初期は縮んだ状態(End)にしたいため、MotionLayoutのprogress(0〜1)を初期化時に1に設定します。
また、キャラクターを離した際、縮んだ状態(End)に戻しつつbounceさせるために、OnTouchListenerのACTION_UPでMotionLayoutのtransitionToEnd()を呼びます。
motionLayout.also {
    // 初期状態をEndの状態にする
    it.progress = 1F
    it.setOnTouchListener { _, event ->
        if (event.action == android.view.MotionEvent.ACTION_UP) {
            // 初期状態に戻しつつ、bounceさせる
            it.transitionToEnd()
            return@setOnTouchListener true
        }
        false
    }
}
キャラクター以外の場所でDragを抑止する
MotionLayoutで単純に実装をすると、Drag操作はキャラクターのView(Anchorとして指定したView)だけでなく、MotionLayoutの領域全体で有効になります。また、MotionLayoutがイベントを遮ってしまうため、後ろのViewにタッチイベントが伝わりません。
さらに、MotionLayoutの領域内でのみアニメーションが描画されるため、ミニマムに領域を確保すると見切れてしまったり、wrap_contentで動的に領域を確保するとアニメーションが壊れてしまいます。
今回作ってるアプリでは、タッチイベントの重なりがないため問題はありませんが、少し複雑なアプリでは問題になります。このため、キャラクターのViewのみ、Drag操作とタッチイベントを有効にしていきます。
CustomView(SpringToyView)を作成し、その中にMotionLayoutをaddViewします。そして、MotionLayout内にあるキャラクターの領域を判定しつつonInterceptTouchEventを制御することで、キャラクターのタッチイベントのみMotionLayoutに伝えています。
class SpringToyView @JvmOverloads constructor(context: Context, attrs: AttributeSet? = null, defStyleAttr: Int = 0)
    : FrameLayout(context, attrs, defStyleAttr) {

    private val touchableArea: View
    private val motionLayout: MotionLayout = LayoutInflater.from(context).inflate(R.layout.motion_start, this, false) as MotionLayout

    init {
        addView(motionLayout)
        touchableArea = motionLayout.findViewById(R.id.character)
    }

    override fun onInterceptTouchEvent(ev: MotionEvent): Boolean {
        // motionLayoutがアニメーション途中
        val isInProgress = (motionLayout.progress > 0.0f && motionLayout.progress < 1.0f)
        // タッチイベントがキャラクターのView内にある時
        val isInAnchor = touchEventInsideAnchorView(touchableArea, ev)
        return if (isInProgress || isInAnchor) {
            // motionLayoutにイベントを流す
            super.onInterceptTouchEvent(ev)
        } else {
            // motionLayoutにイベントを流さない
            true
        }
    }
}
キャラクターのクリックイベントをハンドルする
MotionLayoutにOnTouchListenerを設定し、Clickの判定を行います。
このとき、キャラクターの領域内のタッチイベントのみ流れてくるため、タッチ領域の判定は必要ありません。
motionLayout.setOnTouchListener(OnTouchListener { _, ev ->
    when (ev.action) {
        MotionEvent.ACTION_DOWN -> {
            startX = ev.x
            startY = ev.y
        }
        MotionEvent.ACTION_UP   -> {
            val endX = ev.x
            val endY = ev.y
            if (isClickedAnchor(startX, endX, startY, endY)) {
                listener?.onClickedAnchor()
                return@OnTouchListener true
            }
            it.transitionToEnd()
            listener?.onTransitionEnd()
            return@OnTouchListener true
        }
    }
    false
})
背景をクロスフェードで切り替える
せっかくなので、バネを引っ張ったときに、ImageFilterViewを使って背景を切り替えます。
<androidx.constraintlayout.motion.widget.MotionLayout
    android:id="@+id/layoutBackground"
    android:layout_width="0dp"
    android:layout_height="0dp"
    android:layout_marginStart="32dp"
    android:layout_marginEnd="32dp"
    android:layout_marginBottom="64dp"
    app:layout_constraintTop_toTopOf="parent"
    app:layout_constraintBottom_toBottomOf="parent"
    app:layout_constraintStart_toStartOf="parent"
    app:layout_constraintEnd_toEndOf="parent"
    app:layoutDescription="@xml/scene_image"
    tools:showPaths="true">

    <androidx.constraintlayout.utils.widget.ImageFilterView
        android:id="@+id/imageView"
        android:layout_width="0dp"
        android:layout_height="0dp"
        android:src="@drawable/image_christmas"
        app:altSrc="@drawable/image_new_year"
        app:layout_constraintTop_toTopOf="parent"
        app:layout_constraintBottom_toBottomOf="parent"
        app:layout_constraintStart_toStartOf="parent"
        app:layout_constraintEnd_toEndOf="parent" />

</androidx.constraintlayout.motion.widget.MotionLayout>
クロスフェードのTransitionを設定します。
<MotionScene
    xmlns:android="http://schemas.android.com/apk/res/android"
    xmlns:motion="http://schemas.android.com/apk/res-auto">

    <Transition
        motion:constraintSetEnd="@id/end"
        motion:constraintSetStart="@id/start"
        motion:duration="600"
        motion:interpolator="linear" />

    <ConstraintSet android:id="@+id/start">
        <Constraint
            android:id="@id/imageView"
            android:layout_width="0dp"
            android:layout_height="0dp"
            motion:layout_constraintTop_toTopOf="parent"
            motion:layout_constraintBottom_toBottomOf="parent"
            motion:layout_constraintStart_toStartOf="parent"
            motion:layout_constraintEnd_toEndOf="parent">
            <CustomAttribute
                motion:attributeName="crossfade"
                motion:customFloatValue="0" />
        </Constraint>
    </ConstraintSet>

    <ConstraintSet android:id="@+id/end">
        <Constraint
            android:id="@id/imageView"
            android:layout_width="0dp"
            android:layout_height="0dp"
            motion:layout_constraintTop_toTopOf="parent"
            motion:layout_constraintBottom_toBottomOf="parent"
            motion:layout_constraintStart_toStartOf="parent"
            motion:layout_constraintEnd_toEndOf="parent">
            <CustomAttribute
                motion:attributeName="crossfade"
                motion:customFloatValue="1" />
        </Constraint>
    </ConstraintSet>

</MotionScene>
最後に、キャラクターの操作でImageを切り替えます。
    override fun onCreate(savedInstanceState: Bundle?) {
        super.onCreate(savedInstanceState)
        setContentView(R.layout.activity_main)
        // クリスマスなイメージを表示
        layoutLeft.initialize(R.drawable.image_tonakai) {
            layoutBackground.transitionToStart()
        }
        // 新年なイメージを表示
        layoutRight.initialize(R.drawable.image_inoshishi) {
            layoutBackground.transitionToEnd()
        }
    }

    private fun SpringToyView.initialize(characterImageRes: Int, callback: () -> Unit) {
        character.setImageResource(characterImageRes)
        listener = object : SpringToyView.InteractionListener {
            override fun onTransitionEnd() {
                callback.invoke()
            }

            override fun onClickedAnchor() {
                callback.invoke()
            }
        }
    }
おわりに
今回の内容について、社内勉強会でも発表しました。(Speaker Deck)
姪にこのアプリを見せたところ、初めはめちゃくちゃ楽しそうに触ってましたが、1分もしないうちに飽きてました。
今回作ったアニメーションは、見た目を変えたりすることで、スイッチにするなど応用できそうだなと感じています。
MotionLayoutは、基本的なユースケースから外れると、タッチイベントの制御など対応が難しい部分がありそうかなと感じましたが、少ないコードで簡単にきれいなアニメーションを作れるので、これから使う機会が増えそうですね。
以上です。明日は、@xKxAxKx が書いてくれます!お楽しみに!
参考
-
Picture-in-picture video overlay with MotionLayout
-
Android のタッチイベントを理解する(その1)