これまで
在宅勤務が続いており家族全員が狭い家にひしめいています。一人一部屋の個室がとれない上にプリンタなど共有なものも多いので、テレカン中でも家族が部屋を出入りすることがしばしば。家族としても私がテレカン中なのかそうでないかが閉まったドアの外から分かるとドアを開けるときに注意するべきか分かって良さそうです。
なので部屋の外にテレカン中は「ON AIR」と表示がでるサインを作ってみました。
その1に全体構成を示しました。
今回はディスプレイ側を作っていきます。
材料
RGB LED Matrix
いわゆるHUB-75互換のLEDマトリックスパネルです。「ON AIR」を一行で表示させたいので横長の64x32、あまり大きくないほうが良いので3mmピッチをチョイス。Adafruitで$44.95で売っていますが、同じようなものがAliexpressで$16.99だったのでそちらで調達。
Adafruit Matrix Portal
心臓部はAdafruit Matrix Portalをありがたく使わせてもらいます。
Cortex M4 のパワフルなマイコン(SAMD51)とWiFi用にEPS32も搭載。CircuitPythonの環境や各種ライブラリも整備してくれているのでかなりラクができそうです。
コード
コードはGitHubにあげておきました。シンプルな機能に絞っているつもりですが、それなりに長くなってしまいました。利用しているライブラリもいっぱい。
import time
import json
import board
import microcontroller
import busio
from digitalio import DigitalInOut
import displayio
import framebufferio
import rgbmatrix
import terminalio
from adafruit_bitmap_font import bitmap_font
from adafruit_display_text.label import Label
from adafruit_display_shapes.rect import Rect
import neopixel
from adafruit_esp32spi import adafruit_esp32spi
from adafruit_esp32spi import adafruit_esp32spi_wifimanager
import adafruit_esp32spi.adafruit_esp32spi_socket as socket
import adafruit_minimqtt.adafruit_minimqtt as MQTT
# from adafruit_io.adafruit_io import IO_MQTT
from adafruit_aws_iot import MQTT_CLIENT
いきなりimport文が大量に並びます。timeとjsonはCPythonと同様。board, microcontroller, busio, digitalioあたりはCircuitPythonがマイコン上で動いていることを思い出させてくれます。その後はディスプレイ関係を汎用的に扱うライブラリや、RGB matrixのドライバ、ESP32のドライバ、MQTTライブラリにAWS IoTのライブラリなどが続きます。これだけのライブラリ群が用意されているのは本当にスバラシイ。その殆どをAdafruitが提供してくれています。感謝。
from secrets import secrets
Adafruitのサンプルコードによくあるように、WiFiアクセスポイントのSSIDとパスワードや、AWS IoT coreのエンドポイントなどの情報はsecrets.pyファイルにdictionaryとして入れておきます。
secrets = {
    'ssid' : 'ssid', # home wifi access point ssid
    'password' : 'password', # password for ssid
    'timezone' : "Asia/Tokyo", # http://worldtimeapi.org/timezones
    'aio_username': "username", # Adafruit IO user name
    'aio_password': "", # Adafruit IO password
    'broker': "abc.iot.ap-northeast-1.amazonaws.com", # AWS IoT Device data endpoint
    "client_id": "", # AWS IoT Things name for testing
    "client_id_controller": "", # AWS IoT Things name for controller
    "client_id_matrix": "", # AWS IoT Things name for matrix
}
# Get device certificate
try:
    with open("aws/aws_cert_matrix.pem.crt", "rb") as f:
        DEVICE_CERT = f.read()
except ImportError:
    print("Certificate (aws_cert_matrix.pem.crt) not found on CIRCUITPY filesystem.")
    raise

# Get device private key
try:
    with open("aws/private_matrix.pem.key", "rb") as f:
        DEVICE_KEY = f.read()
except ImportError:
    print("Key (private_matrix.pem.key) not found on CIRCUITPY filesystem.")
    raise
AWS IoTへのcertificateやprivate keyはそれぞれファイルとしてCircuitPythonのフォルダへ格納しておき読み出します。
# Matrix Display
WIDTH = 64
HEIGHT = 32
BLACK = 0x000000
WHITE = 0x505050
WHITE_DIM = 0x1a1a1a
RED = 0xFF0000
RED_DIM = 0x100000
GREEN_DIM = 0x001010
BLUE_DIM = 0x000010

shadow_topic = "$aws/things/{}/shadow".format(secrets["client_id_matrix"])
後から使い回しやすいようにいくつか定数を設定。
RGB LED Matrixライブラリにはneopixelライブラリと違って明るさを調整するbrightnessという概念がないようです。フルに明るくするととっても眩しいので、なるべく暗い色を探しながら設定しました。
deco_font = bitmap_font.load_font("/fonts/Helvetica-Bold-16.bdf")

print("ONAIR display with MatrixPortal")

displayio.release_displays()
matrix = rgbmatrix.RGBMatrix(
    width=64, bit_depth=4,
    rgb_pins=[
        board.MTX_R1,
        board.MTX_G1,
        board.MTX_B1,
        board.MTX_R2,
        board.MTX_G2,
        board.MTX_B2
    ],
    addr_pins=[
        board.MTX_ADDRA,
        board.MTX_ADDRB,
        board.MTX_ADDRC,
        board.MTX_ADDRD
    ],
    clock_pin=board.MTX_CLK,
    latch_pin=board.MTX_LAT,
    output_enable_pin=board.MTX_OE
)
display = framebufferio.FramebufferDisplay(matrix)

splash = displayio.Group(max_size=10)

group_on = displayio.Group()
splash.append(group_on)
group_on.hidden = True
group_off = displayio.Group()
splash.append(group_off)

rect_on = Rect(0, 0, WIDTH, 2*HEIGHT//3, fill=RED_DIM, outline=WHITE)
group_on.append(rect_on)

label_onair = Label(deco_font, text="ON AIR", color=WHITE)
label_onair.scale=1
label_onair.anchor_point = (0.5, 0.5)
label_onair.anchored_position = (WIDTH//2, HEIGHT//4+2)
group_on.append(label_onair)

rect_off = Rect(0, 0, WIDTH, 2*HEIGHT//3, fill=BLACK)
group_off.append(rect_off)

label_off = Label(deco_font, text="GOOD", color=GREEN_DIM)
label_off.scale=1
label_off.anchor_point = (0.5, 0.5)
label_off.anchored_position = (WIDTH//2, HEIGHT//4+2)
group_off.append(label_off)

label_time = Label(terminalio.FONT, text="13:30", color=WHITE_DIM)
label_time.anchor_point = (0.5, 0.5)
label_time.anchored_position = (WIDTH//2, 3*(HEIGHT//4)+1)
splash.append(label_time)
label_time.text = ""

rect_status = Rect(63,31,1,1,fill=RED_DIM)
splash.append(rect_status)
Adafruit learn guideからもらってきたHelveticaフォントを読み込んで、ディスプレイの設定をしていきます。
"ON AIR"表示は赤色のバックに白文字で、通常は黒色バックに淡い緑色で"GOOD"の表示にしました。
また下にスペースが余っているので、何時まで会議なのかを表示できるように時刻表示用ラベルも定義します。WiFiの接続状況も分かると便利なので、1ドットをステータス表示用に確保しました。
# If you are using a board with pre-defined ESP32 Pins:
esp32_cs = DigitalInOut(board.ESP_CS)
esp32_ready = DigitalInOut(board.ESP_BUSY)
esp32_reset = DigitalInOut(board.ESP_RESET)
spi = busio.SPI(board.SCK, board.MOSI, board.MISO)
esp = adafruit_esp32spi.ESP_SPIcontrol(spi, esp32_cs, esp32_ready, esp32_reset)
status_light = neopixel.NeoPixel(
    board.NEOPIXEL, 1, brightness=0.2
)
wifi = adafruit_esp32spi_wifimanager.ESPSPI_WiFiManager(esp, secrets, status_light)

# Set AWS Device Certificate
esp.set_certificate(DEVICE_CERT)

# Set AWS RSA Private Key
esp.set_private_key(DEVICE_KEY)
ESP32を初期化してWiFi関連の設定をします。
def connected(client, userdata, flags, rc):
    # Connected function will be called when the client is connected to Adafruit IO.
    print('Connected to AWS IoT!')
    print('Flags: {0}\nRC: {1}'.format(flags, rc))
    rect_status.fill = BLUE_DIM

    print("Subscribing to matrix shadow update delta...")
    aws_iot.subscribe(shadow_topic + "/update/delta")

    print("Subscribing to matrix shadow get...")
    aws_iot.subscribe(shadow_topic + "/get/accepted")

    print("Publish matrix shadow get")
    aws_iot.publish(shadow_topic + "/get", "{}")
あとからMQTTのステータスに応じて呼ばれるコールバック関数を定義しておきます。
接続されたらsubscribeしたうえで、"/get"に空のメッセージをpublishすることで現在あるべき状態を要求します。
def message(client, topic, msg):
    # This method is called when the client receives data from a topic.
    print("Message from {}: {}".format(topic, msg))
    if topic == shadow_topic + "/get/accepted":
        payload=json.loads(msg)
        print("get accepted state desired is ")
        print(payload["state"]["desired"])
        handle_delta(payload["state"]["desired"])
    elif topic == shadow_topic + "/update/delta":
        payload=json.loads(msg)
        print("update delta state is")
        print(payload["state"])
        handle_delta(payload["state"])

def update_onair(message):
    if message == "ON":
        group_on.hidden = False
        group_off.hidden = True
    elif message == "OFF":
        group_on.hidden = True
        group_off.hidden = False
        #label_time.text = ""
    else:
        print("Unexpected message on LED feed.")

def update_text(message):
    if message == ".":
        label_time.text = ""
    else:
        label_time.text = message

def handle_delta(delta):
    print("handle_delta")
    print(delta)
    reported = {}
    delta_onair = delta.get("onair")
    if delta_onair:
        update_onair(delta_onair)
        reported["onair"] = delta_onair
    delta_text = delta.get("text")
    if delta_text:
        update_text(delta_text)
        reported["text"] = delta_text
    if reported:
        payload = {"state": {"reported":reported}}
        print("publish to /update: ")
        print(payload)
        aws_iot.publish(shadow_topic + "/update", json.dumps(payload))
メッセージを受け取ったら内容に合わせて表示をアップデートし、"/update"に変更内容をpublishします。
# Connect to WiFi
print("Connecting to WiFi...")
wifi.connect()
print("Connected!")
rect_status.fill = GREEN_DIM

# Initialize MQTT interface with the esp interface
MQTT.set_socket(socket, esp)
client =  MQTT.MQTT(
    broker = secrets['broker'],
    client_id = secrets['client_id_matrix'])

aws_iot = MQTT_CLIENT(client)
aws_iot.on_connect = connected
aws_iot.on_disconnect = disconnected
aws_iot.on_subscribe = subscribed
aws_iot.on_unsubscribe = unsubscribed
aws_iot.on_publish = published
aws_iot.on_message = message


# io.add_feed_callback(FEED_ONAIR, on_matrix_onair)
# io.add_feed_callback(FEED_TEXT, on_matrix_text)

print('Attempting to connect to %s'%client.broker)
aws_iot.connect()
wifiに繋ぎAWS用にMQTTクライアントを初期化します。
while True:
    try:
        #aws_iot.loop()
        aws_iot.client.loop(0.1)
    except (ValueError, RuntimeError, MQTT.MMQTTException, AttributeError) as e:
        print("Failed to get data, retrying\n", e)
        try:
            print("wifi.reset")
            wifi.reset()
            print("wifi.connect")
            wifi.connect()
            print("aws_iot.reconnect()")
            aws_iot.reconnect()
        except Exception as e:
            print("Still network error... Going to reset.")
            print(e)
            microcontroller.reset()
        continue
基本的には無限ループの中でaws_iot.loop()をずっと呼び出し続ければいいです。
ただ実際はWiFi接続が切れることもあり、本格的に運用しようと思うといろいろな例外を処理しないといけません。
とりあえず大体のトラブルはESP32をリセットすることで解消するようです。そしてそれでもダメな場合はマイコンごとリセットします。AWS IoT Coreの Thing shadow機能を使うことで、いつリセットしても必ず表示すべき内容にできるのがありがたい。
筐体
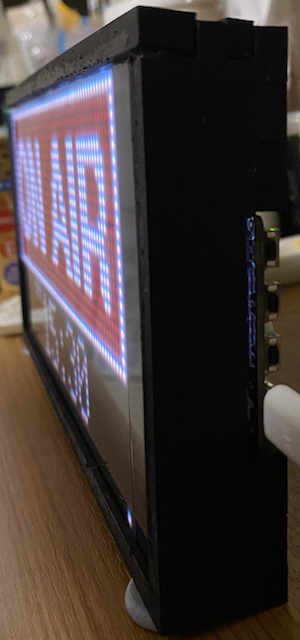
ディスプレイ側は家族の目に触れるものなので、基板むき出しのままではあれなので筐体も作りました。
LEDパネルをきれいに見せたいので、光を分散させるディフューザーとしてBlack LED Diffusion Acrylic Panelを購入。グレイがかった透明アクリルパネルで、表面がちょっとザラザラに加工されています。
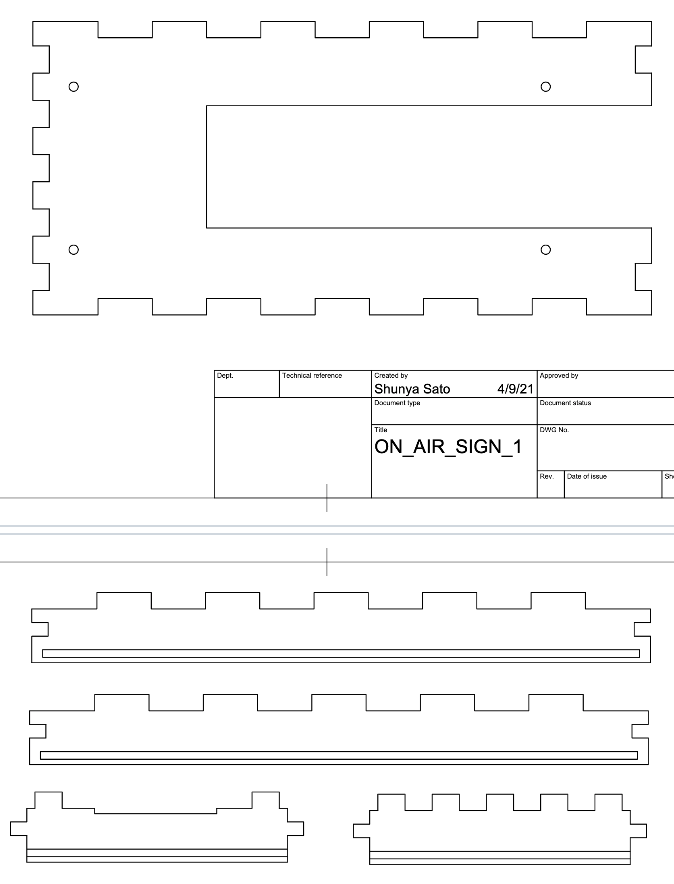
ダイソーに売っている6mmのMDF(合板)をレーザーカッターで加工して箱を作ります。
Fusion360で適当にLEDパネルをモデリングした後、周りを囲む箱を作り、2次元に投影しDXF形式でExportしました。
アクリルパネルをはめ込むための溝もレーザーカッターでうまく加工できました。木工用ボンドで固定し黒スプレーで塗装して完成。
その3ではコントローラー側を作ります。
その1 全体構想
その2 ディスプレイ
その3 コントローラ 下書き中
その4 クラウド 下書き中


