目標
ソフトウェアRAID(mdadmコマンド)を利用して、RAID5を構築する。
AWS EC2上での構築とする。
RAIDとは
高いパフォーマンスや耐久性の実現のため、
複数のハードディスクやパーティションを組み合わせて利用する技術のこと。
RAIDに関しての知識をまとめた参考記事掲載致します。
RAIDをざっくり理解したい
RAIDまとめ
前提
AWS EC2サーバ1台が既に作成済みであること。
利用環境
ハードウェア : AWS EC2サーバ 1台
OS(AMI) : Amazon Linux 2 AMI (HVM), SSD Volume Type
作業の流れ
| 項番 | タイトル |
|---|---|
| 1 | EBSデータボリュームのアタッチ |
| 2 | RAID用パーティション構築 |
| 3 | RAID構築 |
| 4 | その他RAID管理操作 |
手順
1.EBSデータボリュームのアタッチ
RAID構築用EBSデータボリュームを作成し、対象のEC2にアタッチします。
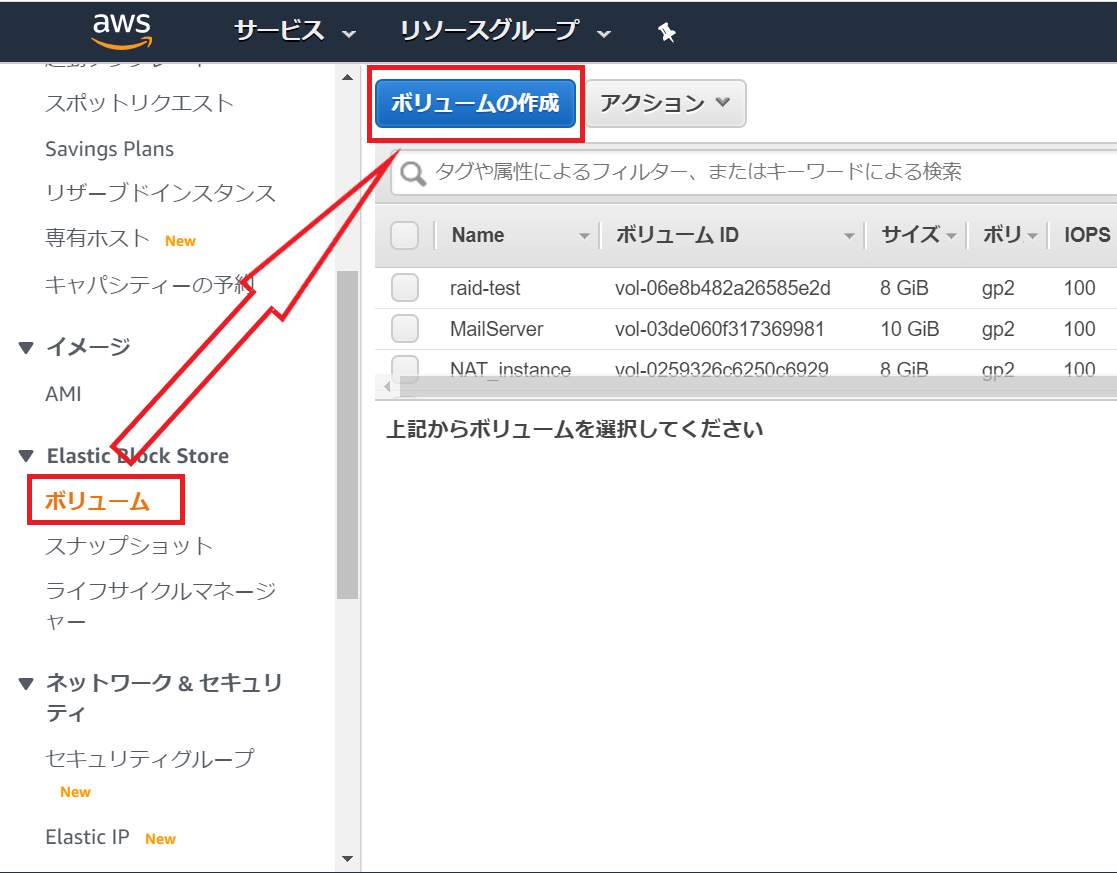
マネージメントコンソールのEC2サービス左枠内ボリューム⇒ボリュームの作成をクリック
サイズは最小の1GiB、アベイラビリティーゾーンはアタッチ対象のEC2と同一のAZを設定し、ボリュームの作成をクリック

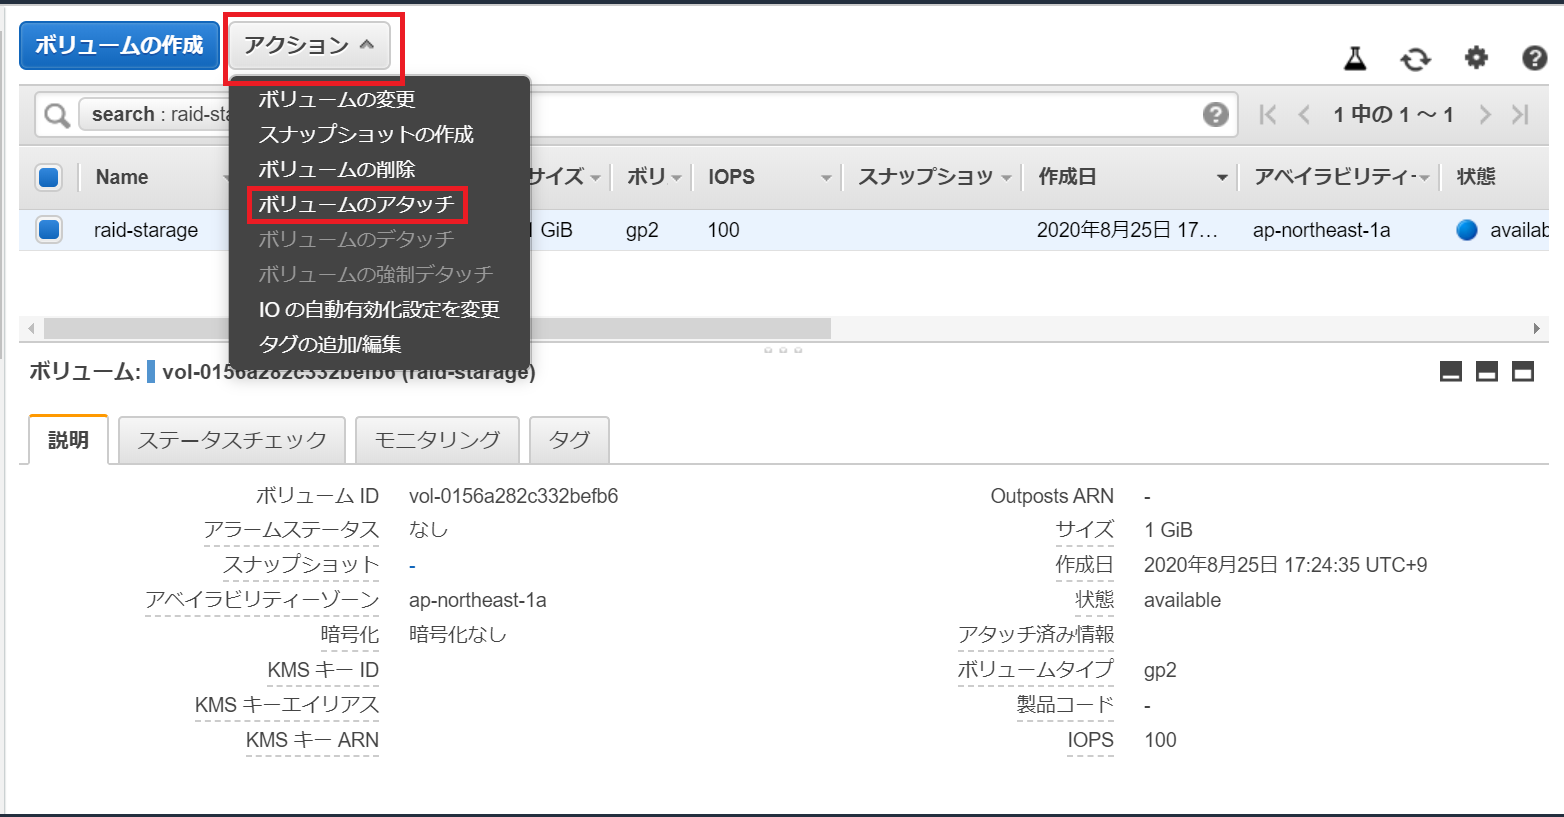
作成したEBSボリュームを選択しアクション⇒ボリュームのアタッチをクリック
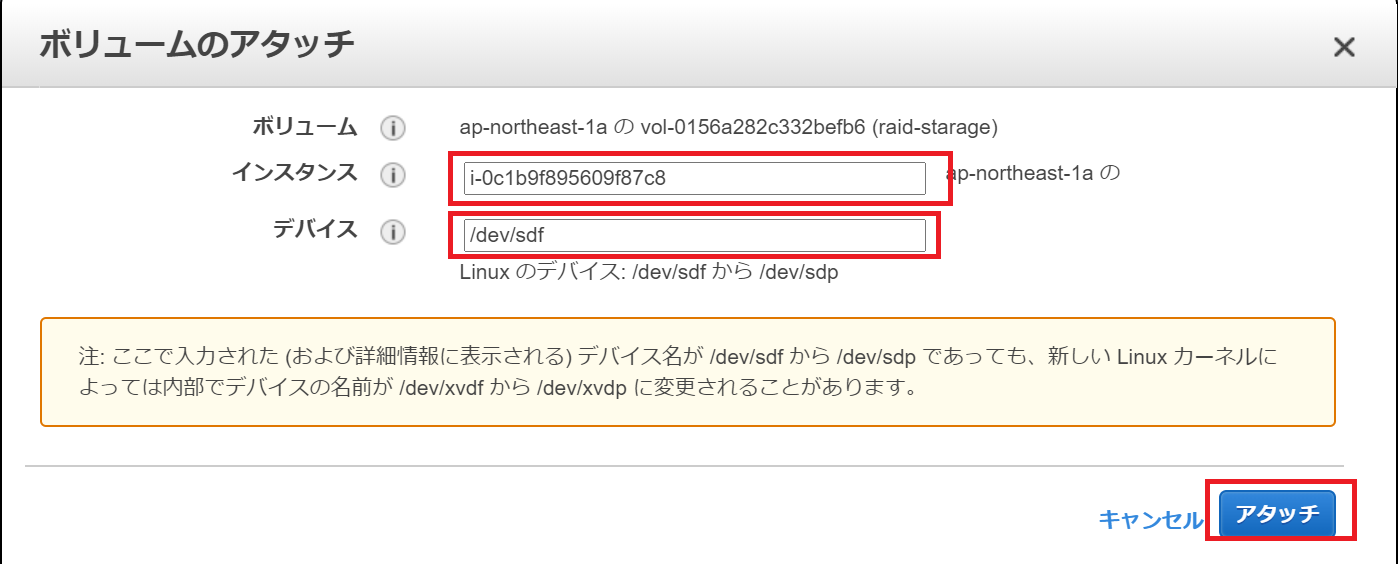
インスタンス欄にはアタッチ対象のEC2インスタンスID、デバイスはdev/sdfとして入力後、アタッチをクリック
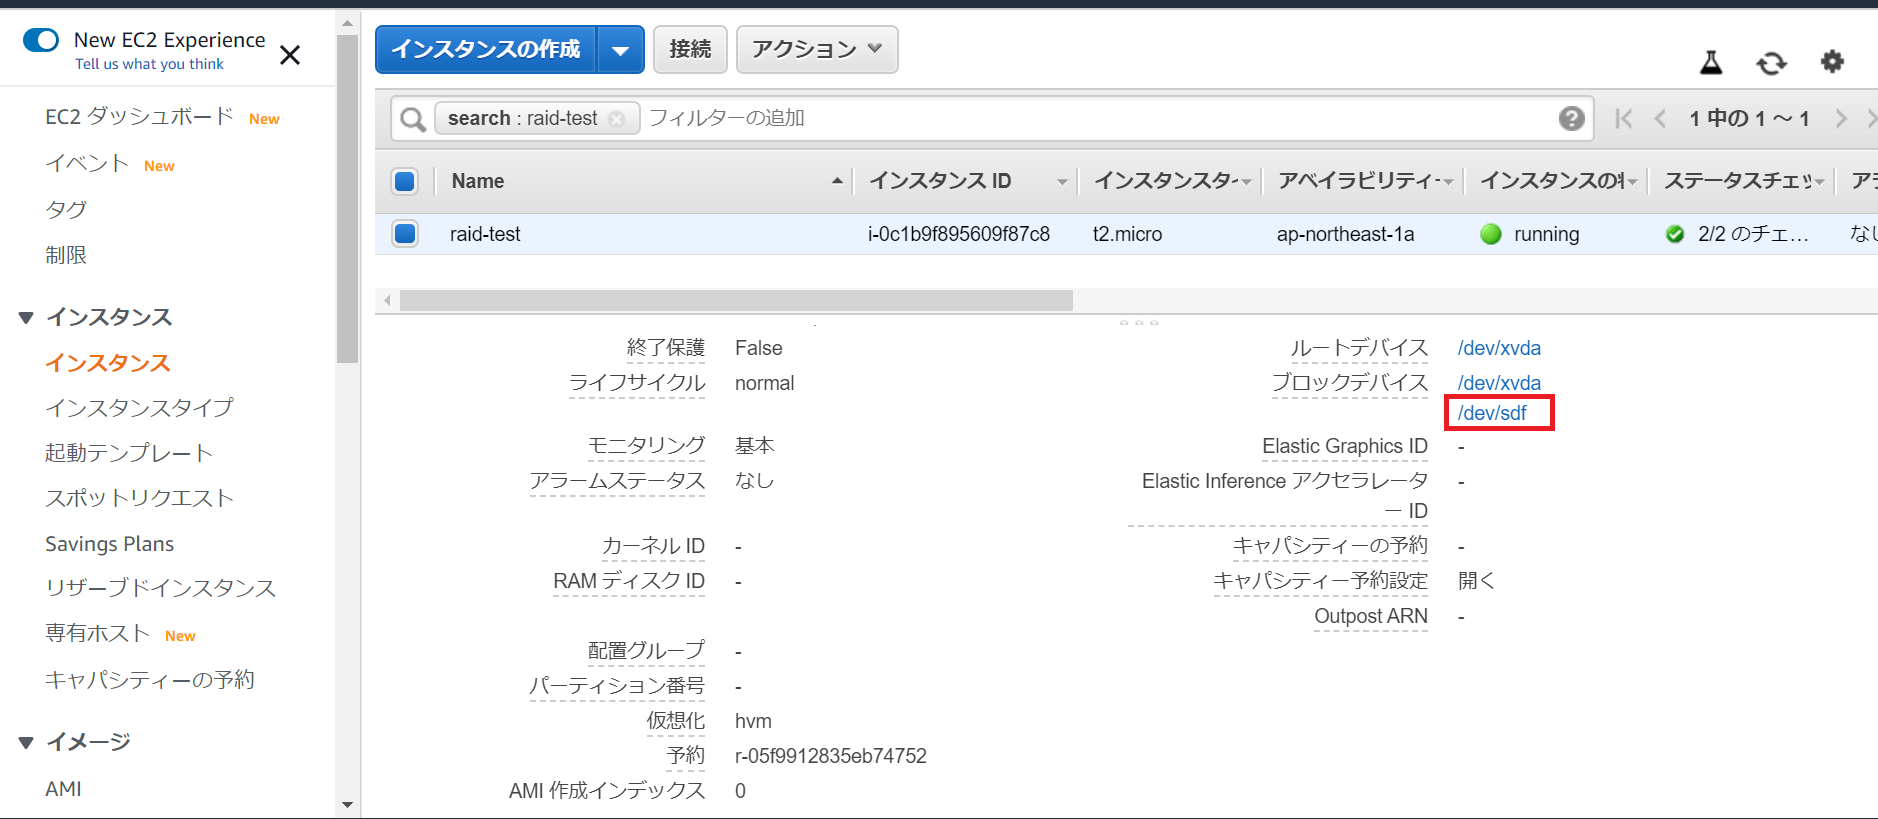
アタッチを実施したインスタンス詳細のブロックデバイスに/dev/sdfが追加されていればOKです。
2.RAID用パーティション構築
対象のEC2にログイン後、ルートユーザスイッチ
sudo su -
パーティション作成を開始します。
fdisk /dev/sdf
プライマリパーティションを3つ(それぞれ100MB)、拡張パーティションを1つ(700MB)、論理パーティションを2つ(それぞれ100MB)作成しました。
拡張パーティション以外のパーティションは全てRAID用のfdとして作成します。
[root@ip-172-31-34-140 ~]# fdisk /dev/sdf

Welcome to fdisk (util-linux 2.30.2).
Changes will remain in memory only, until you decide to write them.
Be careful before using the write command.

Device does not contain a recognized partition table.
Created a new DOS disklabel with disk identifier 0xf261ccfe.

# プライマリパーティションを3つ(それぞれ100MB)作成
Command (m for help): n
Partition type
   p   primary (0 primary, 0 extended, 4 free)
   e   extended (container for logical partitions)
Select (default p): p
Partition number (1-4, default 1): 1
First sector (2048-2097151, default 2048): 2048
Last sector, +sectors or +size{K,M,G,T,P} (2048-2097151, default 2097151): +100M

Created a new partition 1 of type 'Linux' and of size 100 MiB.

Command (m for help): n
Partition type
   p   primary (1 primary, 0 extended, 3 free)
   e   extended (container for logical partitions)
Select (default p): p
Partition number (2-4, default 2): 2
First sector (206848-2097151, default 206848): 206848
Last sector, +sectors or +size{K,M,G,T,P} (206848-2097151, default 2097151): +100M

Created a new partition 2 of type 'Linux' and of size 100 MiB.

Command (m for help): n
Partition type
   p   primary (2 primary, 0 extended, 2 free)
   e   extended (container for logical partitions)
Select (default p): p
Partition number (3,4, default 3): 3
First sector (411648-2097151, default 411648): 411648
Last sector, +sectors or +size{K,M,G,T,P} (411648-2097151, default 2097151): +100M

Created a new partition 3 of type 'Linux' and of size 100 MiB.

# 4つ目のパーティションは拡張パーティション(700MB)として作成
Command (m for help): n
Partition type
   p   primary (3 primary, 0 extended, 1 free)
   e   extended (container for logical partitions)
Select (default e): e

Selected partition 4
First sector (616448-2097151, default 616448): 616448
Last sector, +sectors or +size{K,M,G,T,P} (616448-2097151, default 2097151): +700M

Created a new partition 4 of type 'Extended' and of size 700 MiB.

# 論理パーティションを2つ(それぞれ100MB)作成
Command (m for help): n
All primary partitions are in use.
Adding logical partition 5
First sector (618496-2050047, default 618496): 618496
Last sector, +sectors or +size{K,M,G,T,P} (618496-2050047, default 2050047): +100M

Created a new partition 5 of type 'Linux' and of size 100 MiB.

Command (m for help): n
All primary partitions are in use.
Adding logical partition 6
First sector (825344-2050047, default 825344): 825344
Last sector, +sectors or +size{K,M,G,T,P} (825344-2050047, default 2050047): +100M

Created a new partition 6 of type 'Linux' and of size 100 MiB.

# 拡張パーティション以外の全てのパーティションタイプをRAID用のfdに変更
Command (m for help): t
Partition number (1-6, default 6): 1
Hex code (type L to list all codes): fd

Changed type of partition 'Linux' to 'Linux raid autodetect'.

Command (m for help): t
Partition number (1-6, default 6): 2
Hex code (type L to list all codes): fd

Changed type of partition 'Linux' to 'Linux raid autodetect'.

Command (m for help): t
Partition number (1-6, default 6): 3
Hex code (type L to list all codes): fd

Changed type of partition 'Linux' to 'Linux raid autodetect'.

Command (m for help): t
Partition number (1-6, default 6): 5
Hex code (type L to list all codes): fd

Changed type of partition 'Linux' to 'Linux raid autodetect'.

Command (m for help): t
Partition number (1-6, default 6): 6
Hex code (type L to list all codes): fd

Changed type of partition 'Linux' to 'Linux raid autodetect'.

# 作成したパーティション情報確認
Command (m for help): p
Disk /dev/sdf: 1 GiB, 1073741824 bytes, 2097152 sectors
Units: sectors of 1 * 512 = 512 bytes
Sector size (logical/physical): 512 bytes / 512 bytes
I/O size (minimum/optimal): 512 bytes / 512 bytes
Disklabel type: dos
Disk identifier: 0xf261ccfe

Device     Boot  Start     End Sectors  Size Id Type
/dev/sdf1         2048  206847  204800  100M fd Linux raid autodetect
/dev/sdf2       206848  411647  204800  100M fd Linux raid autodetect
/dev/sdf3       411648  616447  204800  100M fd Linux raid autodetect
/dev/sdf4       616448 2050047 1433600  700M  5 Extended
/dev/sdf5       618496  823295  204800  100M fd Linux raid autodetect
/dev/sdf6       825344 1030143  204800  100M fd Linux raid autodetect

# パーティション情報の内容に問題がなければ設定を反映する
Command (m for help): w
The partition table has been altered.
Calling ioctl() to re-read partition table.
Syncing disks.
適切にパーティション作成が反映されているか確認(※)
fdisk -l
※以下のような出力になっていればOKです(該当ディスクのみ抜粋)
Disk /dev/xvdf: 1 GiB, 1073741824 bytes, 2097152 sectors
Units: sectors of 1 * 512 = 512 bytes
Sector size (logical/physical): 512 bytes / 512 bytes
I/O size (minimum/optimal): 512 bytes / 512 bytes
Disklabel type: dos
Disk identifier: 0xf261ccfe

Device     Boot  Start     End Sectors  Size Id Type
/dev/xvdf1        2048  206847  204800  100M fd Linux raid autodetect
/dev/xvdf2      206848  411647  204800  100M fd Linux raid autodetect
/dev/xvdf3      411648  616447  204800  100M fd Linux raid autodetect
/dev/xvdf4      616448 2050047 1433600  700M  5 Extended
/dev/xvdf5      618496  823295  204800  100M fd Linux raid autodetect
/dev/xvdf6      825344 1030143  204800  100M fd Linux raid autodetect
3.RAID構築
RAID5の構築を行います。
パーティション/dev/sdf1、/dev/sdf2、/dev/sdf3、/dev/sdf5の4デバイスでRAIDアレイ/dev/md0を構築します。
mdadm --create /dev/md0 --level 5 --raid-devices 4 /dev/sdf1 /dev/sdf2 /dev/sdf3 /dev/sdf5
作成されたRAIDアレイの状態を確認(※)します。
cat /proc/mdstat
※出力値は以下のようになっていれば正常にRAIDアレイが作成されています。
[root@ip-172-31-34-140 ~]# cat /proc/mdstat
# RAIDアレイmd0が反映されていて、全デバイスが正常に動作している
Personalities : [raid6] [raid5] [raid4]
md0 : active raid5 xvdf5[4] xvdf3[2] xvdf2[1] xvdf1[0]
      304128 blocks super 1.2 level 5, 512k chunk, algorithm 2 [4/4] [UUUU]

unused devices: <none>
さらにmdadmの設定ファイルmdadm.confにmdadm --detail --scanの出力値を書き込むことで、
システム起動時に今回作成したRAIDアレイmd0を自動認識させることが可能です。(これを実施しないとシステム再起動した際にmd127とかいう謎のRAIDアレイが作成されてしまいました。。)(※)
※以下サイト参考
mdでRAID構築後、再起動すると/dev/md127などのデバイス名がふられる
mdadm --detail --scan >> /etc/mdadm.conf
4.その他RAID管理操作
RAID管理に有用なコマンドをいくつか試してみます。
①RAIDアレイの情報表示
# mdadm --query [RAIDアレイ名] //RAIDアレイの簡単な情報表示
# mdadm --query /dev/md0
/dev/md0: 297.00MiB raid5 4 devices, 0 spares. Use mdadm --detail for more detail.

# mdadm --detail [RAIDアレイ名] //RAIDアレイの詳細な情報表示
# mdadm --detail /dev/md0
/dev/md0:
           Version : 1.2
     Creation Time : Tue Aug 25 09:10:58 2020
        Raid Level : raid5
        Array Size : 304128 (297.00 MiB 311.43 MB)
     Used Dev Size : 101376 (99.00 MiB 103.81 MB)
      Raid Devices : 4
     Total Devices : 4
       Persistence : Superblock is persistent

       Update Time : Tue Aug 25 09:11:03 2020
             State : clean
    Active Devices : 4
   Working Devices : 4
    Failed Devices : 0
     Spare Devices : 0

            Layout : left-symmetric
        Chunk Size : 512K

Consistency Policy : resync

              Name : 0
              UUID : 32f69237:8d14f43a:29cfa390:77b62f43
            Events : 18

    Number   Major   Minor   RaidDevice State
       0     202       81        0      active sync   /dev/sdf1
       1     202       82        1      active sync   /dev/sdf2
       2     202       83        2      active sync   /dev/sdf3
       4     202       85        3      active sync   /dev/sdf5
②RAIDアレイへの予備デバイス追加
作成したRAIDアレイに予備デバイスとして/dev/sdf6を追加してみます。
mdadm --manage /dev/md0 -a /dev/sdf6
xvdf6[5](S)というエントリが追加され、/dev/sdf6が予備デバイスとして追加されたことが分かります。
[root@ip-172-31-34-140 ~]# cat /proc/mdstat
Personalities : [raid6] [raid5] [raid4]
md0 : active raid5 xvdf6[5](S) xvdf5[4] xvdf3[2] xvdf2[1] xvdf1[0]
      304128 blocks super 1.2 level 5, 512k chunk, algorithm 2 [4/4] [UUUU]

unused devices: <none>
③予備デバイスへのフェイルオーバー
RAID構成デバイスに障害が発生した場合、不良マークを付けることで、自動的に予備デバイスへのフェイルオーバーを実施することが可能です。
/dev/sdf5に不良マークをつけます。
mdadm --manage /dev/md0 -f /dev/sdf5
xvdf5[4](F)で/dev/sdf5に不良マークがついており、代わりに先ほど追加した予備デバイス/dev/sdf6がxvdf6[5]でアクティブになっていることがわかります。
[root@ip-172-31-34-140 ~]# cat /proc/mdstat
Personalities : [raid6] [raid5] [raid4]
md0 : active raid5 xvdf6[5] xvdf5[4](F) xvdf3[2] xvdf2[1] xvdf1[0]
      304128 blocks super 1.2 level 5, 512k chunk, algorithm 2 [4/3] [UUU_]
      [==================>..]  recovery = 91.4% (93500/101376) finish=0.0min speed=31166K/sec

unused devices: <none>
④RAIDアレイからデバイスを削除
不良マークをつけた/dev/sdf5をRAIDアレイから削除します。
mdadm --manage /dev/md0 -r /dev/sdf5