SAMに移行する対象のモジュール
python-example-extensionにアップされているこちらのモジュールですが、AWS Command Line Interfaceベースの手順になっているので、こちらをAWS SAMベースに置き換えるのを目標にしたいと思います。
まず、元々のモジュールを確認しておきます。
├── extensions
│   └── python-example-extension
└── python-example-extension
    ├── extension.py
    └── requirements.txt
- extensions
- コンパイル言語やシェルスクリプトではなく、スクリプト言語であるPythonを実行対象とするため、一度
python-example-extensionというシェルスクリプトを介してpythonスクリプトを実行している
- コンパイル言語やシェルスクリプトではなく、スクリプト言語であるPythonを実行対象とするため、一度
- python-example-extension
- extensionの実態となるpythonファイルの配置場所。
python-example-extensionから間接的に実行されている。 - requirements.txtにextensions側で必要となる依存関係を記述。
- extensionの実態となるpythonファイルの配置場所。
これを、README.mdの手順にしたがっていくと、Lambda LayerをAWS CLIベースで作成できます。
SAMに移行する手順
今回は以下の手順でSAMへの移行をしたいと思います。
- SAMをインストールし、最新版にしておく
- SAMプロジェクトを作成
- SAM templateにExtension Layerを追記
- makefile作成
- build & deployし動作確認
SAMへ移行してみよう
SAMをインストールし、最新版にしておく
今回利用したSAMのversionを確認しておきます。
$ sam --version
SAM CLI, version 1.13.2
SAMのversionが古い場合はupgradeしておきましょう。
brew upgrade aws-sam-cli
SAMプロジェクトを作成
まず、python3.8のランタイムでプロジェクト雛形を作ります。
Lambda関数本体のランタイム言語とExtensionsの言語が異なっていても大丈夫です。
Extensionsは関数本体がスクリプト言語でも、コンパイル言語で実行するのをお勧めしています。
$ sam init -r python3.8
Which template source would you like to use?
	1 - AWS Quick Start Templates
	2 - Custom Template Location
Choice: 1
What package type would you like to use?
	1 - Zip (artifact is a zip uploaded to S3)
	2 - Image (artifact is an image uploaded to an ECR image repository)
Package type: 1

Project name [sam-app]: xxxxxxxxx

Cloning app templates from https://github.com/aws/aws-sam-cli-app-templates

AWS quick start application templates:
	1 - Hello World Example
	2 - EventBridge Hello World
	3 - EventBridge App from scratch (100+ Event Schemas)
	4 - Step Functions Sample App (Stock Trader)
	5 - Elastic File System Sample App
Template selection: 1

    -----------------------
    Generating application:
    -----------------------
    Name: xxxxxxxxx
    Runtime: python3.8
    Dependency Manager: pip
    Application Template: hello-world
    Output Directory: .

    Next steps can be found in the README file at README.md
このままだと、hello world感が強いので、階層をrenameしておきます。
├── src
│   ├── __init__.py
│   ├── app.py
│   └── requirements.txt
└── template.yaml
hello_world を src にrenameして、template.yamlも合わせて内容を書き換えました。
今回 API Gatewayからの呼び出しも不要なので、template.yamlからEvent関連も消しておきます。(関数名も適宜妥当な名前に変更しておきます)
AWSTemplateFormatVersion: '2010-09-09'
Transform: AWS::Serverless-2016-10-31
Description: >
  python-extension

Globals:
  Function:
    Timeout: 3

Resources:
  PythonExtensionFunction:
    Type: AWS::Serverless::Function
    Properties:
      CodeUri: src/
      Handler: app.lambda_handler
      Runtime: python3.8

Outputs:
  PythonExtensionFunction:
    Description: "PythonExtensionFunction ARN"
    Value: !GetAtt PythonExtensionFunction.Arn
  PythonExtensionFunctionIamRole:
    Description: "Implicit IAM Role created for PythonExtensionFunction"
    Value: !GetAtt PythonExtensionFunctionRole.Arn
ここまでは至ってシンプルですね。
SAM templateにExtension Layerを追記
Type: AWS::Serverless::LayerVersion リソースを作成し、ローカルのlayerディレクトリをビルド対象にするように記述します。
そして、Lambda関数リソースから!Ref PythonExtensionLayerとして参照します。
  PythonExtensionFunction:
    Type: AWS::Serverless::Function
    Properties:
      CodeUri: src/
      Handler: app.lambda_handler
      Runtime: python3.8
      Layers:
      - !Ref PythonExtensionLayer

  PythonExtensionLayer:
    Type: AWS::Serverless::LayerVersion
    Properties:
      Description: PythonExtensionLayer description
      ContentUri: 'layer/'
      CompatibleRuntimes:
        - python3.8
    Metadata:
      BuildMethod: makefile
Metadata として、BuildMethod: makefileを指定していますが、通常のPython Layerのように /opt/python に展開するのではなく、/opt/extensions に展開しておきたいため、makefile経由でカスタマイズできるようにしておきます。(BuildMethod: python3.8 を記述した場合は、自動で/opt/pythonに展開されます)
元々のgithubに置いてあったpython-example-extensionを、layer ディレクトリ配下にコピーしておきます。
├── layer
│   ├── extensions
│   │   └── python-extension
│   ├── makefile
│   └── python-extension
│       ├── extension.py
│       └── requirements.txt
├── src
│   ├── __init__.py
│   ├── app.py
│   └── requirements.txt
└── template.yaml
makefileをlayerディレクトリ配下に配置します。BuildMethod: makefileを指定してあるので、このmakefileが sam build 時にビルド方法として採用されます。
makefile作成
makefileの中身を仕上げていきましょう。
build-PythonExtensionLayer:
	cp -r extensions $(ARTIFACTS_DIR)
	cp -r python-extension $(ARTIFACTS_DIR)
	python3 -m pip install -r python-extension/requirements.txt -t $(ARTIFACTS_DIR)/python-extension
	chmod +x $(ARTIFACTS_DIR)/python-extension/extension.py $(ARTIFACTS_DIR)/extensions/python-extension
buildタスク名であるbuild-PythonExtensionLayer: は、*build-{SAM template上のLayerリソース名}*で命名しておきます。
※ makefileはTABでインデントしておきます。スペースインデントだとエラーになります。
ARTIFACTS_DIRは、アーティファクトの配置先を格納する環境変数です。ビルド後の生成物は、{SAMプロジェクトルートディレクトリ}/.aws-sam/build/ に出力されていますので気になる方は確認してみてください。
ビルドといってもコンパイル言語ではないので、コンパイル実行はせずに、ただディレクトリのコピーだけをしています。Layer用のpython依存関係モジュールもpipでインストールしておきます。
chmod +xで実行権限をシェルスクリプトとpythonファイル共に与えて置くことを忘れないようにしましょう。
build & deployし動作確認
必須ではないですが、Lambda関数本体も少し、改変しておきます。展開されたLayerがどのように配置されているか確認するコードを追記しておきます。
import json
import subprocess

def lambda_handler(event, context):
    command(['ls','-la', '/opt/extensions'])
    command(['ls','-la', '/opt/python-extension'])

    return {
        "statusCode": 200,
        "body": json.dumps({
            "message": "hello world"
        }),
    }

def command(cmd):
    out = subprocess.run(cmd, stdout=subprocess.PIPE)
    print(out.stdout.decode())
あとは、SAMでデプロイまで実行してしまいます。
$ sam validate
/python-extension/python-example-extension/template.yaml is a valid SAM Template

$ sam build
Building codeuri: src/ runtime: python3.8 metadata: {} functions: ['PythonExtensionFunction']
Running PythonPipBuilder:ResolveDependencies
Running PythonPipBuilder:CopySource
Building layer 'PythonExtensionLayer'
Running CustomMakeBuilder:CopySource
Running CustomMakeBuilder:MakeBuild
Current Artifacts Directory : /python-extension/.aws-sam/build/PythonExtensionLayer

Build Succeeded

Built Artifacts  : .aws-sam/build
Built Template   : .aws-sam/build/template.yaml

Commands you can use next
=========================
[*] Invoke Function: sam local invoke
[*] Deploy: sam deploy --guided


$ sam deploy --guided
これでSAM化はいったん終わりです。
動作確認
ローカル実行
$ sam local invoke
Invoking app.lambda_handler (python3.8)
PythonExtensionLayer is a local Layer in the template
Building image...............
Skip pulling image and use local one: samcli/lambda:python3.8-d33c1db95fbe3759436a3cb41.

Mounting /aws-extensions/python-example-extension/.aws-sam/build/PythonExtensionFunction as /var/task:ro,delegated inside runtime container
START RequestId: 2c1f3029-77aa-49a2-99ca-6444d7b48b7c Version: $LATEST
python-extension  launching extension
[python-extension] Registering...
[python-extension] Registered with ID: 58e0440b-300d-491b-a6fb-d77f87144be9
[python-extension] Waiting for event...
[python-extension] Received event: {"eventType": "INVOKE", "deadlineMs": 3217078239798, "requestId": "2c1f3029-77aa-49a2-99ca-6444d7b48b7c", "invokedFunctionArn": "", "tracing": {"type": "X-Amzn-Trace-Id", "value": ""}}
[python-extension] Waiting for event...
total 12
drwxr-xr-x 2 root root 4096 Dec 21 17:12 .
drwxr-xr-x 1 root root 4096 Dec 21 17:15 ..
-rwxr-xr-x 1 root root  359 Dec 21 17:12 python-extension

total 60
drwxr-xr-x 13 root root 4096 Dec 21 17:12 .
drwxr-xr-x  1 root root 4096 Dec 21 17:15 ..
drwxr-xr-x  2 root root 4096 Dec 21 17:12 bin
drwxr-xr-x  3 root root 4096 Dec 21 17:12 certifi
drwxr-xr-x  2 root root 4096 Dec 21 17:12 certifi-2020.12.5.dist-info
drwxr-xr-x  4 root root 4096 Dec 21 17:12 chardet
drwxr-xr-x  2 root root 4096 Dec 21 17:12 chardet-3.0.4.dist-info
-rwxr-xr-x  1 root root 2298 Dec 21 17:12 extension.py
drwxr-xr-x  3 root root 4096 Dec 21 17:12 idna
drwxr-xr-x  2 root root 4096 Dec 21 17:12 idna-2.10.dist-info
drwxr-xr-x  3 root root 4096 Dec 21 17:12 requests
drwxr-xr-x  2 root root 4096 Dec 21 17:12 requests-2.24.0.dist-info
-rw-r--r--  1 root root   16 Dec 21 17:12 requirements.txt
drwxr-xr-x  6 root root 4096 Dec 21 17:12 urllib3
drwxr-xr-x  2 root root 4096 Dec 21 17:12 urllib3-1.25.11.dist-info

END RequestId: 2c1f3029-77aa-49a2-99ca-6444d7b48b7c
REPORT RequestId: 2c1f3029-77aa-49a2-99ca-6444d7b48b7c  Init Duration: 1.09 ms  Duration: 560.56 ms     Billed Duration: 600 ms    Memory Size: 128 MB     Max Memory Used: 128 MB
{"statusCode": 200, "body": "{\"message\": \"hello world\"}"}
SAM Local のコンテナが起動して、ローカル実行してくれています。 Lambda関数のメインプロセス以外にExtensionのプロセスが起動し標準出力されているのが確認できます。
python-extension  launching extension
[python-extension] Registering...
[python-extension] Registered with ID: 58e0440b-300d-491b-a6fb-d77f87144be9
[python-extension] Waiting for event...
[python-extension] Received event: {"eventType": "INVOKE", "deadlineMs": 3217078239798, "requestId": "2c1f3029-77aa-49a2-99ca-6444d7b48b7c", "invokedFunctionArn": "", "tracing": {"type": "X-Amzn-Trace-Id", "value": ""}}
[python-extension] Waiting for event...
ログをみると
- Registering
- Waiting for event
- Received event
- Waiting for event
となっていることがわかります。
この動きは、/python-extension/extension.py の中身を見るとわかりやすいですね。
# !/usr/bin/env python3
# Copyright Amazon.com, Inc. or its affiliates. All Rights Reserved.
# SPDX-License-Identifier: MIT-0

import json
import os
import requests
import signal
import sys
from pathlib import Path


# global variables
# extension name has to match the file's parent directory name)
LAMBDA_EXTENSION_NAME = Path(__file__).parent.name


# custom extension code
def execute_custom_processing(event):
    # perform custom per-event processing here
    print(f"[{LAMBDA_EXTENSION_NAME}] Received event: {json.dumps(event)}", flush=True)


# boiler plate code
def handle_signal(signal, frame):
    # if needed pass this signal down to child processes
    print(f"[{LAMBDA_EXTENSION_NAME}] Received signal={signal}. Exiting.", flush=True)
    sys.exit(0)


def register_extension():
    print(f"[{LAMBDA_EXTENSION_NAME}] Registering...", flush=True)
    headers = {
        'Lambda-Extension-Name': LAMBDA_EXTENSION_NAME,
    }
    payload = {
        'events': [
            'INVOKE',
            'SHUTDOWN'
        ],
    }
    response = requests.post(
        url=f"http://{os.environ['AWS_LAMBDA_RUNTIME_API']}/2020-01-01/extension/register",
        json=payload,
        headers=headers
    )
    ext_id = response.headers['Lambda-Extension-Identifier']
    print(f"[{LAMBDA_EXTENSION_NAME}] Registered with ID: {ext_id}", flush=True)

    return ext_id


def process_events(ext_id):
    headers = {
        'Lambda-Extension-Identifier': ext_id
    }
    while True:
        print(f"[{LAMBDA_EXTENSION_NAME}] Waiting for event...", flush=True)
        response = requests.get(
            url=f"http://{os.environ['AWS_LAMBDA_RUNTIME_API']}/2020-01-01/extension/event/next",
            headers=headers,
            timeout=None
        )
        event = json.loads(response.text)
        if event['eventType'] == 'SHUTDOWN':
            print(f"[{LAMBDA_EXTENSION_NAME}] Received SHUTDOWN event. Exiting.", flush=True)
            sys.exit(0)
        else:
            execute_custom_processing(event)


def main():
    # handle signals
    signal.signal(signal.SIGINT, handle_signal)
    signal.signal(signal.SIGTERM, handle_signal)

    # execute extensions logic
    extension_id = register_extension()
    process_events(extension_id)


if __name__ == "__main__":
    main()
main関数内で以下のシグナルを受け取った時に子プロセスを起動していた場合は、gracefulにexitするための記述をhandle_signalに記述しておきます。
2 SIGINT キーボードからの割り込み (Interrupt)
15 SIGTERM 終了 (termination) シグナル
    signal.signal(signal.SIGINT, handle_signal)
    signal.signal(signal.SIGTERM, handle_signal)
そしてregister_extensionでExtensionの登録をして、process_eventsでイベントを待ち受けます。
    # execute extensions logic
    extension_id = register_extension()
    process_events(extension_id)
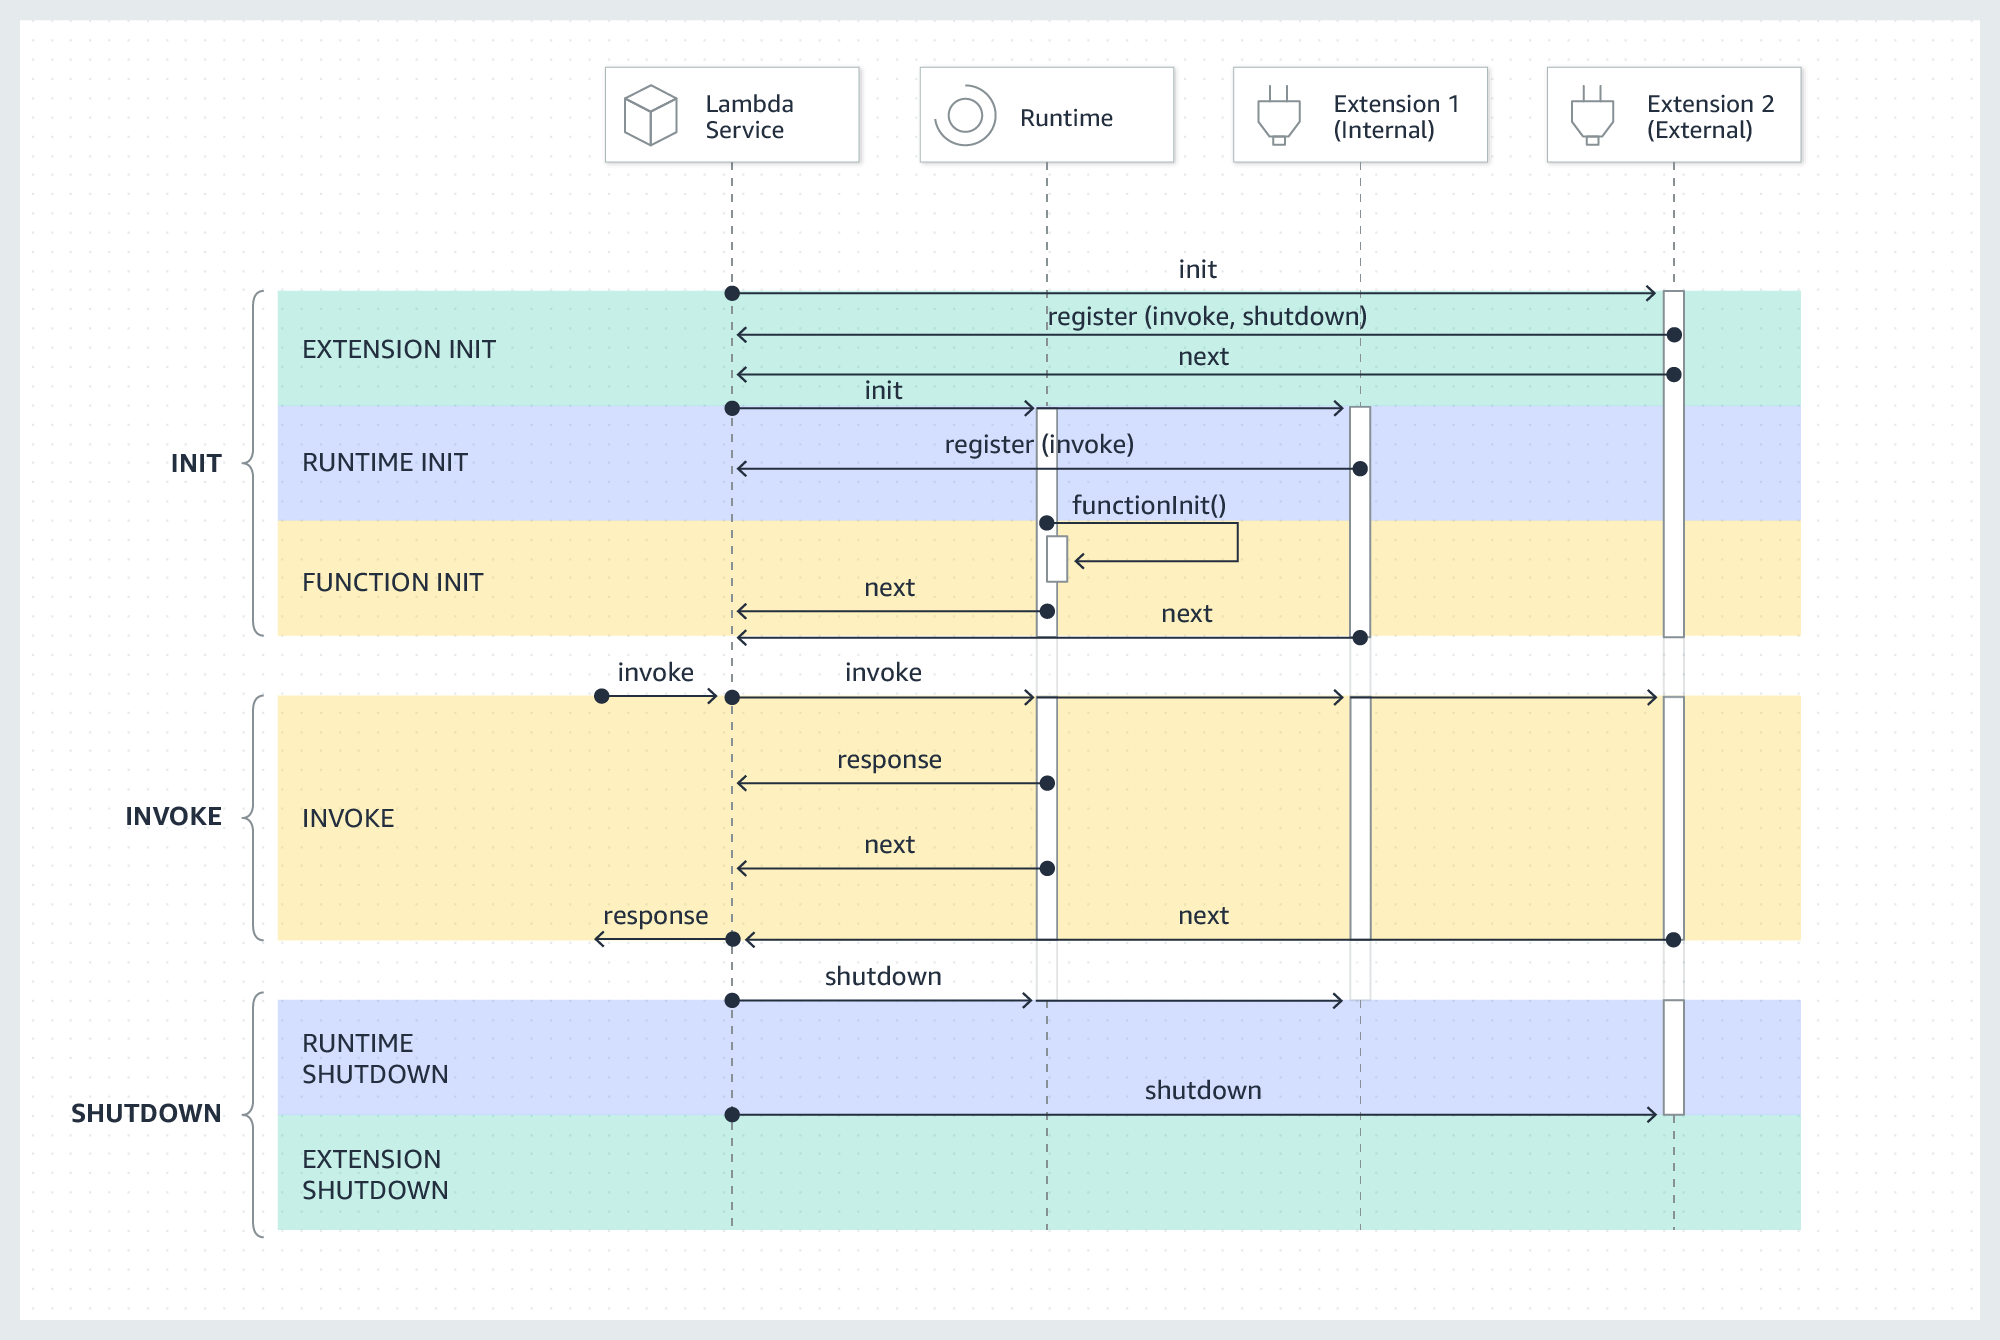
実態は、登録時にLambdaサービスの register APIを呼び出しており、
http://{os.environ['AWS_LAMBDA_RUNTIME_API']}/2020-01-01/extension/register
イベントの待ち受けはLambdaサービスの next APIを呼び出しています。
http://{os.environ['AWS_LAMBDA_RUNTIME_API']}/2020-01-01/extension/event/next
各APIコール時に標準出力しているので
ログをみると
- Registering
- Waiting for event
- Received event
- Waiting for event
となっているのですね。動きがわかりやすいですね。
詳細なシーケンス図に関してAWS公式Docが説明してくれています。
まとめ
AWS SAMを利用することによりExtensionsの管理も楽になります。Extensionsを修正したあとのデプロイサイクルを高速化して、よりよいイテレーションをしてみましょう。