・はじめに
PowerShellという言語を知っていますか?
あまり使ったことのある人は多くないと思いますが、Windowsに標準で入っており、.NETの機能も扱えたりして結構多機能です
ちょっとした自作ツールならPowerShellで十分作成可能です
Windowsの標準環境(外部プログラムインストール禁止)でプログラミングをするとなった場合
C#, VB.NET, PowerShell, bat, VBScript(廃止が予告されている), VBA(厳密には標準ではないが大抵の職場で使える), JavaScript(ブラウザ内のみ), JScript
この選択肢から選ぶことになるのですが
C#・VB.NETはコンパイラ言語で開発のハードルが高め、JScript・VBS・VBAは言語としての機能が現代の言語に比べ貧弱、JavaScriptはブラウザ内のみ、batも用途が特殊で言語としての機能はさらに制約ありと
スクリプト言語で現代の言語と遜色ないプログラミング言語となるとPowerShellに絞られます
そしてPowerShellは.NETを扱えるのでGUI(WinForms)も作成することができます
しかし、C#やVBAのように専用のフォーム開発ツールはなく手でGUI作成となるとそこそこ大変です
PowerShellはC#と同じ.NETのGUIを作成しているのでVisual Studioで作成したC#のフォームを機械的に変換という裏技も使えますが、Visual Studioはインストールできないという仮定で話を進めていきます
また、Excel VBAのほうがGUIの作成は手軽にできます
そこで以前作成したExcel VBAからPythonのTkinterへの変換ツールをPowerShell用に改造しました
ツールはGitHubで公開しています
https://github.com/GUI-Conversion-Tools/VBAForm2PowerShell
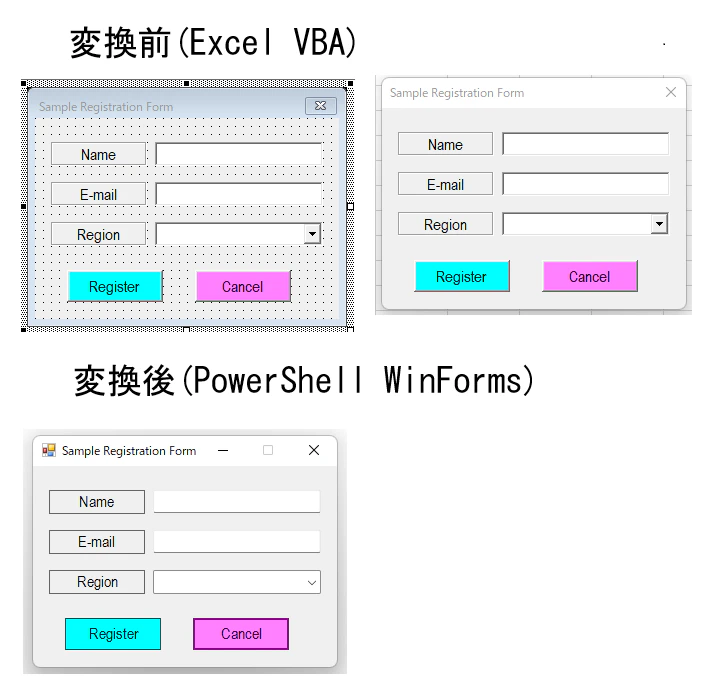
変換後のイメージは以下のようになります
・動作要件
OS・・・Windows
(10/11で動作確認してますがもっと古くても動くと思います)
Excelバージョン・・・Excel 2010以降 (32bit/64bit両対応)
※マルチモニター環境の場合各モニターで異なるDPIが混在しているとウィンドウサイズの計算ロジックに影響が出るため、
一時的にシングルモニターにするかすべてのモニターの拡大率を統一した上で実行してください(解像度の違いは問題なし)
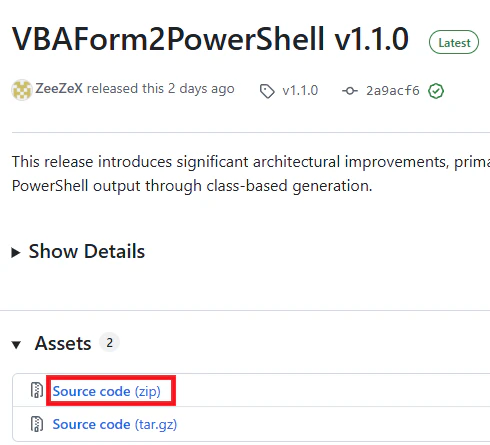
・1.ツールの導入
ここからVBAForm2PowerShellの最新版の「Source code (zip)」をダウンロードします、解凍すると.basファイルが入っておりそのファイルを後に使用します
ダウンロードが禁止されている場合はここにアクセスして全選択→メモ帳にコピペして.basファイルとして保存してください(コピペはOKと仮定します)
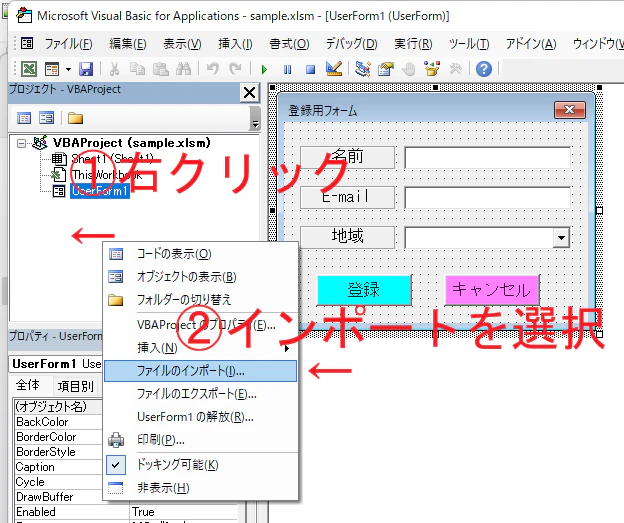
・2.basファイルのインポート
VBA Projectと書いてある場所の何もないところを右クリックしてファイルをインポートしてください
・3.変換コマンドを実行する
イミディエイトウィンドウにコマンドを入力してEnterキーを押すとPowerShellスクリプト(.ps1)が生成されます
コマンドはこれです
「ユーザーフォームのオブジェクト名」のところは変換したいユーザーフォームのオブジェクト名に合わせて変えます
Call ConvertForm2PS(ユーザーフォームのオブジェクト名)
画像の場合はオブジェクト名が「UserForm1」なのでユーザーフォームのオブジェクト名のところは「UserForm1」に置き換えます
Call ConvertForm2PS(UserForm1)

イミディエイトウィンドウの使い方がよくわからない人は以下のように標準モジュールにSubプロシージャを作成して実行する形でもかまいません
Sub test()
    Call ConvertForm2PS(UserForm1)
End Sub
この時点でエラーが発生する場合はオブジェクト名に間違いがないか再度確認をお願いします
また、第二引数をTrueにすると実行ポリシー関係なくダブルクリックで起動できるbatファイルとして生成されます
' batファイルとして生成
Call ConvertForm2PS(UserForm1, True)
ConvertForm2PS には以下の引数を設定できます
v1.1.0より複数フォームの同時変換とクラス化に対応しました
| 引数 | 型 | 説明 |
|---|---|---|
frms |
Variant |
必須 変換対象の UserFormオブジェクトまたはUserFormオブジェクトの配列を指定 |
saveAsBat |
Boolean |
省略可能 (デフォルト: False).Trueにした場合PowerShellスクリプトをダブルクリックで起動可能な.batファイルとして保存する |
useCls |
Boolean |
省略可能 (デフォルト: False).Trueにした場合生成したPowerShellコードにおいて各フォームをクラス化する frmsが配列の場合は自動的にTrueに設定される |
noMainLoop |
Boolean |
省略可能 (デフォルト: False).Trueにした場合生成したPowerShellスクリプトに.ShowDialog()を含めなくする |
' 実行例: 単一のフォームを変換
Call ConvertForm2PS(UserForm1)

' 実行例: 単一のフォームを変換 (クラス化を行う)
Call ConvertForm2PS(UserForm1, useCls:=True)

' 実行例: 複数のフォームを変換 (自動的にクラス化される)
Call ConvertForm2PS(Array(UserForm1, UserForm2))
noMainLoopは生成スクリプトを別のファイルでモジュールとして扱い、importした側で.ShowDialog()を書きたい場合に使用することを想定しています
・4.変換成功可否を確認

変換に成功したら「Saved: 保存先」のメッセージが出現し.ps1または.batファイルが保存されます、保存先はExcelブックと同じフォルダに設定されています
失敗した場合は「Control type "XXXX" is not supported」→「Conversion failed」と出ます
その場合、XXXXに当たる部分のコントロールタイプは変換非対応なので該当のコントロールを削除してからもう一度コマンドを実行してください
対応しているコントロールは以下の通りです
| VBA Formのクラス | WinFormsのクラス |
|---|---|
Label |
Label |
CommandButton |
Button |
Frame (Captionなし) |
Panel |
Frame (Captionあり) |
GroupBox |
TextBox |
TextBox |
SpinButton |
NumericUpDown |
ListBox |
ListBox |
CheckBox |
CheckBox |
ToggleButton |
CheckBox( Appearance = [System.Windows.Forms.Appearance]::Button) |
OptionButton |
RadioButton |
Image |
PictureBox |
ScrollBar |
HScrollBar / VScrollBar
|
ComboBox |
ComboBox |
MultiPage |
TabControl |
・5.ファイルを実行してみる
実行してVBAと同じ見た目か確認します
違う場合は後述の「VBAと見た目の表示が異なる場合の対処法」を参照してください
この時点ではボタンには何もイベントは登録されていません
・6.ボタンの動作を設定する
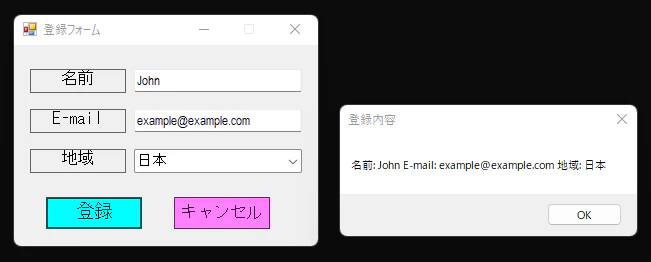
「登録」ボタンを押したらメッセージボックスに登録内容を表示するようにしてみます
function ShowRegistrationInfo($name, $email, $region){
    $registrationInfo = "名前: $name E-mail: $email 地域: $region"
    [System.Windows.Forms.MessageBox]::Show($registrationInfo, "登録内容")
}
生成されたコードと組み合わせます
設定内容は.ShowDialog()の直前に記述するのがおすすめです
動作の定義をこの位置で行うのはレイアウトを再調整する場合に再度生成したコードへコピペが楽になるためです
Add-Type -AssemblyName System.Windows.Forms
Add-Type -AssemblyName System.Drawing
[System.Windows.Forms.Application]::EnableVisualStyles()

$UserForm1 = New-Object System.Windows.Forms.Form
$UserForm1.Text = "登録フォーム"
$UserForm1.ClientSize = New-Object System.Drawing.Size(304, 201)
$UserForm1.MaximizeBox = $false
$UserForm1.FormBorderStyle = [System.Windows.Forms.FormBorderStyle]::FixedSingle
$UserForm1.BackColor = [System.Drawing.ColorTranslator]::FromHtml("#F0F0F0")
$UserForm1.AutoScaleMode = [System.Windows.Forms.AutoScaleMode]::None
$UserForm1.Cursor = $null

$CommandButton2 = New-Object System.Windows.Forms.Button
$UserForm1.Controls.Add($CommandButton2)
$CommandButton2.Location = New-Object System.Drawing.Point(160, 152)
$CommandButton2.Size = New-Object System.Drawing.Size(96, 32)
$CommandButton2.ForeColor = "#000000"
$CommandButton2.BackColor = "#FF80FF"
$CommandButton2.Text = "キャンセル"
$CommandButton2.FlatStyle = [System.Windows.Forms.FlatStyle]::Popup
$CommandButton2.Font = New-Object System.Drawing.Font("MS ゴシック", 12)
$CommandButton2.Cursor = $null

$CommandButton1 = New-Object System.Windows.Forms.Button
$UserForm1.Controls.Add($CommandButton1)
$CommandButton1.Location = New-Object System.Drawing.Point(32, 152)
$CommandButton1.Size = New-Object System.Drawing.Size(96, 32)
$CommandButton1.ForeColor = "#000000"
$CommandButton1.BackColor = "#00FFFF"
$CommandButton1.Text = "登録"
$CommandButton1.FlatStyle = [System.Windows.Forms.FlatStyle]::Popup
$CommandButton1.Font = New-Object System.Drawing.Font("Arial Narrow", 12)
$CommandButton1.Cursor = $null

$ComboBox1 = New-Object System.Windows.Forms.ComboBox
$UserForm1.Controls.Add($ComboBox1)
$ComboBox1.Location = New-Object System.Drawing.Point(120, 104)
$ComboBox1.Size = New-Object System.Drawing.Size(168, 24)
$ComboBox1.ForeColor = "#000000"
$ComboBox1.BackColor = "#FFFFFF"
$ComboBox1_items_value = @()
$ComboBox1.Items.AddRange($ComboBox1_items_value)
$ComboBox1.Text = ""
$ComboBox1.Font = New-Object System.Drawing.Font("Arial Narrow", 10)
$ComboBox1.Cursor = $null

$TextBox2 = New-Object System.Windows.Forms.TextBox
$UserForm1.Controls.Add($TextBox2)
$TextBox2.Location = New-Object System.Drawing.Point(120, 64)
$TextBox2.Size = New-Object System.Drawing.Size(168, 24)
$TextBox2.ForeColor = "#000000"
$TextBox2.BackColor = "#FFFFFF"
$TextBox2.Text = ""
$TextBox2.Multiline = $false
$TextBox2.Font = New-Object System.Drawing.Font("Arial Narrow", 10)
$TextBox2.BorderStyle = [System.Windows.Forms.BorderStyle]::Fixed3D
$TextBox2.TextAlign = "Left"
$TextBox2.Cursor = $null

$TextBox1 = New-Object System.Windows.Forms.TextBox
$UserForm1.Controls.Add($TextBox1)
$TextBox1.Location = New-Object System.Drawing.Point(120, 24)
$TextBox1.Size = New-Object System.Drawing.Size(168, 24)
$TextBox1.ForeColor = "#000000"
$TextBox1.BackColor = "#FFFFFF"
$TextBox1.Text = ""
$TextBox1.Multiline = $false
$TextBox1.Font = New-Object System.Drawing.Font("Arial Narrow", 10)
$TextBox1.BorderStyle = [System.Windows.Forms.BorderStyle]::Fixed3D
$TextBox1.TextAlign = "Left"
$TextBox1.Cursor = $null

$Label4 = New-Object System.Windows.Forms.Label
$UserForm1.Controls.Add($Label4)
$Label4.Location = New-Object System.Drawing.Point(16, 104)
$Label4.Size = New-Object System.Drawing.Size(96, 24)
$Label4.ForeColor = "#000000"
$Label4.BackColor = "#F0F0F0"
$Label4.Text = "地域"
$Label4.Font = New-Object System.Drawing.Font("MS ゴシック", 12)
$Label4.BorderStyle = [System.Windows.Forms.BorderStyle]::FixedSingle
$Label4.TextAlign = [System.Drawing.ContentAlignment]::TopCenter
$Label4.Cursor = $null

$Label2 = New-Object System.Windows.Forms.Label
$UserForm1.Controls.Add($Label2)
$Label2.Location = New-Object System.Drawing.Point(16, 64)
$Label2.Size = New-Object System.Drawing.Size(96, 24)
$Label2.ForeColor = "#000000"
$Label2.BackColor = "#F0F0F0"
$Label2.Text = "E-mail"
$Label2.Font = New-Object System.Drawing.Font("MS ゴシック", 12)
$Label2.BorderStyle = [System.Windows.Forms.BorderStyle]::FixedSingle
$Label2.TextAlign = [System.Drawing.ContentAlignment]::TopCenter
$Label2.Cursor = $null

$Label1 = New-Object System.Windows.Forms.Label
$UserForm1.Controls.Add($Label1)
$Label1.Location = New-Object System.Drawing.Point(16, 24)
$Label1.Size = New-Object System.Drawing.Size(96, 24)
$Label1.ForeColor = "#000000"
$Label1.BackColor = "#F0F0F0"
$Label1.Text = "名前"
$Label1.Font = New-Object System.Drawing.Font("MS ゴシック", 12)
$Label1.BorderStyle = [System.Windows.Forms.BorderStyle]::FixedSingle
$Label1.TextAlign = [System.Drawing.ContentAlignment]::TopCenter
$Label1.Cursor = $null

# 関数を定義
function ShowRegistrationInfo($name, $email, $region){
    $registrationInfo = "名前: $name E-mail: $email 地域: $region"
    [System.Windows.Forms.MessageBox]::Show($registrationInfo, "登録内容")
}

# ボタンに関数を紐づける
$CommandButton1.Add_Click({
    $null = ShowRegistrationInfo $TextBox1.Text $TextBox2.Text $ComboBox1.Text
})

$UserForm1.ShowDialog() | Out-Null
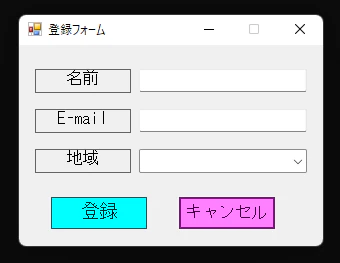
再度実行してボタンを押したら、登録内容がちゃんと表示されました
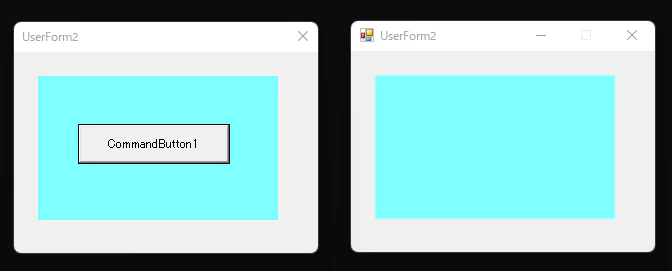
・VBAと見た目の表示が異なる場合の対処法
以下のように、ボタンが隠れてしまう場合があります
これは、VBAのユーザーフォームの前面・背面が変換されたコードに反映されないためです
変換される順番はVBAでの設置順のため、ボタンを先に設置した後にラベルを設置すると隠れてしまいます
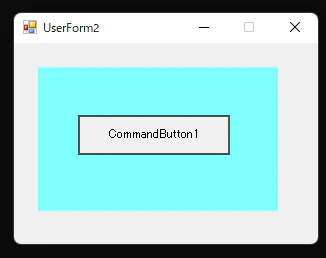
これの解決法は.BringToFront()を使用して前面に部品を持ってくることです
動作設定と同じ位置に以下のコードを記述します
$部品名.BringToFront()
また、逆に背面に部品を配置したい場合は.SendToBack()を使用します
$部品名.SendToBack()
コードに記述すると以下のようになります
Add-Type -AssemblyName System.Windows.Forms
Add-Type -AssemblyName System.Drawing
[System.Windows.Forms.Application]::EnableVisualStyles()

$UserForm2 = New-Object System.Windows.Forms.Form
$UserForm2.Text = "UserForm2"
$UserForm2.ClientSize = New-Object System.Drawing.Size(304, 201)
$UserForm2.MaximizeBox = $false
$UserForm2.FormBorderStyle = [System.Windows.Forms.FormBorderStyle]::FixedSingle
$UserForm2.BackColor = "#F0F0F0"
$UserForm2.AutoScaleMode = [System.Windows.Forms.AutoScaleMode]::None
$UserForm2.Cursor = $null

$Label1 = New-Object System.Windows.Forms.Label
$UserForm2.Controls.Add($Label1)
$Label1.Location = New-Object System.Drawing.Point(24, 24)
$Label1.Size = New-Object System.Drawing.Size(240, 144)
$Label1.ForeColor = "#000000"
$Label1.BackColor = "#80FFFF"
$Label1.Text = ""
$Label1.Font = New-Object System.Drawing.Font("MS UI Gothic", 9)
$Label1.BorderStyle = [System.Windows.Forms.BorderStyle]::None
$Label1.TextAlign = [System.Drawing.ContentAlignment]::TopLeft
$Label1.Cursor = $null

$CommandButton1 = New-Object System.Windows.Forms.Button
$UserForm2.Controls.Add($CommandButton1)
$CommandButton1.Location = New-Object System.Drawing.Point(64, 72)
$CommandButton1.Size = New-Object System.Drawing.Size(152, 40)
$CommandButton1.ForeColor = "#000000"
$CommandButton1.BackColor = "#F0F0F0"
$CommandButton1.Text = "CommandButton1"
$CommandButton1.FlatStyle = [System.Windows.Forms.FlatStyle]::Popup
$CommandButton1.Font = New-Object System.Drawing.Font("MS UI Gothic", 9)
$CommandButton1.Cursor = $null

# ボタンを前面に持ってくる
$CommandButton1.BringToFront()

$UserForm2.ShowDialog() | Out-Null
これで正常に表示されました
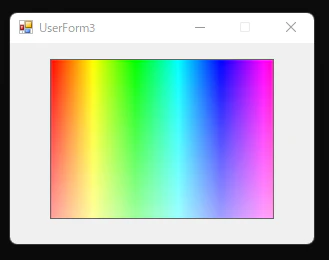
・画像の設定について
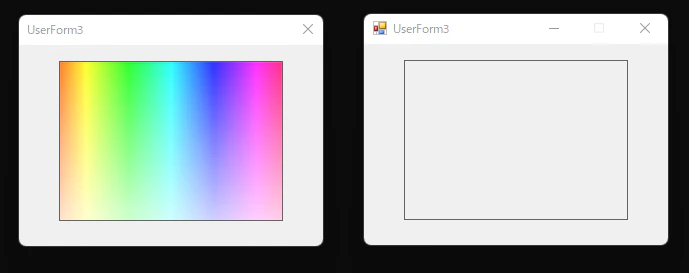
ImageオブジェクトはPictureBoxに変換されますが、設定してある画像までは変換されないので自分で設定を行います
生成されたコードにコメントアウトされた設定用コードがあるのでコメントアウトを解除して設定します
VBAのフォームではbmp画像を設定するのに対して、WinFormsではbmp, png, jpgどれも設定できます
# コメントアウトを解除して画像のPathを設定

#$Image1.Image = [System.Drawing.Image]::FromFile("C:\path\to\your\image.png")
#$Image1.SizeMode = [System.Windows.Forms.PictureBoxSizeMode]::Normal

# ↓ ↓ ↓

$Image1.Image = [System.Drawing.Image]::FromFile("C:\image.bmp")
$Image1.SizeMode = [System.Windows.Forms.PictureBoxSizeMode]::Normal
Add-Type -AssemblyName System.Windows.Forms
Add-Type -AssemblyName System.Drawing
[System.Windows.Forms.Application]::EnableVisualStyles()

$UserForm3 = New-Object System.Windows.Forms.Form
$UserForm3.Text = "UserForm3"
$UserForm3.ClientSize = New-Object System.Drawing.Size(304, 201)
$UserForm3.MaximizeBox = $false
$UserForm3.FormBorderStyle = [System.Windows.Forms.FormBorderStyle]::FixedSingle
$UserForm3.BackColor = "#F0F0F0"
$UserForm3.AutoScaleMode = [System.Windows.Forms.AutoScaleMode]::None
$UserForm3.Cursor = $null

$Image1 = New-Object System.Windows.Forms.PictureBox
$UserForm3.Controls.Add($Image1)
$Image1.Location = New-Object System.Drawing.Point(40, 16)
$Image1.Size = New-Object System.Drawing.Size(224, 160)
$Image1.BackColor = "#F0F0F0"
$Image1.BorderStyle = [System.Windows.Forms.BorderStyle]::FixedSingle
$Image1.Cursor = $null
$Image1.Image = [System.Drawing.Image]::FromFile("C:\image.bmp")
$Image1.SizeMode = [System.Windows.Forms.PictureBoxSizeMode]::Normal


$UserForm3.ShowDialog() | Out-Null
これで正常に表示されました
表示方法は以下の中から変更できます
Normal	        画像をそのままのサイズで表示(PictureBoxの左上基準)
StretchImage	PictureBoxのサイズに合わせて画像を引き伸ばす/縮める
AutoSize	    画像のサイズに合わせてPictureBox自体のサイズが変わる
CenterImage	    画像を中央に配置して表示(サイズは変更しない)
Zoom	        縦横比を維持したまま、PictureBoxに収まる最大サイズで表示