以前この記事で公開したVBAのユーザーフォームをTkinterのコードに変換するツール(VBAForm2Tkinter)の使い方を解説します
作成から関数の設定までを行います
このツールを使用すれば、ドラッグ&ドロップのみで簡単にGUIのパーツ配置を行うことが可能です
ツールはGitHubで公開しています
https://github.com/GUI-Conversion-Tools/VBAForm2Tkinter
・動作要件
OS・・・Windows
(10/11で動作確認してますがもっと古くても動くと思います)
Excelバージョン・・・Excel 2010以降 (32bit/64bit両対応)
※マルチモニター環境の場合各モニターで異なるDPIが混在しているとウィンドウサイズの計算ロジックに影響が出るため、
一時的にシングルモニターにするかすべてのモニターの拡大率を統一した上で実行してください(解像度の違いは問題なし)
1.ユーザーフォームの作成
まず、VBAで普通にユーザーフォームを作成します

2.ツールをダウンロード
ここから最新版のSource code (zip)をダウンロードして解凍してください
2026/3/29現在の時点では1.3.2が最新版です

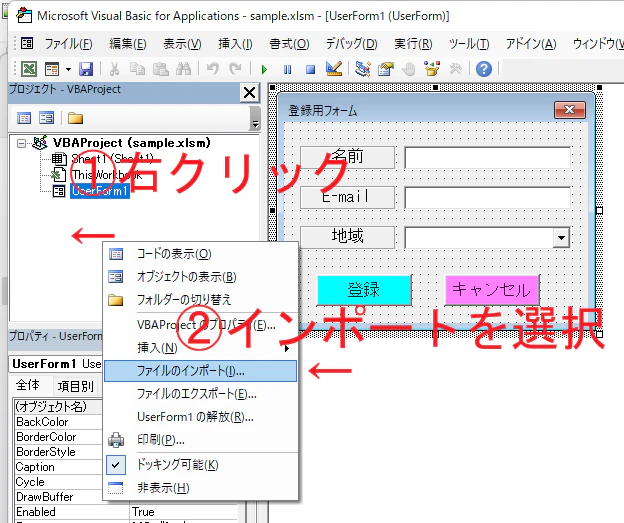
3.VBAForm2Tkinter.basのインポート
VBA Projectと書いてある場所の何もないところを右クリックしてファイルをインポートしてください
さっき解凍したファイルにVBAForm2Tkinter.basが入っているのでそれをインポートします

4.変換コマンドを実行する
イミディエイトウィンドウにコマンドを入力してEnterキーを押してください
コマンドはこれです
「ユーザーフォームのオブジェクト名」のところは変換したいユーザーフォームのオブジェクト名に合わせて変えます
Call ConvertForm2Tkinter(ユーザーフォームのオブジェクト名)
画像の場合はオブジェクト名が「UserForm1」なのでユーザーフォームのオブジェクト名のところは「UserForm1」に置き換えます
Call ConvertForm2Tkinter(UserForm1)

イミディエイトウィンドウの使い方がよくわからない人は以下のように標準モジュールにSubプロシージャを作成して実行する形でもかまいません
Sub test()
    Call ConvertForm2Tkinter(UserForm1)
End Sub
この時点でエラーが発生する場合はオブジェクト名に間違いがないか再度確認をお願いします
ConvertForm2Tkinterには以下の引数を設定できます
v1.3.0より複数フォームの同時変換とクラス化に対応しました
| 引数 | 型 | 説明 |
|---|---|---|
frms |
Variant |
必須 変換対象の UserFormオブジェクトまたはUserFormオブジェクトの配列を指定 |
useCls |
Boolean |
省略可能 (デフォルト: False) Trueにした場合生成したPythonコードにおいて各フォームをクラス化する frmsが配列の場合は自動的にTrueに設定される |
noMainLoop |
Boolean |
省略可能 (デフォルト: False) Trueにした場合生成したPythonコードに.mainloop()を含めなくする |
' 実行例: 単一のフォームを変換
Call ConvertForm2Tkinter(UserForm1)

' 実行例: 単一のフォームを変換 (クラス化を行う)
Call ConvertForm2Tkinter(UserForm1, useCls:=True)

' 実行例: 複数のフォームを変換 (自動的にクラス化される)
Call ConvertForm2Tkinter(Array(UserForm1, UserForm2))
noMainLoopは生成スクリプトを別のpyファイルでモジュールとして扱い、importした側で.mainloop()を書きたい場合に使用することを想定しています
5.変換成功可否を確認
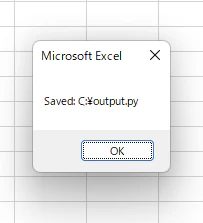
変換に成功したら「Saved: 保存先」のメッセージが出現しpyファイルが保存されます、保存先はExcelブックと同じフォルダに設定されています
失敗した場合は「Control type "XXXX" is not supported」→「Conversion failed」と出ます
その場合、XXXXに当たる部分のコントロールタイプは変換非対応なので該当のコントロールを削除してからもう一度コマンドを実行してください
対応しているコントロールは以下の通りです
v1.2.0よりToggleButtonの変換に対応しました
| VBA Formのクラス | Tkinterのクラス |
|---|---|
Label |
tk.Label |
CommandButton |
tk.Button |
Frame (Captionなし) |
tk.Frame |
Frame (Captionあり) |
tk.LabelFrame |
TextBox (MultiLine=False) |
tk.Entry |
TextBox (MultiLine=True) |
tk.Text |
SpinButton |
tk.Spinbox |
ListBox |
tk.Listbox |
CheckBox |
tk.Checkbutton |
ToggleButton |
tk.Checkbutton(indicatoron=0) |
OptionButton |
tk.Radiobutton |
Image |
tk.Canvas |
ScrollBar |
ttk.Scale |
ComboBox |
ttk.Combobox |
MultiPage |
ttk.Notebook |
6.pyファイルを実行してみる
実行してVBAと同じ見た目か確認します
違う場合は後述の「VBAと見た目の表示が異なる場合の対処法」を参照してください
この時点ではボタンには何もイベントは登録されていません

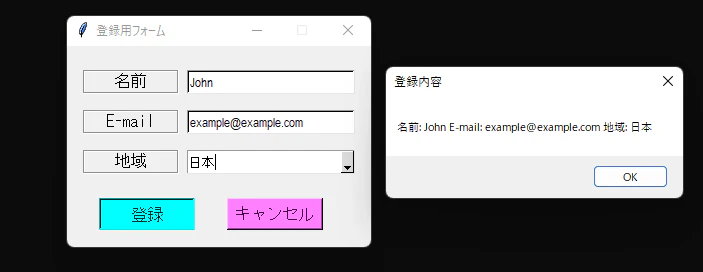
7.ボタンの動作を設定する
「登録」ボタンを押したらメッセージボックスに登録内容を表示するようにしてみます
import ctypes

def show_registration_info(name, email, region):
    registration_info = f"名前: {name} E-mail: {email} 地域: {region}"
    ctypes.windll.user32.MessageBoxW(None, registration_info, "登録内容", None)
生成されたコードと組み合わせます
設定内容は.mainloop()の直前に記述するのがおすすめです
レイアウトを再調整する場合に再度生成したコードからtk.tk()以下、.mainloop()の直前をコピペすれば動作の定義まで再度しなくて済むためです
import tkinter as tk
from tkinter import ttk
from tkinter import font
import ctypes # 追加で使用するライブラリをインポート

UserForm1 = tk.Tk()
UserForm1.title("登録用フォーム")
UserForm1.geometry("304x201")
UserForm1.resizable(False, False)
UserForm1.configure(bg="#F0F0F0")
UserForm1.configure(relief=tk.FLAT, bd=0, highlightthickness=0, highlightbackground="#000000", highlightcolor="#000000")
UserForm1.configure(cursor="")

style = ttk.Style()
style.theme_use('default')

Label1 = tk.Label(UserForm1)
Label1.place(x=16, y=24, width=96, height=24)
Label1.configure(fg="#000000")
Label1.configure(bg="#F0F0F0")
Label1.configure(text="名前")
Label1.configure(font=font.Font(family="MS ゴシック", size=12))
Label1.configure(relief=tk.GROOVE, bd=2, highlightthickness=0, highlightbackground="#646464", highlightcolor="#646464")
Label1.configure(anchor="n")
Label1.configure(justify="center")
Label1.configure(cursor=None)

Label2 = tk.Label(UserForm1)
Label2.place(x=16, y=64, width=96, height=24)
Label2.configure(fg="#000000")
Label2.configure(bg="#F0F0F0")
Label2.configure(text="E-mail")
Label2.configure(font=font.Font(family="MS ゴシック", size=12))
Label2.configure(relief=tk.GROOVE, bd=2, highlightthickness=0, highlightbackground="#646464", highlightcolor="#646464")
Label2.configure(anchor="n")
Label2.configure(justify="center")
Label2.configure(cursor=None)

Label4 = tk.Label(UserForm1)
Label4.place(x=16, y=104, width=96, height=24)
Label4.configure(fg="#000000")
Label4.configure(bg="#F0F0F0")
Label4.configure(text="地域")
Label4.configure(font=font.Font(family="MS ゴシック", size=12))
Label4.configure(relief=tk.GROOVE, bd=2, highlightthickness=0, highlightbackground="#646464", highlightcolor="#646464")
Label4.configure(anchor="n")
Label4.configure(justify="center")
Label4.configure(cursor=None)

TextBox1 = tk.Entry(UserForm1)
TextBox1.place(x=120, y=24, width=168, height=24)
TextBox1.configure(fg="#000000")
TextBox1.configure(bg="#FFFFFF")
TextBox1.insert(0, "")
TextBox1.configure(font=font.Font(family="Arial Narrow", size=10))
TextBox1.configure(relief=tk.SUNKEN, bd=2, highlightthickness=0, highlightbackground="#646464", highlightcolor="#646464")
TextBox1.configure(justify="left")
TextBox1.configure(cursor=None)

TextBox2 = tk.Entry(UserForm1)
TextBox2.place(x=120, y=64, width=168, height=24)
TextBox2.configure(fg="#000000")
TextBox2.configure(bg="#FFFFFF")
TextBox2.insert(0, "")
TextBox2.configure(font=font.Font(family="Arial Narrow", size=10))
TextBox2.configure(relief=tk.SUNKEN, bd=2, highlightthickness=0, highlightbackground="#646464", highlightcolor="#646464")
TextBox2.configure(justify="left")
TextBox2.configure(cursor=None)

ComboBox1 = ttk.Combobox(UserForm1)
ComboBox1.place(x=120, y=104, width=168, height=24)
style.configure("ComboBox1_style.TCombobox", foreground="#000000")
style.configure("ComboBox1_style.TCombobox", fieldbackground="#FFFFFF")
ComboBox1.configure(style="ComboBox1_style.TCombobox")
ComboBox1_items_value = []
ComboBox1.configure(value=ComboBox1_items_value)
ComboBox1.set("")
ComboBox1.configure(font=font.Font(family="Arial Narrow", size=10))
ComboBox1.configure(justify="left")
ComboBox1.configure(cursor=None)

CommandButton1 = tk.Button(UserForm1)
CommandButton1.place(x=32, y=152, width=96, height=32)
CommandButton1.configure(fg="#000000")
CommandButton1.configure(bg="#00FFFF")
CommandButton1.configure(activeforeground="#000000")
CommandButton1.configure(activebackground="#00FFFF")
CommandButton1.configure(text="登録")
CommandButton1.configure(font=font.Font(family="MS ゴシック", size=12))
CommandButton1.configure(cursor=None)

CommandButton2 = tk.Button(UserForm1)
CommandButton2.place(x=160, y=152, width=96, height=32)
CommandButton2.configure(fg="#000000")
CommandButton2.configure(bg="#FF80FF")
CommandButton2.configure(activeforeground="#000000")
CommandButton2.configure(activebackground="#FF80FF")
CommandButton2.configure(text="キャンセル")
CommandButton2.configure(font=font.Font(family="MS ゴシック", size=12))
CommandButton2.configure(cursor=None)

# 関数を定義
def show_registration_info(name, email, region):
    registration_info = f"名前: {name} E-mail: {email} 地域: {region}"
    ctypes.windll.user32.MessageBoxW(None, registration_info, "登録内容", None)

# ボタンに関数を設定
CommandButton1.configure(command=lambda:show_registration_info(TextBox1.get(), TextBox2.get(), ComboBox1.get()))

UserForm1.mainloop()
8.動作を確認
再度実行してボタンを押したら、登録内容がちゃんと表示されました
VBAと見た目の表示が異なる場合の対処法
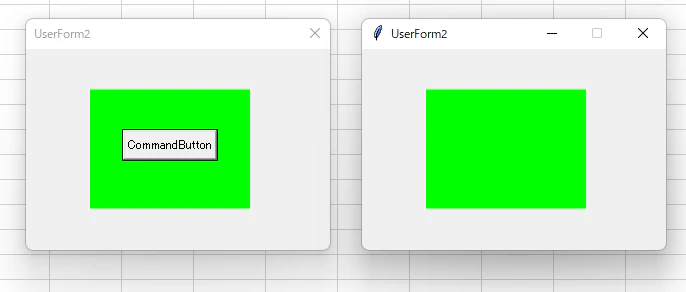
以下のように、ボタンが隠れてしまう場合があります
これは、Tkinterでは設置順が後のものが優先して表示される仕様になっているのに対してVBAのユーザーフォームではそうとは限らないためです
変換される順番はVBAでの設置順のため、ボタンを先に設置した後にラベルを設置すると隠れてしまいます
import tkinter as tk
from tkinter import ttk
from tkinter import font

UserForm2 = tk.Tk()
UserForm2.title("UserForm2")
UserForm2.geometry("304x201")
UserForm2.resizable(False, False)
UserForm2.configure(bg="#F0F0F0")
UserForm2.configure(relief=tk.FLAT, bd=0, highlightthickness=0, highlightbackground="#000000", highlightcolor="#000000")
UserForm2.configure(cursor="")

style = ttk.Style()
style.theme_use('default')

CommandButton1 = tk.Button(UserForm2)
CommandButton1.place(x=96, y=80, width=96, height=32)
CommandButton1.configure(fg="#000000")
CommandButton1.configure(bg="#F0F0F0")
CommandButton1.configure(activeforeground="#000000")
CommandButton1.configure(activebackground="#F0F0F0")
CommandButton1.configure(text="CommandButton1")
CommandButton1.configure(font=font.Font(family="MS UI Gothic", size=9))
CommandButton1.configure(cursor=None)

Label1 = tk.Label(UserForm2)
Label1.place(x=64, y=40, width=160, height=120)
Label1.configure(fg="#000000")
Label1.configure(bg="#00FF00")
Label1.configure(text="")
Label1.configure(font=font.Font(family="MS UI Gothic", size=9))
Label1.configure(relief=tk.FLAT, bd=0, highlightthickness=0, highlightbackground="#646464", highlightcolor="#646464")
Label1.configure(anchor="nw")
Label1.configure(justify="left")
Label1.configure(cursor=None)


UserForm2.mainloop()
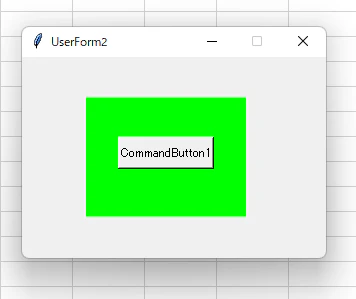
解決方法は簡単で、ラベルの定義を先に行えばいいだけです
定義の部分だけ切り取り&貼り付けします、親コントロールの直後に定義すれば先頭に来ることはありません
定義さえ先にすれば.placeは後で行っても大丈夫です
import tkinter as tk
from tkinter import ttk
from tkinter import font

UserForm2 = tk.Tk()
UserForm2.title("UserForm2")
UserForm2.geometry("304x201")
UserForm2.resizable(False, False)
UserForm2.configure(bg="#F0F0F0")
UserForm2.configure(relief=tk.FLAT, bd=0, highlightthickness=0, highlightbackground="#000000", highlightcolor="#000000")
UserForm2.configure(cursor="")

style = ttk.Style()
style.theme_use('default')

Label1 = tk.Label(UserForm2) # Label1をCommandButton1より先に定義するだけ
CommandButton1 = tk.Button(UserForm2)
CommandButton1.place(x=96, y=80, width=96, height=32)
CommandButton1.configure(fg="#000000")
CommandButton1.configure(bg="#F0F0F0")
CommandButton1.configure(activeforeground="#000000")
CommandButton1.configure(activebackground="#F0F0F0")
CommandButton1.configure(text="CommandButton1")
CommandButton1.configure(font=font.Font(family="MS UI Gothic", size=9))
CommandButton1.configure(cursor=None)

Label1.place(x=64, y=40, width=160, height=120)
Label1.configure(fg="#000000")
Label1.configure(bg="#00FF00")
Label1.configure(text="")
Label1.configure(font=font.Font(family="MS UI Gothic", size=9))
Label1.configure(relief=tk.FLAT, bd=0, highlightthickness=0, highlightbackground="#646464", highlightcolor="#646464")
Label1.configure(anchor="nw")
Label1.configure(justify="left")
Label1.configure(cursor=None)


UserForm2.mainloop()
これで正常に表示されました
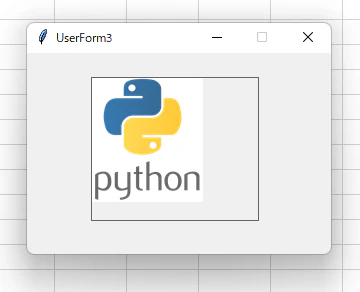
画像の設定について
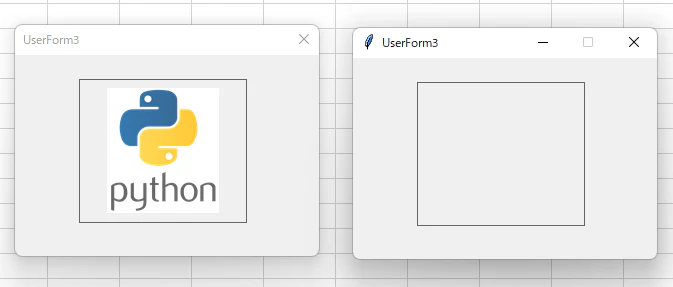
ImageオブジェクトはCanvasに変換されますが、設定してある画像までは変換されないので自分で設定を行います
生成されたコードにコメントアウトされた設定用コードがあるのでコメントアウトを解除して設定します
VBAではbmp画像を設定するのに対して、tk.PhotoImageに設定できるのはpngまたはgif画像のみなので変換を行ってください
bmp画像をペイントで開き、「名前をつけて保存」でpng画像として保存可能です
# コメントアウトを解除して画像のPathを設定(pngまたはgif)

#Image1_photo = tk.PhotoImage(file=r"")
#Image1.create_image(0, 0, image=Image1_photo, anchor=tk.NW)

# ↓ ↓ ↓

Image1_photo = tk.PhotoImage(file=r"C:\image.png")
Image1.create_image(0, 0, image=Image1_photo, anchor=tk.NW)
import tkinter as tk
from tkinter import ttk
from tkinter import font

UserForm3 = tk.Tk()
UserForm3.title("UserForm3")
UserForm3.geometry("304x201")
UserForm3.resizable(False, False)
UserForm3.configure(bg="#F0F0F0")
UserForm3.configure(relief=tk.FLAT, bd=0, highlightthickness=0, highlightbackground="#000000", highlightcolor="#000000")
UserForm3.configure(cursor="")

style = ttk.Style()
style.theme_use('default')

Image1 = tk.Canvas(UserForm3)
Image1.place(x=64, y=24, width=168, height=144)
Image1.configure(bg="#F0F0F0")
Image1.configure(relief=tk.FLAT, bd=0, highlightthickness=1, highlightbackground="#646464", highlightcolor="#646464")
Image1.configure(cursor=None)
Image1_photo = tk.PhotoImage(file=r"C:\image.png")
Image1.create_image(0, 0, image=Image1_photo, anchor=tk.NW)


UserForm3.mainloop()
これで正常に表示されました、表示位置についてはcreate_image(0, 0)の0, 0(xy座標)を調整してください