はじめに
SNS連携を実装するに当たり、Firebaseを利用して実装すると面倒な設定や各プラットフォーム個別の対応をしなくてよいため非常に便利なのはよく知られていますが、その中でLine連携だけ少し特殊な実装が必要になるため記載します。
なにが特殊なのか?
一般的によくSNS連携で使用されるSNSとしては、TwitterやFacebook、またその他の連携としてはGoogleやAppleID等を利用して連携を行います。
上記記載した全てにおいてFirebaseでは元からサインイン用のメソッドが準備されておりますが、Line用のメソッドはないため自分で実装する必要があります。
構成について
-
Lineログイン
クライアント側アプリケーションより、LineSDKを使用してaccess tokenを取得します。 -
access tokenとcustom tokenの交換リクエスト
1で受け取ったaccess token自分のサーバに送信します。 -
access tokenの検証
2で受け取ったaccess tokenが正しいものか検証するため、lineの認証サーバにaccess tokenを送り検証します。 -
custom tokenの取得
3での検証結果が正常であれば、Firebaseからcustom tokenを取得します。 -
custom tokenの返却
デバイスに対してcustom tokenを返却。 -
Firebaseログイン
custom tokenを使用し、クライアント側アプリケーションからFirebaseにログインする。
といったような流れになります。
今回は主に3~5までのサーバ側の処理について細かく記載します。
準備
まずはLine Developerより新規プロバイダーと新規チャネルを作成し、チャネルIDとチャネルシークレットをメモしておきましょう。
また、ネイティブアプリで開発する場合においても、サーバ側のみで先んじて開発を進める場合は一時的にLineログイン設定→ウェブアプリのコールバックURLも設定しておくと便利だと思います。
この記事ではサーバ側の認証が主ですがaccess tokenがあったほうがテストしやすいため、準備としてウェブで簡易的にaccess tokenを発行します。
なお、LineログインAPIはv2.1を前提として進めます。(2021/5/23現在最新)
認証コードの取得
access tokenを発行する場合、認可コードが必要になるので、先んじて認可コードを発行します。
以下のような簡易的な認可コード発行用のhtmlを用意しておくと便利かもしれません。
<html>
	<body>
		<a class="btn" href="https://access.line.me/oauth2/v2.1/authorize?
					response_type=code&
					client_id=[チャネルID]&
					redirect_uri=[コールバックURL]&
					state=12345abcde&
					scope=profile%20openid&
					nonce=09876xyz">
				<div>
					Lineログインする
				</div>
		</a>
	</body>
</html>
パラメータにあるチャネルIDとコールバックURLに関しては自分で取得したものを入れてください。
scope,state,nonceについては、LineAPIドキュメントに記載してありますが、今回のような開発用として使用する場合は上記のままで特に問題はありません。
ログインに成功すると、以下のようなURLにリダイレクトされます。
https://[コールバックURL]/oauth2/authresp?code=XXXXXXXXXXXXX&state=12345abcde
accces tokenの取得
続いてaccess tokenを取得します。
リダイレクトされたURLパラメータにあるcode、Line developerに登録したコールバックURL、チャネルID、チャネルシークレットを入れアクセスするとaccess tokenが取得できます。
curl -v -X POST https://api.line.me/oauth2/v2.1/token \
-H 'Content-Type: application/x-www-form-urlencoded' \
-d 'grant_type=authorization_code' \
-d 'code=xxx' \
-d 'redirect_uri=xxx' \
-d 'client_id=xxx' \
-d 'client_secret=xxx'
{
	"access_token": "XXXXXXXXXXXXXXXXXXXXXXXXXXXXXXXXXXXXXX",
	"token_type": "Bearer",
	"refresh_token": "YYYYYYYYYYYYYYYYYYYYYYYYYYYY",
	"expires_in": 2592000,
	"scope": "profile openid",
	"id_token": "ZZZZZZZZZZZZZZZZZZZZZZZZZZ"
}
ここで取得したaccess tokenは開発中使用するのでどこかに保存しておくといいでしょう。
紛失した場合は、再度認証コードから発行し直す必要があります。
access tokenの検証
図の3の工程であるように、まずはクライアントから送られてきたaccess tokenが正しいものか検証する必要があります。
今回は準備としてaccess tokenを取得済みなので、テストコードでアクセスする場合は直接引き渡してテストすると良いと思います。なお、以下サンプルコードはc#で記載します。
using System.Net;
using System.Net.Http;
namespace AuthService.logic {

	public interface ISnsAuthLogic {
		public Task<ApiResponseCustomTokenData> GetCustomAuthTokenForLine(string accessToken);
	}

	public class SnsAuthLogic : ISnsAuthLogic {

		private static readonly HttpClient _httpClient;

		static SnsAuthLogic() {
			_httpClient = new HttpClient();
		}

		/// <summary>
		/// カスタムトークン取得
		/// </summary>
		/// <returns></returns>
		public async Task<ApiResponseCustomTokenData> GetCustomAuthTokenForLine(string accessToken) {

			string verifyUrl	= $"https://api.line.me/oauth2/v2.1/verify?access_token={accessToken}";

			var veryfyRequest	= new HttpRequestMessage(HttpMethod.Get, verifyUrl);

			//response
			ApiResponseCustomTokenData data = new ApiResponseCustomTokenData() {
				Status		= 0,
				CustomToken = null
			};

			//accessToken検証
			var verifyResponse	= await _httpClient.SendAsync(veryfyRequest);
			data.Status			= (int)verifyResponse.StatusCode;

			if(verifyResponse.StatusCode == HttpStatusCode.OK) {

				//channelId抽出
				var verifyBody	= await verifyResponse.Content.ReadAsStringAsync();
				JObject verify	= JObject.Parse(verifyBody);
				var clientId	= verify["client_id"].ToString();
			}

			return data;
		}
	}
}
c#標準のHttpClientでLineのtoken検証用urlにアクセスします。
HttpClientは都度生成するとパフォーマンスが低下するため、コンストラクタでstatic化して使用しています。
(不適切なインスタンス化のアンチパターンにも記載されていました)
ApiResponseCustomTokenDataはレスポンス用のクラスのため必要に応じて調整してください。
失敗時のHttpStatusと成功時のCustomTokenが返せれば問題ないかと思います。
HttpClientのレスポンスはContentプロパティにボディが入るためReadAsStringAsyncをかけないと中身をみることができないので注意です。
ReadAsStringAsync後のレスポンスは以下のようになります。
{
	"client_id": "XXXXXXXXXXXX",
	"expires_in": 2578105,
	"scope": "profile openid"
}
HttpStatusCodeが200である、かつレスポンスのclient_idが自分が作成したLineDeveloperのチャネルと同一であればaccess tokenの検証は問題なしということになります。
user_idの取得
Firebaseからcustom tokenを取得する場合、一意な値としてユーザIDのような値が必要になるのですが、access token検証APIのレスポンスにはuserIdが存在しないため別途取得する必要があります。
(v1.0のAPIではレスポンスにuidがあったようですがv2.0以降含まれなくなりました)
プロフィールAPIのレスポンスにuserIdが存在するため、こちらを取得します。
https://api.line.me/v2/profile
こちらのAPIはリクエストにAuthorizationヘッダを付けてアクセスする必要があります。
以下は該当部分のサンプルコードです。
string profileUrl	= "https://api.line.me/v2/profile";
var profileRequest	= new HttpRequestMessage(HttpMethod.Get, profileUrl);

//profile取得
if(clientId == CLIENT_ID) {
	profileRequest.Headers.Add("Authorization", "Bearer " + accessToken);
	var profileResponse = await _httpClient.SendAsync(profileRequest);
	var profileBody		= await profileResponse.Content.ReadAsStringAsync();
	JObject profile		= JObject.Parse(profileBody);
	var userId			= profile["userId"].ToString();
}
※CLIENT_IDは自分で取得したチャネルIDになります。
access token検証で返ってきたclientIdと比較し、偽造されていないことを確認しましょう。
custome tokenの取得
access tokenの検証が完了し、custom tokenの取得に必要なuidも取得できたためcustome tokenを取得します。
なお、custome tokenを取得するためにはFirebase Admin SDKが必要になるためパッケージを追加します。
<ItemGroup>
  <PackageReference Include="FirebaseAdmin" Version="2.1.0" />
</ItemGroup>
こちらについてはサーバ起動時に初期化し、staticとして保持しておいても問題ないと思います。
以下のサンプルコードでは処理と一緒に記載しています。
private static FirebaseApp _firebaseApp;

//Firebase初期化
if(_firebaseApp == null) {
	_firebaseApp = FirebaseApp.Create(new AppOptions() {
		Credential = GoogleCredential.FromFile(FirebaseCredentialsFile),
	});
}

//カスタムトークンの取得
data.CustomToken = await FirebaseAuth.DefaultInstance.CreateCustomTokenAsync(userId);
上記のとおり、Firebase Admin SDKは初期化する必要があるのですがサーバ環境がAWS等、Amazon環境下でない場合はFirebaseプロジェクトの秘密鍵が必要になります。
サンプルコードでは予め、FirebaseCredentialsFileにファイル名を設定してあります。
実際はappSettingsで設定するのがよろしいかと思われます。
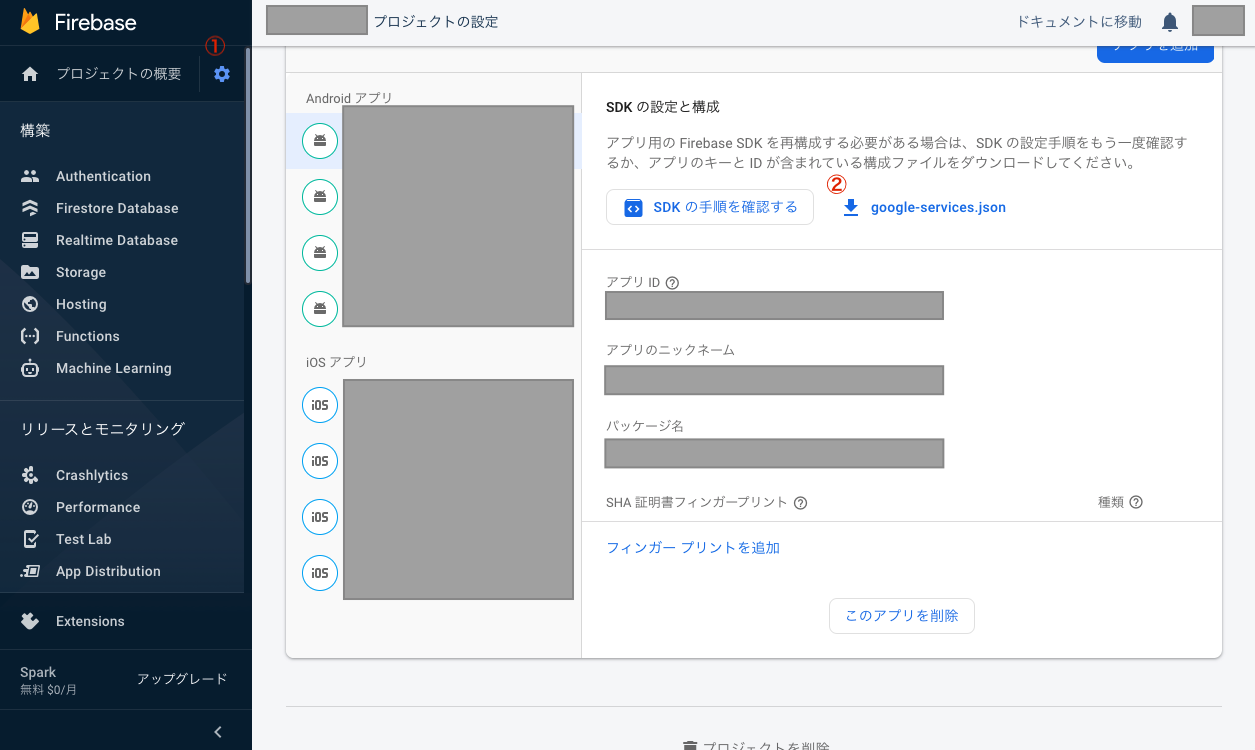
秘密鍵についてはFirebaseのサイト上からダウンロードすることができます。
なお、ダウンロードした秘密鍵は紛失しないように保存しておきましょう。

以上がaccess tokenを受け取ってcustom tokenを返すまでの一連の流れになります。
以下にサンプルとして結合したメソッドを記載しておきます。
using System;
using System.Threading.Tasks;
using Microsoft.Extensions.DependencyInjection;
using Microsoft.Extensions.Logging;
using Microsoft.Extensions.Options;
using System.Net;
using System.Net.Http;
using FirebaseAdmin;
using FirebaseAdmin.Auth;
using Google.Apis.Auth.OAuth2;
using Newtonsoft.Json.Linq;

namespace AuthService.logic {

	public interface ISnsAuthLogic {
		public Task<ApiResponseCustomTokenData> GetCustomAuthTokenForLine(string accessToken);
	}

	public class SnsAuthLogic : ISnsAuthLogic {

		private readonly ILogger<SnsAuthLogic> m_Logger = null;
		private readonly AppSettings m_AppSettings = null;
		private static FirebaseApp _firebaseApp;
		private static readonly HttpClient _httpClient;

		public SnsAuthLogic(IServiceProvider provider) {
			m_Logger = provider.GetRequiredService<ILogger<SnsAuthLogic>>();
			m_AppSettings = provider.GetRequiredService<IOptions<AppSettings>>().Value;
		}

		static SnsAuthLogic() {
			_httpClient = new HttpClient();
		}

		/// <summary>
		/// カスタムトークン取得
		/// </summary>
		/// <returns></returns>
		public async Task<ApiResponseCustomTokenData> GetCustomAuthTokenForLine(string accessToken) {

			string verifyUrl		= $"https://api.line.me/oauth2/v2.1/verify?access_token={accessToken}";
			string profileUrl		= "https://api.line.me/v2/profile";

			var veryfyRequest	= new HttpRequestMessage(HttpMethod.Get, verifyUrl);
			var profileRequest	= new HttpRequestMessage(HttpMethod.Get, profileUrl);

			//response
			ApiResponseCustomTokenData data = new ApiResponseCustomTokenData() {
				Status		= 0,
				CustomToken = null
			};

			//accessToken検証
			var verifyResponse	= await _httpClient.SendAsync(veryfyRequest);
			data.Status			= (int)verifyResponse.StatusCode;

			if(verifyResponse.StatusCode == HttpStatusCode.OK) {

				//channelId抽出
				var verifyBody	= await verifyResponse.Content.ReadAsStringAsync();
				JObject verify	= JObject.Parse(verifyBody);
				var clientId	= verify["client_id"].ToString();

				//profile取得
				if(clientId == m_AppSettings.SnsAuthentication.Line.ClientId) {
					profileRequest.Headers.Add("Authorization", "Bearer " + accessToken);
					var profileResponse = await _httpClient.SendAsync(profileRequest);
					var profileBody		= await profileResponse.Content.ReadAsStringAsync();
					JObject profile		= JObject.Parse(profileBody);
					var userId			= profile["userId"].ToString();

					//Firebase初期化
					if(_firebaseApp == null) {
						_firebaseApp = FirebaseApp.Create(new AppOptions() {
							Credential = GoogleCredential.FromFile(m_AppSettings.SnsAuthentication.FirebaseCredentialsFile),
						});
					}

					data.CustomToken = await FirebaseAuth.DefaultInstance.CreateCustomTokenAsync(userId);

				} else {
					data.Status = (int)HttpStatusCode.Unauthorized;
					m_Logger.LogError("channel error");
				}

			} else {
				m_Logger.LogError("status error");
			}

			return data;
		}
	}
}
public class ApiResponseCustomTokenData {
	public int Status { get; set; }
	public string CustomToken { get; set; }
}
※m_AppSettingsはサーバ起動時にappsetting.jsonを元に設定しています。
